Boat pose looks like sitting. You lean back, lift your legs, and hold. That's it. So why is it one of the hardest yoga poses to hold for more than 10 seconds with good form? Because there's no way to cheat it. Your hip flexors either hold you up or they don't. Your spine either stays straight or it collapses. There's nowhere to hide.
Most people get one thing wrong about navasana: they think it's a core exercise. And it is, partly. But the real driver of this pose is your hip flexors. The psoas, rectus femoris, and pectineus. Without those muscles, the pose is physically impossible. Without meaningful abdominal engagement? Still doable. That doesn't mean your abs aren't working. They are, isometrically, to keep your torso from folding forward. But the hip flexors are running the show. And understanding that changes how you approach the pose entirely.
This guide covers the full progression from hands-behind-the-thighs beginner hold to the straight-leg V-shape that makes your entire core shake, plus the common mistakes that wreck your lower back, and why tight hamstrings are probably the biggest thing standing between you and a clean boat pose.
Quick Facts: Boat Pose
- Equipment needed: None (yoga mat optional)
- Difficulty: Expert in full Paripurna Navasana; beginner-friendly with the supported variation
- Modality: Yoga, isometric hold (breath-paced)
- Body region: Anterior core and hip flexors (lower body lever load)
- FitCraft quest category: Yoga / Core
Muscles Engaged & Stretched
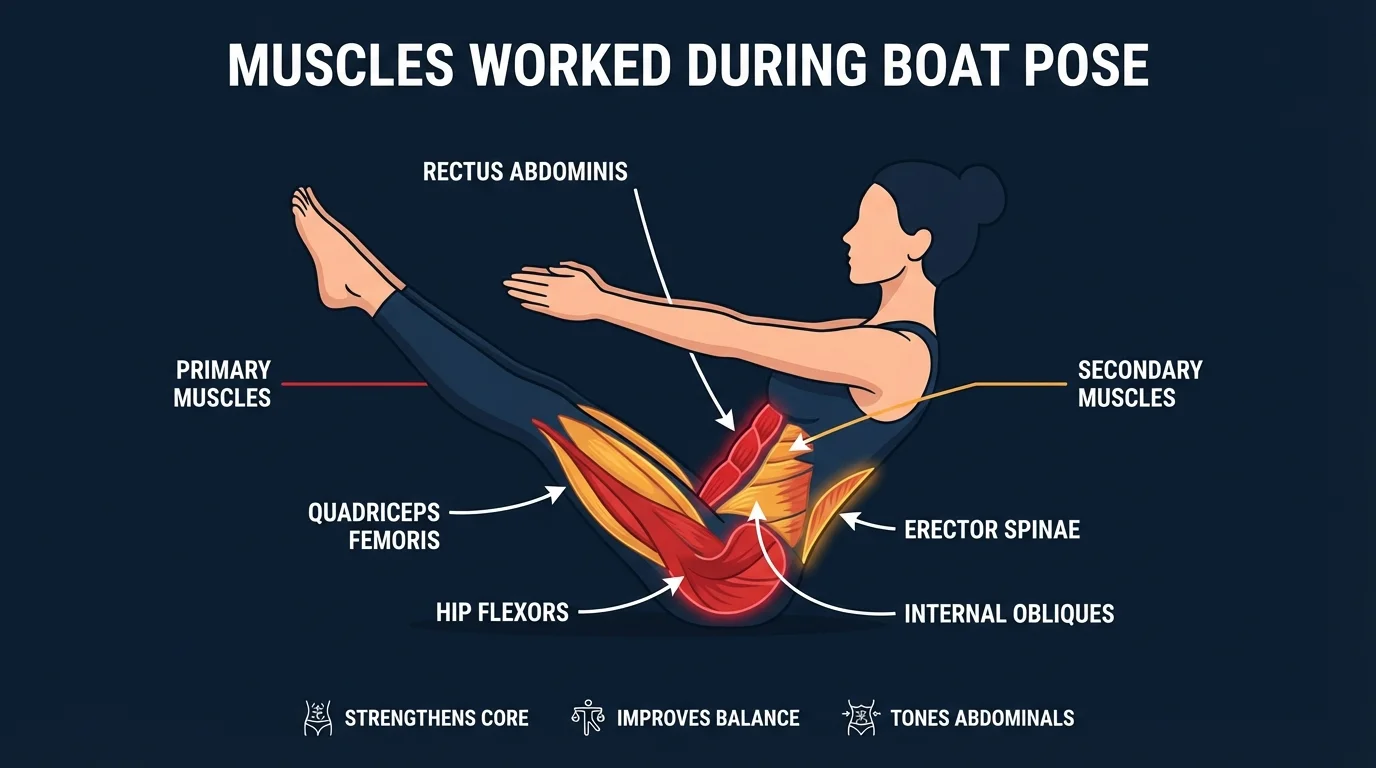
Primary movers. The hip flexors (psoas major, iliacus, and rectus femoris) work isometrically to hold both legs lifted against gravity. The rectus abdominis fires to prevent the torso from collapsing backward and to keep the lumbar spine from arching as the legs pull on the pelvis. These two muscle groups together create the V-shape that defines the pose. The hip flexors carry the heaviest concentric demand on entry into the pose, then sustain that load isometrically through the hold.
Secondary movers. The quadriceps (especially the rectus femoris, which is also a hip flexor) extend the knees in the full straight-leg variation. The hip adductors squeeze the inner thighs together to stabilize the pelvis. The erector spinae fire along the back of the spine to resist the forward-folding moment that the leg load creates. When the arms extend forward parallel to the floor, the anterior deltoids and serratus anterior maintain the reach.
Stabilizers. The deeper core layer (transverse abdominis and the obliques) braces against rotation and keeps the torso square. The deep hip stabilizers (gluteus medius, piriformis) hold the femurs in neutral rotation. The breath itself is a stabilizer here: diaphragmatic breathing supports both the working hip flexors and the bracing core, and breath-holding collapses both. The hamstrings receive a length challenge as the legs straighten, especially in tight individuals, which is one of the most common limiters in the pose.
Evidence. A 10-week intervention study in the International Journal of Yoga found that regular yoga practice produced measurable improvements in flexibility and balance in collegiate athletes versus a non-yoga control group (Polsgrove et al., 2016). Boat pose specifically loads the hip flexor and anterior core complex isometrically, and the demand on the hamstrings to lengthen (as the legs straighten and the pelvis stays upright) is what makes hamstring extensibility the most common ceiling on full Paripurna Navasana. The mechanism is straightforward: tight hamstrings pull the sit bones forward, which posteriorly tilts the pelvis, which rounds the lumbar spine, which is exactly the position to avoid.
How to Do Boat Pose (Step-by-Step)
- Sit on the floor with knees bent. Feet flat, hip-width apart. Place your hands on the floor just behind your hips, fingers pointing forward. Lean back slightly, maybe 10-15 degrees, until you feel your core switch on. Your spine stays long. Chest stays lifted. If your back rounds here, you've already lost the pose before it started.
Coach Ty's cue: "Lift your sternum toward the ceiling. The spine wins before the legs do." - Lift your feet off the ground. Lean back until your torso is roughly 45 degrees from the floor. Lift both feet and bring your shins parallel to the ground, knees bent at about 90 degrees. This is the half boat position, and this is where most people should spend their first few weeks. The spine must stay straight. Non-negotiable.
Coach Ty's cue: "Shins parallel to the floor. Hold here until you own it." - Extend your arms forward. Release your hands from the floor and reach them forward alongside your knees. Palms face inward or down. Shoulders draw down and back, away from your ears. If you can't hold this position without your back rounding, go back to hands behind the thighs. There's no shame in the regression. There is shame in a collapsed spine.
Coach Ty's cue: "Reach the fingertips forward, draw the shoulder blades back. Two opposing forces stabilize the torso." - Straighten your legs (full boat). Only when your spine is rock-solid in the bent-knee version, start extending your legs. Your body forms a V-shape. Toes reach roughly to eye level. Your legs don't need to be perfectly straight. A slight knee bend is fine if it keeps your back from rounding. Straight spine always wins over straight legs.
Coach Ty's cue: "If your back rounds when you straighten the legs, rebend the knees. Always." - Hold and breathe. Hold for 5-10 breaths per round. Breathe steadily through your nose. Keep your gaze forward toward your toes. This helps maintain a neutral neck. To come out, exhale and lower your feet to the floor. Rest 10-15 seconds. Repeat for 2-4 rounds.
Coach Ty's cue: "Count the breaths, not the seconds. If you can't breathe, you're past your edge."
Get this exercise in a personalized workout
FitCraft, our mobile fitness app, uses its AI coach Ty to program yoga poses like this into your plan at the right hold time and frequency, based on your flexibility, level, and goals. Ty was designed and trained by Domenic Angelino, MPH (Brown University) and NSCA-CSCS, with research published in the Journal of Strength and Conditioning Research and Medicine & Science in Sports & Exercise.
Take the Free Assessment Free · 2 minutes · No credit card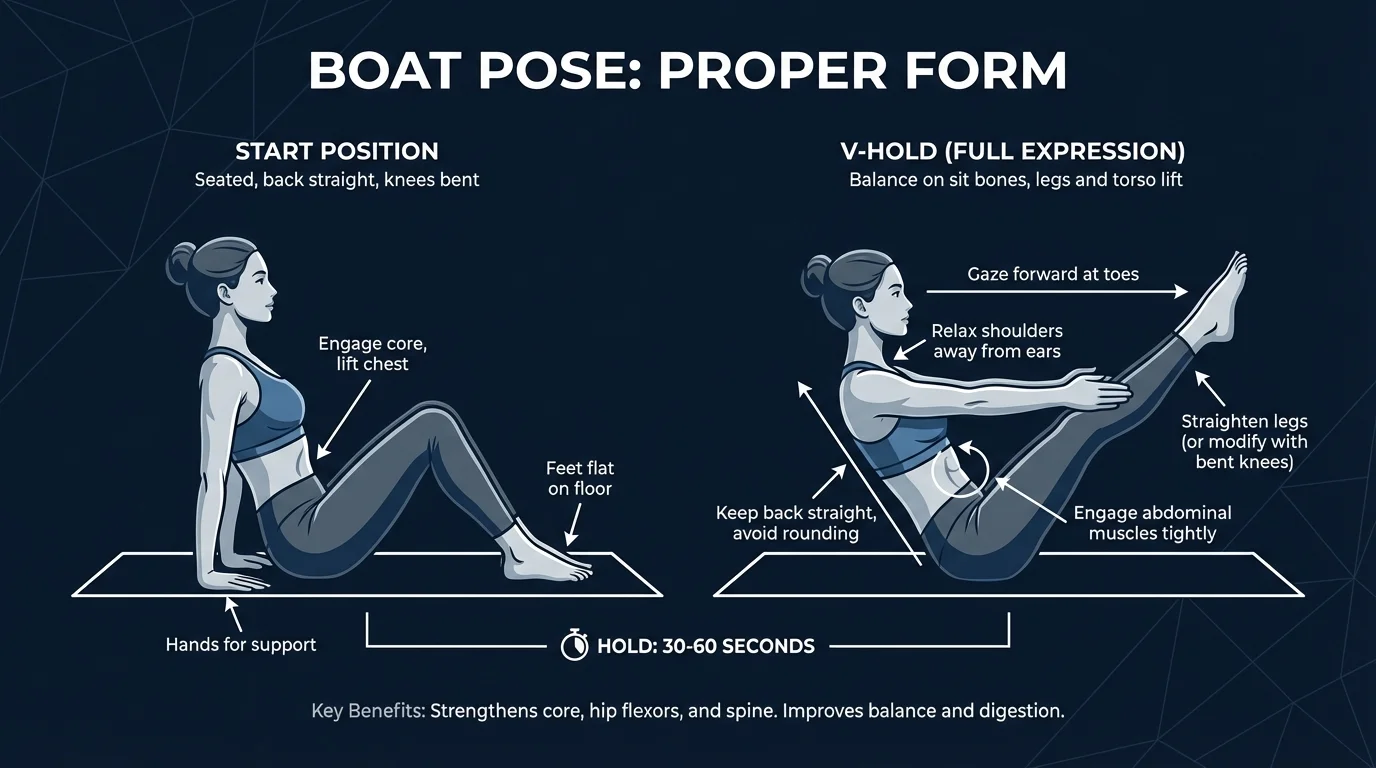
Common Mistakes (and How to Fix Them)
Boat pose is a diagnostic exercise. The mistakes you make tell you exactly what's weak and what's tight. Pay attention to where you break down. That's useful information.
- Rounding the lower back. This is the number one mistake and the one that can actually hurt you. When the hip flexors fatigue, the pelvis tucks under and the lower back rounds into a C-shape. That puts compressive load on the lumbar discs. The fix: bend your knees more, or hold the backs of your thighs for support. If your lower back is rounding, the variation you chose is too hard. Drop down a level. Immediately.
- Holding your breath. People do this reflexively when the pose gets intense. Breath-holding spikes blood pressure and reduces stability. And it makes the pose feel harder than it needs to. Force yourself to breathe. Count the breaths. That's your timer. If you can't breathe smoothly, you've exceeded your capacity. Make the pose easier and try again.
- Shoulders creeping up to your ears. A compensation pattern. Your body recruits muscles it shouldn't when the primary movers are struggling. Consciously press your shoulders down and back. If you can't do that while holding the pose, shorten your hold time.
- Collapsing through the chest. Goes hand-in-hand with back rounding. When the torso folds forward, you lose the 45-degree angle that makes the pose work. Keep your sternum lifted. Imagine someone attached a string to your breastbone and is pulling it slightly upward and forward. That mental cue works for most people.
- Forcing straight legs with tight hamstrings. If your hamstrings can't lengthen enough to let the pelvis stay upright, your low back will round to compensate. A regular hamstring mobility practice (butterfly pose, supine hamstring stretches, forward folds) is the real prerequisite for full Paripurna Navasana. Until then, bend the knees.
Boat Pose Variations: Regressions and Progressions
Easier (Regressions)
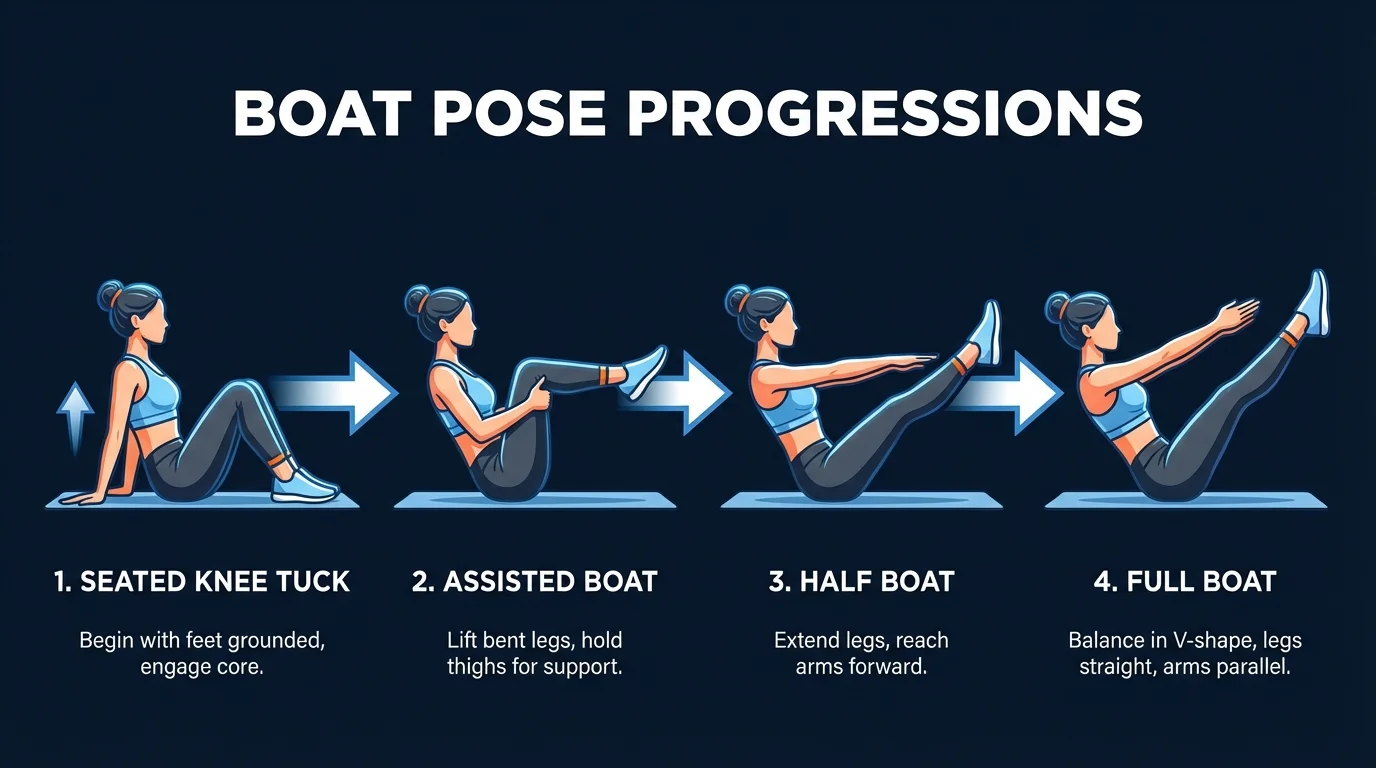
- Supported boat (hands behind thighs): Hold the backs of your thighs with both hands. This removes arm balance demands and lets your hands assist with the lean-back. Focus entirely on keeping the spine straight. This is where beginners should live for the first 2-3 weeks.
- Feet on the floor (single-leg lift): Keep one foot on the ground and lift only the other. Alternate legs. This halves the hip flexor demand and lets you build strength gradually. It also reveals left-right imbalances you didn't know you had.
- Low boat (Ardha Navasana): Lower your torso and legs closer to the ground, roughly 6 inches off the floor, while keeping your lower back pressed into the mat. This variation actually emphasizes the rectus abdominis more than full boat because the hip flexors work through a different part of their range.
Harder (Progressions)
- Boat pose with twist: Hold full boat and rotate your torso side to side, bringing your hands to each hip alternately. This adds oblique load and challenges rotational stability. Keep the legs still while the upper body rotates.
- Boat to low boat flow: Alternate between full boat (V-shape) and low boat (hovering near the floor) for 5-10 reps without your feet or shoulders touching the ground. This crushes the entire anterior chain. Five reps will feel like fifty.
- Arms overhead boat: Instead of arms forward, reach them overhead alongside your ears. This extends the lever arm and the core demand jumps. Only attempt this when you can hold standard full boat for 30+ seconds with zero form breakdown.
When to Avoid or Modify Boat Pose
Boat pose is safe for most healthy adults, but a few conditions warrant modification or temporarily substituting a supine alternative. None of these are permanent restrictions. They're starting points. Always consult your physician or physical therapist for personalized guidance.
- Active lower-back pain or recent disc injury. Boat pose creates a long lever between the lifted legs and lifted torso, and any rounding of the lumbar spine puts compressive load on the discs. During a flare-up, skip boat pose entirely and substitute supine alternatives like dead bugs or leg raises that keep your spine on the floor. Return to supported boat (hands behind thighs, knees bent) once you're pain-free, and only progress while the lumbar stays neutral.
- Recent abdominal or hip surgery. The pose creates significant intra-abdominal pressure and direct loading of the hip flexors and rectus abdominis. Get clearance from your surgeon before attempting any variation. Most post-surgical protocols start with diaphragmatic breathing and supine bracing work before introducing seated lifted-leg loads.
- First 6-8 weeks postpartum or active diastasis recti. The combination of intra-abdominal pressure spike and direct rectus abdominis load can worsen abdominal separation. Start with diaphragmatic breathing, transverse abdominis activation work, dead bugs, and bird-dogs. Progress to boat pose only when you can brace without doming or coning across the midline.
- Uncontrolled hypertension. The pose meaningfully raises blood pressure during the hold, especially if you reflexively hold your breath. If you have known cardiovascular disease or uncontrolled hypertension, consult your physician and emphasize steady nasal breathing throughout shorter holds.
- Hernia (inguinal, hiatal, or umbilical). Boat pose increases intra-abdominal pressure substantially, which can aggravate existing hernias. Substitute with low-pressure core work like bird-dogs until cleared by a clinician.
- Severely tight hamstrings. Not a medical contraindication, but a mechanical one. If your hamstrings won't allow the pelvis to stay upright with straight legs, the lumbar spine will round and the pose will load the wrong tissues. Stay in the bent-knee variation and pair with a regular hamstring mobility practice (butterfly pose, forward folds, supine hamstring stretches).
Related Exercises
If boat pose is part of your routine, these movements complement or extend the same training pattern:
- Easier supine alternative (same anterior-core demand, less risk): Dead bugs and leg raises recreate the hip flexor and anterior core demand with your back on the floor. The safer first step when boat pose bothers your lower back.
- Core foundation for the lifted hold: Forearm planks and hand planks build the bracing endurance you need to hold the spine straight. If you can't hold a clean plank for 30 seconds, your boat pose will collapse.
- Hamstring opener (the real prerequisite for full boat): Butterfly pose opens the inner thighs and hips, which lets the pelvis stay upright. Pair with regular forward folds to give your hamstrings the length the full pose requires.
- Spinal mobility prep: Cat-cow wakes up the spinal segments and grooves the neutral position you need to maintain through the hold. A useful 30-second warm-up before any boat practice.
- Counterpose (decompress the spine after holding): Cobra pose reverses the spinal flexion bias of boat pose and opens the front of the hips. Do a few rounds after a boat sequence.
- Rotational core progression: Bicycle crunches and reverse crunches train the obliques and lower-rectus pattern that the twisted-boat variation demands.
How to Program Boat Pose
Yoga programming differs from resistance training. The American College of Sports Medicine (ACSM) Position Stand on resistance training establishes the general principles for progressive overload (Ratamess et al., 2009), but yoga holds are paced by breath rather than counted reps, and the stimulus is isometric endurance and mobility rather than concentric/eccentric overload. Frequency can be daily because the recovery demand is much lower than a heavy strength session.
| Level | Hold time | Rounds (sets) | Frequency |
|---|---|---|---|
| Beginner (supported, hands behind thighs) | 3-5 breaths (~15-30 seconds) | 1-2 holds | 3-5 sessions/week |
| Intermediate (half boat, arms extended) | 5-10 breaths (~30-60 seconds) | 2-3 holds | 4-6 sessions/week |
| Advanced (full Navasana, flow variations) | 10-15+ breaths (~60-90+ seconds) | 3-5 holds, deeper variations | 5-7 sessions/week |
Where in your workout: Boat pose fits in three contexts. In a standalone yoga session, sequence it during the seated portion (after standing poses, before finishing inversions). As a warm-up before resistance training, a single bent-knee hold mobilizes the hip flexors and primes the core for compound lifts. As a cool-down after training, paired with a counterpose like cobra or a forward fold, it restores the anterior chain and downregulates the nervous system. Skip boat pose as a finisher right before squats or deadlifts, because heavy hip flexor pre-fatigue can compromise spinal stability under load.
Form floor over hold time: if your spine starts to round in the last few breaths of a hold, end the hold there. A 20-second clean hold is more useful than a 45-second hold with a collapsed lumbar. Hold time is a byproduct of form, not a target you chase.
How FitCraft Programs This Exercise
Knowing how to do boat pose is step one. Knowing when to do it, how long to hold, which variation matches your current strength, and when to progress is where most people get stuck.
FitCraft's AI coach Ty handles that. During your personalized diagnostic, Ty maps your flexibility, core strength, and goals. Then Ty builds a program that slots boat pose into a balanced routine at the right variation and hold time for your level.
As your hip flexor endurance and hamstring length improve, Ty adjusts the variation and hold time to match. Supported boat becomes half boat. Half boat becomes full Navasana. Hold time scales with the breath count, not the clock. Every program is designed by an Ivy League-trained exercise scientist using evidence-based programming, then adapted to you by the AI.
Frequently Asked Questions
What muscles does boat pose work?
Boat pose primarily works the hip flexors (psoas, rectus femoris) and rectus abdominis. Secondary muscles include the obliques, quadriceps (to straighten the knees), and erector spinae (to keep the spine straight). Despite its reputation as a core exercise, anatomical analysis shows the hip flexors do the heaviest lifting in navasana. The pose is impossible without them but technically possible without significant abdominal engagement.
Can I do boat pose with lower back pain?
Boat pose is generally not appropriate during an active lower-back flare-up. The pose creates a long lever between the lifted legs and the lifted torso, and any rounding of the lumbar spine concentrates compressive load on the discs. If you have chronic lower back issues, work with a physical therapist and substitute supine alternatives like dead bugs or single-leg raises that keep your spine on the floor. Once you are pain-free, return to boat pose with the supported variation (hands behind the thighs, knees bent) and progress only while your back stays neutral.
Why does my back round in boat pose?
Back rounding usually comes from tight hamstrings pulling your pelvis into a posterior tilt, or insufficient hip flexor and core strength to maintain the torso angle. The fix is to bend your knees more until you can hold a straight spine. A straight back with bent knees is always the correct choice over a rounded back with straight legs.
How long should I hold boat pose?
Hold boat pose for 5-10 breaths per round, roughly 15-30 seconds. Beginners should start with 3-5 breaths with bent knees and hand support. Do 2-4 rounds with brief rest between each. Multiple shorter holds with good form beat one long shaky hold with deteriorating alignment.
Is boat pose bad for your back?
Not when done correctly. The most common issue is rounding the lower back, which compresses the lumbar discs under load. If you have existing lower back issues, start with the bent-knee variation with hands behind your thighs. Stop if you feel sharp pain in your lower back rather than muscular fatigue in your abs and hip flexors.
Can beginners do boat pose?
Yes, with modifications. Start with hands behind your thighs and knees bent. Focus on a straight spine rather than straight legs. As strength builds over several weeks, gradually reduce hand support and work toward extending the legs. FitCraft's AI coach Ty adjusts the difficulty based on your assessment so you progress safely.