If you sit at a desk for 6+ hours a day, cobra pose might be the single most useful exercise you're not doing. That's not an exaggeration. Your spine spends all day in flexion (rounded forward), your chest tightens, your hip flexors shorten, and your back extensors basically fall asleep. Cobra reverses all of that in one movement.
Here's what makes it tricky. Most people treat cobra like a push-up variation. They plant their hands and shove themselves up as high as they can. That's not cobra pose. That's cranking your lower back into hyperextension while your back muscles sit there doing nothing. The whole point is that your back does the work. Your hands are along for the ride.
This guide covers both variants you'll see in FitCraft: the static hold (good for building endurance in your back extensors) and the dynamic cobra (better for building strength through repetitions). Plus the mistakes that turn a back-strengthening exercise into a back-hurting one, and how to progress from baby cobra all the way to full extension.
Quick Facts: Cobra Pose
- Equipment needed: None (yoga mat optional)
- Difficulty: Beginner (baby cobra) to Intermediate (full cobra)
- Modality: Yoga / Mobility
- Body region: Back, core, chest
- FitCraft quest category: Mobility
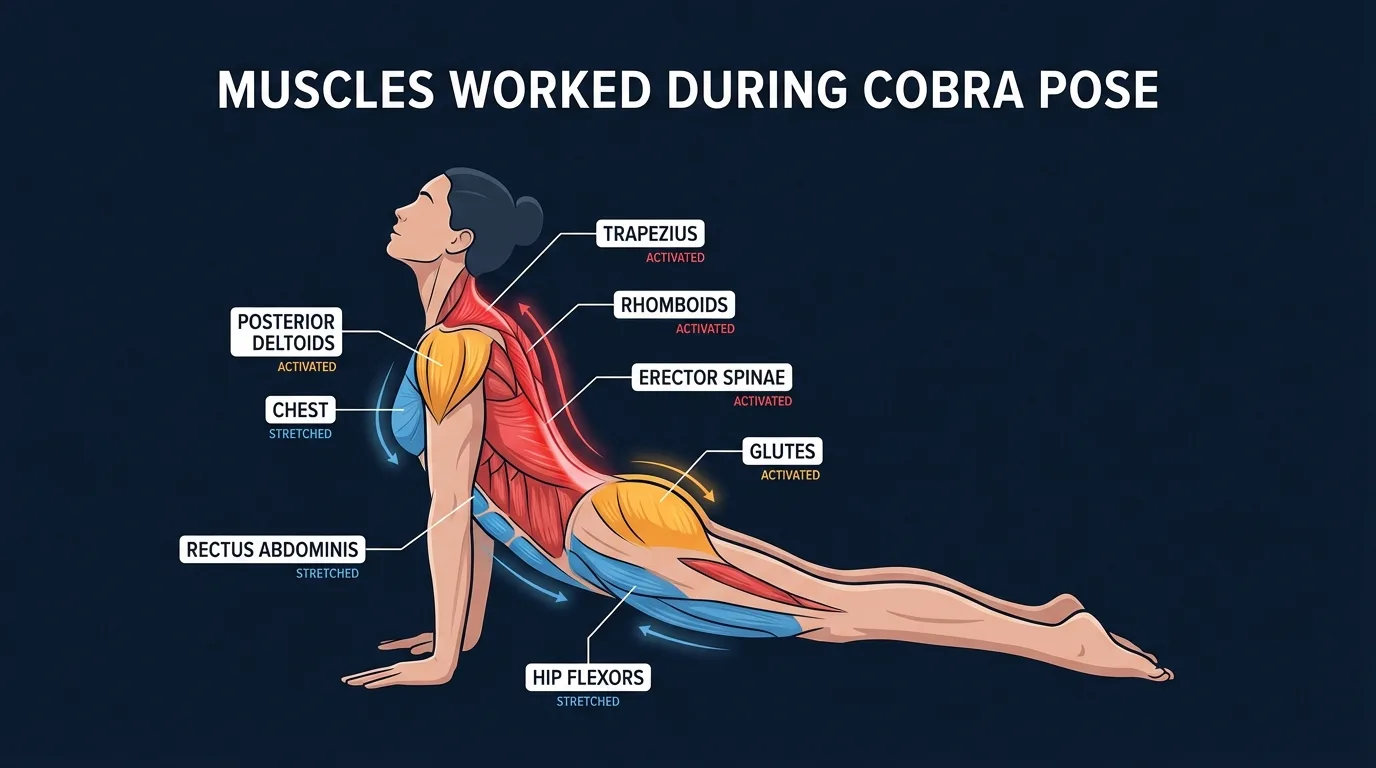
Muscles Engaged & Stretched
Primary movers: the erector spinae (the long muscle group running on either side of your spine), the rhomboids (between your shoulder blades), and the mid-and-lower trapezius. These contract concentrically as you peel your chest off the mat and hold isometrically at the top of the lift. They lengthen eccentrically on the way back down. This is the engagement you should feel most clearly.
Secondary movers: the posterior deltoids (back of your shoulders), triceps brachii (working lightly to extend the elbows if you press into the floor), and the glutes (briefly engaged to stabilize the pelvis and protect the lumbar spine). The serratus anterior also assists in scapular control at the top of the lift.
Stabilizers: the deep core (transverse abdominis and obliques) works isometrically to support the spine even though the rectus abdominis is being stretched. The breath itself acts as a stabilizer here: diaphragmatic breathing through the hold lets the chest expand without losing back engagement.
What gets stretched: the rectus abdominis lengthens significantly through the front of the trunk, the hip flexors (psoas and rectus femoris) stretch as the pelvis presses into the mat, and the pectorals open across the chest as the shoulder blades draw down and together. This combination is why cobra is so effective as a counterbalance to seated postures, which shorten exactly these tissues. The mechanism is straightforward: extension at the thoracolumbar spine reverses the flexion bias of sitting, and the prone position locks the pelvis so the load goes through the back extensors rather than the lumbar passive structures.
How to Do Cobra Pose (Step-by-Step)
- Lie face down. Legs extended behind you, tops of your feet on the floor. Place your hands flat on the mat beside your lower ribs, fingers pointing forward. Elbows stay close to your body and point straight back. Not out to the sides. Back.
Coach Ty's cue: "Hands beside your ribs, not in front of your shoulders. The further forward your hands, the more you'll push from your arms instead of lift from your back."
- Engage before you lift. This step matters more than people think. Before you press up at all, gently engage your glutes and press the tops of your feet into the floor. Pull your shoulder blades together and down your back. This activation is what protects your lower back during the lift. Skip it and you're loading your lumbar spine without support.
Ty's cue: "Squeeze your glutes lightly and press the tops of your feet down. That's what locks your pelvis."
- Peel your chest up using your back. Inhale and use your back muscles to lift your chest off the mat. Here's the test: if you lifted your hands off the mat, would you stay up? You should. Your hands provide light support, nothing more. Lift only as high as you can while keeping your hip bones pressed into the floor.
Ty's key cue: "Lift your hands to check. If you stay up, your back is doing the work. If you drop, you were pushing with your arms."
- Choose your variant. For the static hold, stay at the top for 15-30 seconds while breathing steadily. For the dynamic cobra, exhale and lower back down with control, then repeat for 8-12 reps. Both work. The hold builds endurance, the reps build strength. FitCraft programs both depending on where you are.
Ty's cue: "Keep breathing through the hold. If you're holding your breath, the lift is too high."
- Lower with control. Exhale, slowly lower your chest back to the mat. Lead with your sternum, not your chin. Keep your back muscles engaged on the way down. Don't just collapse. Rest your forehead on the mat between reps or after your hold.
Ty's reminder: "Sternum leads. Don't let your forehead crash down first."
Get this exercise in a personalized workout
FitCraft, our mobile fitness app, uses its AI coach Ty to program yoga poses like this into your plan at the right volume and intensity, based on your level, goals, and equipment. Ty was designed and trained by Domenic Angelino, MPH (Brown University) and NSCA-CSCS, with research published in the Journal of Strength and Conditioning Research and Medicine & Science in Sports & Exercise.
Take the Free Assessment Free · 2 minutes · No credit card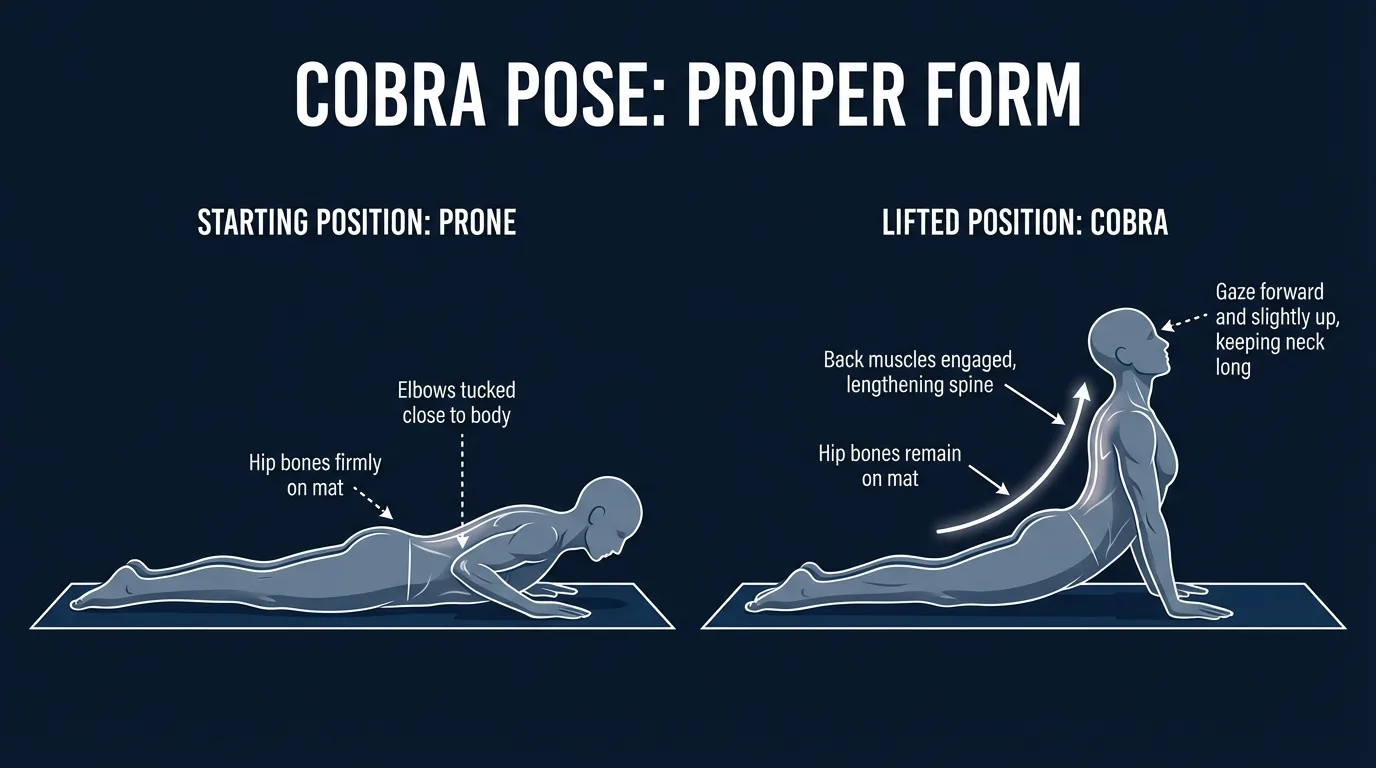
Common Mistakes to Avoid
Cobra pose is beginner-friendly, but "beginner" doesn't mean "impossible to mess up." These are the mistakes that either rob you of results or leave your lower back feeling worse than when you started.
- Pushing up with your arms. The number one mistake. If your arms are doing the lifting, your back extensors aren't working, and you're jamming your lumbar spine into extension with no muscular support. The fix: use the hand-lift test. Hover your palms off the mat for a second. If you can hold your position, your back is engaged. If you drop, you were pushing.
- Going too high too fast. There's this temptation to get as high as possible, as if more height equals more benefit. It doesn't. If your hip bones peel off the mat, you've gone too far. The pose should feel like a stretch across your chest and abs, with the back muscles working steadily. If you feel a pinch in your lower back, back off the height.
- Clenching the glutes too hard. Wait, didn't I say to engage your glutes? Yes. There's a difference between gentle activation and full-force clenching. Over-squeezing your glutes tilts your pelvis posteriorly and fights the natural extension of the pose. Think about 30% effort. Enough to stabilize, not enough to lock everything down.
- Holding your breath. People do this in any pose that requires effort. And it's counterproductive here because steady breathing helps your back muscles relax into a deeper, more controlled extension. Breathe in as you lift, breathe out as you lower. If you're holding your breath, the intensity is probably too high. Back off a bit.
- Cranking your neck back. So many people throw their head back to feel like they're getting "higher." All that does is compress your cervical spine. Keep your gaze forward or slightly downward. Your neck is just a continuation of your spine and follows wherever the upper back leads. Looked at from the side, your ear should be roughly over your shoulder, not behind it.
- Forgetting your feet. Pressing the tops of your feet into the mat activates your glutes and stabilizes your pelvis. If your feet are flopping there inert, you're missing half the exercise. Press down through the entire foot, not just the toes.
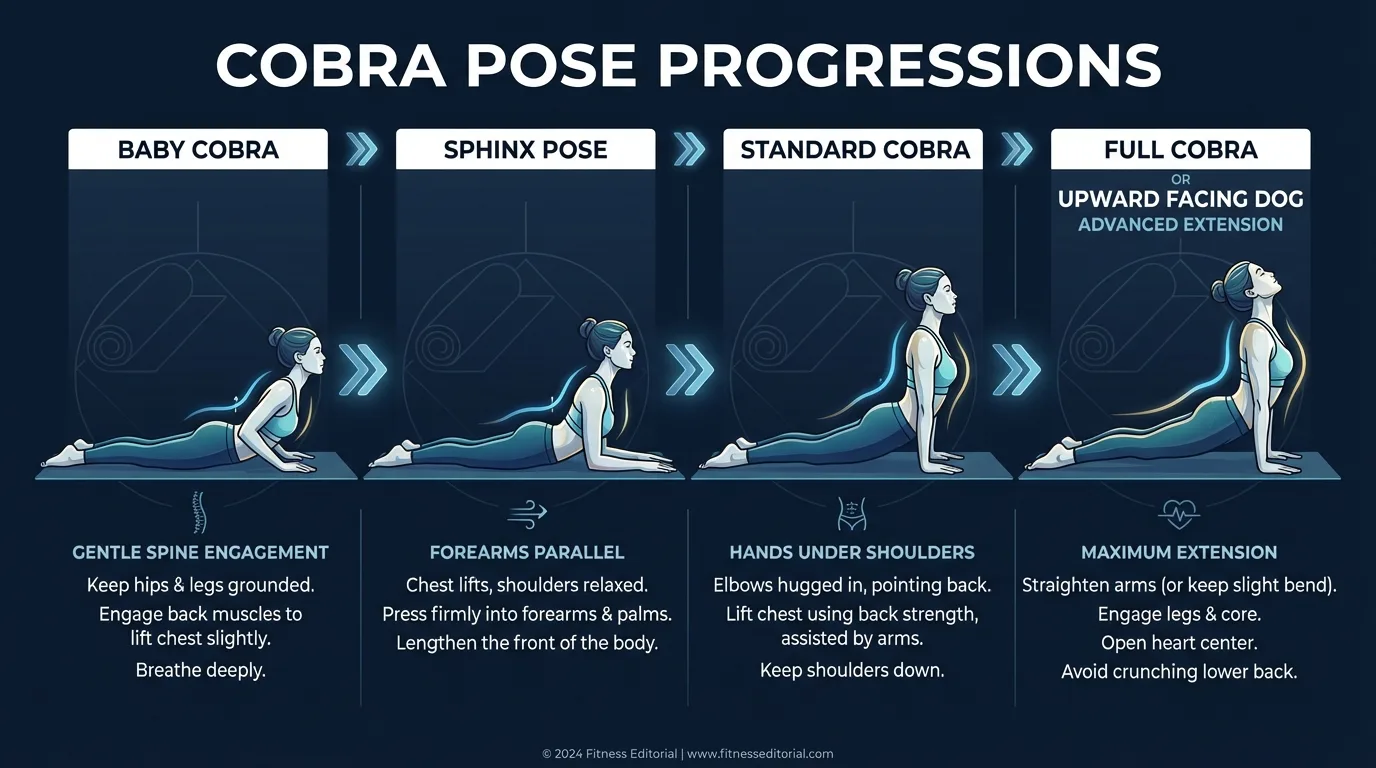
Variations: From Beginner to Advanced
Baby Cobra (Beginner Regression)
Same setup as full cobra, but you lift only a few inches off the mat. Hands can stay lightly on the floor or hover. This is where everyone should start. It teaches the back-engagement pattern without any risk of going too deep. If you can hold baby cobra for 20 seconds and feel your mid-back working, you're doing it right.
Sphinx Pose (Beginner/Intermediate)
Instead of hands by your ribs, rest on your forearms with elbows directly under your shoulders. This gives you a supported position to practice holding spinal extension for longer periods (30-60 seconds). Less demanding than full cobra and produces more sustained work for the erector spinae. Useful for desk workers who need daily back extension practice.
Standard Cobra (Intermediate)
The version described in the step-by-step above. Hands beside your ribs, elbows slightly bent, hip bones on the mat, chest lifted to a moderate height. This is the working version for most practitioners and the one you'll see most often in yoga classes and FitCraft programs.
Full Cobra with Straight Arms (Advanced)
In this version, you straighten your arms fully while keeping your hip bones on the mat (if your flexibility allows). This creates a much deeper backbend and significantly more chest opening. Only progress here if you can do the standard cobra with perfect form and zero lower back discomfort. Most people don't need to go this deep. Standard cobra gives you 90% of the benefit.
When to Avoid or Modify Cobra Pose
Cobra pose is safe for most healthy adults, but a few conditions warrant modification or temporarily swapping in a gentler back exercise. None of these are permanent restrictions. They're starting points. Always consult your physician or physical therapist for personalized guidance.
- Acute disc herniation or active sciatica. Spinal extension can feel relieving in some disc cases (the McKenzie method is built on this) and worsening in others. Don't self-diagnose. Get cleared by a spine specialist before doing prone extension work. If cleared, start with prone press-ups on forearms (sphinx) and stop the moment symptoms travel further down the leg.
- Recent abdominal or spinal surgery. Cobra stretches the abs significantly and loads the spine into extension. Get clearance from your surgeon, and start with neutral-spine stability work like deadbugs and bird-dogs before reintroducing any backbend.
- Late pregnancy (second and third trimester). The prone position is uncomfortable and unsafe as the belly grows. Substitute with seated cat-cow or standing back extensions. Work with a prenatal-trained instructor for safe modifications.
- Wrist pain or carpal tunnel. Cobra loads the wrists into extension, similar to plank or push-up positions. Drop to sphinx pose (forearms down) to remove the wrist load entirely. The back-extension benefit is preserved.
- Lumbar spine injury (spondylolisthesis, facet joint syndrome, pars defect). Cobra deepens lumbar lordosis, which can aggravate these conditions. Stay with baby cobra (minimal lift), focus on thoracic extension over lumbar, and work with a PT to build deep-core stability with deadbugs and forearm planks first.
- Hypermobility or connective tissue disorders (Ehlers-Danlos, JHSD). Hypermobile spines tend to dump into lumbar extension instead of distributing it through the thoracic spine. Focus on muscular engagement (back-extensor work, glute activation) over depth, and keep the lift conservative.
Related Exercises
If cobra is part of your routine, these movements complement or extend the same training pattern:
- Same back-extension pattern (prone strength): Superman holds train the same erector spinae and posterior chain from a prone position but also lift the legs, increasing the demand on the lower back and glutes. A natural progression once cobra feels easy.
- Easier regression (safer for the lower back): Bird-dogs train the same back extensors from an all-fours position with built-in core stability. The go-to substitute if prone extension bothers your lower back.
- Dynamic spinal mobility complement: Cat-cow alternates between extension and flexion. Pairs well with cobra because it mobilizes the spine through both directions instead of just one.
- Core foundation for safe extension: Forearm planks and deadbugs build the deep-core stability that protects the lumbar spine during any extension work. Worth prioritizing if your lower back feels fatigued after cobra.
- Hip-flexor opener pair: Butterfly pose opens the hip flexors and inner thighs, which complement cobra's anterior-chain stretch. Doing both in sequence is a posture-correction mini-routine for desk workers.
- Standalone back-extension strength work: Back extensions (on a bench or hyperextension machine) progress the same erector spinae pattern with adjustable load. Useful once bodyweight cobra and superman holds feel too easy.
How to Program Cobra Pose
Cobra pose programming follows yoga-specific timing rather than the rep-and-set framework used for resistance training, but the underlying principles of progressive loading still apply. The American College of Sports Medicine (ACSM) Position Stand on resistance training establishes evidence-based dosing for progressive overload, and the same concept maps onto isometric holds: increase duration, depth, or frequency over time, with adequate recovery between higher-intensity sessions (Ratamess et al., 2009).
| Level | Hold time × Reps | Rest between holds | Frequency |
|---|---|---|---|
| Beginner (baby cobra) | 3-5 breaths (~15-30s) × 1-2 holds | 15-20 seconds | 3-5 sessions/week |
| Intermediate (standard cobra) | 5-10 breaths (~30-60s) × 2-3 holds, or 3 × 8-12 dynamic reps | 20-30 seconds | 4-6 sessions/week |
| Advanced (full cobra) | 10-15+ breaths (~60-90s) × 3-5 holds, or 3 × 12-15 dynamic reps | 30-45 seconds | 5-7 sessions/week |
Where in your workout: cobra fits well in three contexts. As part of a standalone yoga sequence (after warm-up, with other prone poses). As a warm-up before strength training (1-2 holds to mobilize the spine before deadlifts, rows, or any pulling work). And as a daily desk break, on its own or paired with cat-cow as a 2-minute posture reset. Yoga programming can be daily because the stimulus is mobility and isometric endurance rather than progressive overload of contractile tissue.
Form floor over depth targets: if your lower back starts to pinch, your hip bones lift off the mat, or your breathing becomes strained, lower the height. Holding a clean baby cobra for 30 seconds beats grinding through a strained full cobra. Range of motion follows control, never the other way around.
How FitCraft Programs This Exercise
Knowing how to do cobra is step one. Knowing when to do it, how long to hold, and when to progress is where most people get stuck.
FitCraft's AI coach Ty handles that. During your personalized diagnostic assessment, Ty maps your fitness level, posture goals, and how much time you spend sitting. Then Ty builds a personalized program that slots cobra into a balanced routine at the right variation for your level.
As your back strength and mobility improve, Ty adjusts the variation and volume to match. Baby cobra becomes standard cobra. Holds get longer. The pose can show up in your warm-up, in a standalone yoga session, or as a midday desk break. Every program is designed by an Ivy League-trained exercise scientist and NSCA-certified strength coach using evidence-based periodization, then adapted to you by the AI.
Frequently Asked Questions
Can I do cobra pose with lower back pain?
It depends on the type of pain. Cobra pose can help with pain that comes from prolonged flexion (sitting, slouching, forward-head posture) because it trains your back extensors and restores extension range. If your back pain is from a recent disc injury, acute sciatica, or facet joint irritation, extension can make it worse. Start with baby cobra (only a few inches off the mat) and stop immediately if pain increases. If unsure, get cleared by a physical therapist before adding cobra to your routine.
What muscles does cobra pose work?
Cobra pose primarily engages the erector spinae, rhomboids, and middle and lower trapezius (your upper and mid back muscles) while stretching the rectus abdominis, hip flexors, and pectorals. Your glutes and posterior deltoids work as secondary stabilizers. It's one of the most accessible bodyweight exercises for counteracting the effects of prolonged sitting.
What's the difference between cobra pose and upward dog?
In cobra, your hip bones stay on the mat and your elbows remain slightly bent. In upward dog, your hips and thighs lift completely off the mat, your arms straighten fully, and only your hands and tops of feet touch the ground. Upward dog is a significantly deeper backbend. Cobra is the better starting point for beginners and anyone with lower back sensitivity.
How long should I hold cobra pose?
For the static hold, 15-30 seconds per hold with 3-5 reps is a solid starting point. For dynamic cobra, aim for 3 sets of 8-12 reps with a controlled 2-second lift and 2-second lower. Beginners should start with baby cobra and shorter holds until their back strength develops.
Can I do cobra pose every day?
Yes, gentle cobra can and should be practiced daily, especially if you sit for long periods. Keep the intensity moderate for daily practice. If you're using cobra as a strengthening exercise with longer holds or higher depth, allow 48 hours between higher-intensity sessions for recovery.