The reverse crunch looks small, but it asks for a specific skill: posterior pelvic tilt under control. Your knees move toward your chest, but the real rep happens when your pelvis curls upward and your lower back peels off the mat without a leg swing.
That makes reverse crunches useful for people who want a neck-friendly core exercise. Your head, shoulders, and arms stay down. The work shifts to the lower segment of the trunk, where you have to keep the ribs down, exhale through the effort, and stop the hip flexors from taking over.
Quick Facts: Reverse Crunches
- Equipment needed: None; exercise mat optional
- Difficulty: Beginner to intermediate
- Modality: Core strength
- Body region: Core and hip flexors
- FitCraft quest category: Core
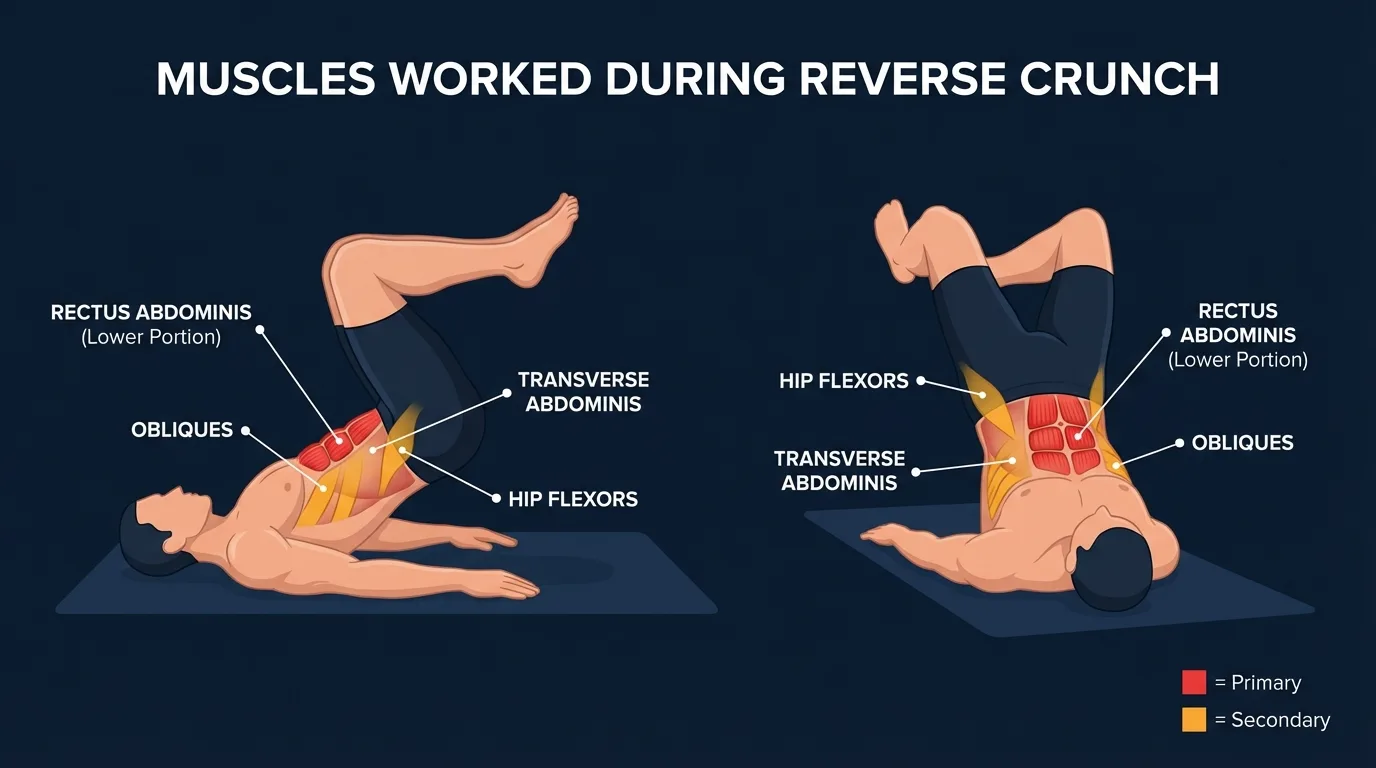
Muscles Worked
The primary mover is the rectus abdominis. It shortens as you curl the pelvis toward the ribcage, then works eccentrically as you lower the pelvis back to the mat one segment at a time.
The obliques assist the curl and help keep the pelvis from rotating or drifting side to side. The hip flexors hold the legs in the 90-degree starting position, but they should not drive the rep. If the front of the hips burns before the abs, shorten the range and focus on the pelvic tilt.
The transverse abdominis, diaphragm, pelvic floor, and spinal erectors act as stabilizers. Exhaling during the curl helps reinforce the deep-core canister, while the lower back stays controlled against the mat between reps.
The training effect comes from changing which end of the trunk moves. A standard crunch curls the ribs down toward the pelvis; a reverse crunch curls the pelvis up toward the ribs. That bottom-up pattern makes the exercise useful for teaching pelvic control, especially when paired with slower lowering and a clear stop before the next rep.
How to Do Reverse Crunches Step by Step
- Set your starting position. Lie face-up with your arms at your sides and palms pressing into the floor. Bend your hips and knees to about 90 degrees, then flatten your lower back into the mat.
Coach Ty's cue: "Ribs down, lower back heavy, knees quiet."
- Curl your pelvis, not your legs. Exhale and curl your tailbone off the mat. Your knees move toward your chest because the pelvis is rolling, not because you kicked your legs.
Coach Ty's cue: "Tailbone first. Feet just follow."
- Pause at the top. Hold for one count when your hips are lifted and your lower abs feel locked in. Keep your upper back and shoulders planted.
Coach Ty's cue: "Own the top before you come down."
- Lower with control. Put your lower back and hips down slowly. Take 2 to 3 seconds, and do not let your feet swing away from you.
Coach Ty's cue: "Lower like you are setting glass on the floor."
- Reset before repeating. Return to the 90-degree start with your lower back flat. If you lose that position, stop the set or make the next rep smaller.
Coach Ty's cue: "Every rep starts from control."
Get this exercise in a personalized workout
FitCraft, our mobile fitness app, uses its AI coach Ty to program core stability work like this into your plan at the right volume and intensity, based on your level, goals, and equipment. Ty was designed and trained by Domenic Angelino, MPH (Brown University) and NSCA-CSCS, with research published in the Journal of Strength and Conditioning Research and Medicine & Science in Sports & Exercise.
Take the Free Assessment Free · 2 minutes · No credit card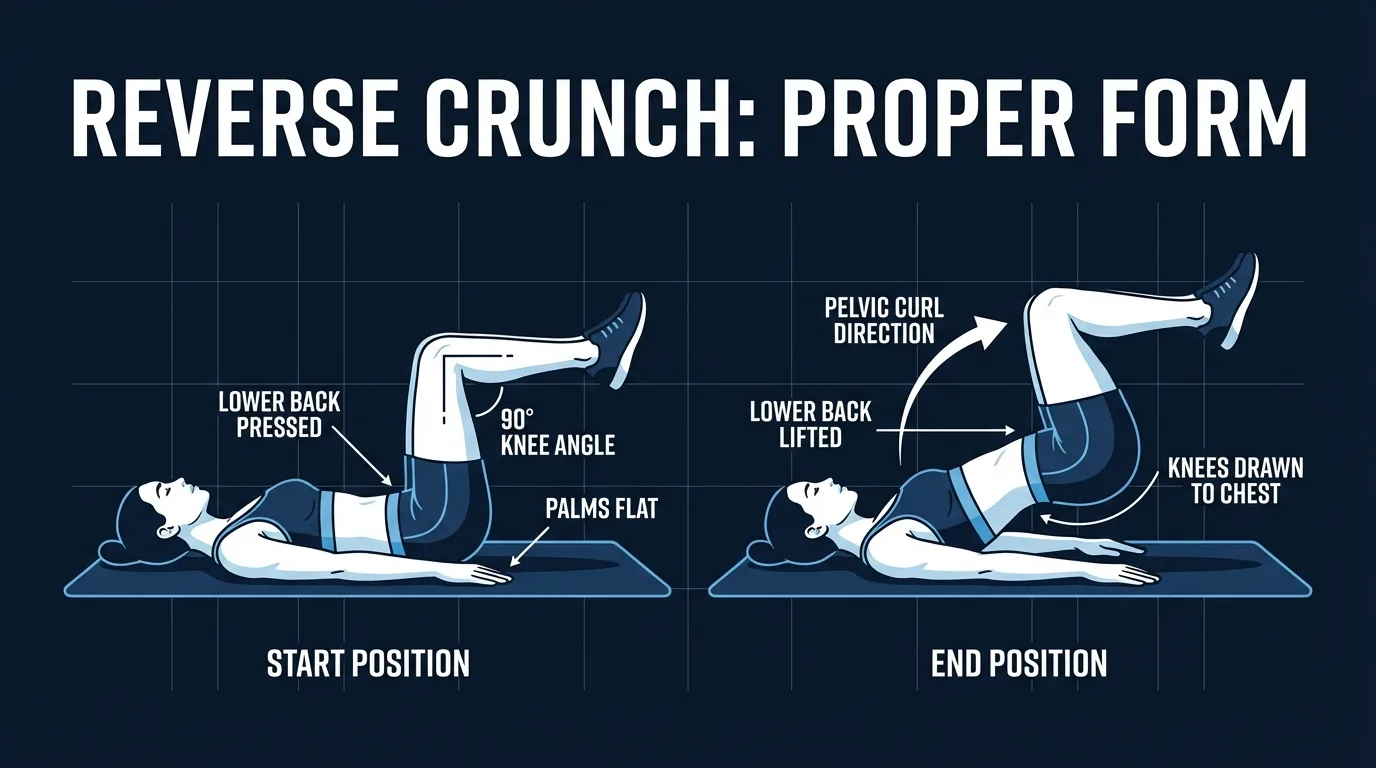
Common Mistakes to Avoid
- Swinging the legs. If your feet rock up and down while your hips barely lift, momentum is doing the rep. Bend the knees more, slow down, and make the pelvic curl smaller.
- Pulling from the hip flexors. A clean reverse crunch starts with a pelvis roll toward the ribs. If the front of your hips dominates, reset your lower back and exhale harder through the curl.
- Arching between reps. Letting the lower back lift in the starting position turns the next rep into a hip-flexor swing. Press the lower back down before every rep.
- Lowering too fast. Dropping your legs at the bottom removes the eccentric work and can tug on the lower back. Take 2 to 3 seconds to lower.
- Using too much range too soon. Bigger is not always better. Stop the rep before the lower back arches or the pelvis rocks out of control.
- Holding your breath. Breath-holding can spike pressure and make the movement feel braced in the wrong way. Exhale as the pelvis curls, then inhale during the reset.
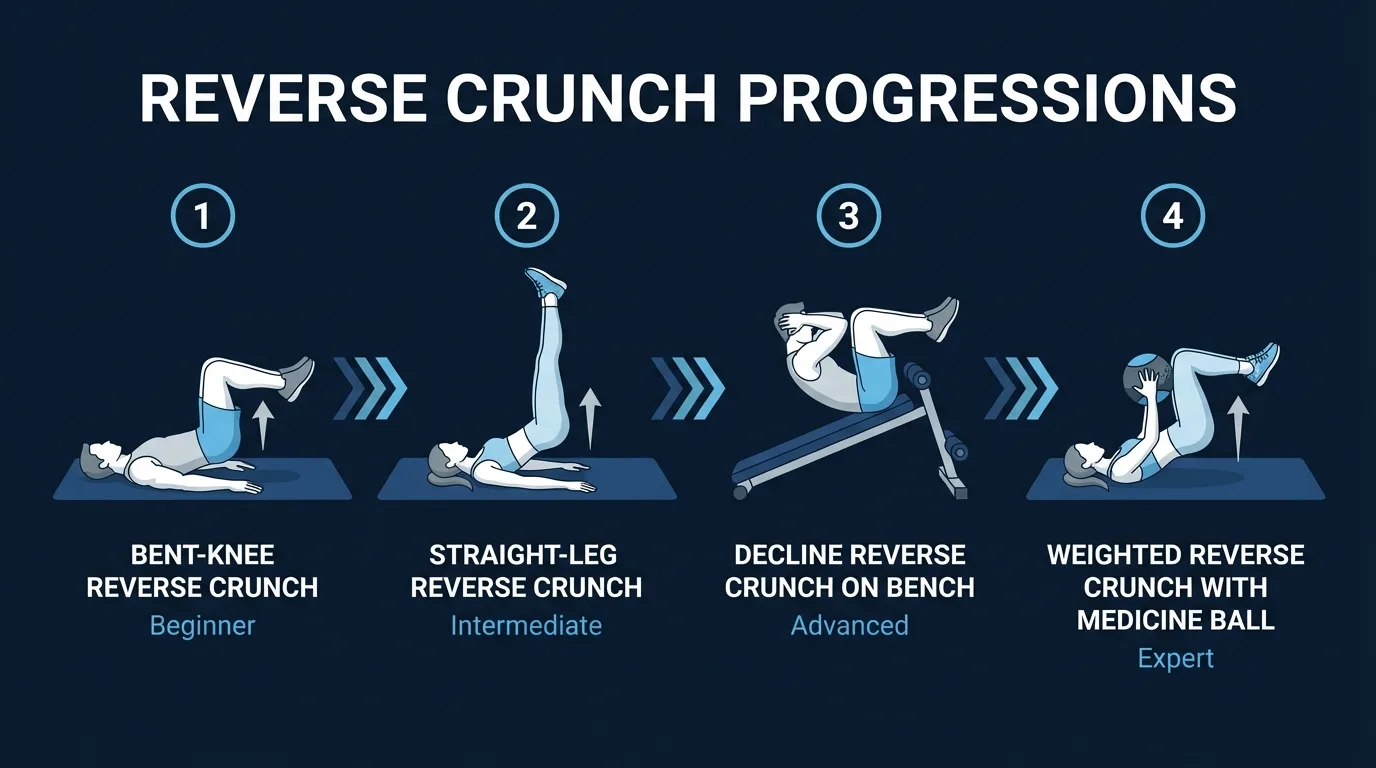
Reverse Crunch Variations: Regressions and Progressions
Bent-Knee Reverse Crunch
This is the standard version and the best starting point. Keeping the knees bent shortens the lever arm, so you can learn the pelvis-first curl without your hip flexors taking over.
Small-Range Reverse Crunch
Use a shorter lift if your lower back arches or your legs swing. Curl the tailbone only an inch or two, pause, and lower under control. This builds the exact control the full rep needs.
Straight-Leg Reverse Crunch
Extend the legs toward the ceiling to lengthen the lever arm. Keep a slight knee bend if your hamstrings pull or your lower back wants to arch.
Decline Reverse Crunch
Perform the movement on a decline bench while holding the bench behind your head. The angle increases the resistance and range, so only use it once the floor version is smooth.
Weighted Reverse Crunch
Hold a small medicine ball or dumbbell between the knees once bodyweight reps are easy. Add load slowly, and end the set before the weight makes you swing.
When to Avoid or Modify Reverse Crunches
Reverse crunches are safe for most healthy adults, but the exercise still loads the trunk through controlled spinal flexion and intra-abdominal pressure. Always consult your physician or physical therapist if you are returning from injury, surgery, pregnancy, or any condition that affects your spine, abdomen, or pelvic floor.
- Acute lower-back pain or known disc pathology. Skip full reverse crunches if they reproduce symptoms. Start with deadbugs or bird-dogs to rebuild bracing without spinal flexion.
- First 6 to 8 weeks postpartum or active diastasis recti. Restore deep-core pressure control first. Use breathing drills, deadbugs, and clinician-guided progressions before loaded curling patterns.
- Recent abdominal surgery. Get clearance from your surgeon before flexion-based core work. Begin with gentle bracing before moving into repeated pelvic curls.
- Hernia symptoms. Reverse crunches can raise abdominal pressure. Use medical guidance before adding the exercise back.
- Pregnancy in the second or third trimester. Avoid longer supine exercise blocks and high-flexion core work. Use side-lying or upright core options instead.
- Pelvic-floor dysfunction or pelvic-organ prolapse. Work with a pelvic-floor physical therapist and avoid breath-holding or pressure-heavy progressions.
Related Exercises
- Same anterior-core family: Crunches and bicycle crunches train trunk flexion from different angles.
- Lower-ab and hip-flexor pairing: Leg raises use a longer lever and demand more control from the lower back.
- Core-control regressions: Deadbugs teach the same lower-back position with less spinal flexion.
- Spinal-bracing foundation: Bird-dogs build anti-rotation control before harder dynamic core work.
- Isometric core progression: Forearm planks and hollow holds train longer bracing sets.
- Posterior-chain balance: Glute bridges balance the hip-flexion bias with hip-extension strength.
How to Program Reverse Crunches
Ratamess et al., 2009 recommends progressing resistance training by matching volume, intensity, and rest to training status. For reverse crunches, use the dynamic rep-based core ranges below and advance only when your lower back stays controlled.
| Level | Sets × Reps | Rest between sets | Frequency |
|---|---|---|---|
| Beginner | 2-3 × 8-12 | 45-60 seconds | 2-4 sessions/week |
| Intermediate | 3 × 10-20 | 45-60 seconds | 3-5 sessions/week |
| Advanced | 3-4 × 15-30 with slow tempo | 60 seconds | 4-6 sessions/week |
Place reverse crunches near the end of a strength session or in a core finisher. You can also use low-rep sets after warm-up work if your goal is to practice pelvic control before harder trunk exercises.
Use a form floor over rep targets. End the set when your lower back arches, your legs swing, or your breath turns into a hard brace you cannot control.
FitCraft, our mobile fitness app, uses its AI coach Ty to program core stability work like this into your plan at the right volume and intensity, based on your level, goals, and equipment. Ty was designed and trained by Domenic Angelino, MPH (Brown University) and NSCA-CSCS, with research published in the Journal of Strength and Conditioning Research and Medicine & Science in Sports & Exercise.
Frequently Asked Questions
What muscles do reverse crunches work?
Reverse crunches primarily train the rectus abdominis through a bottom-up spinal-flexion pattern. The obliques and transverse abdominis help keep the pelvis controlled, while the hip flexors assist with leg position.
Are reverse crunches better than regular crunches?
They are different tools. Regular crunches curl the ribs toward the pelvis, while reverse crunches curl the pelvis toward the ribs. Reverse crunches can feel better for people who dislike neck strain because the head and shoulders stay down.
Can I do reverse crunches with lower-back pain?
Modify or skip reverse crunches if they reproduce lower-back pain, especially if you have known disc pathology. Start with deadbugs or bird-dogs, keep the range small, and get guidance from a qualified clinician if symptoms persist.
How many reverse crunches should I do?
Start with 2 to 3 sets of 8 to 12 controlled reps, 2 to 4 times per week. Add reps only while you can keep the lower back flat and lower your hips slowly.
Do reverse crunches burn belly fat?
Reverse crunches strengthen the abdominal muscles, but they do not spot-reduce belly fat. Visible abdominal definition depends on overall training, nutrition, recovery, and body-fat changes over time.