Most people sit for 8+ hours a day. Your hips know it. They get tight, stiff, and locked up in flexion, and that tightness quietly contributes to lower back pain, limited mobility, and a general feeling of being 80 years old when you stand up from a chair. The butterfly pose is one of the simplest ways to undo that damage. No equipment, no gym, no excuses.
Also called baddha konasana in yoga, the butterfly stretch targets the muscles along your inner thighs and groin that get chronically shortened from sitting. It's a staple in yoga, physical therapy, and athletic warm-ups for a reason. It works. A 2017 study in the Journal of Bodywork and Movement Therapies found that consistent static stretching of the hip adductors significantly improved hip range of motion over just four weeks (Muanjai et al., 2017). The butterfly pose is one of the most accessible ways to get that stretch.
But there's a catch. Most people do it wrong. They round their back, yank their knees toward the floor, and wonder why nothing improves. So let's fix that.
Quick Facts: Butterfly Pose
- Equipment needed: None (optional: yoga block or folded blanket under hips, blocks or pillows under knees for support)
- Difficulty: Beginner
- Modality: Static stretch, bilateral, hip external rotation
- Body region: Hips, inner thighs, groin, lower back
- FitCraft quest category: Mobility / Flexibility
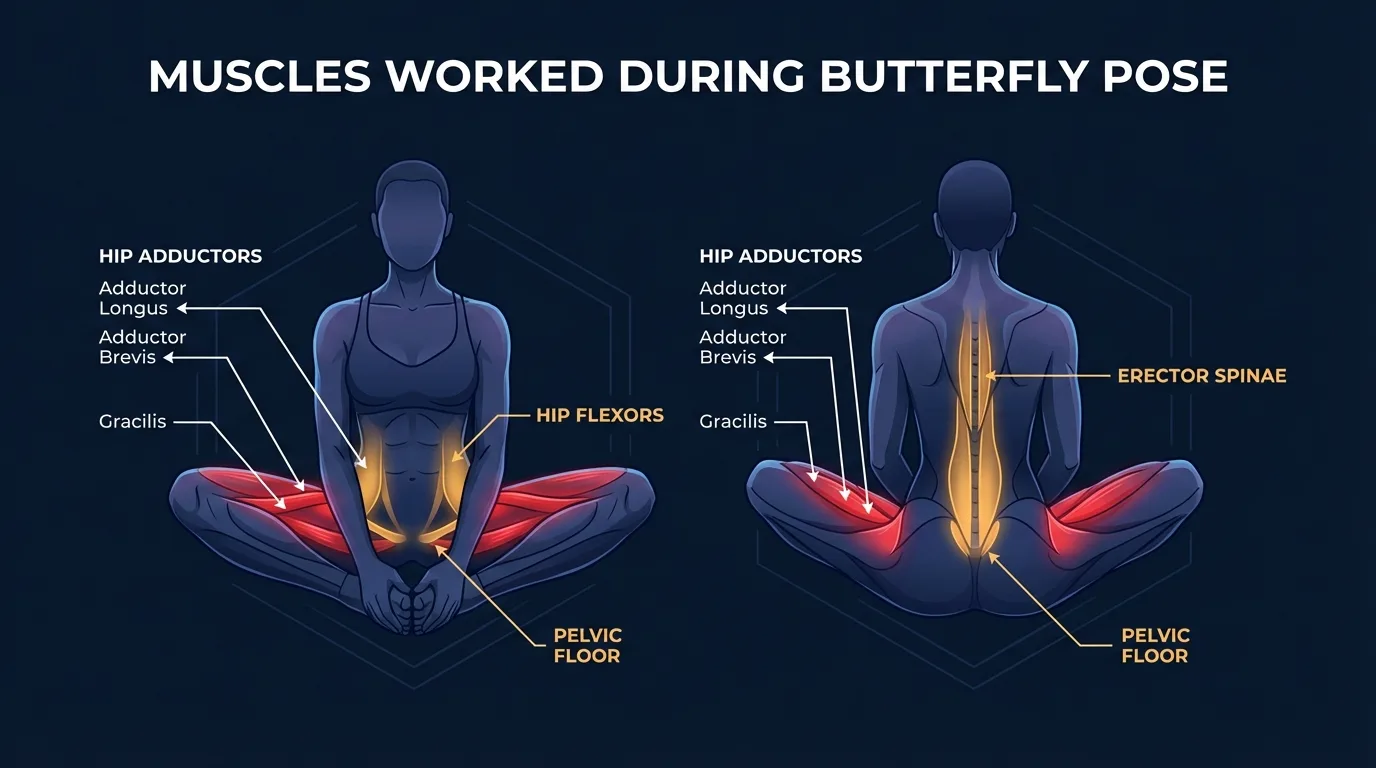
Muscles Engaged & Stretched
Primary stretch targets: the hip adductor group along the inner thigh. The adductor longus, adductor brevis, and gracilis lengthen as the femur rotates externally and the knees drop toward the floor. These are the muscles that get chronically shortened from prolonged sitting, and they are the limiter for most people who can't get their knees down.
Secondary stretch and engagement: the deep hip rotators (piriformis, obturator group) lengthen through the external rotation pattern. The hip flexors (psoas, iliacus) get a mild stretch through the pose's open-hip position, and the pectineus along the medial groin shares load with the adductors. If you add the forward fold variation, the erector spinae and thoracolumbar fascia along the lower back stretch as well.
Stabilizers: the core works isometrically to hold a tall spine. The transverse abdominis, obliques, and erector spinae fire quietly to prevent the pelvis from collapsing backward into a slumped position, which is why butterfly pose feels harder than it looks if your seated posture is weak. Diaphragmatic breathing is also a stabilizer here. The exhale is when the adductors release, so breath control directly affects how deep the stretch goes.
Why static adductor stretching works: Muanjai et al. (2017) showed that consistent static stretching of the hip adductors produced meaningful gains in hip abduction range of motion over a four-week protocol. The mechanism is a combination of viscoelastic deformation of the muscle-tendon unit (the tissue physically lengthens under sustained load) and neurological desensitization (the stretch reflex damps down as the nervous system learns the new range is safe). Both adaptations require time under tension, which is why holding the pose for 30 seconds or longer beats brief, repeated entries.
How to Do the Butterfly Pose (Step-by-Step)
- Sit tall and bring your soles together. Sit on the floor with your legs extended. Bend both knees and bring the soles of your feet together, pulling your heels in toward your pelvis. Let your knees fall out to the sides naturally. Hold the tops of your feet or your ankles with both hands. If your lower back immediately rounds, sit on a folded blanket or yoga block. That small elevation tilts your pelvis forward and makes everything easier.
- Lengthen your spine. Think about growing tall through the crown of your head. Roll your shoulders back and down, away from your ears. Your chest should be open, not collapsed. Imagine a string pulling you straight up from the top of your skull. This spinal alignment is the whole foundation of the pose. Without it, you're just slouching with your legs open.
- Let gravity do the work. This is where people mess up. Do not push your knees down with your hands or elbows. Let gravity pull them toward the floor on its own. You should feel a gentle stretch along your inner thighs and groin. If the stretch feels intense just from gravity, that's your starting point. Own it. Forcing your knees lower than your muscles are ready for is how you strain your groin.
- Optional: fold forward. Once the upright version feels comfortable, try hinging forward at the hips. Keep your spine long as you fold. The hinge happens at your hip crease, not your waist. Walk your hands forward on the floor in front of your feet. Only go as far as you can without your upper back rounding into a C-shape. This adds a stretch to the lower back and deepens the adductor stretch.
- Breathe and hold. Breathe slowly through your nose. With each exhale, notice if your knees drop a fraction lower. Don't force it. Hold for 30 seconds to 2 minutes. Beginners: start with 30 seconds and build up. To come out, use your hands to gently bring your knees back together before extending your legs.
Get this exercise in a personalized workout
FitCraft, our mobile fitness app, uses its AI coach Ty to program yoga poses like this into your plan at the right volume and intensity, based on your level, goals, and equipment. Ty was designed and trained by Domenic Angelino, MPH (Brown University) and NSCA-CSCS, with research published in the Journal of Strength and Conditioning Research and Medicine & Science in Sports & Exercise.
Take the Free Assessment Free · 2 minutes · No credit card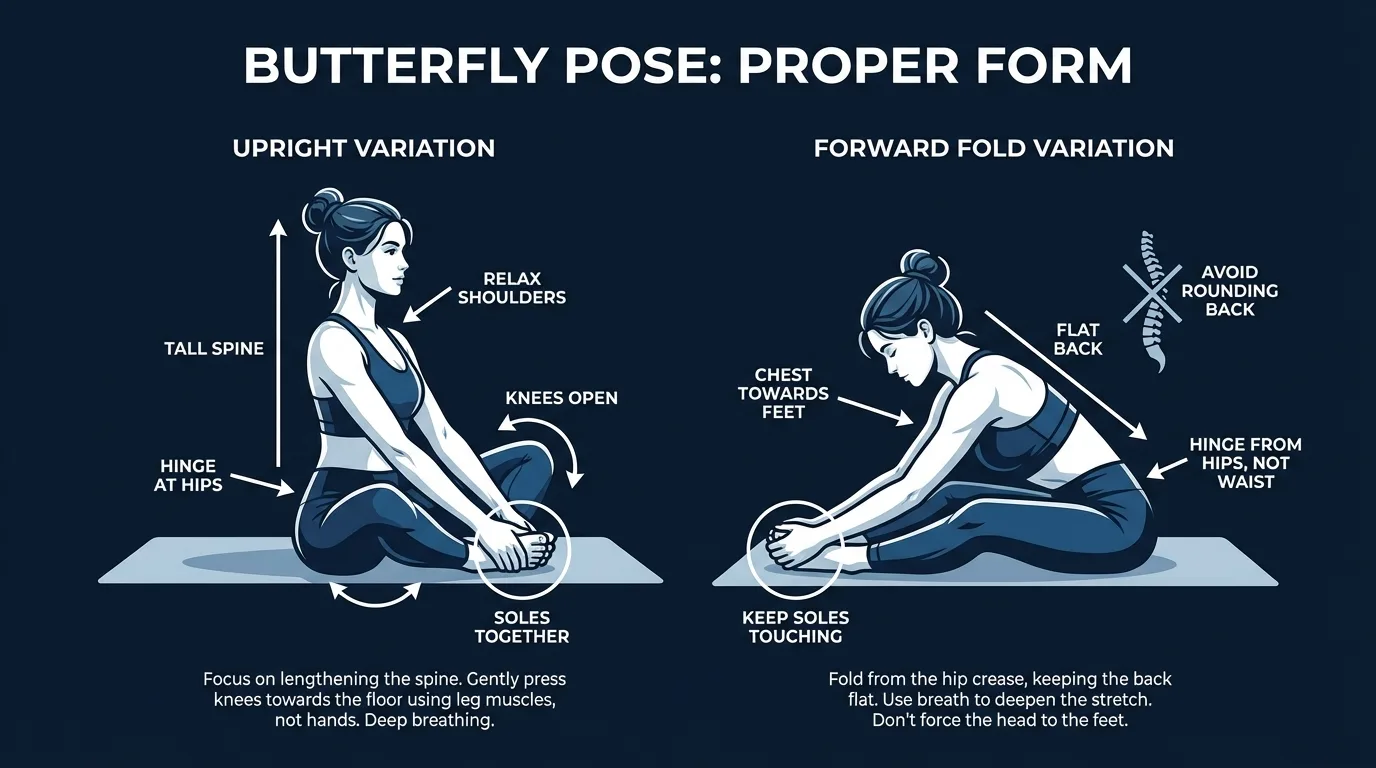
Common Mistakes to Avoid
The butterfly pose looks simple. That's actually what makes it tricky. People assume they can skip the details. Here's what goes wrong.
- Pushing your knees down with your hands. This is the most common mistake and the fastest path to a groin strain. Your adductor muscles need time to lengthen. When you force your knees past their current range, you're loading connective tissue that isn't ready. Let gravity stretch you. If your knees are high, that's fine. They'll come down over weeks of consistent practice.
- Rounding your back. When your spine collapses into a C-shape, the stretch shifts away from your inner thighs and onto your lower back in a bad way. You're compressing discs instead of stretching muscles. Sit tall. If you can't keep a neutral spine with your feet pulled in close, move your feet farther from your body until your back stays upright.
- Bouncing your knees. Ballistic bouncing activates the stretch reflex, which actually causes your adductor muscles to contract rather than relax. It's doing the opposite of what you want. Hold the stretch still and let each exhale take you slightly deeper. Static wins here.
- Holding your breath. Tension loves company. When you hold your breath, your muscles tighten up and fight the stretch. Breathe slowly and deliberately. The exhale is where things open up because your nervous system relaxes on the out-breath.
- Feet too close too soon. Pulling your heels all the way to your pelvis when your hips aren't ready creates excessive strain on the groin. Start with your feet 12 to 18 inches from your body and gradually bring them closer as your flexibility improves over sessions.
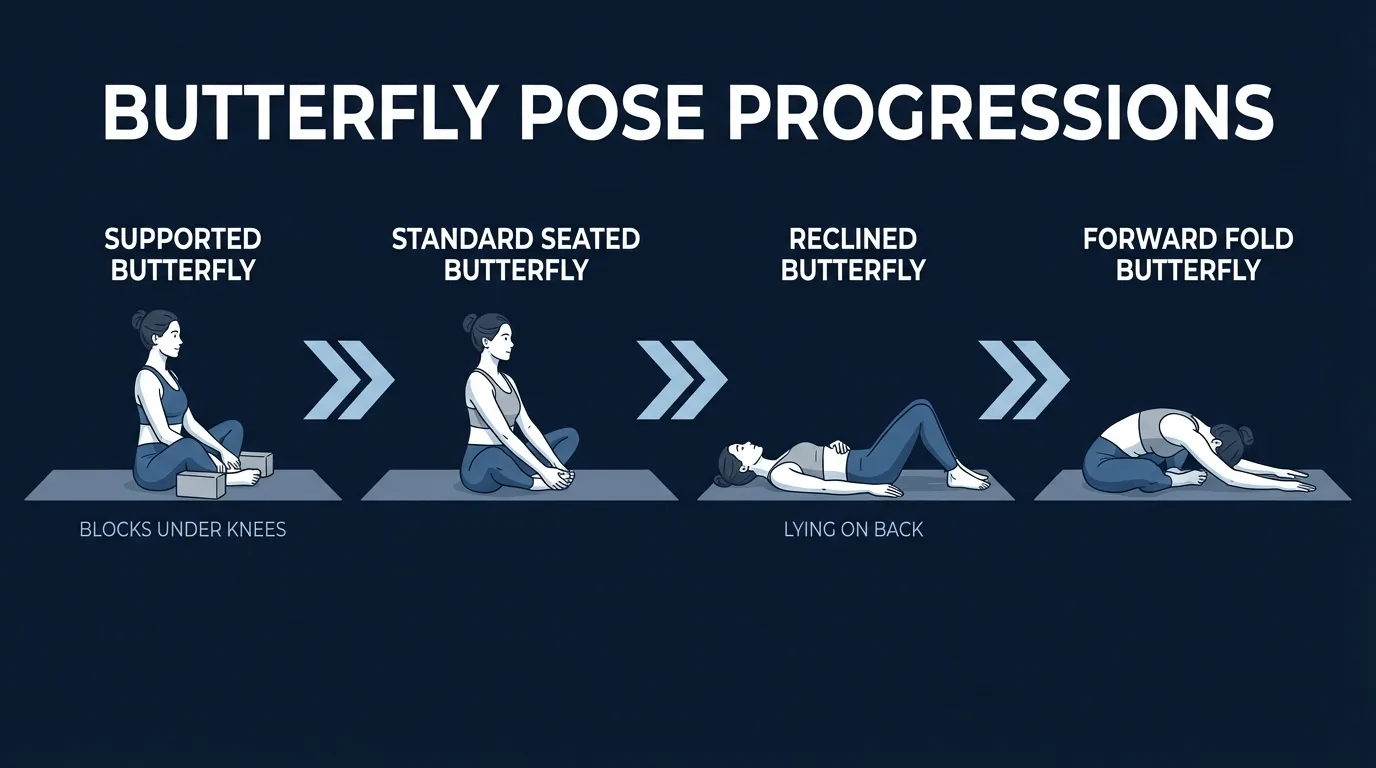
Variations: From Supported to Deep
Supported Butterfly (Beginner)
Place a yoga block or folded towel under each knee for support. This takes the intensity way down and gives your adductors time to open up without strain. If your knees sit more than 8 to 10 inches off the floor, start here. You can also sit against a wall for back support if keeping your spine upright feels like its own workout.
Reclined Butterfly / Supta Baddha Konasana (Beginner-Intermediate)
Lie on your back with the soles of your feet together and knees falling open. Gravity works differently here. It pulls your knees toward the floor while your back is fully supported. This might be the most relaxing variation. It's great for bedtime stretching, and it's perfect if you struggle to keep your spine upright in the seated version. Place pillows under your knees if the stretch feels like too much.
Forward Fold Butterfly (Intermediate)
From the standard seated position, hinge forward at the hips while keeping your spine long. Walk your hands out in front of your feet. This deepens the adductor stretch and adds a stretch to the lower back erector spinae muscles. Only fold as far as you can without rounding. If your back starts curving, you've gone too far. Back it up a bit.
Alternative Stretches
If the butterfly pose isn't working for your body right now, these target similar muscles or build the same hip mobility from different angles:
- Deep squat hold: Opens the hips through a different range of motion and stretches the adductors, hip flexors, and ankles simultaneously.
- Glute bridges: Strengthen the glutes and open the hip flexors. Pairs well with butterfly pose for a balanced hip routine.
- Royal pigeon pose: A deeper, more advanced hip opener that targets the deep external rotators (piriformis, obturator group) more aggressively than butterfly pose.
- Butterfly reach: An active mobility version that adds a hinge and arm reach to engage the core through the same hip position.
When to Avoid or Modify Butterfly Pose
Butterfly pose is one of the safer stretches in the library, but a few conditions warrant modification or temporarily swapping for an alternative. None of these are permanent restrictions. They're starting points. Always consult your physician or physical therapist for personalized guidance.
- Acute groin pain or recent adductor strain. The pose loads exactly the muscles that are injured. Skip it until the acute pain settles, then return with the supported variation (yoga blocks under both knees) and short 15 to 20 second holds. Progress depth and duration over weeks. If the pain is sharp or lingers beyond two weeks, see a physical therapist before resuming.
- Knee meniscus injury or recent knee surgery. The pose places the knee in deep flexion with external rotation at the hip, which can torque a healing meniscus. Avoid the full pose until cleared. As a substitute that targets similar muscles without loading the knee, try the hip abductor stretch or a reclined version with pillows fully supporting the knees.
- SI joint pain. The asymmetric external rotation can aggravate sacroiliac joint dysfunction in some people. Try the reclined butterfly first (the back is fully supported, which often eliminates the SI provocation). If pain persists, swap for the glute bridge to mobilize the hips from a different position.
- Late pregnancy (third trimester). The deep forward fold variation is uncomfortable or unsafe as the belly grows. Stick with the upright seated version, sit on a higher elevation (folded blanket or bolster), and skip the fold entirely. The reclined variation may also feel unstable late in pregnancy. Consult a prenatal yoga instructor for individualized cues.
- Lower back pain that worsens with seated postures. If sitting on the floor with a tall spine is itself painful, butterfly pose isn't the right entry point. Build seated tolerance with cat-cow and bird-dogs first to mobilize the spine and engage the deep core, then return to butterfly pose with hips elevated on a block.
- Hypermobility or connective tissue disorders. If you already have excessive hip range of motion, passive stretching can encourage joint instability. Focus on muscular engagement at the limit of your active range instead of pushing for deeper passive depth. Pair butterfly pose with glute bridges and squats to build strength through the hip range you have.
Related Exercises
If butterfly pose is part of your routine, these movements complement or extend the same training pattern:
- Same hip-opening pattern (more advanced): Royal pigeon pose targets the deep external rotators (piriformis, obturator group) more aggressively, useful once butterfly feels easy and you want a deeper hip opener.
- Active version of the same position: Butterfly reach adds a controlled forward hinge and arm extension to engage the core through the same hip position, blending mobility with active stability.
- Inner-thigh mobility from a different angle: Hip abductor stretch targets the same adductor group from a standing or side-lying position, useful as a warm-up before lower-body training.
- Hip mobility prep: Cat-cow mobilizes the spine and pelvis through flexion and extension, a useful warm-up before any seated hip opener.
- Strengthen what you've stretched: Glute bridges build the posterior chain that balances the front-of-hip opening butterfly creates, preventing the common imbalance where mobility outpaces strength.
- Full hip range pair: Squats use the hip mobility butterfly builds in a loaded, functional pattern. Pairing them in the same session links passive range to active control.
How to Program Butterfly Pose
Butterfly pose isn't a resistance exercise, but it still benefits from structured programming. The ACSM Position Stand on resistance training (Ratamess et al., 2009) frames flexibility work as a complementary stimulus to strength training, ideally programmed daily or near-daily because connective tissue responds to frequent, low-intensity loading. Hold times should be long enough for the stretch reflex to settle (typically 30 seconds or longer), with multiple sets to accumulate tissue exposure.
| Level | Hold time × Sets | Rest between sets | Frequency |
|---|---|---|---|
| Beginner (supported, hips elevated) | 15–30 seconds × 2–3 sets | 30–60 seconds | 3–5 sessions/week |
| Intermediate (standard or reclined) | 30–60 seconds × 2–3 sets | 30–60 seconds | 4–6 sessions/week |
| Advanced (forward fold, deeper holds) | 60–120 seconds × 3–5 sets | 30–60 seconds | 5–7 sessions/week |
Where in your workout: butterfly pose fits in three contexts. As a warm-up before lower-body training, use a shorter, lighter version (1 to 2 sets of 30 seconds) to open the hips without sedating the nervous system. As a cool-down after any workout, use longer holds (60 seconds or more) when the tissue is warm and most receptive. As a standalone mobility session (especially evening or pre-bed), pair butterfly pose with other hip openers like royal pigeon and cat-cow for a 10 to 15 minute restorative sequence.
Form floor over hold-time targets: if your spine is rounding or your knees are forcing past your current range, shorten the hold rather than push through. Two clean 30-second sets beat one collapsed 90-second set. Adaptation comes from quality time under tension, not white-knuckled depth.
How FitCraft Programs This Pose
Knowing how to do butterfly pose is step one. Knowing when to do it, how long to hold, and how to layer it with other mobility work is where most people get stuck.
FitCraft's AI coach Ty handles that. During your personalized diagnostic, Ty maps your mobility, goals, and available equipment. Then Ty builds a personalized program that slots butterfly pose into flexibility and recovery sessions at the right variation and hold time for your level.
As your hip mobility improves, Ty adjusts the variation and hold time to match your level. Supported becomes standard. Standard becomes forward fold. Hold times extend as your tissue tolerance grows. Every program is designed by an Ivy League-trained exercise scientist and NSCA-certified strength coach using evidence-based principles, then adapted to you by the AI.
Frequently Asked Questions
Can I do butterfly pose if I have groin pain or a groin strain?
If you have acute groin pain or a recent adductor strain, skip the butterfly pose until the pain settles. The pose loads exactly the muscles that are injured (adductor longus, adductor brevis, gracilis), and stretching irritated tissue prolongs healing. Once the acute pain passes, return with the supported variation: place yoga blocks or folded towels under each knee so the adductors are barely on stretch, and only hold for 15 to 20 seconds. Progress depth and duration over weeks, not days. If the pain is sharp or lingers beyond two weeks, see a physical therapist before resuming.
What muscles does the butterfly pose stretch?
The butterfly pose primarily stretches the hip adductors (inner thighs), including the adductor longus, adductor brevis, and gracilis. It also opens the hip flexors, stretches the groin, and gently engages the pelvic floor muscles and lower back. The seated version with a forward fold adds a stretch to the erector spinae along the lower back.
How long should I hold the butterfly pose?
Hold the butterfly pose for 30 seconds to 2 minutes per set. Beginners should start with 30-second holds and gradually increase duration as hip flexibility improves. For best results, practice 3 to 5 times per week. Consistency matters more than duration. Two minutes of daily practice produces better results than a single long session once a week.
Why can't I get my knees to the floor in butterfly pose?
Tight hip adductors and limited hip external rotation are the most common reasons your knees stay elevated during the butterfly pose. Bone structure also plays a role. Your hip socket shape affects your maximum range of motion, and this varies person to person. Do not force your knees down. Practice consistently with gentle gravity-assisted stretching and your range will gradually improve over weeks.
Is butterfly pose good for lower back pain?
The butterfly pose can help relieve lower back pain by stretching the hip adductors and improving hip mobility. Tight hips often contribute to lower back tension because the pelvis gets pulled out of alignment. By opening the hips, the butterfly pose can reduce compensatory stress on the lumbar spine. But if the pose itself causes back pain, sit on a cushion to elevate your hips and avoid rounding your spine.
Can I do the butterfly stretch every day?
Yes. The butterfly pose is a low-intensity static stretch that is safe to perform daily. Daily practice is ideal for improving hip flexibility because connective tissue responds best to frequent, gentle loading. Just avoid forcing your knees down or bouncing, as ballistic stretching can cause muscle strain. Listen to your body and back off if you feel sharp pain rather than a gentle pull.