Downward dog is one of the most recognized yoga poses on the planet. It's also one of the most butchered. Walk into any yoga class and you'll see rounded backs, scrunched shoulders, white-knuckled grips, and people grinding their heels into the mat at the expense of everything else. That's not downward dog. That's just suffering upside down.
Most people miss the real point. Downward dog is a full-body position that strengthens your shoulders, arms, and core while lengthening your entire posterior chain. The shoulder demand is real: a 2015 study in the Journal of Bodywork and Movement Therapies measured shoulder muscle activation during common yoga poses and found that downward dog produced deltoid and rotator cuff engagement comparable to moderate-intensity resistance exercises (Longpre et al., 2015). Holding this pose correctly is real work. If it feels easy, something is off.
Whether you use it as a rest pose between vinyasa flows or as a standalone strength and flexibility exercise, this guide covers the real technique, the mistakes that make it useless (or painful), and how to progress from modified versions through to one-leg holds that will have your arms shaking.
Quick Facts: Downward Dog
- Equipment needed: None (yoga mat optional)
- Difficulty: Beginner (wall variation) to Intermediate (full pose)
- Modality: Yoga · Isometric hold · Mobility
- Body region: Full body (shoulder-dominant, posterior-chain stretch)
- FitCraft quest category: Yoga / Mobility
Muscles Engaged & Stretched
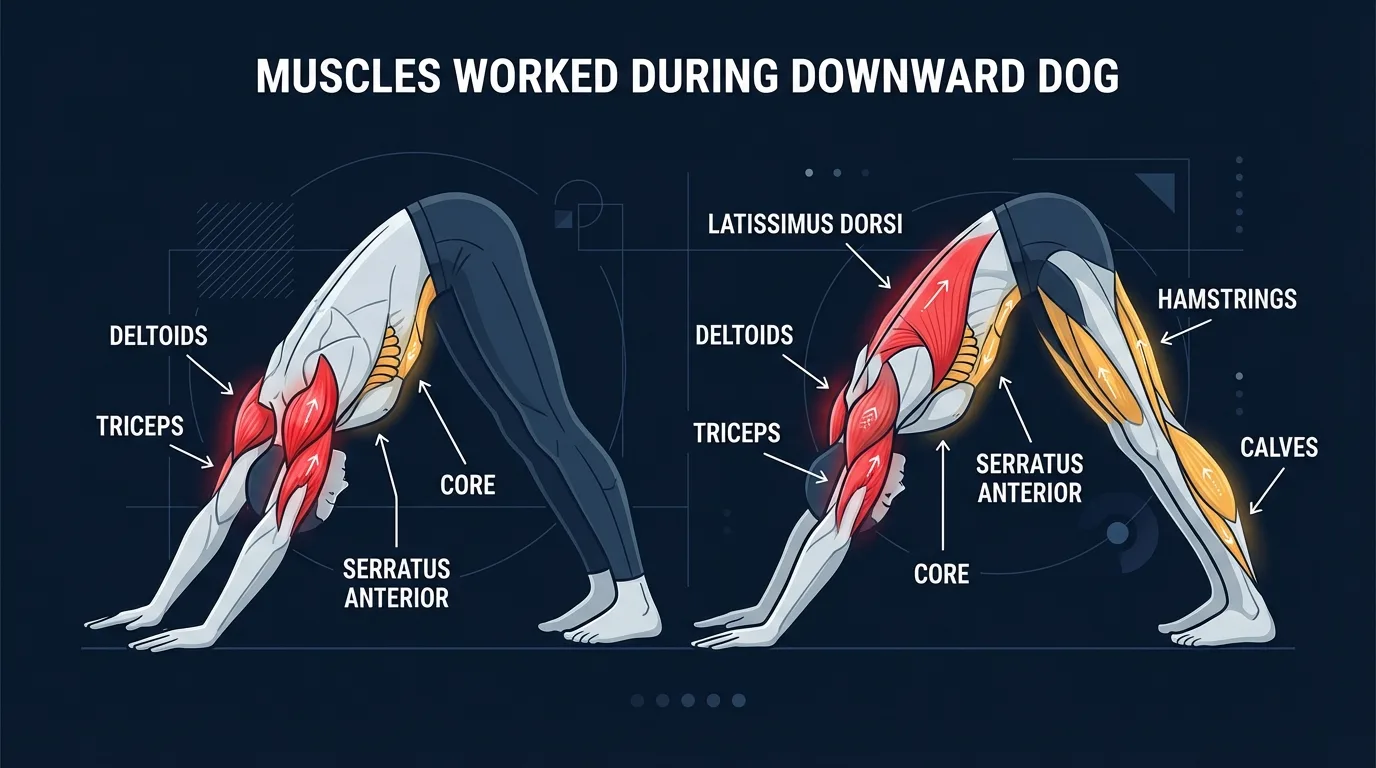
Primary movers (working isometrically): the anterior and middle deltoids, latissimus dorsi, and triceps brachii. These muscles hold the shoulder girdle in flexion and elbow extension against bodyweight. They don't shorten and lengthen the way they would in a press, but they fire continuously to maintain the inverted V.
Secondary movers: the serratus anterior protracts the scapula at the top of the hold (the "push the floor away" cue), the rotator cuff (especially the infraspinatus and teres minor) stabilizes the glenohumeral joint, and the pectoralis major contributes to shoulder flexion under load.
Stabilizers: the entire anterior and posterior core (rectus abdominis, transverse abdominis, obliques, erector spinae) holds the spine long and neutral. The deep hip stabilizers (gluteus medius, piriformis) prevent hip drift. The breath is also a stabilizer: diaphragmatic breathing supports both the working muscles and the posterior-chain stretch.
What gets stretched: the hamstrings, gastrocnemius and soleus (calves), and the spinal extensors lengthen passively under bodyweight as the hips drive up and back. Heel position depends on individual ankle dorsiflexion and Achilles tendon length, not effort.
Evidence on shoulder demand: Longpre et al. (2015) measured shoulder muscle activation during common yoga poses and found that downward dog produced significant deltoid, rotator cuff, and scapular stabilizer activation, with levels comparable to moderate-intensity resistance exercises. That is why a clean downward dog hold feels like a workout in the shoulders on top of a stretch in the legs.
Step-by-Step: How to Perform Downward Dog
The cues below apply to the full pose. If you cannot hold a flat spine, regress to the wall variation or puppy pose described later and come back here when your shoulders and hamstrings catch up.
Step 1: Start on All Fours
Hands shoulder-width apart, fingers spread wide. Knees hip-width apart, stacked right under your hips. Your wrists sit directly under your shoulders. Press your entire palm into the mat across the whole hand. This is your launch position.
Coach Ty's cue: "Spread your fingers wide and grip the mat. Press through every knuckle and finger pad, distributing load across the whole hand."
Step 2: Tuck Your Toes and Lift Your Hips
Curl your toes under, exhale, and push the floor away to lift your knees off the ground. Send your hips up and back. Think about pushing the mat toward the wall behind you. Your body starts forming an inverted V. Keep your knees soft here. Don't lock them out yet.
Ty's cue: "Push the floor away. Don't just hang in your shoulders. Active press, not passive collapse."
Step 3: Lengthen Your Spine
This is the part everyone skips. Press your chest gently toward your thighs. Your ears should be between your upper arms, not in front of them. The goal is a long, straight line from your wrists through your shoulders to your tailbone. If your back is rounding, bend your knees more. A flat back with bent knees beats a rounded back with straight legs. Every single time.
Ty's key cue: "Bend your knees as much as you need to keep a flat, long back. Hamstrings open up over time. A rounded spine does not fix itself."
Step 4: Work Your Legs Gradually
If your hamstrings have the range, start straightening your legs and sinking your heels toward the floor. Your heels do not need to touch the ground. Some people's anatomy means their heels will never touch, and that is completely fine. Never sacrifice your spinal length to chase the floor with your heels.
Ty's cue: "Roll your biceps slightly forward to externally rotate the shoulders. Shoulder blades draw down the back, away from the ears."
Step 5: Hold and Breathe
Hold for 5-10 full breaths. On each exhale, press your hands firmly into the mat and draw your shoulder blades down your back. On each inhale, lengthen through the spine like someone is pulling your tailbone toward the ceiling. To come out, bend your knees and lower back to tabletop.
Ty's reminder: "If your shoulders are shrugging up near your ears, you're collapsing. Reset, press through the hands, and draw the shoulder blades back down."
Get this exercise in a personalized workout
FitCraft, our mobile fitness app, uses its AI coach Ty to program yoga poses like this into your plan at the right hold time and frequency, based on your flexibility, level, and goals. Ty was designed and trained by Domenic Angelino, MPH (Brown University) and NSCA-CSCS, with research published in the Journal of Strength and Conditioning Research and Medicine & Science in Sports & Exercise.
Take the Free Assessment Free · 2 minutes · No credit card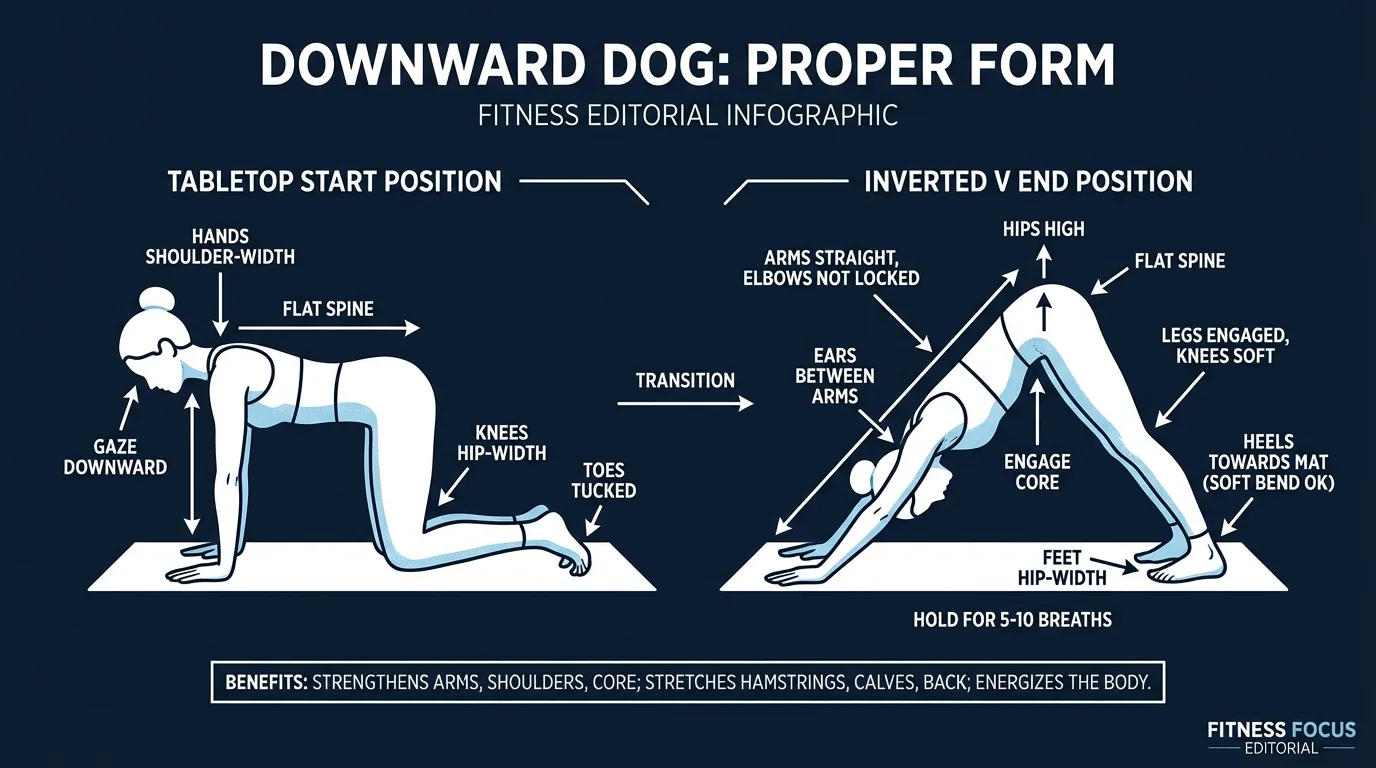
Common Mistakes (and How to Fix Them)
Downward dog looks simple. Inverted V, right? But a handful of mistakes turn it from a powerful full-body position into a waste of time or a path to shoulder problems.
- Rounding the upper back. Most common mistake. It's almost always caused by tight hamstrings pulling the pelvis under, which rounds the lower back and collapses the upper back with it. The whole V flattens into a U. Fix: bend your knees until your spine is completely flat. Spinal alignment matters more than straight legs.
- Dumping weight into the wrists. If your wrists scream at you, you're probably loading all your weight onto the heel of your hand with passive fingers. Spread your fingers, press through every knuckle, grip the mat slightly with your fingertips. Distribute the load across your entire hand so the wrist crease isn't taking the brunt.
- Shoulders creeping up to the ears. This happens when people get tired or lose focus. The shoulders hike up toward the ears, compressing the joint and shrinking the space the rotator cuff needs. Keep actively pressing the mat away and pulling your shoulder blades down your back. If you can't maintain it, rest in child's pose and come back.
- Forcing heels to the floor. Your heel position depends on calf flexibility, Achilles tendon length, and ankle dorsiflexion. Those things vary enormously between people. Forcing your heels down usually means you're shifting weight backward, losing the hand press, and compromising your spine. Let your heels be where they are. They'll get closer over months of consistent practice.
- Hands too close together. Narrow hand placement crowds the shoulders and limits how far back you can drive your hips. Hands should track directly under (or very slightly wider than) your shoulders, with fingers spread wide for grip and stability.
Downward Dog Variations: Regressions and Progressions
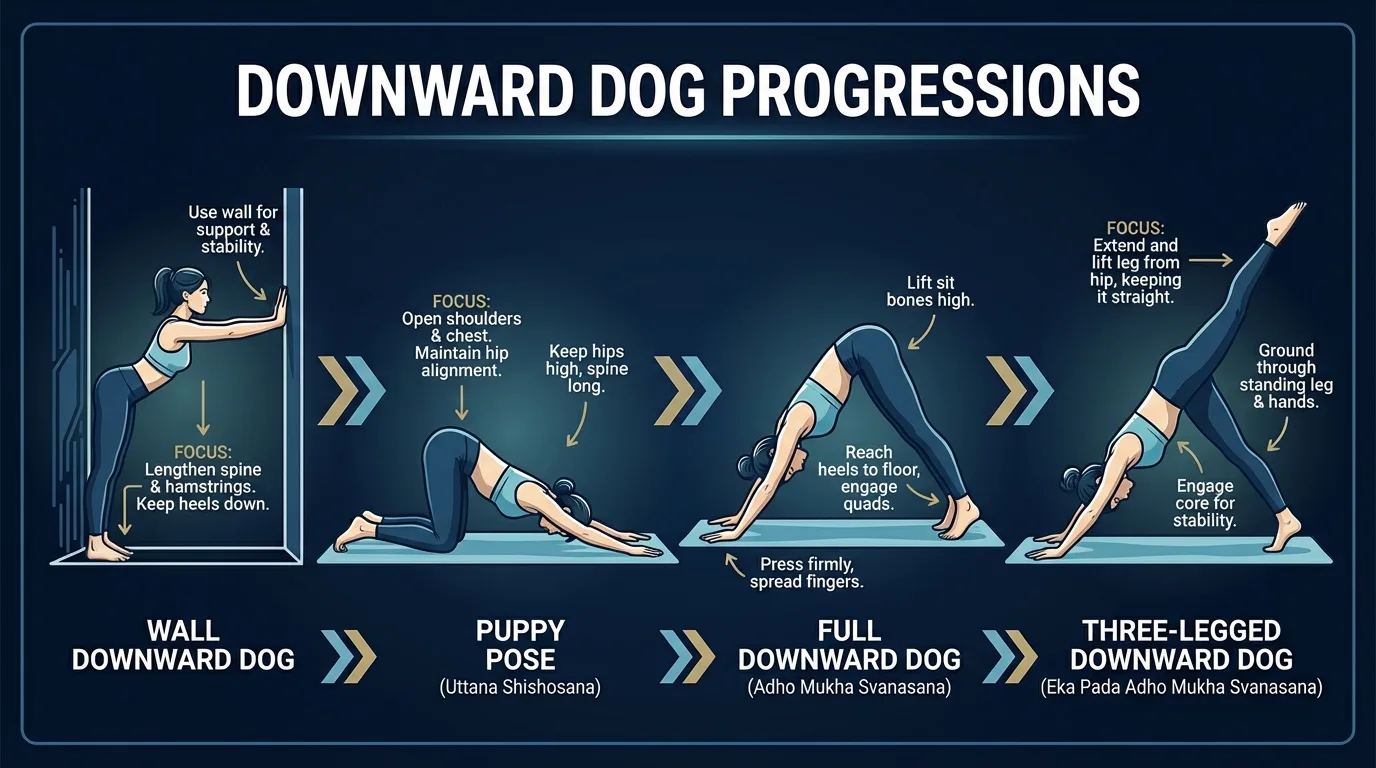
Wall Downward Dog (Beginner Regression)
Place your hands on a wall at hip height instead of the floor. Walk your feet back until your torso is roughly parallel to the ground. This removes the wrist pressure and cuts the shoulder strength demand way down, but it still teaches you the spinal alignment and hip hinge pattern you need. If regular downward dog feels overwhelming, start here for two weeks.
Puppy Pose / Half Downward Dog (Beginner Regression)
From tabletop, walk your hands forward while keeping your hips stacked over your knees. Your chest melts toward the floor, arms extend. It's the upper-body stretch of downward dog without the hamstring or weight-bearing demand. Great for building shoulder mobility before tackling the full pose.
Standard Downward Dog (Intermediate)
The full pose described in the step-by-step. Hold for 5-10 breaths with a flat spine, soft or straight knees as your flexibility allows, and a continuous press through both hands.
Three-Legged Downward Dog (Advanced Progression)
From full downward dog, lift one leg straight up toward the ceiling while keeping your hips level. This increases the balance demand, core engagement, and shoulder loading on the grounded side significantly. Keep the standing leg strong and don't let your hip open. Alternate legs for equal work. This one sneaks up on you. Your arms will be shaking by the third hold.
When to Avoid or Modify Downward Dog
Downward dog is safe for most healthy adults, but a few conditions warrant modification or substituting easier variations. None of these are permanent restrictions. They're starting points. Always consult your physician or physical therapist for personalized guidance.
- Wrist pain, carpal tunnel, or wrist arthritis. The pose loads the wrists at roughly 90 degrees of extension. Spread your fingers wide and grip the mat to distribute the load. Yoga blocks under the heels of your hands reduce wrist extension. Wall downward dog and puppy pose remove most of the wrist demand. If pain persists, substitute with forearm-based poses or see an occupational therapist.
- Acute shoulder impingement or rotator cuff irritation. The shoulder flexion under bodyweight can compress the supraspinatus tendon. Use wall downward dog to reduce load, keep ears between the upper arms (not the shoulders shrugging up), and work only within a pain-free range. Build the prerequisite shoulder stability with the rotator cuff stretch and shoulder rolls before returning to the full pose.
- Late pregnancy (second and third trimesters). The inverted position can become uncomfortable as the abdomen grows, and the mild head-below-heart position is not recommended in later pregnancy. Substitute with a modified table-top stretch or work with a prenatal yoga instructor. Always consult your obstetrician.
- Uncontrolled hypertension, glaucoma, or recent eye surgery. Downward dog is a mild inversion. The head sits below the heart, which raises intracranial and intraocular pressure. If you have uncontrolled high blood pressure, glaucoma, retinal issues, or recent eye surgery, get medical clearance before practicing. Substitute with a tabletop spinal stretch or puppy pose at floor level.
- Vertigo or active balance disorders. The head-down position can trigger vertigo in some people. Start with wall downward dog and practice near a wall in case of dizziness. If symptoms appear during the hold, come out immediately and rest in child's pose.
- Recent shoulder, wrist, or spinal surgery. Get clearance from your surgeon. Most post-surgical protocols start with much smaller ranges and progress through wall and puppy variations before the full pose. The plank-to-down-dog transition in particular demands significant shoulder stability that takes time to rebuild.
Related Exercises
Downward dog sits inside a family of yoga poses and supporting movements. These extend or complement the same shoulder, core, and posterior-chain pattern:
- Similar yoga poses (shoulder + posterior chain): Cobra pose and Warrior pose build complementary shoulder and spinal patterns that pair well with downward dog in a flow.
- Easier yoga regression: Cat-cow teaches the spinal articulation and shoulder press pattern at floor level with zero hamstring demand, useful as a warm-up or as a substitute on tight days.
- Mobility prep (hamstrings and shoulders): the hip abductor stretch, tricep and lat stretch, and wrist stretch open the prerequisite ranges so the full pose stops feeling like a fight.
- Core foundation for the held position: Hand planks and forearm planks build the bracing pattern downward dog relies on, useful if your hips drop or your spine rounds under the hold.
- Shoulder strength carry-over: Pike push-ups use the same hip-high position to load the shoulders dynamically, a natural strength progression for anyone who can hold a clean downward dog for 60+ seconds.
How to Program Downward Dog
Downward dog programs differently from a typical resistance exercise. The stimulus is isometric endurance and mobility, not progressive overload, so frequency can be much higher. That said, the same evidence-based progression principles for sets, holds, and rest still apply (Ratamess et al., 2009).
| Level | Hold time × Sets | Rest between holds | Frequency |
|---|---|---|---|
| Beginner (wall or puppy pose) | 15-30 sec (3-5 breaths) × 1-2 holds | 30-60 seconds in child's pose | 3-5 sessions/week |
| Intermediate (full pose) | 30-60 sec (5-10 breaths) × 2-3 holds | 30-60 seconds in child's pose | 4-6 sessions/week |
| Advanced (full pose or three-legged) | 60-90+ sec (10-15+ breaths) × 3-5 holds | 30-60 seconds in child's pose | 5-7 sessions/week |
Where in your workout: downward dog fits in three contexts. As part of a standalone yoga session, it sequences naturally between sun salutations and standing poses. As a warm-up before training, 1-2 holds mobilize the shoulders, hamstrings, and calves before the workout starts. As a cool-down, longer holds decompress the spine and downregulate the nervous system after strength or conditioning work. Because the muscle damage is low, daily practice is fine for most people. Listen to your shoulders. If they're fatigued from heavy pressing the day before, take an off day or go to the wall variation.
Form floor over hold targets: if your spine rounds, your shoulders shrug, or your form starts to break in the last 30 seconds of a hold, stop the set there. Hitting a 90-second target with broken form trains nothing useful. Quality holds beat long ugly ones every time.
How FitCraft Programs This Exercise
Knowing how to do downward dog is step one. Knowing when to use it, how long to hold it, and which variation matches your current flexibility is where most people get stuck.
FitCraft's AI coach Ty handles that. During the personalized diagnostic, Ty maps your flexibility, shoulder stability, and goals, then slots downward dog into a balanced plan at the right variation for your level. Ty's 3D demonstrations show the exact alignment from multiple angles, which makes the form click faster than reading about it.
As your flexibility and shoulder strength improve, Ty adjusts the variation and hold time to match your level. Wall becomes puppy. Puppy becomes the full pose. Longer holds and three-legged variations get layered in as you progress.
Frequently Asked Questions
What muscles does downward dog work?
Downward dog primarily strengthens the deltoids, latissimus dorsi, and triceps while stretching the hamstrings, calves, and spinal extensors. The core (rectus abdominis, obliques, erector spinae) works isometrically to maintain the inverted V position. The serratus anterior and rotator cuff stabilize the shoulder girdle. It is both a strengthening and stretching exercise simultaneously.
Why can't I get my heels to the floor in downward dog?
Tight hamstrings and calves are the most common reason your heels do not reach the floor in downward dog, and that is completely normal. Heel position depends on your individual anatomy, including your Achilles tendon length and ankle dorsiflexion range. Focus on a long, flat spine instead of forcing your heels down. Over weeks of consistent practice, your flexibility will improve.
How long should I hold downward dog?
For general practice, hold downward dog for 5-10 full breaths (roughly 30-60 seconds). Beginners can start with 3-5 breaths and build from there. In a yoga flow or vinyasa sequence, you may hold it for just 1-2 breaths as a transitional pose. The key is maintaining proper form for the entire hold, not duration for its own sake.
Is downward dog good for beginners?
Downward dog is technically an intermediate pose because it requires baseline shoulder strength, hamstring flexibility, and core stability. But beginners can practice it using modifications: bend the knees, place hands on an elevated surface, or start with wall downward dog and puppy pose. FitCraft's AI coach Ty provides real-time form cues to help beginners learn the correct alignment from day one.
Can I do downward dog if I have wrist pain or carpal tunnel?
Downward dog loads the wrists at roughly 90 degrees of extension, which can aggravate carpal tunnel, wrist strain, or arthritic wrists. Spread your fingers wide and press through every knuckle to distribute the load. Wall downward dog or puppy pose remove most of the wrist demand. If pain persists, use yoga blocks under the heels of your hands to reduce wrist extension, or substitute with forearm-based poses. See a physical therapist or occupational therapist if symptoms continue beyond a week.