Here's a question most people never think about: why do some arms look thick from every angle while others only look big from the front? The answer is usually the brachialis. And the fastest way to train it is hammer curls.
The hammer curl is a dumbbell curl variation where your palms face each other (neutral grip) instead of facing up. That one change in wrist position shifts the workload away from the biceps brachii and toward the brachialis and brachioradialis. The brachialis sits underneath the biceps, so when it grows, it pushes the biceps up and out, making the whole arm look thicker.
And hammer curls just feel better for a lot of people. The neutral grip keeps the wrist in a stronger, more natural position. If regular curls bother your wrists or elbows, hammer curls are usually the fix. Plus, you can typically go a bit heavier because the neutral grip is biomechanically stronger. More load, less joint stress. That's a good trade.
Quick Facts: Hammer Curl
- Equipment needed: Pair of dumbbells
- Difficulty: Beginner to Advanced
- Modality: Strength (isolation)
- Body region: Upper body (arms)
- FitCraft quest category: Strength
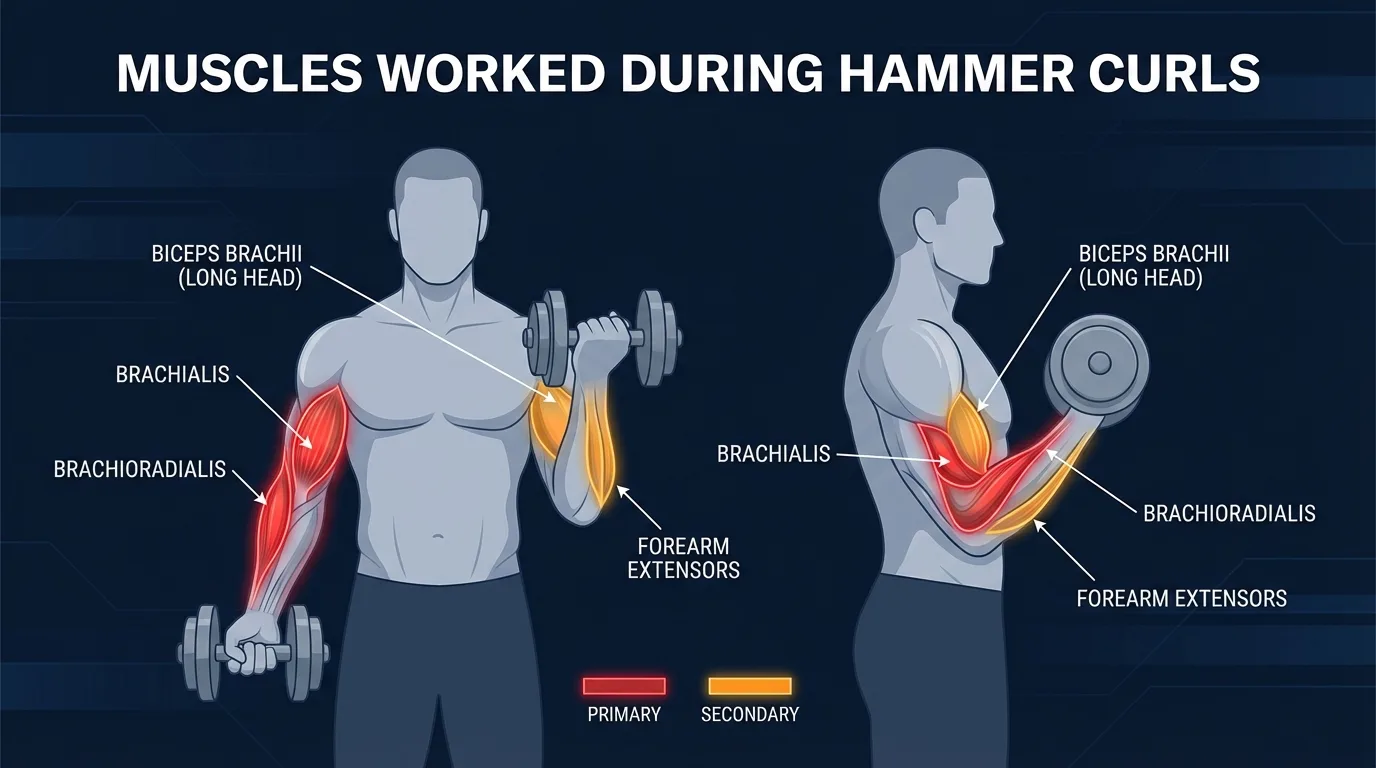
Muscles Worked
Primary movers: the brachialis (the deep elbow flexor that sits underneath the biceps) and the brachioradialis (the thick muscle that runs along the top of the forearm). The neutral grip puts both muscles in a mechanically dominant position. They shorten on the way up (concentric phase) and lengthen under tension on the way down (eccentric phase), which is what produces the strength and hypertrophy stimulus.
Secondary movers: the long head of the biceps brachii contributes meaningful work because the grip keeps it loaded across the shoulder joint, and the forearm extensors fire isometrically to hold the dumbbell against gravity. This is why hammer curls also build grip strength over time.
Stabilizers: the shoulder girdle (deltoids, rotator cuff, scapular retractors) holds the upper arm pinned to the side throughout every rep, and the core (rectus abdominis, transverse abdominis, obliques) braces against the load to prevent torso sway. The trunk is not actively loaded, but it has to stay neutral or the form breaks down.
Why neutral grip biases the brachialis: Marcolin et al. (2018) measured electromyographic activity across curl variations in the Journal of Sports Science and Medicine and found that the neutral-grip hammer curl significantly increases brachialis and brachioradialis activation compared to the supinated (palms-up) curl. The mechanism is straightforward: the biceps brachii is a strong supinator of the forearm, so when the grip is supinated, the biceps does more of the work. Neutralize the grip and the brachialis and brachioradialis pick up the slack. That's the whole point of the exercise.
Step-by-Step: How to Perform a Hammer Curl
Whether you're standing, seated, or alternating arms, the movement pattern is the same. The cues below apply to all variations.
Step 1: Stand with Dumbbells at Your Sides
Feet shoulder-width apart, a dumbbell in each hand. Arms hanging naturally at your sides with palms facing your thighs. That's the neutral grip. Thumbs point forward, knuckles face out. Shoulders back and down, core braced. Don't shrug. Don't lean forward. Just stand tall.
Coach Ty's cue: "Thumbs point forward, palms face each other. That's the hammer position. Hold it there before you move."
Step 2: Curl the Dumbbells Up
Keeping your upper arms pinned to your sides, curl both dumbbells up toward your shoulders. Maintain that neutral grip the entire way up. Thumbs stay on top. Palms face each other. If your wrists start rotating even slightly, you're turning it into a regular curl. Stay neutral.
Ty's key cue: "Elbows glued to your ribs. If they drift forward, you're cheating with your front delts." Elbow drift is the number one form error on hammer curls.
Step 3: Squeeze at the Top
Pause for a one-count when your forearms are roughly vertical. Squeeze hard. The dumbbells should be near your shoulders but not resting against them. If the weights touch your shoulders, you've curled too far and lost tension on the muscle. Back it off half an inch.
Ty's cue: "Squeeze at the top like you're crushing a walnut between your bicep and your forearm."
Step 4: Lower Under Control
Slowly lower the dumbbells back to the starting position. Take 2 to 3 seconds. Full extension at the bottom. Don't let the weights swing or drop. The lowering phase is where the brachialis gets its best stimulus. Rushing through it is leaving muscle on the table.
Ty's cue: "Two seconds down, minimum. The negative is where the brachialis grows."
Step 5: Reset and Repeat
Check that your upper arms are still at your sides, wrists are neutral, and you're standing tall. Breathe out on the curl, in on the descent. Beginners: 3 sets of 10 to 12 reps with a weight that challenges the last 2 to 3 reps.
Ty's reminder: "If your torso is rocking, the weight is too heavy. Drop it 5 pounds and try again."
Get this exercise in a personalized workout
FitCraft, our mobile fitness app, uses its AI coach Ty to program isolation exercises like this into your plan at the right volume and intensity, based on your level, goals, and equipment. Ty was designed and trained by Domenic Angelino, MPH (Brown University) and NSCA-CSCS, with research published in the Journal of Strength and Conditioning Research and Medicine & Science in Sports & Exercise.
Take the Free Assessment Free · 2 minutes · No credit card
Common Mistakes (and How to Fix Them)
Here are the mistakes Ty corrects most often during hammer curl sets.
- Swinging the weight up. Using momentum from your hips and torso to heave the dumbbells up removes the load from the target muscles. Fix: stand against a wall with your shoulder blades and glutes touching it. If you can't complete the rep without your body pulling away from the wall, the weight is too heavy. Drop it 5 to 10 lbs.
- Elbows drifting forward. When your elbows creep in front of your torso during the curl, the front delt starts assisting and the brachialis gets less work. Fix: elbows stay directly under your shoulders throughout the entire rep. They go nowhere. Film yourself from the side if you're not sure.
- Wrist rotation. Any supination (turning palms up) shifts the emphasis to the biceps brachii and defeats the purpose of the hammer curl. Fix: watch your thumbs. They should point straight at the ceiling throughout the curl. If they rotate outward, you're supinating.
- Going too heavy too soon. Hammer curls allow slightly heavier loads than regular curls, but that doesn't mean you should jump 10 lbs. The brachialis is a smaller muscle than the biceps. Overloading it leads to compensatory patterns (swinging, elbow drift) that remove it from the equation anyway. Start moderate. Progress in 2.5 to 5 lb increments.
- Partial range of motion at the bottom. Not extending fully at the bottom shortens the stretch on the brachialis and reduces the stimulus. Fix: every rep starts and ends with the dumbbell at thigh level, arm fully extended. If you're maintaining a bend to "keep tension," you're just making the exercise easier.
- Rushing the eccentric. The brachialis responds really well to eccentric loading. 2 to 3 seconds down, minimum. If you're dropping the dumbbells and catching them at the bottom, you're losing half the exercise.
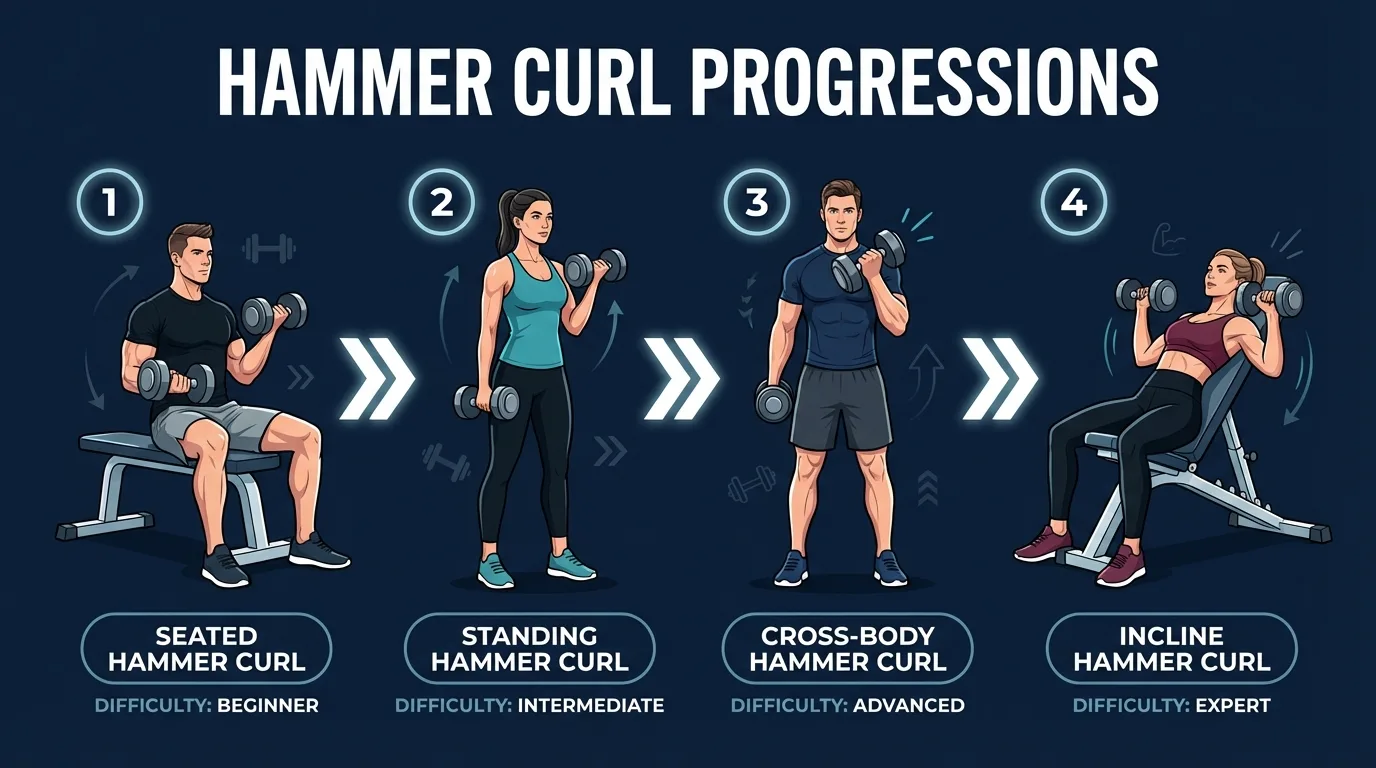
Hammer Curl Variations: From Seated to Incline
Start where your form is strong and progress as your strict-form rep count climbs.
Seated Hammer Curl (Beginner)
Sit on a bench with back support and perform the same movement. Seated curls eliminate any possibility of momentum from your legs and hips, which forces the arms to do all the work. This is a great option if you catch yourself swaying during standing hammer curls. Use 10 to 15% less weight than standing.
Standing Alternating Hammer Curl (Beginner-Intermediate)
Curl one arm at a time while the other holds the dumbbell at your side. This lets you focus on each arm individually, which is useful for spotting and fixing left-right strength imbalances. It also doubles the time each arm spends under tension per set. Just make sure you don't lean toward the curling arm. Stay centered.
Cross-Body Hammer Curl (Intermediate)
Instead of curling straight up, curl the dumbbell across your body toward the opposite shoulder. This shifts even more emphasis onto the brachialis and adds a small amount of forearm pronation work. It's a subtle variation, but if you've plateaued on standard hammer curls, cross-body curls can break the stall. Use the same weight or slightly less.
Incline Hammer Curl (Advanced)
Set a bench to 45 to 60 degrees, sit back, and let your arms hang straight down. Curl from this stretched position. The incline pre-stretches the long head of the biceps and brachialis, increasing the range of motion and the demand at the bottom of the curl. This variation is significantly harder. Drop the weight 20 to 30% compared to standing.
Zottman Curl (Advanced Hybrid)
Curl up with a supinated grip (palms up), rotate to pronated at the top (palms down), and lower with the pronated grip. The pronated eccentric hammers the brachioradialis and forearm extensors. It's a hammer curl cousin that adds significant forearm work in a single rep.
When to Avoid or Modify Hammer Curls
Hammer curls are safe for most healthy adults, but a few conditions warrant modification or a temporary swap to a lighter variation. None of these are permanent restrictions. They're starting points. Always consult your physician or physical therapist for personalized guidance.
- Bicipital tendinopathy or distal biceps tendinosis. Inflammation at the biceps tendon (proximal at the shoulder or distal at the elbow) will be aggravated by curl variations. Hammer curls are usually better tolerated than supinated curls because the neutral grip reduces strain on the bicipital tendon, but they still load the elbow flexors. Drop to a very light load (5 to 10 lbs), work in a pain-free range, slow the eccentric to 3 to 4 seconds, and stop the set the moment symptoms increase.
- Lateral epicondylitis ("tennis elbow") or medial epicondylitis ("golfer's elbow"). The brachioradialis and forearm flexors that hammer curls load attach near the elbow epicondyles. If you have active epicondylitis, stop the set the moment symptoms increase and consider switching to chin-ups or a row variation that loads the elbow flexors with less direct insertion stress.
- Carpal tunnel syndrome or active wrist pain. The neutral grip is friendlier to the wrist than the supinated grip of regular curls, but holding a heavy dumbbell still loads the carpal tunnel. Use lighter weights, higher reps (15 to 20), and grip the dumbbell deeper in the palm to reduce wrist strain. If symptoms persist, see a hand specialist or physical therapist.
- Recent shoulder, elbow, or wrist surgery. Get clearance from your surgeon before any loaded curl variation. Most post-surgical protocols start with isometric scapular work and active range-of-motion drills before introducing dumbbell loading on a controlled timeline.
- Lower-back pain that worsens when standing under load. If standing hammer curls flare your lower back (often a sign of poor bracing or excessive lordosis), switch to the seated variation with back support. Rebuild bracing strength with forearm planks, deadbugs, and bird-dogs before returning to standing.
Related Exercises
If hammer curls are part of your routine, these movements complement or extend the same training pattern:
- Same target muscle (other curl variants): Bicep Curls (supinated grip) emphasize the biceps brachii peak, the natural complement to hammer curls. Zottman Curl combines a supinated concentric with a pronated eccentric to hit the brachioradialis hard.
- Forearm-specific work: Drag Curl keeps the elbows pulled back and biases the long head of the biceps. Twist Curl rotates the wrist mid-rep and adds supination work.
- Compound pulls that include the brachialis: Chin-Ups are the ultimate compound brachialis builder, training the same muscles hammer curls target plus the entire back. Bent-Over Rows load the brachialis isometrically through every rep.
- Antagonist isolation (pair pushes with pulls): Tricep Extensions and Tricep Kickbacks balance the elbow flexor work with elbow extension. Supersetting the two is a classic arm-day pattern.
- Shoulder and scapular health: W-Raise, Y-Raise, T-Raise, and Pull-Apart work the rotator cuff and scapular retractors that stabilize the shoulder during curl variations.
How to Program Hammer Curls
Hammer curl programming follows the same evidence-based ranges as any single-joint isolation exercise. The American College of Sports Medicine (ACSM) Position Stand on resistance training recommends moderate-to-high rep ranges for isolation work, with shorter rest periods than compound lifts and frequency of 2 to 4 sessions per week per muscle group (Ratamess et al., 2009).
| Level | Sets × Reps | Rest between sets | Frequency |
|---|---|---|---|
| Beginner (seated, light load) | 2–3 × 10–15 | 45–60 seconds | 2–3 sessions/week |
| Intermediate (standing or alternating) | 3–4 × 8–12 | 60–90 seconds | 2–3 sessions/week |
| Advanced (cross-body, incline, heavier loads) | 3–4 × 6–12 (intensity-dependent) | 60–120 seconds | 2–4 sessions/week |
Where in your workout: Hammer curls belong late in the session, after compound pulling work like chin-ups, bent-over rows, or pull-downs. Isolation work is accessory. Doing it first will fatigue the elbow flexors and underload your main compound lifts. Pair hammer curls with a supinated curl variation (alternating sets or supersets) for complete biceps and brachialis development. On a "pull day" or "arm day" split, place them after the main pulling block.
Form floor over rep targets: if your last 2 reps of a set break form (elbow drift, torso sway, wrist rotation), stop the set there. Hitting a target rep count with broken form trains compensation patterns, not the brachialis.
How FitCraft Programs This Exercise
Knowing how to do a hammer curl is step one. Knowing when to do it, which variation fits your level, and how much weight to use is where most people get stuck.
FitCraft's AI coach Ty handles that. During your personalized diagnostic assessment, Ty maps your fitness level, goals, and available equipment. Then Ty builds a personalized program that slots hammer curls into a balanced training plan at the right variation for your level.
As you get stronger, Ty adjusts the variation and volume to match your level. Seated becomes standing. Standing pairs with cross-body or incline. Volume adjusts based on your recovery and consistency. Every program is designed by an Ivy League-trained exercise scientist and NSCA-certified strength coach using evidence-based periodization, then adapted to you by the AI.
Frequently Asked Questions
What muscles do hammer curls work?
Hammer curls primarily target the brachialis and brachioradialis, with the biceps brachii (especially the long head) as a secondary mover. The neutral grip shifts emphasis away from the biceps peak and toward the muscles that add thickness to the outer arm and forearm. This makes hammer curls an excellent complement to standard supinated curls.
Are hammer curls better than regular curls?
Neither is better. They target different muscles. Regular (supinated) curls emphasize the biceps brachii, especially the long head responsible for the biceps peak. Hammer curls emphasize the brachialis and brachioradialis, which add arm thickness and forearm size. For complete arm development, do both.
How heavy should I go on hammer curls?
Most people can go slightly heavier on hammer curls than regular curls because the neutral grip is a mechanically stronger position. Beginners typically start with 10 to 15 lb dumbbells, intermediate lifters use 20 to 35 lbs, and advanced lifters may use 40 to 50+ lbs. If your upper arms are swinging away from your torso, the weight is too heavy.
Should I do hammer curls standing or seated?
Standing is the standard and allows a slightly more natural arm path. Seated versions eliminate momentum and force stricter form, which makes them useful if you tend to cheat with body english. Both are effective. If you catch yourself swaying, switch to seated.
How many hammer curls should I do per workout?
For most people, 3 to 4 sets of 8 to 12 reps is the sweet spot. Hammer curls are an accessory movement, so place them after your main pulling work (rows, pull-ups, chin-ups). Total weekly biceps volume should generally stay between 10 and 20 sets across all curl variations.
Can I do hammer curls if I have bicep or elbow tendon pain?
Tendinopathy at the biceps insertion or the lateral elbow (tennis elbow) can flare with curl variations. Hammer curls are usually better tolerated than supinated curls because the neutral grip reduces strain on the bicipital tendon, but they still load the elbow flexors. Drop to a very light load, work in a pain-free range, slow the eccentric to 3 to 4 seconds, and stop the set the moment symptoms increase. If pain persists beyond a week or two, get assessed by a physical therapist before progressing.