The chin-up is one of the best upper body exercises you can do. It's also one of the most humbling. You grab a bar with your palms facing you, pull your entire body weight up until your chin clears the bar, and lower back down. That's it. No machines to adjust, no cables to set, no momentum to hide behind. Either you can move your body through space or you can't.
What makes the chin-up special is the grip. That underhand (supinated) position puts your biceps in a mechanically stronger line of pull compared to the overhand grip used in pull-ups. A 2010 study in the Journal of Strength and Conditioning Research found that chin-ups produced higher biceps brachii activation than pull-ups, while latissimus dorsi activation was comparable between the two (Youdas et al., 2010). So you get similar back development plus more biceps work. Better deal all around.
And here's what most people miss: the chin-up trains a lot more than just the back and biceps. Your core has to brace to keep your body from swinging. Your grip has to hold your entire weight. Your posterior delts and rhomboids have to stabilize your shoulder blades throughout the movement. That's why chin-ups belong in almost every upper-body program.
Muscles Worked
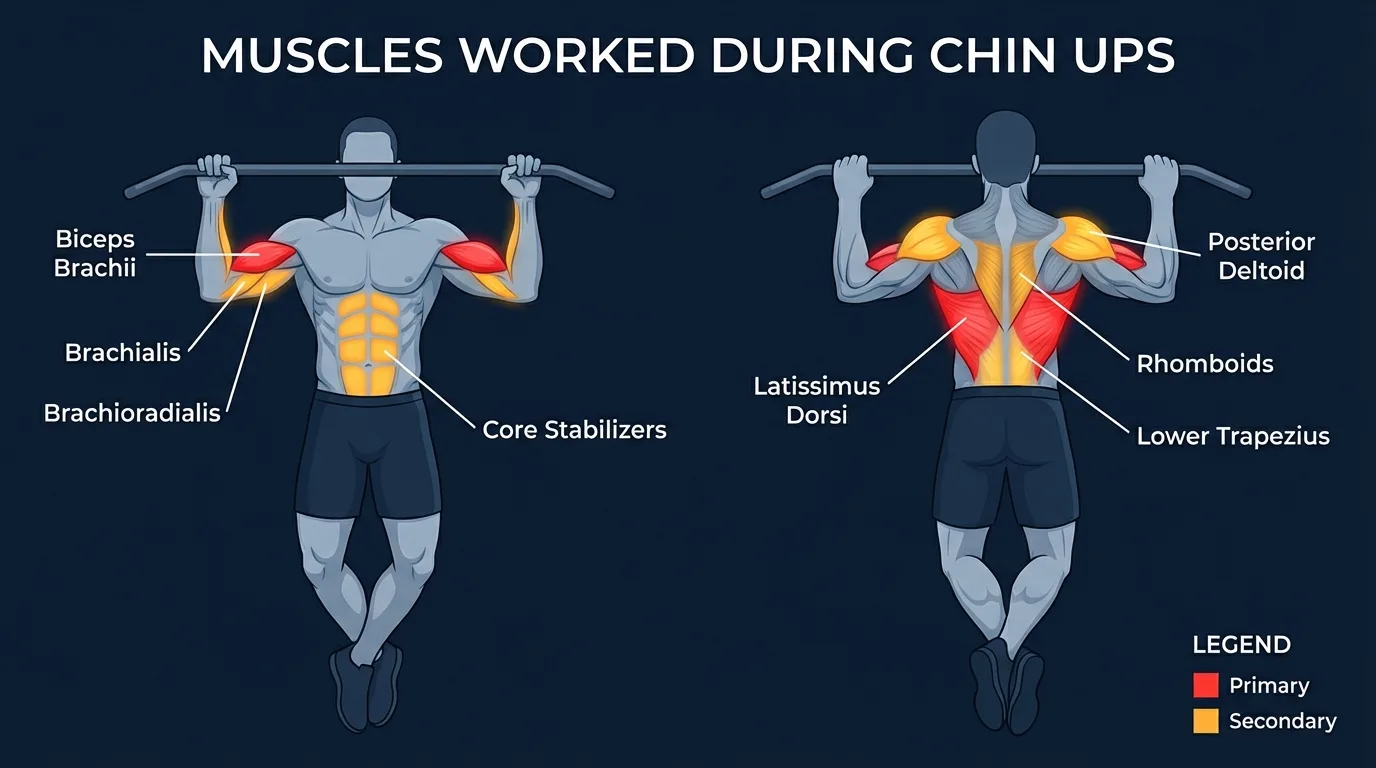
Primary movers: the biceps brachii and the latissimus dorsi. The lats drive shoulder extension and adduction, pulling the upper arm down and back. The biceps drive elbow flexion. Both fire concentrically on the way up and resist the load eccentrically on the way down, which is what builds strength and size in both muscles at once.
Secondary movers: the brachialis and brachioradialis (assist elbow flexion alongside the biceps), the posterior deltoid (assists shoulder extension), and the rhomboids and lower trapezius (retract and depress the scapula at the top of the rep). The supinated grip biases the biceps far more than the overhand pull-up grip does, which is why you can usually do more chin-ups than pull-ups.
Stabilizers: the forearm flexors and extensors (grip the bar under your full bodyweight), the rotator cuff (controls the shoulder through the pull), and the entire anterior core (rectus abdominis, transverse abdominis, obliques) plus the glutes (prevent body swing and the legs from kicking up). The serratus anterior assists with scapular control, especially at the bottom of the rep when the shoulders are packed.
Evidence on grip orientation: Youdas et al. (2010) measured EMG activation across pull-up variations and found chin-ups produced higher biceps brachii activation than pull-ups, while latissimus dorsi activation was comparable between the two grips. The takeaway: chin-ups are the more biceps-biased version of the vertical pull pattern, while still being a top-tier lat exercise. That's why they're often the most efficient single-exercise upper-body builder you can program.
Quick Facts: Chin-Ups
- Equipment needed: Pull-up bar (fixed mounted bar, doorway bar, or rig pull-up bar)
- Difficulty: Advanced to Expert (use dead hangs, negatives, or band-assisted variations to build up)
- Modality: Compound bodyweight pulling (bilateral, vertical pull pattern)
- Body region: Upper body (back and biceps dominant)
- FitCraft quest category: Strength
Step-by-Step: How to Perform a Chin-Up
The chin-up looks simple. Hang, pull, lower, repeat. But the order in which the muscles fire and the position of the shoulder blades through the rep is what separates a clean chin-up from a body curl that hammers your biceps and leaves your back untrained.
Step 1: Grip the Bar Underhand
Grab the pull-up bar with a supinated grip, palms facing toward you, hands about shoulder-width apart. Hang with your arms fully extended. Pack your shoulders down and back like you're trying to put your shoulder blades into your back pockets. Engage your core and either cross your ankles behind you or keep your legs straight. This dead hang is your start and finish position for every rep.
Coach Ty's cue: "Shoulder-width is the standard. Going much narrower increases elbow stress; going much wider doesn't load the biceps or lats well. Keep your hands roughly over your shoulders."
Step 2: Initiate the Pull With Your Back
This is the part most people get wrong. Don't start by bending your elbows. Start by depressing your shoulder blades. Pull them down and together first. Then drive your elbows down and back toward your hips. You should feel your lats engage before your biceps do.
Ty's key cue: "Shoulders first, arms second. Imagine someone has their hand on top of your shoulder and you're trying to push it down. Once you feel your lats load up, then bend your elbows." Getting this sequence right is the difference between a chin-up that builds your back and one that just pumps your biceps.
Step 3: Pull Until Your Chin Clears the Bar
Continue pulling in a smooth arc until your chin is clearly above the bar. Your chest should come close to the bar at the top. Don't crane your neck upward to get your chin over. That's cheating your range and loading your cervical spine.
Ty's cue: "Drive your elbows down toward your hip bones, not behind your back. When the elbows drift backward, the posterior delt takes over and the lats lose their leverage." If you can't get your chin over without the neck crane, you're not strong enough for that rep yet. That's useful information.
Step 4: Lower Yourself Under Control
Slowly extend your arms to return to a full dead hang. This should take 2-3 seconds. Full extension at the bottom. No half reps. No bouncing out of the bottom. The eccentric (lowering) phase builds tremendous strength, and dropping fast leaves a lot of gains on the table.
Ty's reminder: "Dead hang at the bottom, chin clearly over the bar at the top. Full range or it doesn't count."
Step 5: Reset and Repeat
At the bottom, make sure your shoulders are packed again before pulling. Dead stop. No kipping, no swinging, no momentum. Breathe out during the pull, breathe in on the way down. If you're swinging after a rep, wait until you're still before starting the next one.
Ty's cue: "Strict form with a dead stop between reps. If you can only do 2 strict reps, do 2 strict reps. That's better than 8 kipping reps."
Chin-Up vs Pull-Up: What's Actually Different?
This is probably the most common pulling-exercise question in any gym. The short answer: grip orientation changes muscle emphasis, but both exercises train the same general pattern.
- Grip. Chin-ups use a supinated (underhand) grip with palms facing you. Pull-ups use a pronated (overhand) grip with palms facing away. This changes the line of pull on the biceps.
- Biceps involvement. The supinated grip places the biceps brachii in a stronger mechanical position. The 2010 Youdas study showed higher peak biceps EMG during chin-ups compared to pull-ups. In practical terms, that's why most people can do more chin-ups than pull-ups.
- Lat activation. Surprisingly similar. The same study found no meaningful difference in latissimus dorsi activation between the two grips. Both exercises are excellent lat builders.
- Difficulty. Chin-ups are easier for beginners because the biceps can contribute more force. If you can't do a pull-up yet, start with chin-ups. They build the back and grip strength you need to progress to pull-ups later.
- Shoulder comfort. Some people find chin-ups more comfortable because the supinated grip externally rotates the shoulder, which opens up the subacromial space. Others find it strains the wrist or elbow. If one grip bothers you, switch to the other or try a neutral grip (palms facing each other).
The bottom line: do both. Start with chin-ups if you're building your first rep. Add pull-ups once you can do 3-5 clean chin-ups. Alternate between them for balanced development.
Get this exercise in a personalized workout
FitCraft, our mobile fitness app, uses its AI coach Ty to program pulling exercises like this into your plan at the right volume and intensity, based on your level, goals, and equipment. Ty was designed and trained by Domenic Angelino, MPH (Brown University) and NSCA-CSCS, with research published in the Journal of Strength and Conditioning Research and Medicine & Science in Sports & Exercise.
Take the Free Assessment Free · 2 minutes · No credit card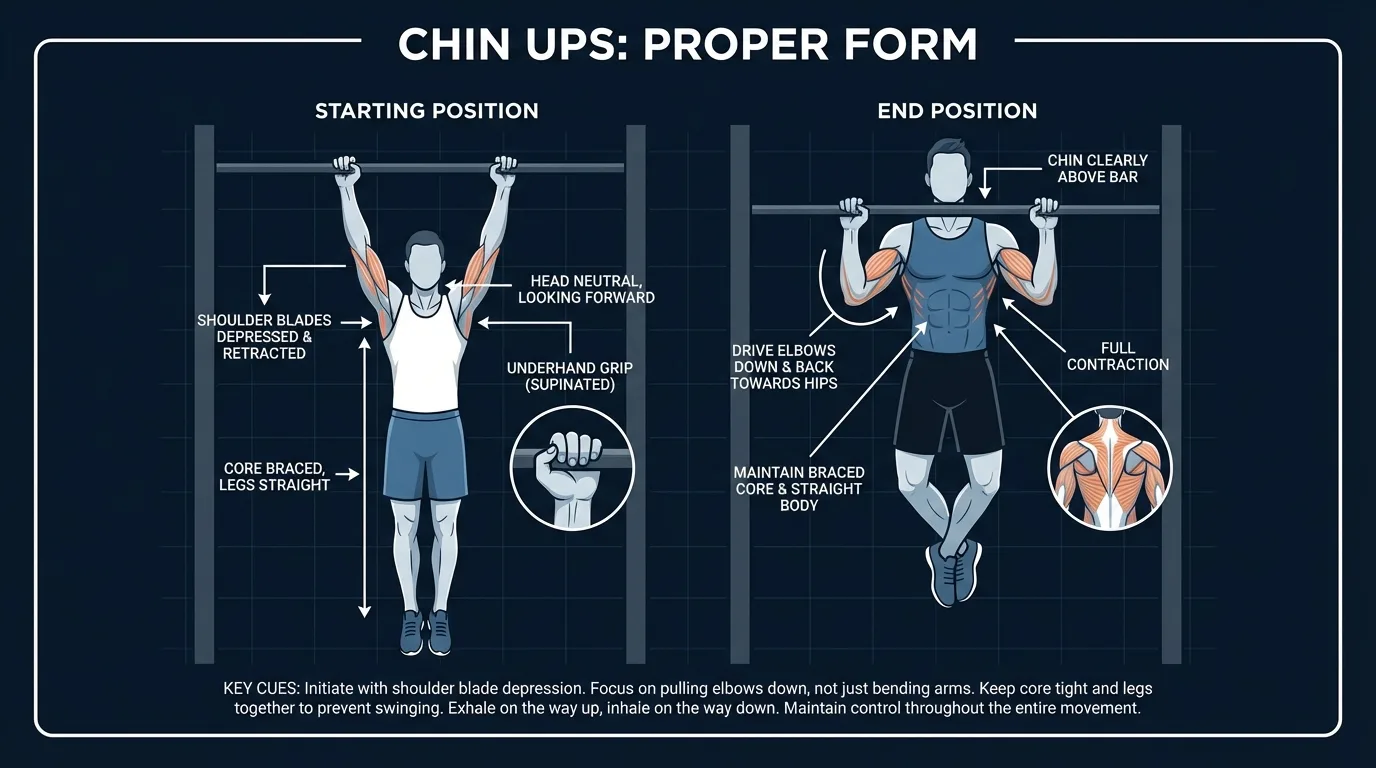
Common Mistakes (and How to Fix Them)
Chin-ups have a deceptively simple pattern, but the mistakes are everywhere. Here are the ones that cost you reps, gains, or joint health.
- Starting with the arms instead of the back. If you initiate the chin-up by bending your elbows first, the biceps take the brunt of the load and your lats barely engage. Over time, this turns into a pattern where your arms fatigue before your back gets any real stimulus. The fix: before each rep, actively pull your shoulder blades down and together. Feel the lats load. Then pull.
- Half reps at the bottom. Not extending fully at the bottom of each rep is the most common chin-up cheat. It cuts range of motion by 20-30% and eliminates the stretch on the lats where they're strongest. The fix: every rep ends in a dead hang with arms fully extended. If you're keeping a slight bend to maintain "tension," you're keeping a slight bend to make it easier. Extend fully.
- Neck craning to get the chin over. Jutting your chin forward and up to clear the bar is a range-of-motion illusion. Your body didn't actually pull higher. You just moved your neck. And that loads the cervical spine under your full body weight while teaching a bad movement pattern. The fix: pull until your chest approaches the bar. Your chin will clear naturally when you're strong enough.
- Swinging and kipping. Using hip drive and leg swing to start each rep takes the load off the muscles you're trying to train. Plus, it puts hefty dynamic stress on the shoulder joint at the bottom of the swing. A 2019 analysis in the International Journal of Sports Physical Therapy noted that ballistic loading during kipping movements increases shoulder injury risk, particularly in lifters without adequate baseline strength (Aune et al., 2019). The fix: dead stop at the bottom, no leg movement, strict pull.
- Going too fast. Speed kills chin-up quality. The concentric (pulling) phase should be controlled, and the eccentric (lowering) should take 2-3 seconds. Dropping from the top sacrifices the eccentric stimulus, which research shows accounts for a substantial portion of hypertrophy from resistance training. Slow down.
Chin-Up Variations: From Dead Hang to Weighted
Dead Hang / Engaged Hang (Foundation)
Before you can do a chin-up, you need to hang from the bar for at least 20-30 seconds with good shoulder position. This builds grip endurance and teaches the packed-shoulder starting position. Hang with arms fully extended, shoulders actively pulled down (not shrugged up by your ears), core engaged. When you can hold 3 sets of 30 seconds with an active shoulder pack, you're ready for the next step.
Negative Chin-Ups (Beginner)
Jump or step up to the top position (chin over bar) and lower yourself as slowly as you can. Aim for a 5-second descent. This trains the eccentric portion of the chin-up, which builds the strength you need for the concentric pull. Do 3 sets of 3-5 negatives. When you can control a 5-second negative for 5 reps, you're very close to your first full chin-up.
Top Chin Hold (Intermediate Isometric)
Hold the top position of the chin-up (chin clearly above the bar, chest close to the bar) for time. Aim for 10-30 seconds. The top hold trains the upper portion of the rep, which is usually the hardest part to lock out. Combine top holds with negatives to attack both ends of the strength curve.
Band-Assisted Chin-Ups (Beginner-Intermediate)
Loop a resistance band over the bar and place your foot or knee in the loop. The band assists most at the bottom (where you're weakest) and least at the top. Start with a heavy band and progress to lighter ones over time. One thing to know: bands change the strength curve, so you'll eventually need to ditch them to build true chin-up strength.
Bodyweight Chin-Up (Standard)
Full range, full body weight, no assistance. Dead hang to chin over bar, controlled descent, no kipping. Once you can do 3 sets of 8-10 clean reps with strict form, you've earned the right to start loading.
Weighted Chin-Ups (Expert)
Once you can do 3 sets of 8-10 clean bodyweight chin-ups, it's time to add weight. Dip belt, dumbbell held between your feet, or weighted vest. Start with 5-10 lbs and add weight in small increments. Weighted chin-ups are one of the most effective exercises for building back thickness and biceps mass. Loaded vertical pulling produces more lat hypertrophy than unloaded bodyweight training in trained lifters (Schoenfeld et al., 2014).
Alternative Exercises (No Bar Available)
If a pull-up bar isn't accessible, or you're building toward your first chin-up:
- Inverted rows: Train the same horizontal-meets-vertical pulling pattern at a much lower difficulty. Adjust the angle of your torso to make them easier (higher bar) or harder (lower bar). A great bridge exercise on the path to chin-ups.
- Bent-over rows: Load the lats and biceps with dumbbells using a horizontal pulling pattern. Useful if one side is weaker than the other, since the unilateral variation exposes imbalances that chin-ups can mask.

When to Avoid or Modify Chin-Ups
Chin-ups are safe for most healthy adults, but a few conditions call for modification or substituting easier variations. None of these are permanent restrictions. They're starting points. Always consult your physician or physical therapist for personalized guidance.
- Acute shoulder injury or rotator cuff irritation. Hanging from a bar loads the shoulder at full elevation under your full bodyweight, which can flare an angry rotator cuff. Skip the chin-up until cleared by a PT. Substitute with inverted rows at a higher angle (closer to vertical) or supported rows to keep training the back without overloading the shoulder.
- Tennis or golfer's elbow (lateral or medial epicondylitis). The chin-up grip and pull pattern aggravate elbow tendons, especially with high frequency or volume. Reduce volume, try a thicker bar grip to spread the load across the hand, or shift to eccentric-only chin negatives during the rehab phase. Heavy biceps curls on the same day amplify the load on the same tendons; space them out.
- Recent shoulder, elbow, or wrist surgery. Get clearance from your surgeon before any pulling work. Most post-surgical protocols start with scapular activation and assisted variations, then build back to full bodyweight pulling on a controlled timeline.
- Lower-back pain that worsens with body swing. A swinging chin-up flares the lumbar spine and tugs on irritated tissues. Use a strict hollow-body position (ribs down, glutes squeezed, legs straight or crossed), reduce range, or substitute with inverted rows on a low bar where the feet stay grounded.
- Wrist pain or stiffness. A sustained hang loads the wrists in extension under full bodyweight. Try a neutral-grip variation (palms facing each other if your bar setup allows it) or thick-grip handles to redistribute the load. Reduce hold time on dead-hang work.
- Beginners without baseline pulling strength. If you can't do a single strict chin-up, jumping straight to full reps usually leads to frustration or kipping bad habits. Spend 4-8 weeks on the regression ladder: engaged hangs, chin negatives, then band-assisted reps. Most people earn their first strict chin-up on this path.
Related Exercises
If chin-ups are part of your routine, these movements complement or extend the same training pattern.
- Same muscle group (vertical pull): Bent-Over Rows and Overhead Pullover load the lats and biceps from different angles. Rows train the horizontal pull pattern; pullovers stretch and load the lats in their fully lengthened position.
- Easier regressions: Inverted Rows, Supported Row, Corner Row, and Reverse Row all train the pulling pattern at scalable difficulty. Start here if a full chin-up isn't yet realistic.
- Strength-building eccentric: Chin Negatives isolate the lowering phase, which is where most untrained lifters are strongest and where chin-up specific strength is built fastest.
- Grip and shoulder foundation: Engaged Hang and Top Chin Hold train the start and finish positions isometrically, building the grip endurance and shoulder packing needed to chain reps together.
- Core anti-swing foundation: Deadbugs and Bird-Dogs teach the bracing pattern that keeps your body still during chin-ups. A strong anti-swing core is what separates a clean strict rep from a flailing kip.
How to Program Chin-Ups
Chin-up programming follows the same evidence-based principles as any compound pulling movement. The American College of Sports Medicine (ACSM) Position Stand on resistance training recommends roughly 8-12 reps per set for strength and hypertrophy, with at least 48 hours between sessions training the same muscle group (Ratamess et al., 2009). Because chin-ups are grip-limited and stress the elbow tendons, frequency and total weekly volume need extra attention.
| Level | Sets × Reps | Rest between sets | Frequency |
|---|---|---|---|
| Beginner (inverted rows, dead hangs, negatives) | 2-3 × 5-10 | 60-90 seconds | 2-3 sessions/week |
| Intermediate (assisted or partial chin-ups) | 3-4 × 5-12 | 90-120 seconds | 2-3 sessions/week |
| Advanced (full or weighted chin-ups) | 3-5 × 4-10 | 90-180 seconds | 2-4 sessions/week |
Where in your workout: Place chin-ups early in an upper-body session, when your grip is fresh. Pulling is grip-limited, so doing chin-ups after heavy carries, deadlifts, or barbell rows will under-train the back. If you're combining chin-ups with weighted pulling (rows, pulldowns), do chin-ups first and use the others as accessory work. In a full-body or push-pull split, chin-ups belong at the start of the pulling block.
Form floor over rep targets: if your last 2 reps of a set break form (kipping, half range, neck craning), stop the set there. Hitting a target rep count with broken form trains compensation patterns and adds joint stress without adding stimulus. Strict reps with a dead stop at the bottom always beat sloppy reps with momentum.
How FitCraft Programs This Exercise
Knowing how to do a chin-up is step one. Knowing when to do it, how many reps, which regression you're ready for, and when to add weight is where most people get stuck.
FitCraft's AI coach Ty handles that. During your personalized diagnostic assessment, Ty maps your current pulling strength, fitness level, goals, and available equipment. Then Ty builds a personalized program that slots chin-ups (or the right regression) into a balanced training plan at the right variation for your level.
As you get stronger, Ty adjusts the variation and volume to match your level. Dead hangs become negatives. Negatives become band-assisted. Band-assisted becomes bodyweight. Bodyweight eventually becomes weighted. Every program is designed by an Ivy League-trained exercise scientist and NSCA-certified strength coach using evidence-based periodization, then adapted to you by the AI.
Frequently Asked Questions
What is the difference between a chin-up and a pull-up?
The chin-up uses a supinated (underhand, palms facing you) grip, while the pull-up uses a pronated (overhand, palms away) grip. A 2010 study in the Journal of Strength and Conditioning Research found that chin-ups produced higher biceps brachii activation than pull-ups, while lat activation was similar between the two. Chin-ups are easier for beginners because the biceps can contribute more to the pulling motion.
What muscles do chin-ups work?
Chin-ups primarily target the biceps brachii and latissimus dorsi. Assisting muscles include the brachialis, brachioradialis, posterior deltoid, rhomboids, lower trapezius, and core stabilizers. The supinated grip places the biceps in a mechanically stronger position compared to pull-ups, which is why most people can do more chin-ups than pull-ups.
How many chin-ups should a beginner be able to do?
Most beginners can't do a single strict chin-up, and that's normal. A reasonable first goal is 1 clean rep with full range of motion. From there, work toward 3 sets of 5 reps. If you can't do one yet, start with dead hangs, then progress to negative chin-ups (jumping to the top and lowering slowly). Most people earn their first chin-up within 4-8 weeks of consistent training.
Can I do chin-ups with elbow pain or tennis elbow?
Usually not at full bodyweight while the tendons are inflamed. Tennis elbow (lateral epicondylitis) and golfer's elbow (medial epicondylitis) are both aggravated by the chin-up grip and pull pattern. Reduce volume, switch to a thicker grip to spread the load, or shift to eccentric-only chin negatives for 4-6 weeks while you rehab. Heavy biceps curls on the same day amplify the load on the same tendons; space them out. If pain persists or worsens, see a physical therapist before progressing.
Are chin-ups good for building biceps?
Yes. Chin-ups are one of the most effective biceps exercises because they load the muscle through a full range of motion under your entire body weight. EMG data shows chin-ups produce higher biceps activation than many common curl variations. They also train the brachialis and brachioradialis, which adds thickness to the upper arm that curls alone won't build.
Can I do chin-ups every day?
You can, but most people shouldn't. Chin-ups stress the biceps, lats, and elbow tendons under your full bodyweight. Training them daily without adequate recovery increases the risk of tendinitis, particularly in the elbows and shoulders. For most people, 2-3 sessions per week with at least 48 hours between them is the sweet spot for building strength without overuse injuries.