Spider planks look like a small change to a standard plank, but the lateral knee drive changes the job of your core. Instead of only resisting spinal extension, your trunk has to resist rotation while one hip flexes and abducts. That is why the exercise feels much more oblique-heavy than a regular high plank.
The movement only works when the plank stays honest. If your hips twist toward the moving knee, sag toward the floor, or pike toward the ceiling, the obliques lose the job you wanted them to do. Use a smaller knee drive first. Clean range beats a bigger, messier rep.
Quick Facts: Spider Planks
- Equipment needed: None
- Difficulty: Intermediate to Advanced
- Modality: Core strength
- Body region: Core and hips
- FitCraft quest category: Core
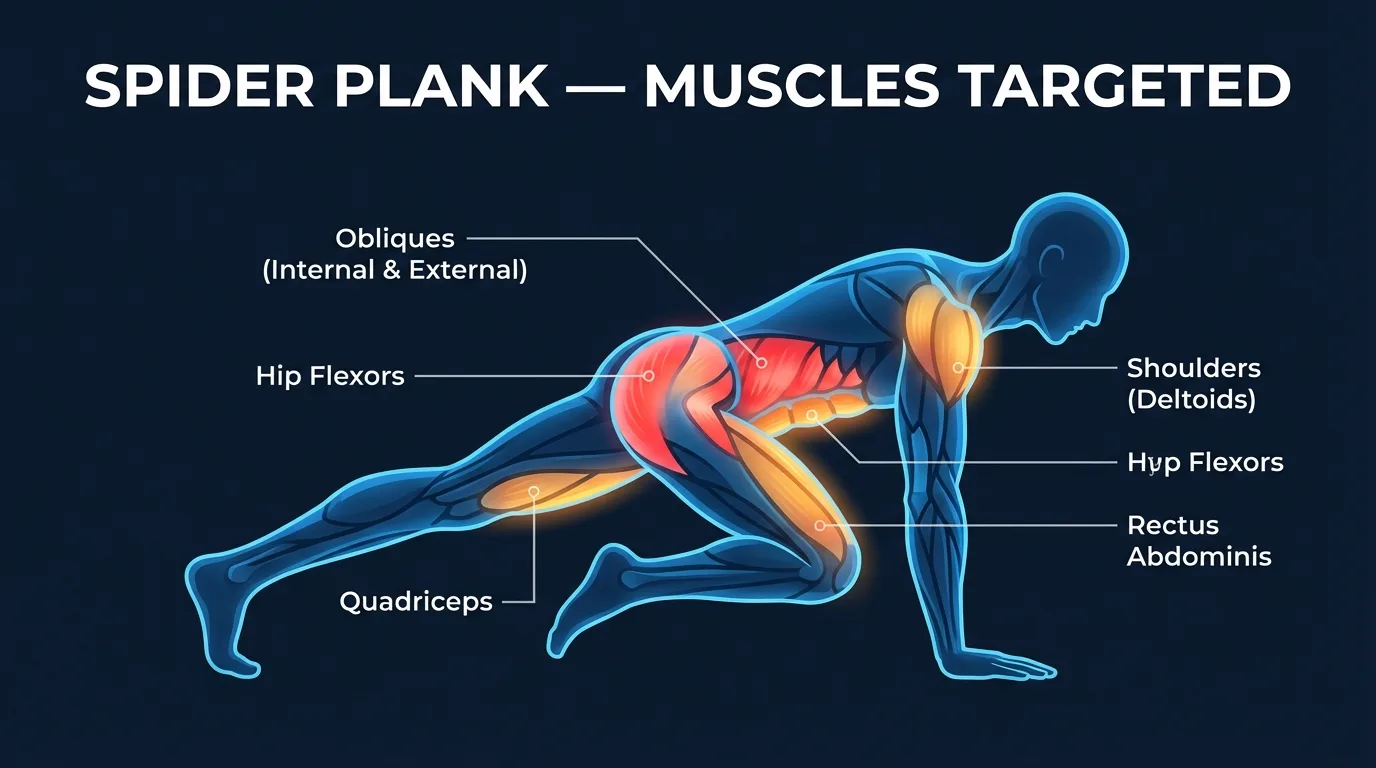
Muscles Worked
Primary movers: the internal and external obliques, hip flexors, rectus abdominis, and transverse abdominis. The hip flexors lift the knee toward the elbow, while the obliques shorten on the working side and resist rotation on the opposite side. The abs also resist spinal extension so your lower back does not sag.
Secondary movers: the anterior deltoids, triceps, pectoralis major, serratus anterior, quadriceps, and glutes. These muscles do not drive the knee path, but they keep the high plank from collapsing while the leg moves.
Stabilizers: the diaphragm and pelvic floor support the deep-core brace, the spinal erectors help control the lumbar position, and the shoulder girdle keeps your upper body quiet. Exhaling during the knee drive reinforces transverse abdominis activation, which is why breathing with the rep usually feels more stable than holding your breath.
Mechanism: spider planks combine anti-extension and anti-rotation. The moving leg tries to pull the pelvis into rotation and anterior tilt. Your obliques, transverse abdominis, glutes, and shoulder stabilizers counter that pull so the torso stays square to the floor.
Step-by-Step: How to Perform Spider Planks
Step 1: Start in a high plank
Place your hands directly under your shoulders and extend your legs behind you. Brace your abs, squeeze your glutes, and make a straight line from head to heels.
Coach Ty's cue: "Lock the plank before you move the knee."
Step 2: Drive your right knee toward your right elbow
Bend your right knee and bring it out to the side toward your right elbow. The knee travels laterally, not straight under your chest like a mountain climber.
Coach Ty's cue: "Aim outside the ribs, then keep your belt buckle facing the floor."
Step 3: Pause without letting the hips turn
Pause near elbow height if your mobility allows. You should feel the right-side obliques contract while the left side keeps your pelvis from rolling open.
Coach Ty's cue: "Small range with flat hips beats big range with a twist."
Step 4: Return to plank and switch sides
Extend the right leg back under control and reset your brace. Then drive the left knee toward the left elbow with the same slow path.
Coach Ty's cue: "Return quietly. No foot slap, no hip drop."
Step 5: Breathe and keep the tempo controlled
Exhale as the knee drives forward and inhale as the leg returns. Use a slow enough tempo that each rep looks the same from side to side.
Coach Ty's cue: "Your breathing should make the brace stronger, not break it."
Get this exercise in a personalized workout
FitCraft, our mobile fitness app, uses its AI coach Ty to program core stability work like this into your plan at the right volume and intensity, based on your level, goals, and equipment. Ty was designed and trained by Domenic Angelino, MPH (Brown University) and NSCA-CSCS, with research published in the Journal of Strength and Conditioning Research and Medicine & Science in Sports & Exercise.
Take the Free Assessment Free · 2 minutes · No credit card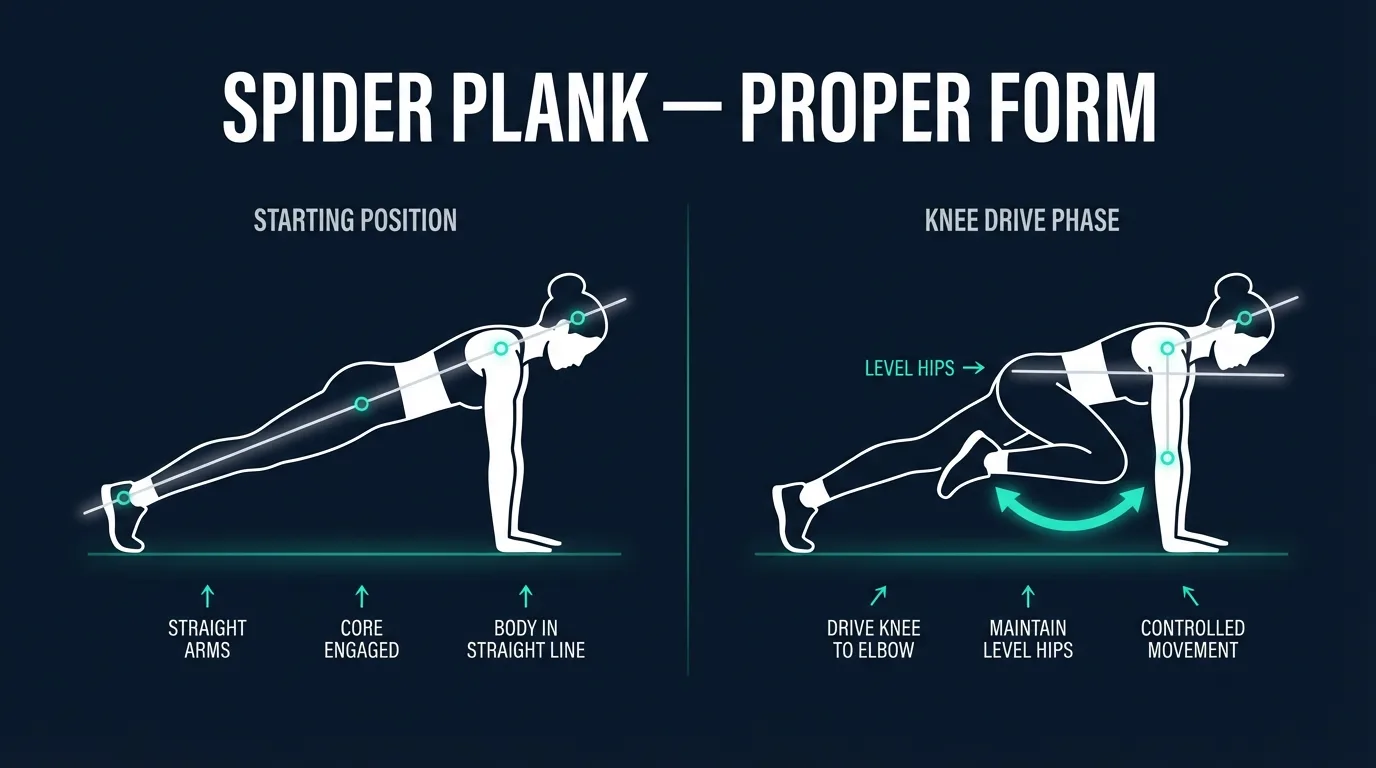
Common Mistakes (and How to Fix Them)
- Letting the hips rotate. The pelvis rolls toward the moving knee, which turns the drill into a leg swing. Fix it by shortening the knee drive and keeping both hip points facing the floor.
- Piking the hips up. Raising the hips takes load off the abs and changes the plank angle. Squeeze your glutes and lower your hips until your body forms one line again.
- Sagging through the lower back. The lumbar spine drops when the brace fails. Stop the set, reset with a shorter range, or regress to forearm planks and deadbugs.
- Rushing the knee drive. Speed hides rotation. Take one count out, pause briefly, then take one count back.
- Dropping the head. Looking straight down often pulls the neck out of line. Keep your gaze slightly ahead of your hands so the head stays neutral.
- Holding your breath. Breath-holding can spike pressure and shorten the set. Exhale on the knee drive and inhale during the return.
Spider Plank Variations: Regressions and Progressions
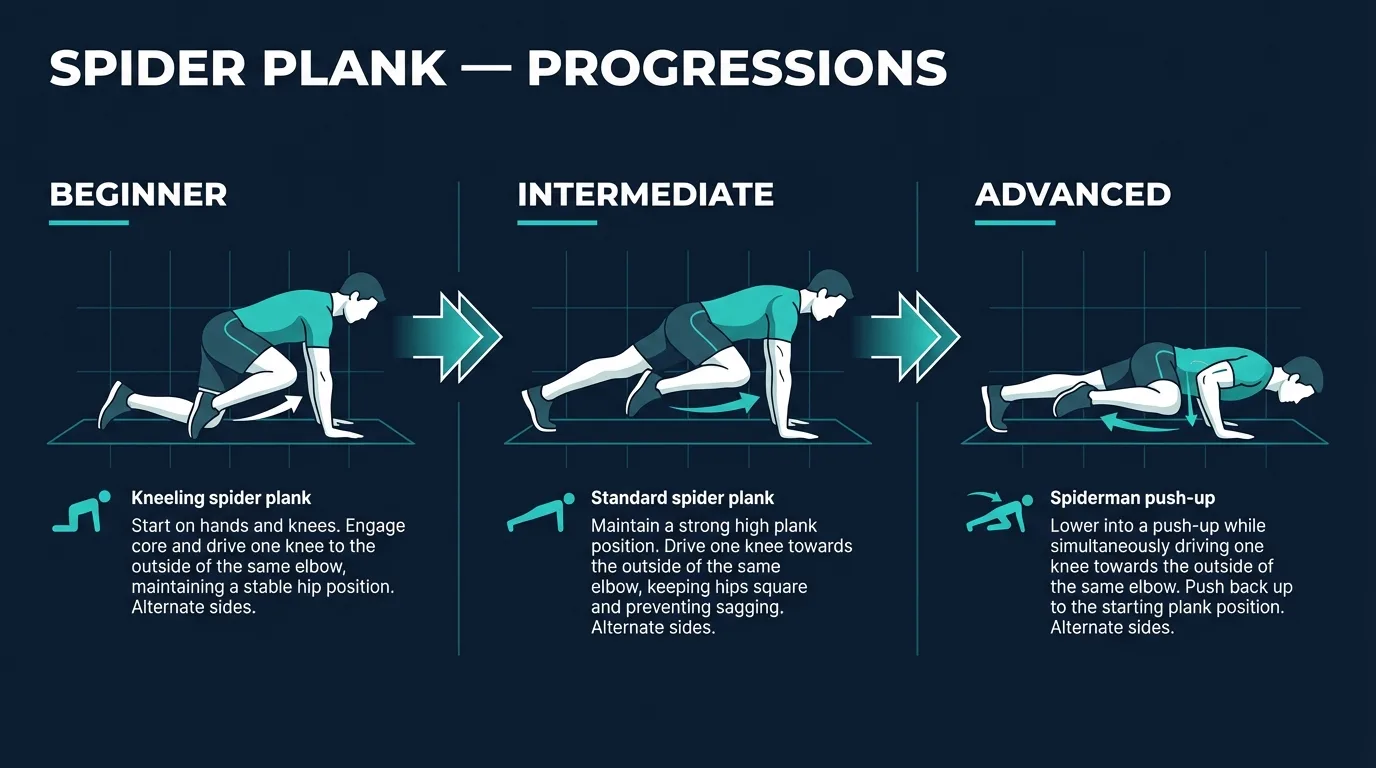
Kneeling Spider Plank
Start from a modified high plank with both knees on the floor. Drive one knee out toward the same-side elbow, return, and switch sides. This shortens the lever so you can learn the knee path without fighting the full plank load.
Standard Spider Plank
This is the full version: high plank, alternating lateral knee drives, slow tempo, and level hips. Own this variation before chasing faster reps or adding a push-up.
Paused Spider Plank
Pause for two seconds near the top of each knee drive. The pause removes momentum and makes the obliques hold the anti-rotation position longer.
Spiderman Push-Up
Combine the knee drive with a push-up. As you lower, drive the knee toward the same-side elbow, then press back up as the leg returns. This adds chest, triceps, and shoulder demand, so only use it after standard spider planks stay clean.
Alternative Exercises
- Mountain Climbers: use the same high-plank setup with a forward knee drive and more conditioning emphasis.
- Bicycle Crunches: train an oblique knee-to-elbow pattern from your back, with less shoulder and plank demand.
When to Avoid or Modify Spider Planks
Spider planks are safe for most healthy adults, but the high-plank position and lateral knee drive can be too demanding in a few situations. Use the easiest pain-free version and consult your physician or physical therapist for personalized guidance.
- Acute lower-back pain or known disc pathology. The moving leg can pull the pelvis into anterior tilt or rotation. Start with deadbugs, bird-dogs, or short forearm planks instead.
- First 6-8 weeks postpartum or active diastasis recti. Dynamic plank work can raise intra-abdominal pressure if the deep core cannot manage the brace. Rebuild with breathing drills, deadbugs, and bird-dogs first.
- Recent abdominal surgery or hernia repair. Get clearance from your surgeon before loading the abdominal wall with plank variations. Progress from gentle bracing to short holds before dynamic knee drives.
- Wrist, elbow, or shoulder pain. High planks load the upper body through extended arms. Use forearm planks or elevated hand planks until the joint position is comfortable.
- Pregnancy, pelvic-floor dysfunction, or pelvic-organ prolapse. The brace and knee drive can increase pressure through the trunk and pelvis. Work with a qualified clinician on lower-pressure core options.
Related Exercises
If spider planks fit your routine, these movements build the same core qualities from different angles:
- Same anti-rotation family: Plank Twists and Plank Walks challenge plank control while the limbs move.
- Easier regression: Mountain Climbers use the same high-plank base with a simpler forward knee path.
- Foundation for spinal bracing: Deadbugs and Bird-Dogs train trunk control with less pressure than a full high plank.
- Static plank base: Hand Planks and Forearm Planks build the bracing endurance spider planks require.
- Oblique-focused floor option: Bicycle Crunches train a knee-to-elbow pattern without supporting bodyweight through the shoulders.
How to Program Spider Planks
Spider planks are rep-based core stability work, so build volume gradually and stop each set when the plank position breaks. The American College of Sports Medicine Position Stand on resistance training supports progressive volume, appropriate rest, and level-based loading for healthy adults (Ratamess et al., 2009).
| Level | Sets × Reps | Rest between sets | Frequency |
|---|---|---|---|
| Beginner (kneeling or short range) | 2-3 × 6-8 per side | 45-60 seconds | 2-4 sessions/week |
| Intermediate (standard) | 3 × 8-12 per side | 45-60 seconds | 3-5 sessions/week |
| Advanced (paused or push-up variation) | 3-4 × 10-15 per side | 60 seconds | 4-6 sessions/week |
Where in your workout: place spider planks near the end of a resistance-training session, inside a dedicated core block, or after easier bracing drills. Avoid doing high-volume spider planks before heavy squats, deadlifts, or loaded carries because core fatigue can compromise spinal position.
Form floor over rep targets: if your hips rotate, sag, or pike during the last reps, end the set there. Fewer clean reps beat a bigger number with a broken plank.
How FitCraft Programs This Exercise
Knowing the movement is useful. Knowing when to use it, how much to do, and when to regress is where programming matters.
FitCraft's AI coach Ty can place core stability work into a balanced plan based on your level, goals, and equipment. For a movement like spider planks, that means matching the variation and volume to the core control you can actually hold.
Ty was designed and trained by Domenic Angelino, MPH (Brown University) and NSCA-CSCS, with research published in the Journal of Strength and Conditioning Research and Medicine & Science in Sports & Exercise.
Frequently Asked Questions
What muscles do spider planks work?
Spider planks primarily train the internal and external obliques, hip flexors, rectus abdominis, and transverse abdominis. The shoulders, serratus anterior, chest, glutes, quads, and spinal stabilizers help hold the high-plank position.
How many spider planks should I do?
Start with 2 to 3 sets of 6 to 8 reps per side if you are learning the movement. Build toward 3 sets of 10 to 20 reps per side, stopping each set when your hips rotate, sag, or pike.
Are spider planks good for obliques?
Yes. The lateral knee drive makes the working-side obliques shorten while the opposite-side obliques resist hip rotation. That combination trains flexion, anti-rotation, and plank endurance in one bodyweight drill.
What is the difference between spider planks and mountain climbers?
Mountain climbers drive the knee forward under the torso and are usually faster and more conditioning-focused. Spider planks drive the knee out toward the same-side elbow at a slower tempo, which shifts more demand to the obliques and hip control.
Can I do spider planks with lower-back pain?
Modify or skip spider planks if lower-back pain worsens during bracing, twisting, or hip flexion. Use deadbugs, bird-dogs, or short forearm plank holds first, and get guidance from a qualified healthcare provider or physical therapist if pain persists.