The fire hydrant is one of those exercises that doesn't get enough respect. It looks like you're, well, a dog at a fire hydrant. Not exactly glamorous. But the muscle it targets, the gluteus medius, is arguably the most important muscle people aren't training. It stabilizes your pelvis when you walk, run, squat, and lunge. When it's weak, your knees cave in, your hips drop, and your lower back picks up the slack. So yeah, it matters.
This guide covers proper form, Coach Ty's cues, common mistakes, when to avoid the exercise, and how to pair fire hydrants with donkey kicks for the most effective glute warm-up you can do at home.
Quick Facts: Fire Hydrants
- Equipment needed: None (mini resistance band optional for progression)
- Difficulty: Beginner
- Modality: Isolation, unilateral, hip abduction
- Body region: Hips and glutes
- FitCraft quest category: Strength and activation
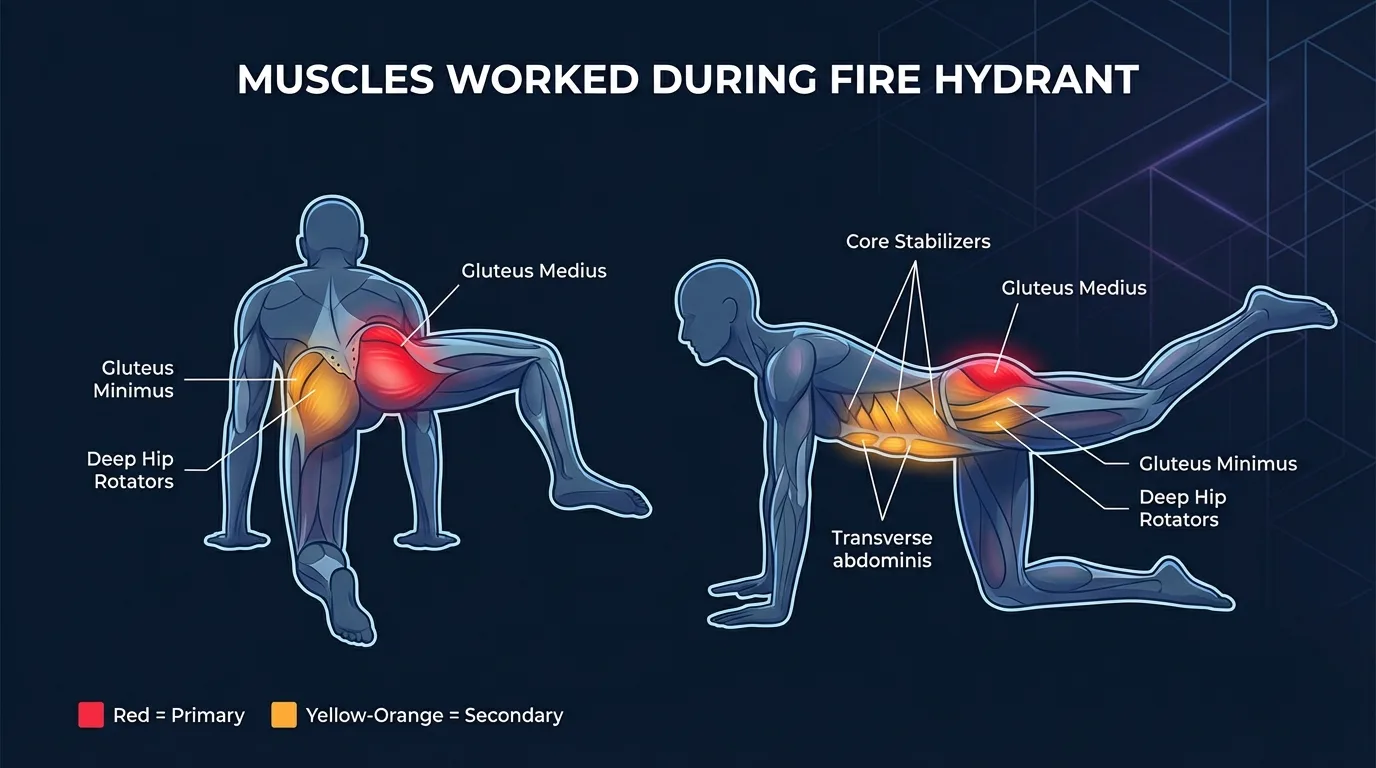
Muscles Worked
Primary movers. The gluteus medius does the lion's share of the work, abducting the hip concentrically as you lift the knee to the side and controlling the descent eccentrically as you lower. This is the same muscle that prevents your pelvis from dropping when you walk or run on one leg, which is why fire hydrants are a staple of running rehab and knee-valgus correction.
Secondary movers. The gluteus minimus sits underneath the medius and assists with the abduction. The deep hip external rotators (piriformis, gemelli, obturator internus and externus, quadratus femoris) fire because the femur is rotating outward in the hip socket as you lift, not just abducting. The upper fibers of the gluteus maximus also contribute, particularly at the top of the range.
Stabilizers. The core (rectus abdominis, transverse abdominis, obliques) works isometrically to keep the pelvis from rotating, which is the whole game with this exercise. The supporting shoulder girdle (deltoids, serratus anterior, scapular retractors) loads through the arms to keep the upper body stable. The contralateral hip stabilizers also fire to keep you from collapsing toward the working side.
Evidence. A 2012 systematic review in the International Journal of Sports Physical Therapy analyzed gluteus medius and maximus EMG activation across dozens of common rehabilitation and strengthening exercises (Reiman et al., 2012). Quadruped hip abduction (the fire hydrant) consistently ranked among the top exercises for gluteus medius activation, alongside side-lying hip abduction and single-leg squats. The high activation comes from the gravity-loaded abduction angle and the absence of compensating muscle groups. You can't use momentum or other muscles to cheat from the all-fours position.
How to Do Fire Hydrants (Step-by-Step)
- Get on all fours. Hands directly under your shoulders, knees directly under your hips. Spine neutral. Look at a spot on the floor about a foot ahead of your hands. This keeps your neck in line with your spine and prevents you from craning your head up.
- Brace your core. Tighten your abs to lock your pelvis in place. This is the key to the entire exercise. If your pelvis rotates when you lift, you lose the glute medius activation completely. Coach Ty's cue: "Imagine you're balancing a book on your lower back. Don't let it fall off."
- Lift your knee out to the side. Keep your knee bent at 90 degrees the entire time. Open your hip like a gate swinging outward. Lift until your thigh is roughly parallel to the floor, or as high as you can go without your hips rotating. For most beginners, that's about 45 degrees. That's fine. Range of motion isn't the goal here. Control is. Coach Ty's cue: "Lower is better than higher. A 45-degree lift with perfect form beats a 90-degree lift with hip rotation every single time."
- Squeeze and hold. Hold the top position for a full second. Squeeze the outer glute, the muscle on the side of your hip. You should feel the burn right there, on the side. Not in your lower back. Not in your inner thigh. On the side of the hip. Coach Ty's cue: "Where you feel the burn tells you if you're doing it right. Side of the hip? Perfect. Lower back? Your pelvis is rotating."
- Lower slowly. Bring your knee back down under control. Stop just before it touches your other knee, then lift again. Don't rest at the bottom between reps. Complete all reps on one side before switching. Coach Ty's cue: "2 seconds up, 1 second hold, 2 seconds down. The controlled tempo is what creates the mind-muscle connection."
Common Mistakes to Avoid
The fire hydrant is a beginner exercise, but the form errors are surprisingly common even among experienced lifters:
- Rotating the hips. Mistake number one. When people lift their knee, their entire pelvis rotates with it. The knee goes higher, sure, but the glute medius barely fires because the pelvis is doing the work instead. Fix: brace your core and reduce the height until your hips stay completely square.
- Shifting weight to the opposite hand. As your right leg lifts, your body wants to lean left. This unloads the working hip and reduces the glute activation. Press both hands firmly into the floor. Keep your weight centered.
- Going too fast. Fire hydrants aren't a speed exercise. If you're blasting through 30 reps in 20 seconds, you're not getting much out of it. Slow down. Feel each rep. If the exercise suddenly gets twice as hard, you were definitely going too fast.
- Extending the knee. Your knee should stay bent at 90 degrees throughout. If your leg starts straightening as you lift, you're turning it into a different exercise that loads the outer quad instead of the glute medius.
- Looking up. Craning your neck up arches your upper back and changes your spinal alignment. Keep your gaze at a fixed point on the floor, about a foot in front of your hands.
Get this exercise in a personalized workout
FitCraft, our mobile fitness app, uses its AI coach Ty to program isolation exercises like this into your plan at the right volume and intensity, based on your level, goals, and equipment. Ty was designed and trained by Domenic Angelino, MPH (Brown University) and NSCA-CSCS, with research published in the Journal of Strength and Conditioning Research and Medicine & Science in Sports & Exercise.
Take the Free Assessment Free · 2 minutes · No credit card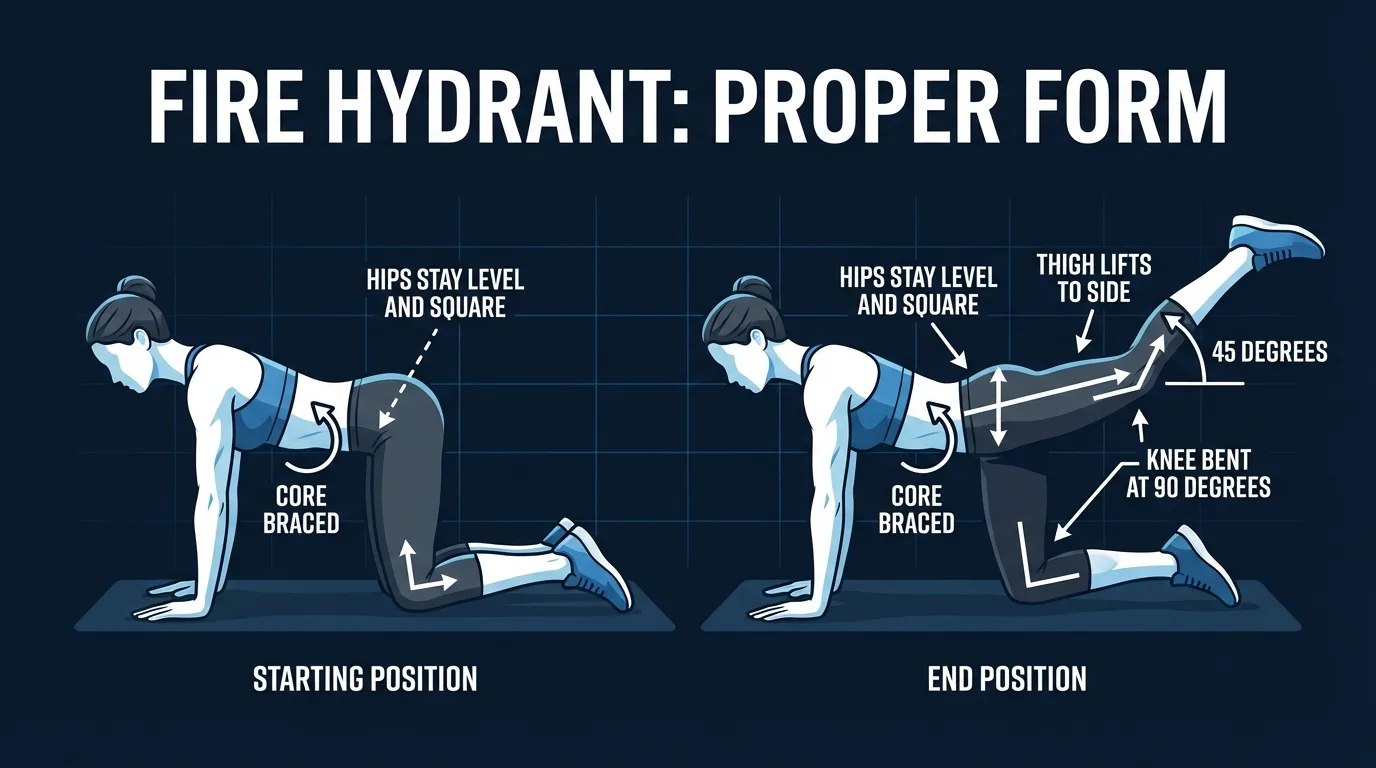
Variations and Progressions
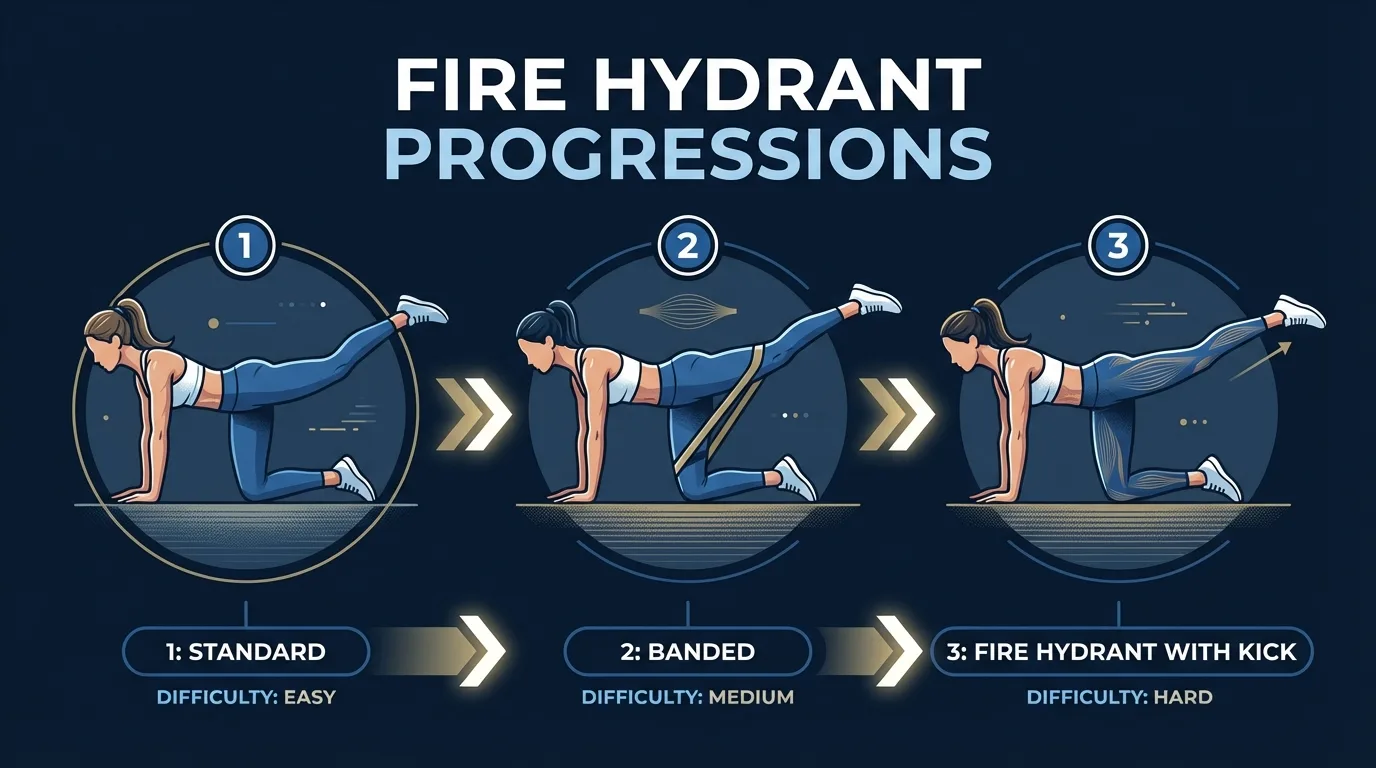
Standard Fire Hydrant (Beginner)
The version described above. Bodyweight, all fours, 90-degree knee bend, lift to the side. This is where everyone starts. Once you can do 3 sets of 20 per leg with a full 1-second squeeze at the top and zero hip rotation, you're ready to progress.
Banded Fire Hydrant (Intermediate)
Loop a mini resistance band around both thighs just above the knees. The band adds resistance at the outer range where the glute medius works hardest. Start with a light band and work up. This is the most common progression and honestly the most effective one.
Fire Hydrant with Kick (Advanced)
Lift your knee to the side like a standard fire hydrant, then extend your leg straight out at the top before bringing it back in and lowering. This adds a hip extension component and recruits more of the gluteus maximus alongside the medius. Harder on balance too.
When to Avoid or Modify Fire Hydrants
Fire hydrants are among the safest hip exercises out there and are widely used in physical therapy. Even so, a few situations warrant modification. Always consult a qualified healthcare provider or physical therapist before starting or returning to any exercise program, especially if any of the following apply.
- Acute hip pain, labral tear, or hip impingement (FAI). The combined abduction-plus-external-rotation movement loads the hip joint in a position that can pinch impinged or torn tissue. Stop if you feel sharp pain in the front of the hip and consult an orthopedic provider. Side-lying hip abduction (clamshells, side-lying leg raises) is usually better tolerated.
- Acute sacroiliac joint pain. Asymmetric hip movement can irritate an inflamed SI joint. Start with bilateral isometric glute work (glute bridges) before reintroducing unilateral patterns.
- Wrist pain or carpal tunnel symptoms. The quadruped position loads the wrists in extension. Substitute with side-lying hip abduction (clamshells) until wrist symptoms resolve. Forearm-down quadruped on a yoga mat is a workable middle ground.
- Late-pregnancy diastasis recti or pelvic-floor concerns. The quadruped position is generally pregnancy-friendly, but the rotational core demand may aggravate diastasis. Consult a pelvic-floor physical therapist for tailored modifications.
- Recent hip surgery or labral repair. Wait for surgeon clearance before adding abduction and external rotation under load. Early rehab usually starts with bilateral isometric glute work and progresses to side-lying abduction before quadruped patterns.
- Lower back pain that increases with the lift. Pain in the lower back during fire hydrants almost always means the pelvis is rotating. Reduce the lift height first; if it persists, build core stability with bird-dogs before returning to fire hydrants.
Related Exercises
- Same muscle group (hip abductors): clamshells are the classic side-lying alternative that targets the same gluteus medius without the wrist load.
- Complementary glute pattern (hip extension): donkey kicks work the gluteus maximus through hip extension. Pair them with fire hydrants as a superset for a complete glute warm-up.
- Compound glute strength: glute bridges load the glutes heavier through hip extension; activation work like fire hydrants pairs well as a warm-up before bridges or any heavier glute work.
- Core and hip stability foundation: bird-dogs use the same quadruped position and train anti-rotation core stability, which directly carries over to keeping your pelvis still during fire hydrants.
How to Program Fire Hydrants
Fire hydrants work best as activation, warm-up, or rehab work, not as a strength-building lift in their own right. Programming follows the general guidance for low-load isolation work in Ratamess et al., 2009 (American College of Sports Medicine Position Stand on Progression Models in Resistance Training), with the higher end of the rep ranges because the load is light.
| Level | Sets × Reps (per leg) | Rest between sets | Frequency |
|---|---|---|---|
| Beginner | 2-3 × 12-15 | 30-45s | 3-5 sessions/week |
| Intermediate | 3 × 15-20 (banded) | 30-60s | 3-5 sessions/week |
| Advanced | 3 × 15-20 (banded or with kick) | 45-60s | 3-5 sessions/week |
Where in your workout. Slot fire hydrants into your warm-up before any lower-body session that includes squats, lunges, deadlifts, or running. A common warm-up superset is 2 sets of 15 fire hydrants per leg paired with 15 donkey kicks per leg, no rest between exercises and 30 seconds between rounds. You can also use them as an end-of-session accessory after your main compound work, or as standalone activation work on rest days for hip stability or rehab.
Form floor over rep targets. The point of fire hydrants is glute medius activation, and that only happens when the pelvis stays still. If your hips start rotating in the last few reps, stop the set there. A clean 12 with locked pelvis beats a sloppy 20 with hip rotation every time.
FitCraft's AI coach Ty programs fire hydrants as part of your warm-up sequence when your plan includes lower-body compound movements. Ty's 3D demonstrations show the lift height for your level and the cueing emphasizes pelvic control rather than range of motion.
Frequently Asked Questions
Can I do fire hydrants with lower back pain?
Often yes, but the cause of the pain matters. Fire hydrants are low-load and are commonly used in rehab settings, so they generally don't aggravate non-specific lower back pain. If you have an acute disc issue, sacroiliac joint pain, or sharp pain when you lift the leg, stop and consult a physical therapist. The most common reason people feel fire hydrants in the lower back is that the pelvis is rotating instead of staying square. Reduce the lift height, brace your core harder, and the back sensation usually disappears within a few reps.
What muscles do fire hydrants work?
Fire hydrants primarily target the gluteus medius, the muscle on the side of your hip responsible for hip abduction and pelvic stabilization. Secondary muscles include the gluteus minimus, the deep hip external rotators (piriformis, gemelli, obturator internus and externus, quadratus femoris), and the upper fibers of the gluteus maximus. The core stabilizers and the supporting shoulder girdle work isometrically to keep the spine neutral throughout the rep.
How many fire hydrants should I do?
3 sets of 15 to 20 reps per leg for most people. Higher rep ranges work better for this low-load isolation exercise. Focus on the squeeze at the top and the slow tempo rather than cranking out as many reps as possible.
What's the difference between fire hydrants and donkey kicks?
Fire hydrants lift your knee to the side (hip abduction), targeting the gluteus medius. Donkey kicks push your foot toward the ceiling (hip extension), targeting the gluteus maximus. They're complementary exercises that work different parts of the glute complex.
Are fire hydrants good for beginners?
Yes. Fire hydrants are one of the most beginner-friendly hip exercises. They require no equipment, the range of motion is small, and the loading is low. They're commonly used in physical therapy and rehabilitation programs.
Why do I feel fire hydrants in my lower back?
Your hips are rotating when you lift your leg, forcing your lower back to compensate. Fix: reduce the height of your lift and brace your core harder. Your pelvis should stay completely still. Only your thigh rotates outward at the hip joint.