Half pigeon is the gentler sibling of pigeon pose. Same shape, same target muscles, but the front shin stays angled close to the body instead of folding parallel to the mat. The result: a deep stretch through the piriformis and front hip rotators with less torque on the front knee.
If you have tight hips (which most desk workers do), half pigeon is where you start. Hold it for several weeks. Build the mobility patiently. Many practitioners stay in half pigeon as their permanent hip opener and skip full pigeon entirely. That's a legitimate practice.
This guide covers the half-pigeon setup, the prop choices that keep the pelvis level, the cues that protect your knees, and the path forward to full pigeon and beyond if that's where you want to go.
Quick Facts: Half Pigeon
- Equipment needed: None (yoga mat, block, and folded blanket optional)
- Difficulty: Beginner
- Modality: Static hold · Hip opener
- Body region: Hips, glutes, hip flexors
- FitCraft quest category: Yoga / Flexibility
Muscles Engaged & Stretched
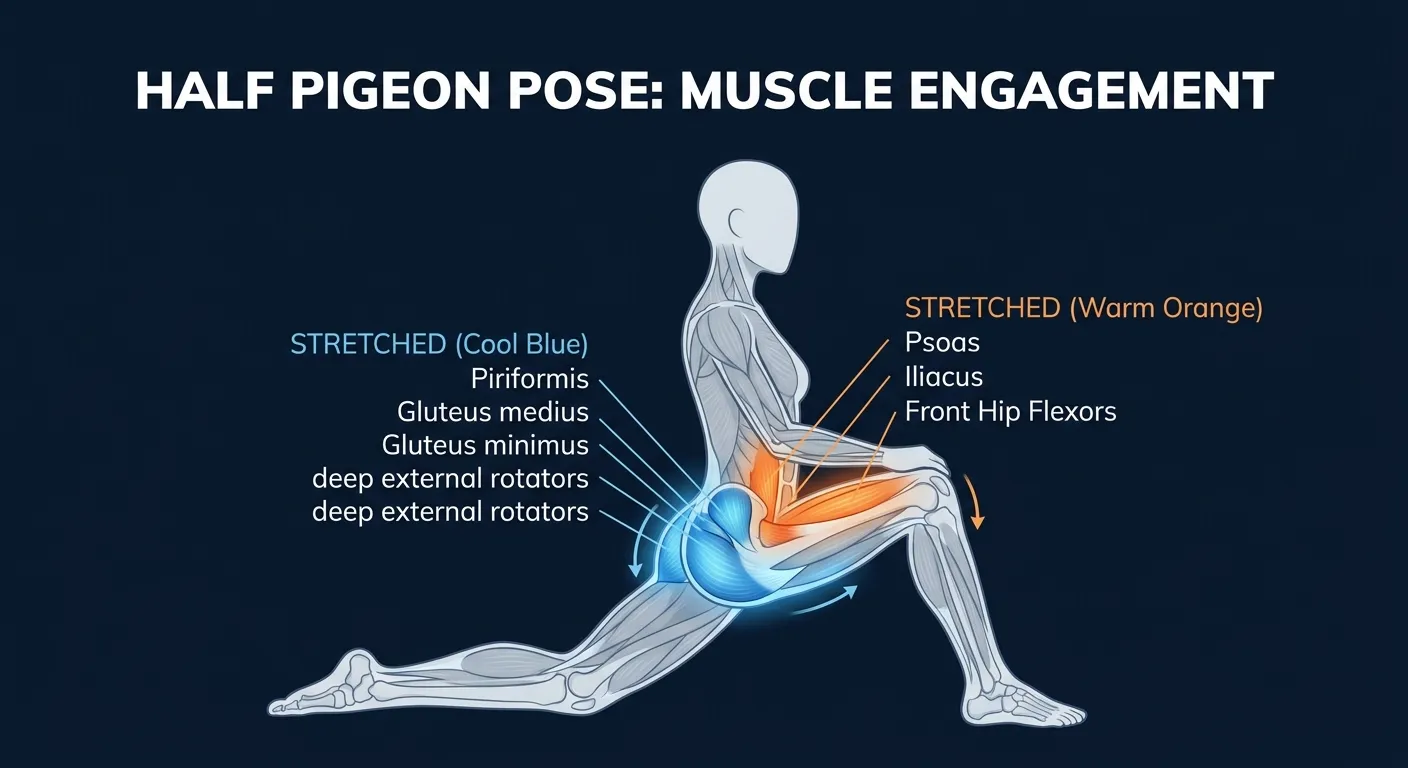
Primary tissues stretched. Half pigeon is a static hold, so the main adaptation comes from sustained length rather than concentric and eccentric reps. The front hip's piriformis, gemelli, obturators, and other deep external rotators lengthen as the thigh rests in flexion and external rotation. The gluteus medius and minimus also lengthen across the outside of the front hip. On the back leg, the psoas, iliacus, and rectus femoris lengthen as the hip extends behind you.
Secondary movers. The spinal extensors, lower trapezius, and deep neck flexors help keep the torso tall in the upright version. The adductors and hamstrings of the front leg assist by controlling the shin angle and keeping the knee from drifting. If you lower to your forearms, the shoulder girdle and serratus anterior add light support work.
Stabilizers and the breath. The transverse abdominis, obliques, erector spinae, gluteus medius, and deep hip stabilizers work isometrically to keep the pelvis level. The breath is part of the stabilization strategy. Slow diaphragmatic breathing reduces guarding through the hip capsule and makes it easier to hold the stretch without forcing depth.
Mechanism: why the block matters. Half pigeon is useful because it asks the hip to provide the rotation while the knee stays quiet. If the front hip floats and the pelvis tilts, the shin twists under the body and the knee takes stress it cannot buffer well. A block or folded blanket under the front hip restores a level pelvis, which lets the external rotators lengthen without forcing the joint below them.
Step-by-Step: How to Perform Half Pigeon
The cues below apply to the upright half-pigeon shape. Stay tall in this version rather than folding forward.
Step 1: Start in tabletop position
Come onto hands and knees with wrists under shoulders and knees under hips. Take one smooth diaphragmatic breath. Tabletop gives you a stable starting platform; transitioning from a standing pose tends to lead to sloppy alignment.
Coach Ty's cue: "Tabletop first. Settle into a clean platform before you transition."
Step 2: Slide the front shin forward
Slide your right knee forward toward your right wrist. Keep the right shin angled close to the body at roughly 45 degrees, with the right heel near the left hip. This shallower angle is what makes the pose half pigeon rather than full pigeon, and it keeps the front knee in a safer position.
Ty's cue: "Heel near opposite hip. Shin at 45, not parallel. That's the half-pigeon difference."
Step 3: Extend the back leg
Slide your left leg straight back behind you. Top of the left foot presses into the mat, toes pointing straight back. Square both hip points toward the front of the mat. The back hip will want to fall open to the side; resist that.
Ty's key cue: "Square the hips. Both points face forward, every breath."
Step 4: Prop the front hip if it lifts
If the right hip lifts off the mat (very common for tight hips), slide a yoga block or folded blanket under the right hip until the pelvis is level. Most practitioners need a prop here. Use whatever height the hip needs. The prop is what allows the stretch to land in the hip instead of the knee.
As Ty coaches it: "If the hip floats, prop it. The block is the actual pose."
Step 5: Stay upright and hold
Stay upright with hands resting by your hips, or rest your forearms on the floor for a slightly deeper version. Unlike full pigeon, half pigeon emphasizes staying tall rather than folding forward. Hold for 1 to 2 minutes per side, breathing slowly through the nose. Press back to tabletop and switch sides.
Ty's reminder: "Stay tall. The forward fold is full pigeon's job. Half pigeon targets the hip first."
Get this exercise in a personalized workout
FitCraft, our mobile fitness app, uses its AI coach Ty to program yoga poses like this into your plan at the right volume and intensity, based on your level, goals, and equipment. Ty was designed and trained by Domenic Angelino, MPH (Brown University) and NSCA-CSCS, with research published in the Journal of Strength and Conditioning Research and Medicine & Science in Sports & Exercise.
Take the Free Assessment Free · 2 minutes · No credit card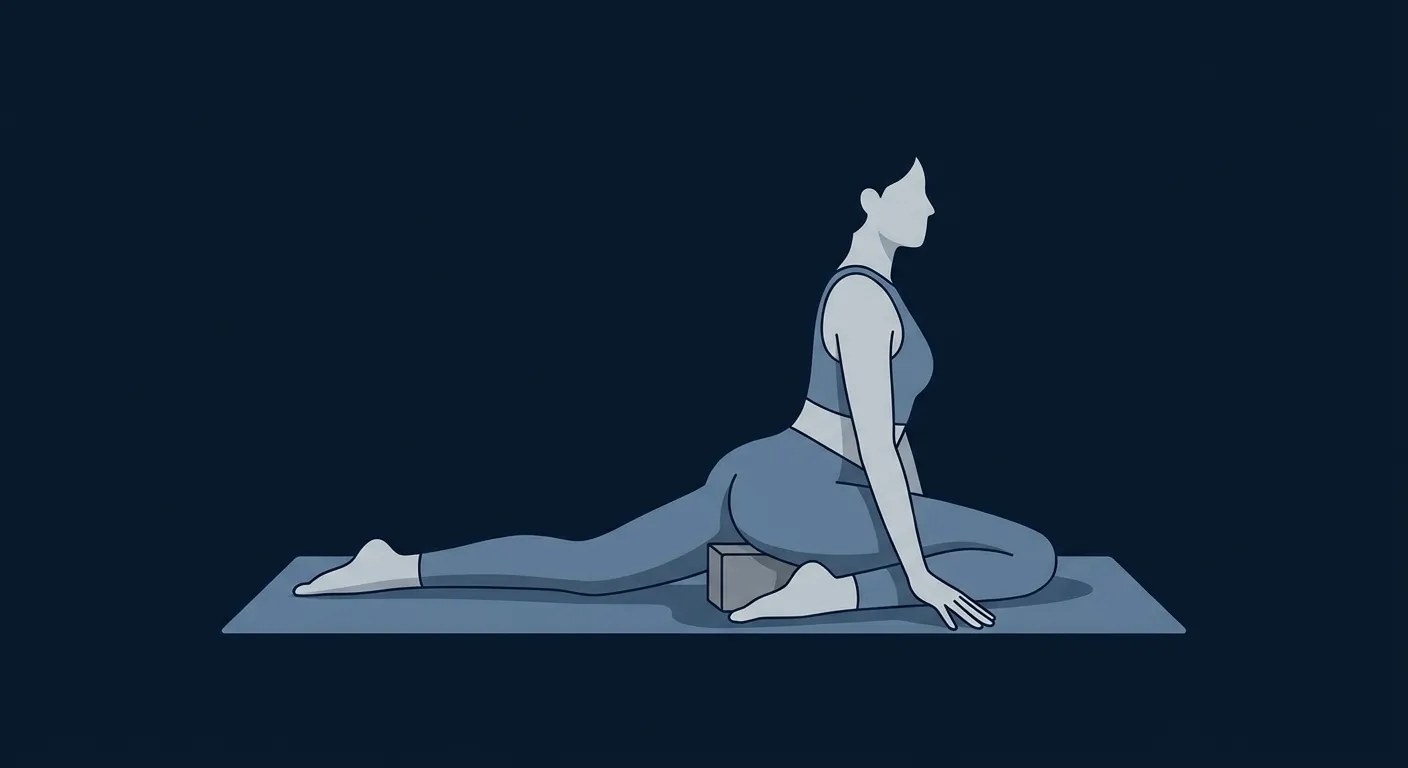
Common Mistakes (and How to Fix Them)
Here are the mistakes Ty corrects most often.
- Letting the front hip float off the mat. The right hip lifts and the pelvis tilts. Why it's a problem: the front shin rotates and the knee absorbs torque. Fix: slide a block or folded blanket under the floating hip until the pelvis is level. Most people need this.
- Forcing the shin too parallel to the mat. Trying to copy a yoga-magazine photo where the shin is parallel. Why it's a problem: that's full pigeon, not half pigeon, and it loads the front knee in deep external rotation. Fix: keep the shin angled at 45 degrees with the heel near the opposite hip. Save the parallel shin for full pigeon when you've built the mobility.
- Collapsing the back hip out to the side. The back leg drifts outward and the pelvis rotates. Why it's a problem: the hip flexor stretch disappears and the front knee gets uneven loading. Fix: actively press the back thigh and toes into the mat, and check that both hip points still face forward.
- Folding forward in half pigeon. The forward fold belongs to full pigeon, not half pigeon. Why it's a problem: folding deepens the pose past what the hip is ready for and shifts load into the lower back. Fix: stay upright or only come to forearms. Save the forehead-to-floor fold for full pigeon.
- Skipping the prop because "beginners use blocks." Avoiding the block as a pride thing. Why it's a problem: without the prop, the pelvis tilts and the pose stops working in the right place. Fix: use the block. Tall practitioners often need taller blocks. The prop is the pose for most people.
- Holding the breath. Clamping down during the deep hip stretch. Why it's a problem: the nervous system reads breath-holding as danger and resists the stretch. Fix: count five slow nasal breaths to settle, then keep breathing. If the breath shortens, back off depth.
Half Pigeon Variations: Regressions and Progressions
Start where you are and progress when your form is solid at the current level.
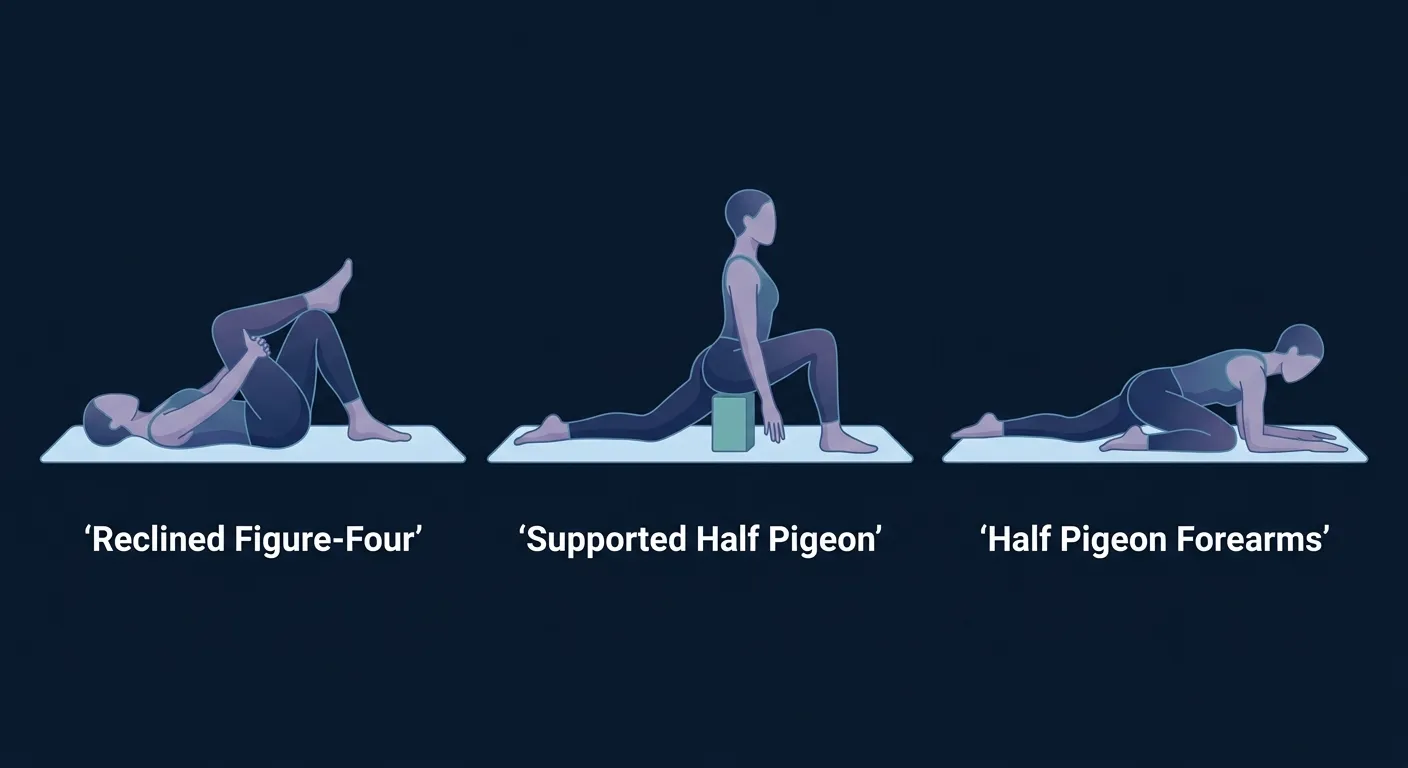
Reclined figure-four stretch (Beginner Regression)
Lie on your back. Cross your right ankle over your left thigh just above the knee. Thread your hands behind the left thigh and gently draw the legs toward your chest. Same piriformis target as half pigeon, with the floor supporting the pelvis and zero load on the front knee. Use this version if half pigeon feels uncomfortable in the knee.
Supported half pigeon with block (Standard for most people)
The standard half-pigeon shape with a yoga block or folded blanket under the front-leg hip. This is where most practitioners spend most of their time. The prop keeps the pelvis level so the stretch lands in the hip while the knee stays quiet.
Half pigeon, forearms down (Intermediate progression)
From supported half pigeon, walk your hands forward and lower onto your forearms. The torso angles down slightly without fully folding. Adds depth without overloading the front knee.
Full pigeon (Intermediate-to-advanced progression)
Angle the front shin closer to parallel with the front of the mat and fold forward over the front leg. This is the deeper version that most yoga classes mean by "pigeon pose." See the dedicated pigeon pose guide for the full setup. Move here only when half pigeon feels easy and the pelvis stays level without a prop.
When to Avoid or Modify Half Pigeon
Half pigeon is safe for most healthy adults, but the front hip and knee position makes smart modifications important. Always consult your physician or physical therapist before starting a new exercise practice, especially if any of the following apply.
- Front-knee pain, meniscus irritation, or recent knee surgery. Skip the floor version if the front knee feels pinched, twisted, or unstable. Switch to a reclined figure-four stretch and return only when the hip can rotate without knee symptoms.
- Acute hip injury, labral symptoms, or deep groin pain. Half pigeon places the front hip in deep flexion and external rotation. Use a higher prop, reduce the angle, or choose butterfly pose until the hip tolerates the position.
- Recent surgery affecting the spine, hips, or knees. Get clearance before using long static hip holds. During rehab, use a block, blanket, wall, or chair-supported setup prescribed by your clinician.
- Late pregnancy. The belly, pelvic pressure, and shifting center of gravity can make prone hip-openers uncomfortable. Use pregnancy-specific yoga modifications from a qualified prenatal instructor.
- Lower-back pain that worsens in deep hip flexion. Stay upright and supported. Pair the pose with cat-cow first so the lumbar spine can move before you settle into the hold.
- Hypermobility or connective tissue disorders. Avoid sinking passively into the deepest shape. Use muscular engagement, keep the front foot active, and treat a mild stretch as the endpoint.
Related Exercises
Half pigeon fits into a broader hip-opening and yoga-mobility sequence. These pair well as you build range without forcing the front knee.
- Same body region, deeper progression: Pigeon pose uses the same hip-opening pattern with a deeper shin angle and optional forward fold.
- Advanced hip-opener progression: Royal pigeon pose adds a backbend and quad stretch once the basic pigeon family is comfortable.
- Easier seated hip opener: Butterfly pose opens the inner thighs and hips with both knees supported by gravity instead of one leg under the body.
- Spine and pelvis prep: Cat-cow warms up pelvic tilt and lumbar motion before static hip work.
- Core foundation for stable holds: Deadbugs build the trunk control that helps you keep the pelvis level instead of dumping into the lower back.
How to Program Half Pigeon
Yoga programming differs from resistance training because the stimulus is mobility and isometric endurance rather than progressive overload. Frequency can be daily when the pose stays pain-free. The American College of Sports Medicine's resistance training guidelines (Ratamess et al., 2009) inform the broader training framework, but for static yoga holds the practical variables are hold time, breath quality, and weekly exposure.
| Level | Hold time | Reps/sets | Frequency |
|---|---|---|---|
| Beginner | 3-5 breaths (15-30 seconds) | 1-2 holds per side, supported with a block or blanket | 3-5 sessions/week |
| Intermediate | 5-10 breaths (30-60 seconds) | 2-3 holds per side, upright or forearms down | 4-6 sessions/week |
| Advanced | 10-15+ breaths (60-90+ seconds) | 3-5 holds per side, deeper half pigeon or full pigeon progression | 5-7 sessions/week |
Where in your workout. Use half pigeon near the end of a yoga session after the hips are warm, as a cool-down after lower-body training, or as a standalone mobility break after long sitting. If you use it before heavy squats, lunges, or jumps, keep the hold short and gentle so you do not downshift force production before training.
Form floor over time targets. The hold ends when the front knee complains, the breath gets tight, or the pelvis starts rolling open. A supported 30-second hold with quiet breathing beats a forced 2-minute hold in a twisted position.
How FitCraft Programs This Exercise
Knowing how to do half pigeon is step one. Knowing how long to hold, how often to practice, and when to progress is where most people get stuck.
FitCraft's AI coach Ty uses your personalized assessment to match yoga and mobility work to your level, goals, and available equipment. For hip openers like half pigeon, that means choosing a depth and hold time that fit your current mobility rather than forcing the deepest version on day one.
As your practice develops, Ty adjusts the variation and volume to match your progress. The exercise logic is designed by Domenic Angelino, MPH (Brown University) and NSCA-CSCS, then adapted to your program in the app.
Frequently Asked Questions
Can I do half pigeon with knee pain?
Modify or skip half pigeon if it causes front-knee pain. Most knee discomfort comes from forcing the shin too parallel or letting the pelvis tilt, which transfers rotation from the hip into the knee. Use a block under the front hip, keep the heel closer to the opposite hip, or switch to reclined figure-four. If pain persists, stop and get assessed by a qualified clinician.
What is the difference between half pigeon and pigeon pose?
Half pigeon keeps the front shin angled close to the body, with the heel near the opposite hip and the shin at roughly 45 degrees. Full pigeon angles the front shin closer to parallel with the front of the mat and often adds a forward fold. Half pigeon gives a similar hip stretch with less front-knee torque.
What muscles does half pigeon stretch?
Half pigeon primarily stretches the piriformis and the deep external rotators of the front hip, plus the hip flexors (psoas, iliacus) of the back leg. The gluteus medius and minimus of the front hip also lengthen. Because the torso stays upright, half pigeon emphasizes the hip stretch rather than the lower-back stretch you get in folded full pigeon.
How long should I hold half pigeon?
Hold half pigeon for 1 to 2 minutes per side. If you're working specifically on hip mobility, you can extend to 3 to 5 minutes per side as a yin-style hold, but only once you have the prerequisite mobility and only if your breath stays slow and easy throughout. Practice 3 to 5 sessions per week.
When should I move from half pigeon to full pigeon?
Move from half pigeon to full pigeon when your pelvis stays level in half pigeon without a prop and you can hold the shape for 1 to 2 minutes per side with slow breathing. Then start angling the front shin slightly more parallel to the mat over weeks of practice. There is no rush. Many practitioners stay in half pigeon long-term because it gives the hip stretch without the knee risk.