Heel taps are one of those exercises that look almost too simple to work. You lie on the floor, bend your knees, and tap your heels. That's it? That's the whole exercise?
Yes. And when you do them correctly, your obliques will let you know about it by rep eight. Here's the thing: this exercise works so well for beginners because it isolates lateral spinal flexion (side bending) in a position where your back is fully supported by the floor. There's almost no way to hurt yourself, the coordination demand is low, and you can feel exactly which muscles are firing. So if you've tried more complex oblique exercises like Russian twists or bicycle crunches and couldn't quite feel your obliques working, heel taps are where you start.
But there's a catch. Because heel taps are simple, people rush through them. They bob their heads, flail their arms, and turn a targeted oblique exercise into a full-body wiggle. That's not training. That's just wiggling on the floor. So this guide covers the form that actually works, the mistakes that waste your time, and how to progress when the basic version stops challenging you.
Quick Facts: Heel Taps
- Equipment needed: None (bodyweight only; mat optional)
- Difficulty: Beginner (regressions and weighted progressions available)
- Modality: Bodyweight isolation, controlled dynamic lateral spinal flexion
- Body region: Core (lateral / obliques)
- FitCraft quest category: Core / Strength
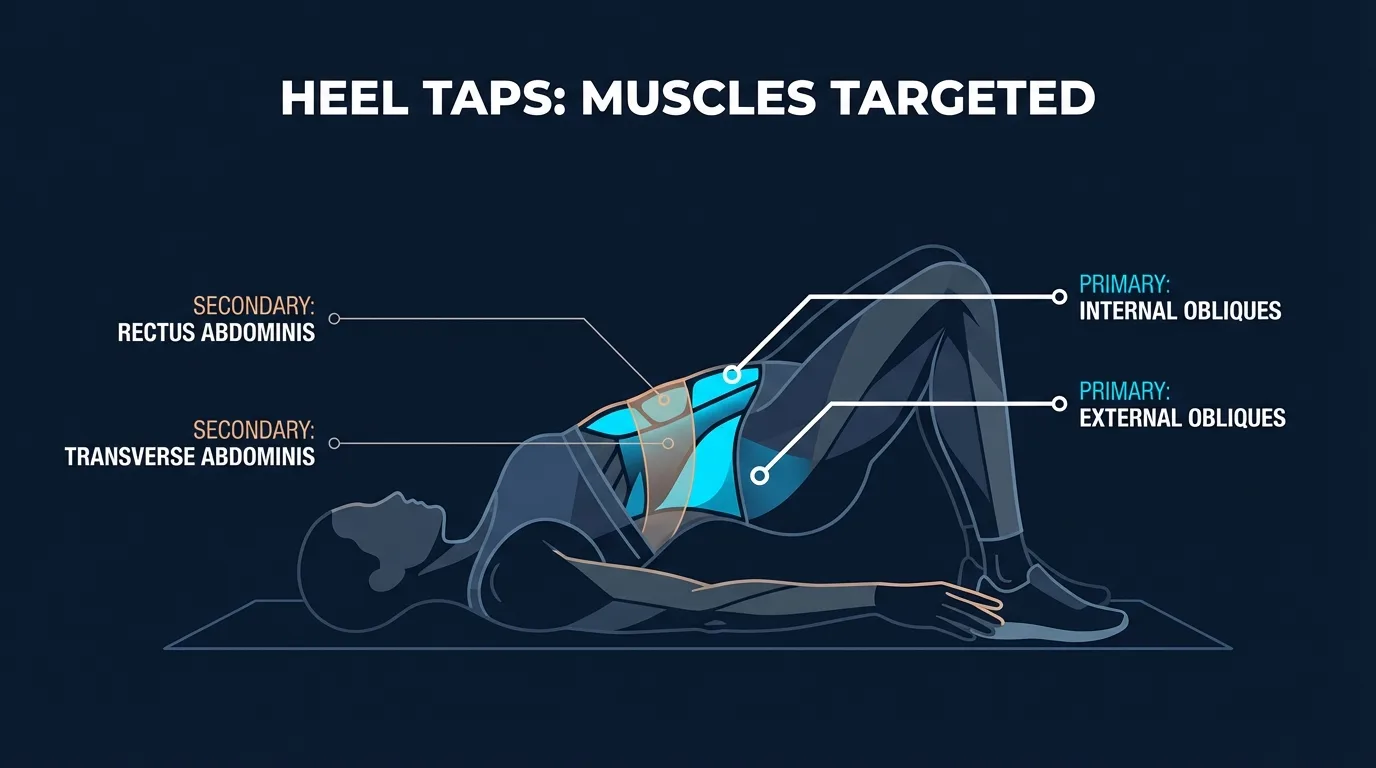
Muscles Worked
Primary movers. Heel taps load the internal and external obliques concentrically during the side-bending reach toward each heel, and eccentrically as you return to the center crunch position. Because the movement is lateral spinal flexion (a sideways bend at the waist), the obliques on the side you're reaching toward shorten under load while the opposite-side obliques lengthen under tension. Alternating taps train both sides evenly within a single set.
Secondary movers. The rectus abdominis works isometrically the entire time to keep your shoulder blades elevated off the mat, the position that defines the exercise. If your head and shoulders drop between taps, the rectus disengages and the obliques lose their leverage. The deep neck flexors and upper-thoracic spinal segments also contribute to holding the crunch.
Stabilizers. The transverse abdominis braces the spine and ribcage during each lateral reach, preventing the lumbar spine from buckling sideways. The diaphragm and pelvic floor form the deep core canister around the trunk; exhaling on each reach reinforces transverse abdominis activation and keeps intra-abdominal pressure controlled. The hip flexors hold the knees bent and feet planted, while the glutes and hamstrings keep the pelvis quiet so the movement comes from the spine and not from rolling hips.
Evidence and mechanism. Heel taps are kinesiologically a controlled lateral flexion drill, and EMG work on side-bending patterns consistently shows the internal obliques as the dominant lateral flexors of the trunk, with the external obliques contributing during ipsilateral bending (the side you bend toward). Because the exercise is performed supine with the back supported, shear and compressive loads on the lumbar spine stay low compared with seated rotational patterns like Russian twists. The mechanism is straightforward: shorten the distance between the lower ribs and the iliac crest on the reaching side, the obliques fire to produce that shortening, the rectus abdominis holds the crunch so the obliques have a stable anchor to pull from.
How to Do Heel Taps (Step-by-Step)
- Set your starting position. Lie face-up on a mat with your knees bent and feet flat on the floor. Your feet should be about 6 to 8 inches from your glutes, close enough that you can reach your heels when you side-bend. Place your arms straight at your sides, palms facing down. Now lift your head, neck, and shoulder blades off the mat into a slight crunch. Hold that position. This is where you stay for the entire set.
Coach Ty's cue: "Imagine a tennis ball under your upper back. You never want to crush it. That constant crunch is what keeps your rectus abdominis engaged while your obliques handle the side bending."
- Reach toward your right heel. Keeping your shoulder blades elevated, laterally flex your torso to the right. Slide your right hand along the floor (or just above it) toward your right heel or ankle. The movement is a short side bend. Your whole torso shifts sideways, and not forward. You should feel a contraction in your right oblique as you reach. Touch or tap the heel, then return to center.
Coach Ty's cue: "Bend sideways, don't crunch forward. If your shoulders are lifting higher when you reach, you're crunching. If your whole torso shifts left or right like a pendulum, you're doing it right."
- Return to center. Come back to the neutral crunch position with control. Don't drop your shoulders to the mat. Don't lift higher. Just return to the starting position and pause for a beat.
- Reach toward your left heel. Same movement, opposite side. Laterally flex your torso to the left, sliding your left hand toward your left heel. Feel the squeeze in your left oblique. Touch, then return to center. One right tap plus one left tap equals one full rep.
- Breathe and repeat. Exhale each time you reach toward a heel. Inhale as you return to center. Keep your lower back pressed into the mat and your core braced the entire time. Don't hold your breath. Beginners: 3 sets of 12 to 15 reps per side. If your neck starts to fatigue before your obliques, that's a sign you need to refocus on your core doing the work.
Coach Ty's cue: "Slow it down. Two seconds to reach, two seconds to return. The burn should be in the side of your waist, not in your neck."
Common Mistakes to Avoid
Heel taps are beginner-friendly, but that doesn't make them mistake-proof. These are the errors that turn a solid oblique exercise into wasted floor time.
- Dropping your head between reps. Every time your head and shoulders touch the mat between taps, you reset the exercise. Your abs relax, you lose tension, and the next tap starts from scratch. That constant crunch position is what makes heel taps effective. If your neck fatigues before your obliques, try pressing your tongue to the roof of your mouth. It engages the deep neck flexors and takes strain off the surface muscles. Still doesn't help? Your neck endurance needs separate work.
- Reaching with your arm instead of your torso. Your hand touching your heel is a result. The goal is lateral flexion of your spine. If you're stretching your arm while your torso stays perfectly still, your obliques aren't doing much. Think about shortening the distance between your ribcage and your hip on the reaching side. The arm just follows along.
- Moving your hips or knees. Your lower body stays completely still during heel taps. If your knees are swaying side to side, you're rotating your hips instead of bending your spine laterally. Plant your feet, lock your knees in place, and make all the movement come from above your waist. Wandering knees make the exercise easier in the worst possible way.
- Going too fast. By far the most common mistake. Doing 30 heel taps in 15 seconds feels productive, but the obliques barely fire when momentum drives the movement. Research consistently shows that slower tempos increase time under tension and muscle activation in abdominal exercises (Lacerda et al., 2015). Two seconds per tap is plenty fast. Want it harder? Slow down instead of speeding up.
Get this exercise in a personalized workout
FitCraft, our mobile fitness app, uses its AI coach Ty to program core stability work like this into your plan at the right volume and intensity, based on your level, goals, and equipment. Ty was designed and trained by Domenic Angelino, MPH (Brown University) and NSCA-CSCS, with research published in the Journal of Strength and Conditioning Research and Medicine & Science in Sports & Exercise.
Take the Free Assessment Free · 2 minutes · No credit card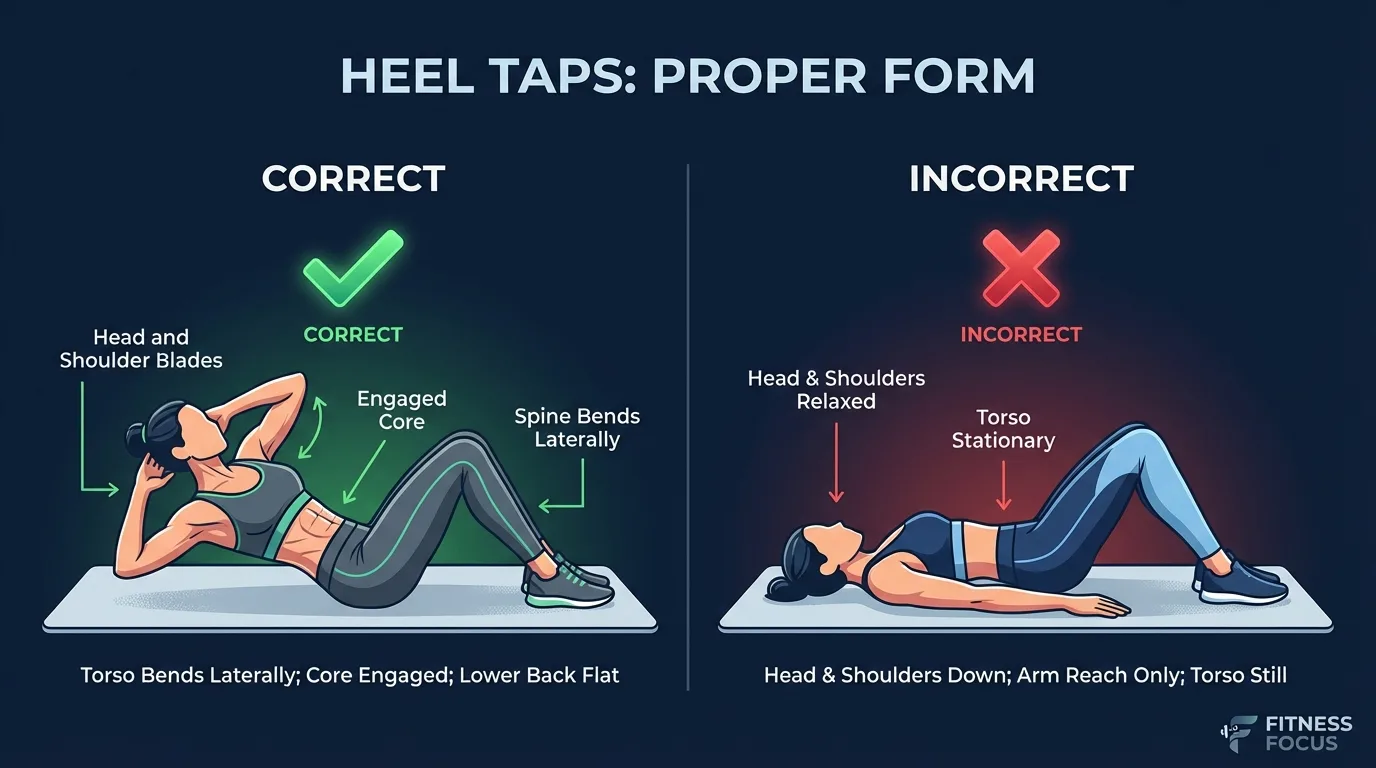
Variations: From Beginner to Advanced
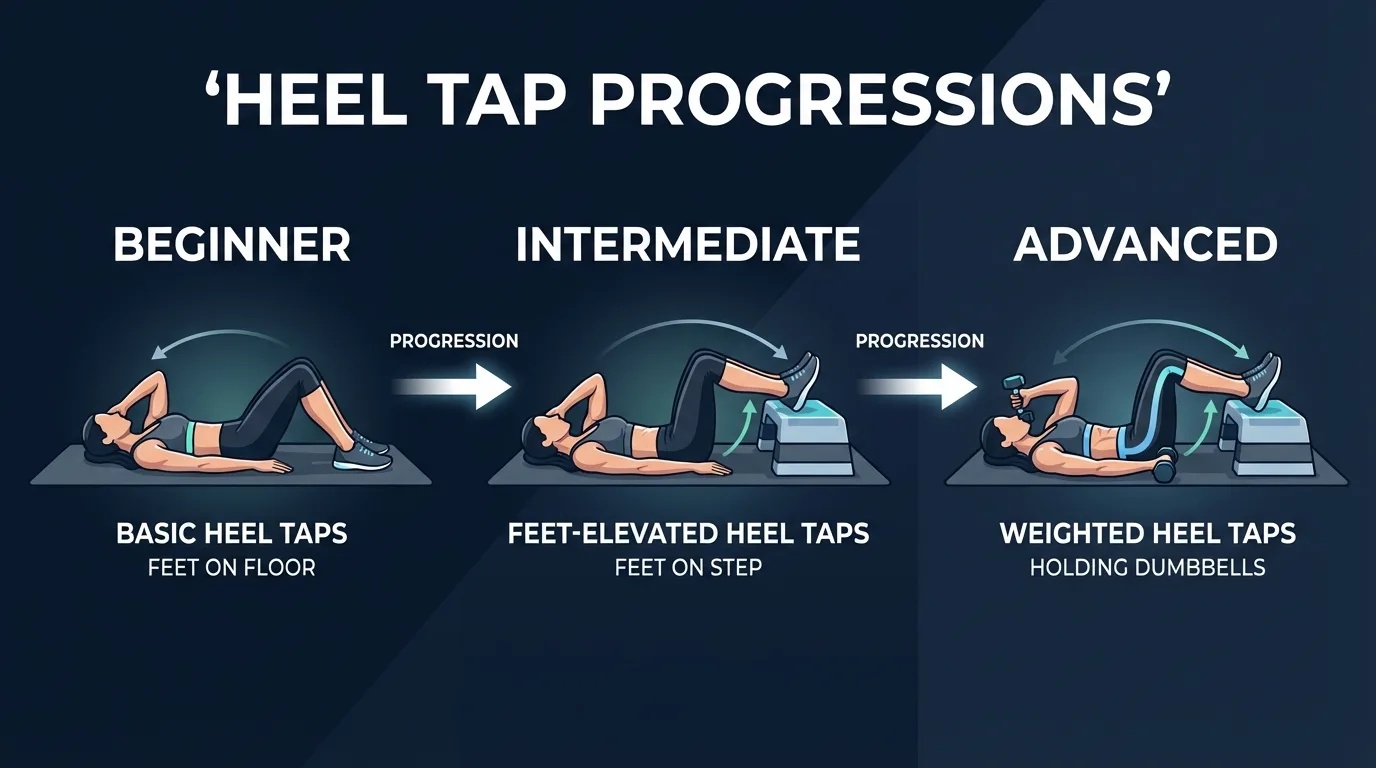
Basic Heel Taps (Beginner)
This is the standard version described above. Feet flat on the floor, shoulder blades lifted, alternating side bends to tap each heel. Master the slow, controlled tempo first. When you can comfortably do 3 sets of 20 reps per side with a two-second tempo per tap, you're ready to progress.
Feet-Elevated Heel Taps (Intermediate)
Place your feet on a low step, yoga block, or the edge of a couch. Anything that raises them 6 to 8 inches off the floor. Now your heels are further from your hands, which forces a deeper lateral flexion to reach them. More range of motion means more oblique work per rep. The movement pattern stays identical, but the difficulty jump is noticeable. You'll feel it on the first set.
Weighted Heel Taps (Advanced)
Hold a light dumbbell (5 to 10 lbs) in one hand and perform all reps on that side before switching. The added resistance increases oblique loading meaningfully. Another option: hold a weight in both hands stacked at your chest and alternate sides. This forces your core to stabilize asymmetrically on every rep. Start light. Your obliques are smaller muscles and they fatigue fast under load.
Alternative Exercises
If heel taps aren't quite what you need, these alternatives target the obliques differently:
- Bicycle crunches: More advanced. Adds rotation and hip flexion to the oblique work. According to ACE-sponsored research, bicycle crunches produce the highest overall abdominal activation of any common ab exercise. Graduate to these once heel taps feel easy.
- Side planks: An isometric oblique exercise where you hold a side-lying position. Great for building oblique endurance and core stability. They pair really well with heel taps in a core circuit, since one is dynamic and the other is static.
- Seated side bend: An upright variation of the same lateral-flexion pattern, useful when you need a quick oblique drill without lying on the floor.
When to Avoid or Modify Heel Taps
Heel taps are safe for most healthy adults thanks to the supine, fully supported position and the small range of motion. A handful of conditions warrant modification or postponement. Always consult a qualified healthcare provider or physical therapist before starting or returning to any core training program.
- Acute lower-back pain or known disc pathology. Even though heel taps don't load the spine like sit-ups do, active lateral flexion can aggravate certain disc and facet-joint issues. Regress to deadbugs or bird-dogs until cleared by a physical therapist, then reintroduce heel taps with a very small range of motion.
- First 6 to 8 weeks postpartum or active diastasis recti. Lateral flexion combined with the crunch position can widen abdominal separation. Restore deep-core function first with diaphragmatic breathing, transverse abdominis activation, and bird-dogs and deadbugs.
- Recent abdominal surgery (C-section, hernia repair, appendectomy). Get clearance from your surgeon. Most post-surgical protocols start with diaphragmatic breathing, progress to gentle bracing, then add progressive loading before any active flexion or side-bending.
- Hernia (umbilical, inguinal, ventral). Any movement that increases intra-abdominal pressure can worsen a hernia. Consult your physician about safe options before adding heel taps.
- Pregnancy (second and third trimesters). Avoid extended supine positions because of vena cava compression. Substitute upright or side-lying lateral-flexion drills, or simple seated side bends.
- Pelvic-organ prolapse or pelvic-floor dysfunction. The exhale-on-effort pattern matters a lot here. Work with a pelvic-floor PT to make sure you're managing intra-abdominal pressure correctly before progressing to higher-tension core work.
- Chronic neck strain. If holding the head off the mat dominates the set before your obliques fatigue, support the back of your head with one hand (elbow flared) and keep the elbow lifted with the shoulder blade. This reduces cervical strain while preserving the crunch.
Related Exercises
- Same lateral-flexion pattern: seated side bend (upright lateral flexion, often loaded with a dumbbell).
- Rotational oblique work: bicycle crunches, Russian twists, twist crunches, standing twists.
- Isometric oblique work: side planks (anti-lateral-flexion, pairs well with heel taps in a core circuit).
- Core foundation (universal): deadbugs, bird-dogs. Anti-extension and anti-rotation drills that build the bracing pattern heel taps rely on.
- Sagittal-plane partners: crunches, leg raises, hollow holds. Pair with heel taps for balanced ab development across flexion and lateral flexion.
- Anti-extension progression: forearm planks. Graduate here once your bracing is solid.
How to Program Heel Taps
The general programming framework below follows the ACSM Position Stand on Resistance Training (Ratamess et al., 2009). Heel taps sit in the dynamic rep-based core camp, alongside crunches and bicycle crunches, with three progression levers: range of motion (feet flat vs feet elevated), tempo (1-second reach vs 3-second reach), and external load (none vs dumbbell).
| Level | Sets × Reps (per side) | Rest between sets | Frequency |
|---|---|---|---|
| Beginner | 2 to 3 × 8 to 12 | 45 to 60 seconds | 2 to 4 sessions/week |
| Intermediate | 3 × 10 to 20 (feet flat or feet elevated) | 45 to 60 seconds | 3 to 5 sessions/week |
| Advanced | 3 to 4 × 15 to 30 (slow tempo, optional dumbbell) | 60 seconds | 4 to 6 sessions/week |
Where in your workout. Heel taps fit best at the end of a resistance-training session as a core finisher, on a dedicated core day, or as part of a 3- to 4-exercise oblique circuit paired with side planks and bicycle crunches. Avoid programming heavy core work like heel taps right before heavy compound lifts (squats, deadlifts, overhead press); fatigued obliques compromise spinal stability under load.
Form floor over rep targets. If your shoulder blades drop to the mat, the rep doesn't count. End the set when form breaks rather than chasing the rep number. A clean set of 12 with full lateral flexion beats a messy set of 25 with hips swaying and head bouncing.
FitCraft's AI coach Ty adjusts the variation and volume of heel taps to match your level, with clear demonstrations of the lateral bending motion from multiple angles and personalized form feedback that distinguishes sideways bending from forward crunching.
Frequently Asked Questions
Can I do heel taps if I have lower-back pain?
Heel taps load the trunk through lateral spinal flexion in a fully supported position, with the back resting on the mat. That makes them gentler than loaded sit-ups or rotational movements like Russian twists. Still, anyone with acute lower-back pain, known disc pathology, or a recent flare-up should consult a qualified healthcare provider or physical therapist before adding heel taps. A common safer starting point is bird-dogs or deadbugs for 2 to 4 weeks to restore deep-core bracing, then layer in heel taps with a small range of motion once the back tolerates active bending.
What muscles do heel taps work?
Heel taps primarily target the obliques (both internal and external) through lateral spinal flexion. Secondary muscles include the rectus abdominis, which maintains the crunch position throughout the set, and the transverse abdominis, which stabilizes the spine. The exercise is one of the most accessible ways to train the obliques without any equipment.
How many heel taps should I do per day?
For most beginners, 3 sets of 12 to 15 reps per side, performed 2 to 3 times per week, is an effective starting point. That totals 72 to 90 touches per session. Focus on controlled movement and oblique contraction rather than speed. If the exercise feels too easy at 20 reps per side, progress to a harder variation like feet-elevated or weighted heel taps rather than simply adding volume.
Are heel taps good for beginners?
Yes, heel taps are one of the best beginner core exercises because the range of motion is small, no equipment is needed, and the movement pattern is easy to learn. They teach lateral spinal flexion in a supported position on the floor, which reduces injury risk. Beginners who struggle with bicycle crunches or Russian twists often find heel taps more manageable as a starting point for oblique training.
Can heel taps give you a smaller waist?
Heel taps strengthen and tone the oblique muscles, but no exercise can spot-reduce fat from a specific area. A smaller-looking waist comes from reducing overall body fat through a caloric deficit combined with building the obliques and transverse abdominis for a tighter midsection. Heel taps are a solid piece of that equation when paired with consistent training and nutrition.
What is the difference between heel taps and bicycle crunches?
Heel taps use lateral flexion (bending side to side) to target the obliques, while bicycle crunches use rotation (twisting) combined with hip flexion. Heel taps keep both feet on the floor and are significantly easier, making them better for beginners. Bicycle crunches are more advanced and generate higher overall abdominal activation according to ACE research, but they require more coordination and core strength to perform correctly.