Everyone thinks they know how to do a crunch. Lie down, put your hands behind your head, and yank yourself up as fast as possible. Right? Wrong. That version strains your neck, lets momentum do the work, and is why so many people think crunches are useless or, worse, dangerous.
Done correctly, the crunch is a highly effective core isolation exercise that targets your rectus abdominis with minimal equipment and space. The key is technique: where you initiate the movement, how you control the tempo, and what you do at the top of each rep.
What follows is step-by-step instruction for both the partial crunch (beginner) and the standard crunch (intermediate), with form tips for the key steps.
Quick Facts: Crunch
- Equipment needed: None (bodyweight)
- Difficulty: Beginner (partial crunch) to Intermediate (standard crunch)
- Modality: Strength
- Body region: Core
- FitCraft quest category: Strength
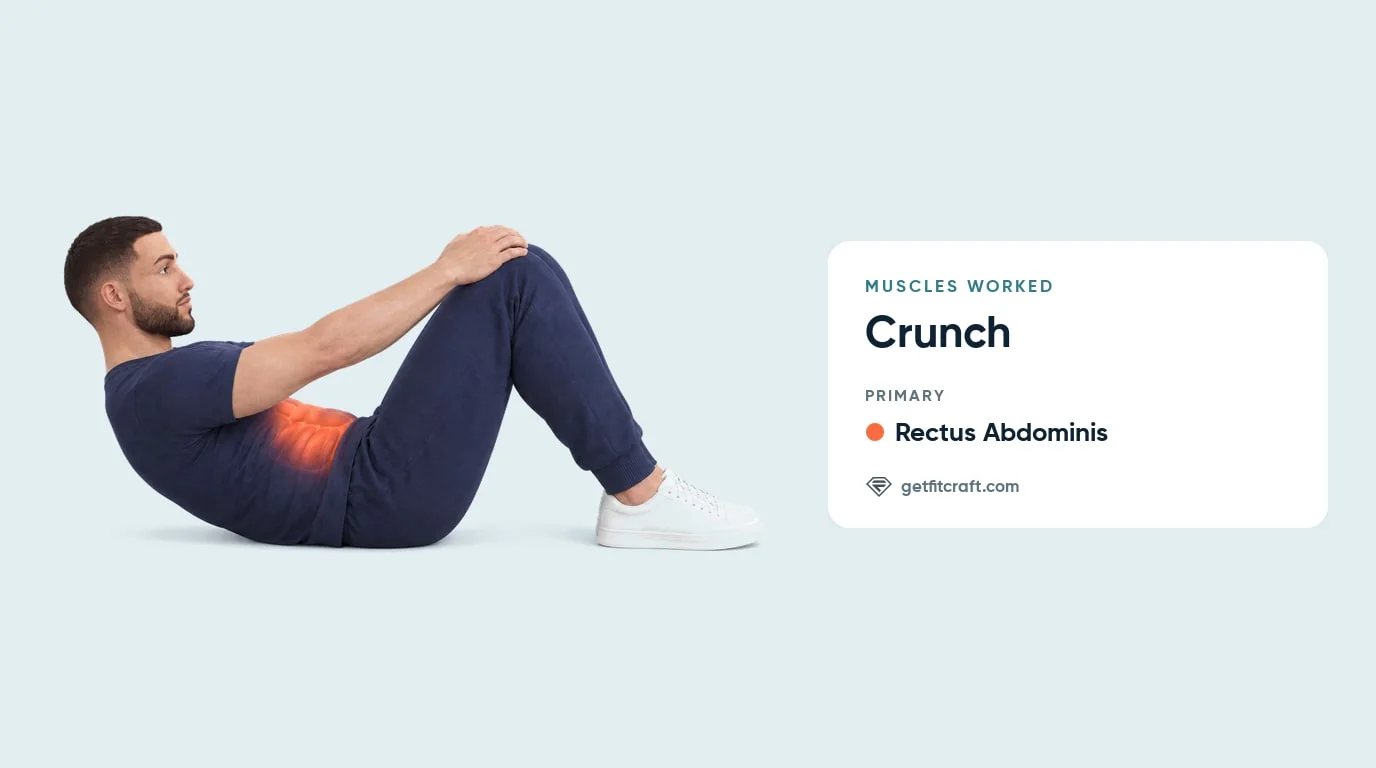
Muscles Worked
Primary movers. The rectus abdominis is the main muscle doing the work. It runs vertically along the front of the abdomen from the sternum and lower ribs down to the pubis, and its action is to flex the spine by bringing the ribcage closer to the pelvis. During a crunch, the rectus abdominis contracts concentrically as you curl up and eccentrically as you lower under control. The upper portion of the muscle bears most of the load because the movement lifts the upper trunk while the pelvis stays fixed.
What the research shows. In EMG testing the crunch ranked among the highest exercises for the rectus abdominis (Escamilla et al., 2006). The hip flexors are not a working muscle here: rectus femoris activity in the crunch was among the lowest of the exercises tested (Escamilla et al., 2010). They join in when you sit all the way up, which turns the crunch into a sit-up, so keep your lower back and hips on the floor.
Stabilizers. ExRx lists no significant stabilizers for the crunch, and lower-back (lumbar paraspinal) muscle activity stays low during it (Escamilla et al., 2006). Breathe out as you curl up and in as you lower.
Mechanism note. The crunch is mechanically distinct from the sit-up despite the visual similarity. A crunch isolates spinal flexion through about 30 degrees of upper-trunk lift, with the lower back and hips staying on the floor. A sit-up uses both spinal flexion and hip flexion, lifting the entire torso to vertical and recruiting the psoas and rectus femoris heavily. For pure rectus abdominis development, the crunch keeps tension on the target muscle without recruiting hip flexors as the primary movers. This is why crunches remain a fixture in most evidence-based core programs despite criticism of their spinal-loading profile.
Step-by-Step: How to Perform a Crunch
Whether you're starting with partial crunches or performing the standard version, the setup and movement cues are nearly identical. The difference is range of motion.
Step 1: Set Your Starting Position
Lie face up on a mat with your knees bent and your feet flat on the floor, hip-width apart, heels about 12 to 18 inches from your tailbone. Rest your hands on the fronts of your thighs with your arms straight, and keep a small gap between your chin and chest.
Form tip: keep your feet flat on the floor for the whole set.
Step 2: Brace Your Core
Before you move, engage your abdominal muscles. Draw your belly button toward your spine and press your lower back gently into the floor. Your lower back and hips stay on the floor for the whole rep.
Step 3: Curl Your Shoulders Off the Floor
Exhale and curl your head, shoulders and upper back off the floor, sliding your hands up your thighs. Think about curling your ribcage toward your pelvis rather than sitting up. For partial crunches, stop when your hands are about halfway up your thighs and your shoulders have just cleared the floor. For standard crunches, keep curling until your hands reach your kneecaps, about 30 degrees of trunk lift, with your lower back and hips still on the floor.
Form tip: curl your upper back off the floor, not just your head, and keep a small gap between your chin and chest.
Step 4: Squeeze at the Top
At the top of the movement, hold for a beat, about one second, with your abs tight before you lower. Feel the contraction.
Step 5: Lower with Control and Repeat
Slowly lower your shoulders back to the floor. Don't just drop. Resist gravity on the way down. Repeat with the same controlled tempo on every rep.
Form tip: lower until your shoulders touch down, then start the next rep smoothly, with no jerking.
Get this exercise in a personalized workout
FitCraft, our mobile fitness app, uses its AI coach Ty to program core stability work like this into your plan at the right volume and intensity, based on your level, goals, and equipment. Ty was designed and trained by Domenic Angelino, MPH (Brown University) and NSCA-CSCS, with research published in the Journal of Strength and Conditioning Research and Medicine & Science in Sports & Exercise.
Take the Free Assessment Free · 2 minutes · No credit card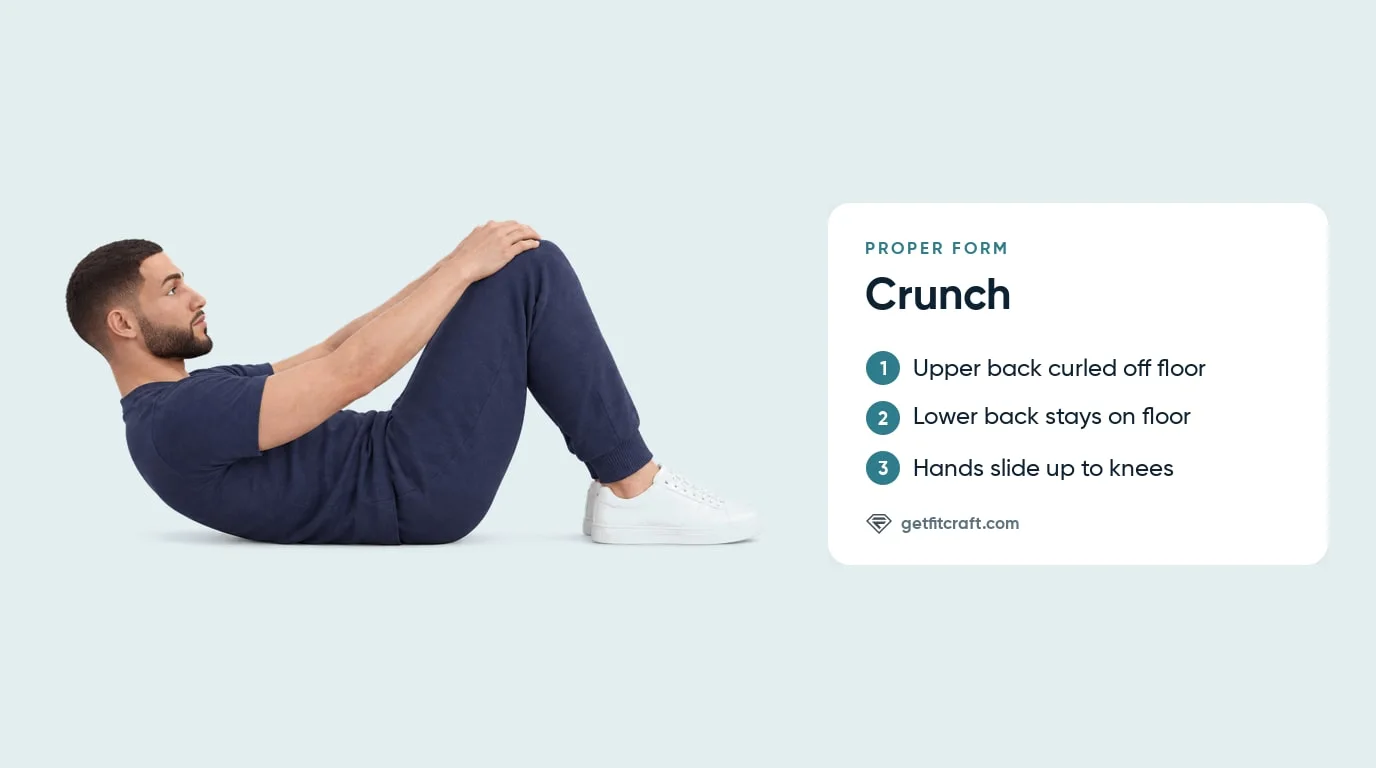
Common Mistakes (and How to Fix Them)
Crunches are deceptively simple. These are the most common errors, and the fix for each.
- Pulling on your neck. This is the most common crunch mistake by far. When your abs fatigue, your hands take over and yank your head forward, straining your cervical spine. Fix: rest your hands on your thighs and slide them up as you curl, so your hands never touch your head. If you move on to the harder hands-behind-the-head version, keep your fingertips light and never pull. If you feel your neck working, you're doing it wrong.
- Using momentum. Rocking your body to generate speed bypasses the abdominal contraction entirely. Fix: slow down. Curl up smoothly, hold briefly at the top, then lower under control. If you can't do it slowly, reduce your rep count.
- Sitting all the way up. A crunch is not a sit-up. Lifting your whole back off the floor turns it into a sit-up, which adds the hip flexors. Fix: stop when your hands reach your kneecaps, with your lower back and hips still on the floor. That's the full range of motion for a crunch.
- Flattening your chin to your chest. Tucking your chin too aggressively compresses your neck. Fix: keep a small gap between your chin and chest throughout the movement.
- Letting your feet lift off the floor. Your feet, hips and lower back should stay on the floor for every rep. Fix: keep your feet flat on the ground throughout the entire set.
- Holding your breath. Forgetting to breathe during core exercises is extremely common. Fix: exhale as you crunch up, inhale as you lower down.
Crunch Variations: Regressions and Progressions
The crunch is a progression-friendly exercise. Start where you are and level up when your form is solid.
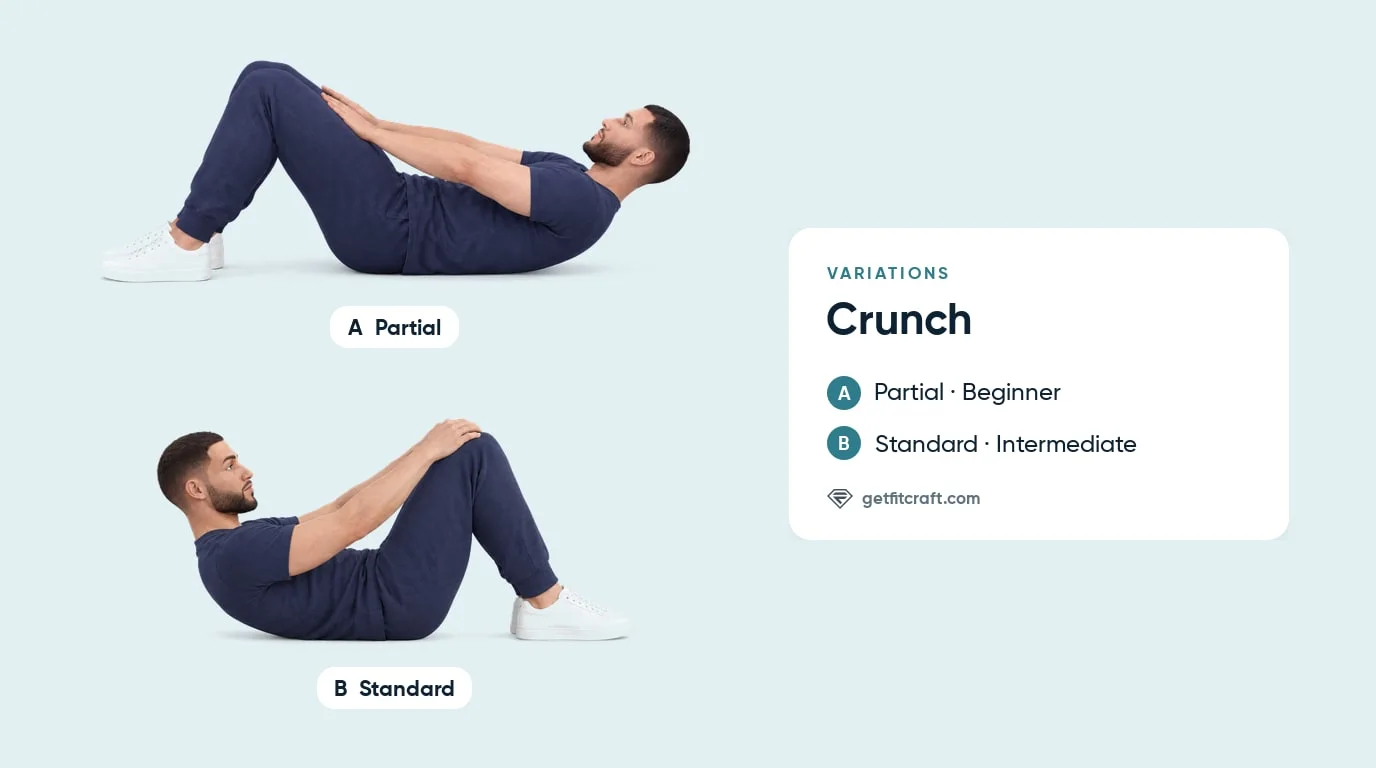
Partial Crunch (Beginner)
A smaller range of motion: you stop when your hands are about halfway up your thighs and your shoulders have just cleared the floor. The focus is entirely on learning to contract your abs deliberately and maintaining tension throughout the set. This is where everyone should start until the mind-muscle connection is rock solid.
Standard Crunch (Intermediate)
Curl until your hands reach your kneecaps, about 30 degrees of trunk lift, with a controlled pause at the top. Once you can perform 3 sets of 20 reps with perfect form and a one-second pause at the top, you're ready for harder variations. The simplest step up is to change your arm position: cross your arms on your chest, then later place your fingertips lightly behind your head. Abdominal activity rises as the arms move up (Rutkowska-Kucharska and Szpala, 2010; Crommert et al., 2021).
Bicycle Crunch (Advanced Progression)
Add a rotational component by bringing your opposite elbow toward your knee as you crunch. This targets the obliques alongside the rectus abdominis, making it a more complete core exercise. The key is to rotate from your torso, not just move your elbow.
Twist Crunch (Advanced Progression)
A static rotational variant where you crunch up and twist your torso toward one side, then return and alternate. Less dynamic than the bicycle crunch but excellent for building deliberate oblique control without the momentum risk.
Weighted Crunch (Advanced Progression)
Hold a weight plate or dumbbell against your chest while performing the standard crunch. Even 5 to 10 pounds significantly increases the challenge. Progress the weight gradually. Your abs respond to progressive overload like any other muscle.
When to Avoid or Modify Crunches
Crunches are safe for most healthy adults, but a handful of conditions warrant modification or substitution. The crunch loads the spine into repeated flexion under bodyweight resistance, which is the load profile most likely to aggravate disc-related and postpartum issues. Always consult a qualified healthcare provider or physical therapist before starting or returning to any exercise program, especially if any of the following apply.
- Acute lower-back pain or known disc pathology. Repeated spinal flexion can aggravate disc-related back pain. Substitute with anti-extension patterns like deadbugs, bird-dogs, and forearm planks, and consult a physical therapist before reintroducing loaded flexion.
- Active diastasis recti or first 6 to 8 weeks postpartum. Crunching can widen abdominal separation. Restore deep-core function first with diaphragmatic breathing, transverse abdominis activation, and gentle bird-dogs and deadbugs. Get clearance from a pelvic-floor specialist before adding loaded flexion.
- Recent abdominal surgery (C-section, hernia repair, appendectomy). Get clearance from your surgeon. Most post-surgical protocols start with diaphragmatic breathing, progress to gentle bracing, and only later reintroduce loaded flexion.
- Hernia (umbilical, inguinal, ventral). The intra-abdominal pressure spike during a crunch can worsen some hernias. Consult your physician about safe options before continuing.
- Pregnancy (second and third trimesters). Avoid supine positions for long durations (vena cava compression). Avoid high-flexion movements. Use upright or side-lying core alternatives such as standing pallof presses or side-lying leg lifts.
- Pelvic-organ prolapse or pelvic-floor dysfunction. The high intra-abdominal pressure of a crunch can worsen prolapse symptoms. Work with a pelvic-floor physical therapist on appropriate core progressions.
- Cervical (neck) pain or pinched nerve. Even with perfect form, the head-lifting component can flare cervical symptoms. Substitute with deadbugs and bird-dogs until symptoms resolve.
Related Exercises
- Easier regression (same plane): Partial Crunch. Shorter range of motion, ideal for learning the contraction pattern before adding range.
- Same plane, rotational: Bicycle Crunches and Twist Crunches. Add an oblique component to the spinal-flexion pattern.
- Same plane, reversed: Reverse Crunches. Pelvis moves to the ribcage instead of the ribcage to the pelvis, biasing the lower portion of the rectus abdominis.
- Foundation for spinal bracing (anti-extension): Deadbugs and Bird-Dogs. Universal foundations that build deep-core control without loading the spine into flexion.
- Isometric anti-extension: Forearm Planks and Hand Planks. Train the same musculature isometrically and balance the flexion load from crunches.
- Posterior chain pairing: Superman Holds and Glute Bridges. Train spinal extension and hip extension to balance the anterior emphasis of crunches.
- Hip-flexion alternative: Leg Raises. Bias the lower abs and hip flexors through a different movement pattern.
How to Program Crunches
The ranges below draw on the ACSM position stand on resistance training (Ratamess et al., 2009), which recommends 8-12 repetitions for beginners and, for muscular endurance, light loads for 10 to 25 or more repetitions with rests under 90 seconds. Applied to crunches, that means learning the movement at the beginner level, building endurance at intermediate, and adding reps or weight at the advanced level.
| Level | Sets × Reps | Rest between sets | Frequency |
|---|---|---|---|
| Beginner | 2-3 × 8-12 (partial range) | 45-60 seconds | 2-4 sessions/week |
| Intermediate | 3 × 10-20 (full range) | 45-60 seconds | 3-5 sessions/week |
| Advanced | 3-4 × 15-30 (slow tempo or weighted) | 60 seconds | 4-6 sessions/week |
Where in your workout. Place crunches at the end of a resistance-training session. Pre-fatiguing the core before compound lifts like squats or deadlifts compromises spinal stability under load. Crunches also work well as part of a dedicated core block or finisher, paired with anti-extension and anti-rotation patterns (planks, deadbugs, bird-dogs) for balanced trunk training. As a warm-up, swap to low-rep deadbugs or bird-dogs to wake up the deep core without fatiguing the flexors.
Form floor over rep targets. If your form breaks down at rep 12 but the program says 15, stop at 12. Quality reps drive adaptation. Sloppy reps recruit compensating muscles (hip flexors, neck) and reduce the stimulus to the rectus abdominis. Hit the form floor first, then chase the rep targets.
How FitCraft Programs This Exercise
Knowing how to do a crunch is step one. Knowing how many sets and reps to perform, which variation suits your level, and how crunches fit into a balanced core training program is where most people get stuck.
FitCraft handles that. During your personalized diagnostic assessment, the app maps your current fitness level, available equipment, and goals. It then builds a personalized program that slots crunches, at the right variation, into a balanced training plan alongside other core, upper body, and lower body exercises.
As you get stronger, the app adjusts the variation and volume to match your level. Partial crunches (Beginner in the app) progress to standard crunches (Intermediate). Standard crunches get paired with more challenging variations. Volume adjusts based on your recovery and consistency patterns.
Every program is designed by an Ivy League-trained exercise scientist and NSCA-certified strength coach using evidence-based periodization, and then adapted to you by the AI. It's expert programming that fits your life.
Frequently Asked Questions
Can I do crunches with lower-back pain?
Repeated spinal flexion under load can aggravate disc-related lower-back pain, so if you have acute back pain or a known disc issue, skip crunches for now. Substitute with anti-extension and anti-rotation patterns (deadbugs, bird-dogs, and forearm planks) that train your core without loading the spine into flexion. See a physical therapist for an assessment before adding loaded flexion back into your program.
What is the difference between a partial crunch and a standard crunch?
A partial crunch involves a smaller range of motion. You stop when your hands are about halfway up your thighs and your shoulders have just cleared the floor. A standard crunch uses a fuller range of motion: you keep curling until your hands reach your kneecaps, about 30 degrees of trunk lift, with your lower back and hips still on the floor. Partial crunches are ideal for beginners building core activation patterns. Standard crunches add more challenge for intermediate exercisers.
Are crunches bad for your back?
Crunches involve repeated spinal flexion, which is a real concern for people with disc-related back pain. For healthy adults with no history of back issues, well-executed crunches are not harmful. Problems arise when people pull on their neck, use momentum, or perform excessive volume. The key is to lift from your abs (not your neck), maintain a controlled tempo, and stay within a pain-free range of motion. If you have any pre-existing back condition, consult a healthcare professional before adding crunches to your routine.
How many crunches should I do per workout?
Quality matters more than quantity. For beginners, 2 to 3 sets of 8 to 12 reps with proper form is a solid starting point. For intermediate exercisers, 3 sets of 10 to 20 reps works well. Advanced trainees can push to 3 to 4 sets of 15 to 30 reps with a slow tempo. FitCraft programs the right volume based on your fitness level, goals, and overall training plan so your core work complements your other exercises rather than competing with them.
Will crunches give me a six-pack?
Crunches build the rectus abdominis (the six-pack muscle), but visible abs require low body-fat levels (roughly 10 to 15 percent for men and 18 to 22 percent for women). You can have very strong abs that stay hidden under a layer of fat. Crunches develop the muscle. Diet, total training volume, and overall conditioning reveal it. A balanced program that pairs core training with full-body strength and a calorie strategy is what produces visible abs.