Most people skip partial crunches entirely. They go straight to full crunches, bicycle crunches, or whatever ab exercise looks hardest on social media. Then they wonder why their neck hurts and their abs don't grow. The partial crunch exists to solve both problems at once.
By limiting the range of motion to a few inches off the floor, the partial crunch forces your rectus abdominis to do all the work. There's nowhere to hide behind momentum, neck pulling, or hip flexor compensation. It's a stripped-down core exercise that builds the mind-muscle connection you need before progressing to anything harder.
Quick Facts: Partial Crunch
- Equipment needed: None (a mat is helpful but optional)
- Difficulty: Beginner to Intermediate
- Modality: Strength (core endurance and motor control)
- Body region: Core (anterior, upper-ab emphasis)
- FitCraft quest category: Strength
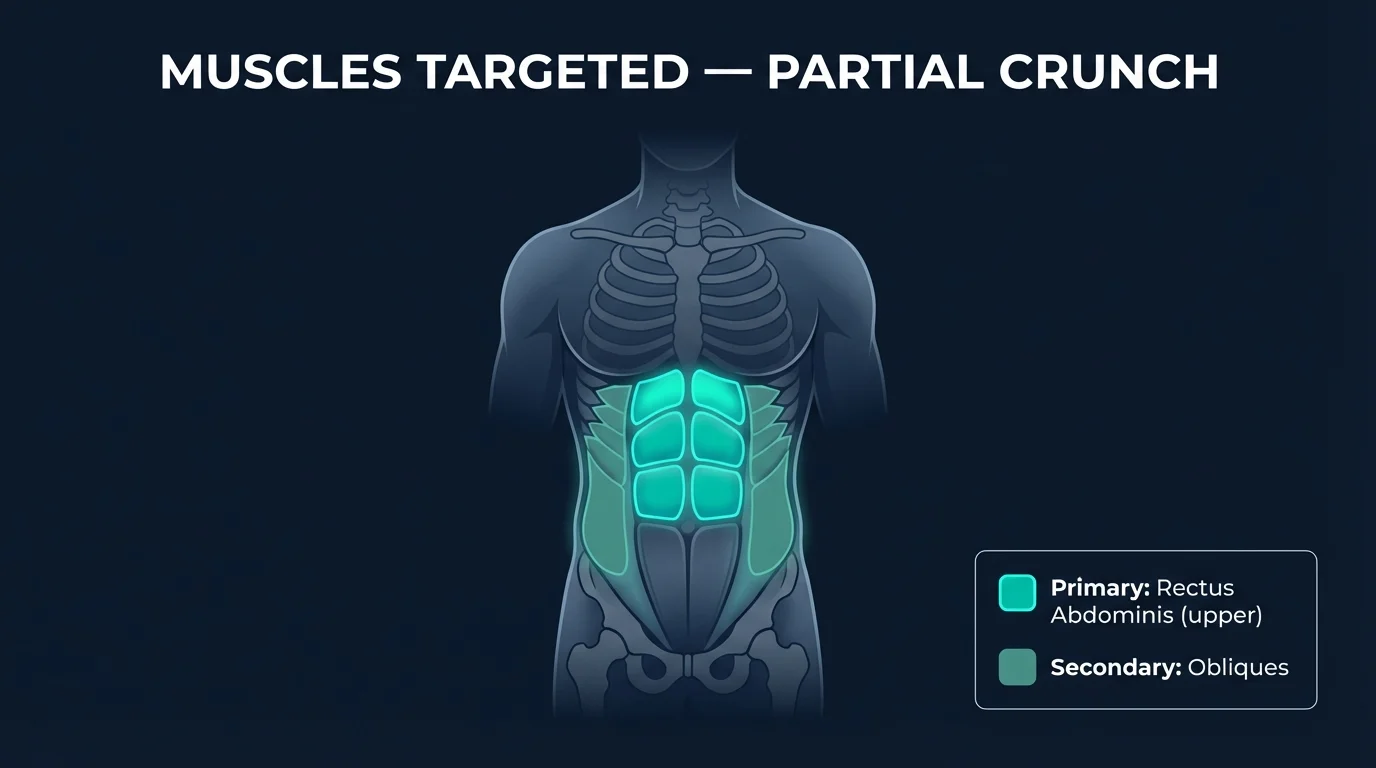
Muscles Worked
Primary movers: the rectus abdominis, with a bias toward the upper portion of the muscle. The rectus shortens concentrically as you curl your shoulders off the floor, lengthens eccentrically as you lower under control, and holds an isometric contraction at the top of the rep. That concentric-isometric-eccentric loading pattern, applied through a short range, is what makes the partial crunch a focused upper-ab drill rather than a hip-flexor exercise in disguise.
Secondary movers: the internal and external obliques fire to keep your trunk square as you curl up. They don't drive the movement, but they prevent the spine from twisting under fatigue. If you let one shoulder lead, you've turned the partial crunch into a rotational pattern and lost the bilateral ab loading.
Stabilizers: the diaphragm and pelvic floor form the deep core canister and pressurize the trunk during the exhale. The hip flexors stay relaxed (this is the whole point of the partial range), and the cervical spine is held in a neutral position by the deep neck flexors. The breath is the load-bearing stabilizer here: exhale on the way up reinforces transverse abdominis activation and keeps intra-abdominal pressure clean.
Why the short range works: the rectus abdominis is fully engaged in the first 30 degrees of trunk flexion. Past that point, the hip flexors (psoas, iliacus, rectus femoris) take over and pull you the rest of the way up into a sit-up position. By capping the range at a few inches off the floor, the partial crunch keeps the work where you want it: on the abs, not on the hip flexors, and without loading the lumbar discs in a sustained flexed position.
Step-by-Step: How to Perform a Partial Crunch
The partial crunch looks simple. It is simple. But "simple" doesn't mean "easy" when you do it right. Here's the exact sequence, with coaching cues from Ty, FitCraft's AI coach.
Step 1: Set Your Starting Position
Lie face up on a mat with your knees bent at roughly 90 degrees and your feet flat on the floor, hip-width apart. Place your fingertips lightly behind your ears or cross your arms over your chest if you tend to pull on your neck. Never interlace your fingers behind your head. That's an invitation to yank on your cervical spine.
Coach Ty's cue: "Fingertips behind your ears, elbows wide. Your hands are there for head support, not for pulling."
Step 2: Brace Your Core
Before anything moves, engage your abs. Draw your belly button toward your spine and press your lower back gently into the floor. This pre-activation step is non-negotiable. Without it, your hip flexors will hijack the movement and your abs barely participate.
Step 3: Curl Your Shoulders Up a Few Inches
Exhale and lift your shoulder blades just a few inches off the floor. Think about curling your ribcage toward your pelvis. Your lower back stays pressed into the mat the entire time. If your lower back lifts, you've gone too far.
Ty's cue: "Your focus here is on squeezing your abs as hard as you can at the top."
Step 4: Squeeze and Hold
This is the step most people skip, and it's where the partial crunch becomes effective. At the top of the movement, squeeze your abs deliberately and hold for one full second. Feel the contraction. If you can't feel it, you probably went too fast or too high.
Step 5: Lower with Control
Slowly lower your shoulders back toward the floor. Don't just drop. The eccentric (lowering) phase builds as much strength as the concentric phase, possibly more. Take two full seconds to lower. Repeat for the prescribed number of reps without resting your head fully on the ground between reps.
Ty's cue: "Make each repetition smooth and controlled, not quick and jerky."
Get this exercise in a personalized workout
FitCraft, our mobile fitness app, uses its AI coach Ty to program core stability work like this into your plan at the right volume and intensity, based on your level, goals, and equipment. Ty was designed and trained by Domenic Angelino, MPH (Brown University) and NSCA-CSCS, with research published in the Journal of Strength and Conditioning Research and Medicine & Science in Sports & Exercise.
Take the Free Assessment Free · 2 minutes · No credit card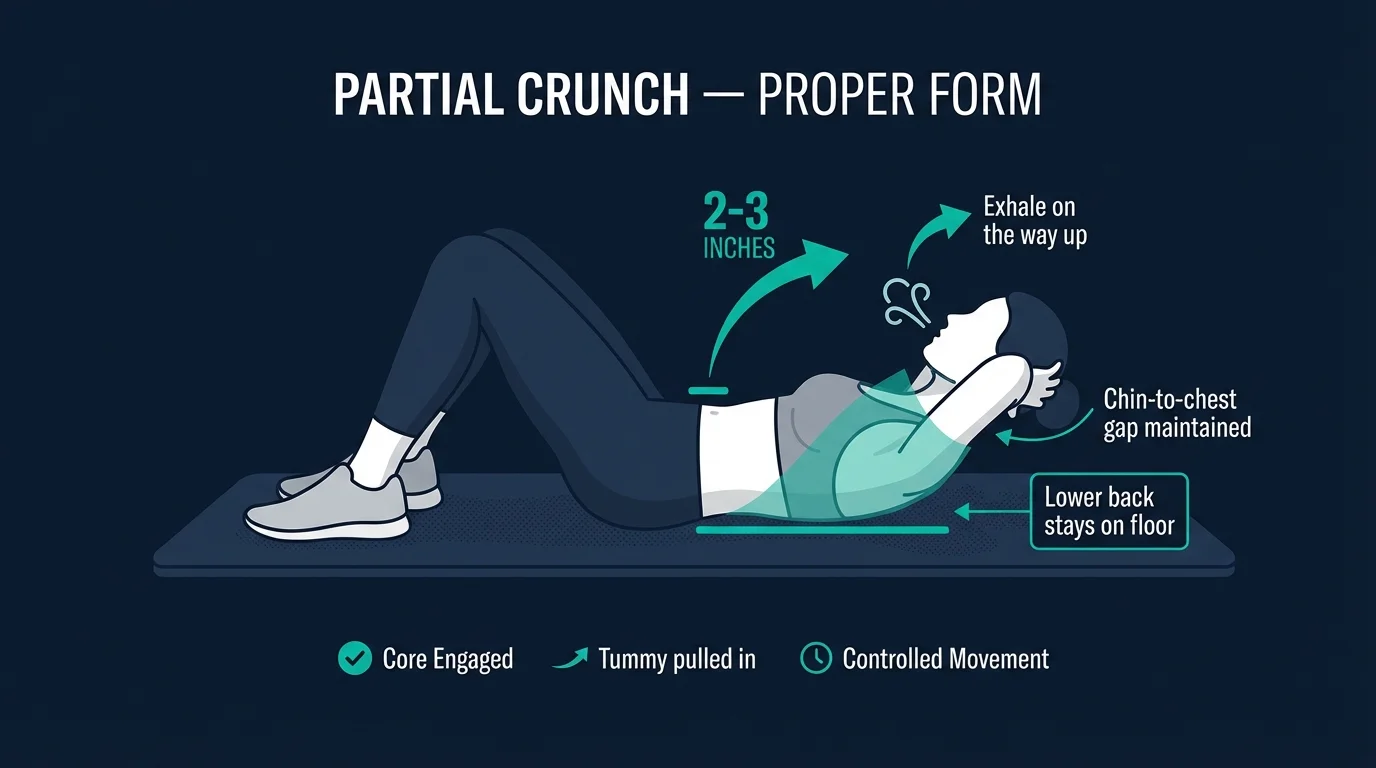
Common Mistakes (and How to Fix Them)
The partial crunch is forgiving, but these errors can still reduce its effectiveness or strain your neck.
- Pulling on your neck. Your head juts forward and your chin tucks into your chest as you fatigue. This strains the cervical spine and means your abs aren't doing the work. Fix: place fingertips lightly behind your ears or cross your arms over your chest. Imagine holding an orange between your chin and your chest, and maintain that gap throughout every rep.
- Going too high. You curl up until your lower back lifts off the floor, essentially turning a partial crunch into a full sit-up. This shifts work to the hip flexors and increases lumbar disc load. Fix: keep it small. Shoulder blades should barely clear the floor. If your lower back lifts, you've gone too far.
- Using momentum. Rocking up quickly, bouncing at the top, dropping back down. The set is over in ten seconds and you got almost zero ab work. Fix: use a two-second up, one-second hold, two-second down tempo. If you can't maintain this tempo, reduce reps.
- Holding your breath. Face turning red, that straining expression that screams "I forgot breathing exists." Increases blood pressure unnecessarily and reduces core engagement. Fix: exhale as you crunch up, inhale as you lower down. Make it rhythmic.
- Skipping the squeeze. Most people treat the top of the rep as a turnaround point and lower immediately. The one-second isometric squeeze at the top is where the partial crunch becomes effective. Fix: pause, contract hard, count one full second, then lower under control.
Partial Crunch Variations: Regressions and Progressions
Start where your form is honest, and progress when you can hold tempo for the full set.
Hands-on-Thighs Partial Crunch (Beginner Regression)
Instead of placing your hands behind your ears, slide your palms along your thighs as you crunch up. This removes any temptation to pull on your neck and provides tactile feedback for range of motion. Stop when your fingertips reach your kneecaps. This is the right starting point if you find yourself yanking on your head during standard partial crunches.
Standard Partial Crunch (Intermediate)
Fingertips behind ears, elbows wide, one-second squeeze at the top, two seconds down. This is the version most of the cues above describe. Once you can complete 3 sets of 15 with clean tempo and a deliberate squeeze, you're ready to add intensity.
Slow-Tempo Partial Crunch (Advanced Progression)
Use a four-second up, two-second hold, four-second down tempo. Same range of motion, dramatically more time under tension. This variation is surprisingly brutal and builds exceptional core control without adding range or load.
Full Crunch (Range-of-Motion Progression)
Once partial crunches feel easy at slow tempo, progress to the full crunch. The movement pattern is identical, but you curl your shoulder blades completely off the floor for a fuller rectus abdominis range. Do not skip this progression step. Adding range before adding control just teaches your hip flexors to take over.
When to Avoid or Modify Partial Crunches
Partial crunches are one of the safer floor core exercises because the short range minimizes lumbar disc load and the controlled tempo eliminates the momentum that makes sit-ups risky. A few conditions still warrant modification or temporarily swapping in an anti-flexion alternative. Always consult your physician or physical therapist for personalized guidance.
- Acute lower-back pain or known disc pathology. Spinal flexion under load can aggravate a flare even at the partial range. Swap to deadbugs and bird-dogs, which train the same deep core muscles without any spinal flexion. Reintroduce partial crunches once you're pain-free and have rebuilt baseline bracing strength. If pain persists, see a physical therapist before resuming flexion-based core work.
- First 6 to 8 weeks postpartum or active diastasis recti. Crunching widens abdominal separation in this window. Restore deep-core function first with diaphragmatic breathing, transverse abdominis activation, deadbugs, and bird-dogs. Get clearance from a pelvic-floor physical therapist before reintroducing crunch variations, and watch for doming or coning of the abdomen as a sign you've progressed too soon.
- Recent abdominal surgery (C-section, hernia repair, appendectomy). Get clearance from your surgeon. Most post-surgical protocols start with diaphragmatic breathing, progress to gentle bracing, and only later introduce loaded flexion patterns like partial crunches.
- Hernia (umbilical, inguinal, or ventral). The intra-abdominal pressure spike during a crunch can worsen some hernias. Consult your physician about which core patterns are safe in your case. Anti-extension and anti-rotation drills like partial deadbugs and bird-dogs are usually the safer starting point.
- Pregnancy (second and third trimesters). Supine positions for long durations can compress the vena cava, and flexion adds intra-abdominal pressure. Switch to upright or side-lying core work, including standing anti-rotation patterns and modified planks.
- Pelvic-organ prolapse or pelvic-floor dysfunction. High intra-abdominal pressure during the squeeze phase can worsen symptoms. Work with a pelvic-floor PT on breathing mechanics and pressure management before adding flexion-based ab work.
- Cervical (neck) pain or radiculopathy. Even with hands behind the ears, some people pull on the neck under fatigue. Cross your arms over your chest to eliminate the neck-pull pathway entirely, or switch to deadbugs until the neck symptoms resolve.
Related Exercises
If partial crunches are part of your routine, these movements complement or extend the same core training pattern:
- Foundation for spinal bracing: Deadbugs and Bird-Dogs train the deep core in anti-extension and anti-rotation patterns with zero spinal flexion. Universally safe and the right starting point if partial crunches aggravate your back.
- Same plane (anterior flexion): Full Crunches are the natural range-of-motion progression once partial crunches feel controlled. Reverse Crunches work the lower fibers of the rectus abdominis by lifting the pelvis instead of the shoulders.
- Rotational core progression: Bicycle Crunches and Twist Crunches add the oblique rotation component once you can bilaterally load the rectus abdominis cleanly.
- Isometric core alternative: Forearm Planks train the entire core as a stabilizer rather than a mover. Great pairing with partial crunches in the same session: dynamic flexion plus isometric anti-extension.
- Glute foundation (often paired): Glute Bridges and Partial Glute Bridges reinforce the posterior chain that opposes anterior core work. Pair them in the same core session for balanced trunk loading.
- Advanced core variation: Superman Holds flip the pattern entirely into isometric spinal extension. Useful for training the posterior trunk that crunches do not touch.
How to Program Partial Crunches
Partial crunches follow the same evidence-based programming logic as any controlled, low-load core movement. The American College of Sports Medicine (ACSM) Position Stand on resistance training recommends programming core work for muscular endurance (12 to 20 reps), with shorter rest periods than for major compound lifts, and 48 hours between sessions training the same pattern (Ratamess et al., 2009).
| Level | Sets × Reps | Rest between sets | Frequency |
|---|---|---|---|
| Beginner | 2–3 × 8–12 | 45–60 seconds | 2–4 sessions/week |
| Intermediate | 3 × 10–20 | 45–60 seconds | 3–5 sessions/week |
| Advanced (slow tempo) | 3–4 × 15–30 | 60 seconds | 4–6 sessions/week |
Where in your workout: Partial crunches belong at the end of a resistance-training session, after compound lifts. Pre-fatiguing the core before squats, deadlifts, or overhead pressing compromises spinal stability under load and increases injury risk. They also work well as part of a standalone core finisher, or as a low-rep activation drill (5 to 8 reps with deliberate squeezes) at the start of a session to wake up the deep core before bigger lifts.
Form floor over rep targets: if your last 2 reps of a set break form (neck pulling, lower back lifting, lost squeeze at the top), stop the set there. Hitting a target rep count with broken form is worse than hitting fewer reps cleanly. Partial crunches reward quality, not volume.
How FitCraft Programs This Exercise
Knowing how to do a partial crunch is step one. Knowing when to do it, how many reps, and when to progress to full crunches or harder variations is where most people get stuck.
FitCraft's AI coach Ty handles that. During your personalized diagnostic assessment, Ty maps your fitness level, goals, and any current core limitations (postpartum status, back pain history, training experience). Then Ty builds a personalized program that slots partial crunches into a balanced training plan at the right variation, volume, and point in your workout.
As you get stronger, Ty adjusts the variation and volume to match your level. Partial crunches become standard crunches, then rotational and reverse variations get added, then isometric work like forearm planks rounds out the anti-extension pattern. Every program is designed by an Ivy League-trained exercise scientist and NSCA-certified strength coach using evidence-based periodization, then adapted to you by the AI.
Frequently Asked Questions
Can I do partial crunches with lower-back pain?
Partial crunches involve less spinal flexion than full crunches or sit-ups, so they load the lumbar discs less. They can still aggravate acute lower-back pain or known disc pathology. If you're in an active flare, switch to anti-extension and anti-rotation patterns first: deadbugs, bird-dogs, and forearm planks train the same deep core muscles without spinal flexion. Reintroduce partial crunches once you're pain-free and have rebuilt baseline bracing strength. If pain persists or worsens, see a physical therapist for an individualized assessment.
What is the difference between a partial crunch and a regular crunch?
A partial crunch uses a smaller range of motion than a regular crunch. You lift your shoulders only a few inches off the floor, keeping the movement compact and focused entirely on abdominal contraction. A regular crunch curls your shoulder blades completely off the ground with a fuller range of motion. Partial crunches are ideal for beginners learning to isolate their abs and for anyone recovering from core weakness.
Are partial crunches effective for building abs?
Yes. Partial crunches are effective for building core strength, especially for beginners. The short range of motion forces deliberate rectus abdominis contraction without recruiting hip flexors or relying on momentum. The reduced spinal flexion also minimizes lumbar disc load, making partial crunches a safer entry point for core training than full sit-ups.
How many partial crunches should a beginner do?
Beginners should start with 2 to 3 sets of 8 to 12 reps, focusing on slow, controlled movement with a one-second squeeze at the top. Quality matters far more than quantity. Rest 45 to 60 seconds between sets and train your core 2 to 4 times per week with at least one rest day between sessions.
When should I progress from partial crunches to full crunches?
Progress to full crunches when you can perform 3 sets of 15 reps with a controlled two-second up, one-second hold, two-second down tempo without losing form. If your neck starts pulling forward or your lower back lifts off the floor before you finish a set, you are not ready to progress. Building the mind-muscle connection at the partial range is more valuable than rushing to a fuller range of motion.