The partial deadbug teaches your body to resist extension under load without any equipment and without loading your spine. You lie on your back, hold your arms toward the ceiling, and slowly extend one leg at a time while keeping your lower back pressed into the floor. It sounds simple. It is not.
What makes the partial deadbug so effective is its constraint. Your lower back must stay flat against the ground through every rep. The moment it lifts, your deep core stabilizers have reached their limit. That built-in feedback mechanism makes it nearly impossible to do the exercise wrong without knowing it, which is rare in core training.
Quick Facts: Partial Deadbug
- Equipment needed: None (mat optional for comfort)
- Difficulty: Beginner to Intermediate
- Modality: Core stability / strength
- Body region: Core (trunk, anterior chain)
- FitCraft quest category: Core
Muscles Worked
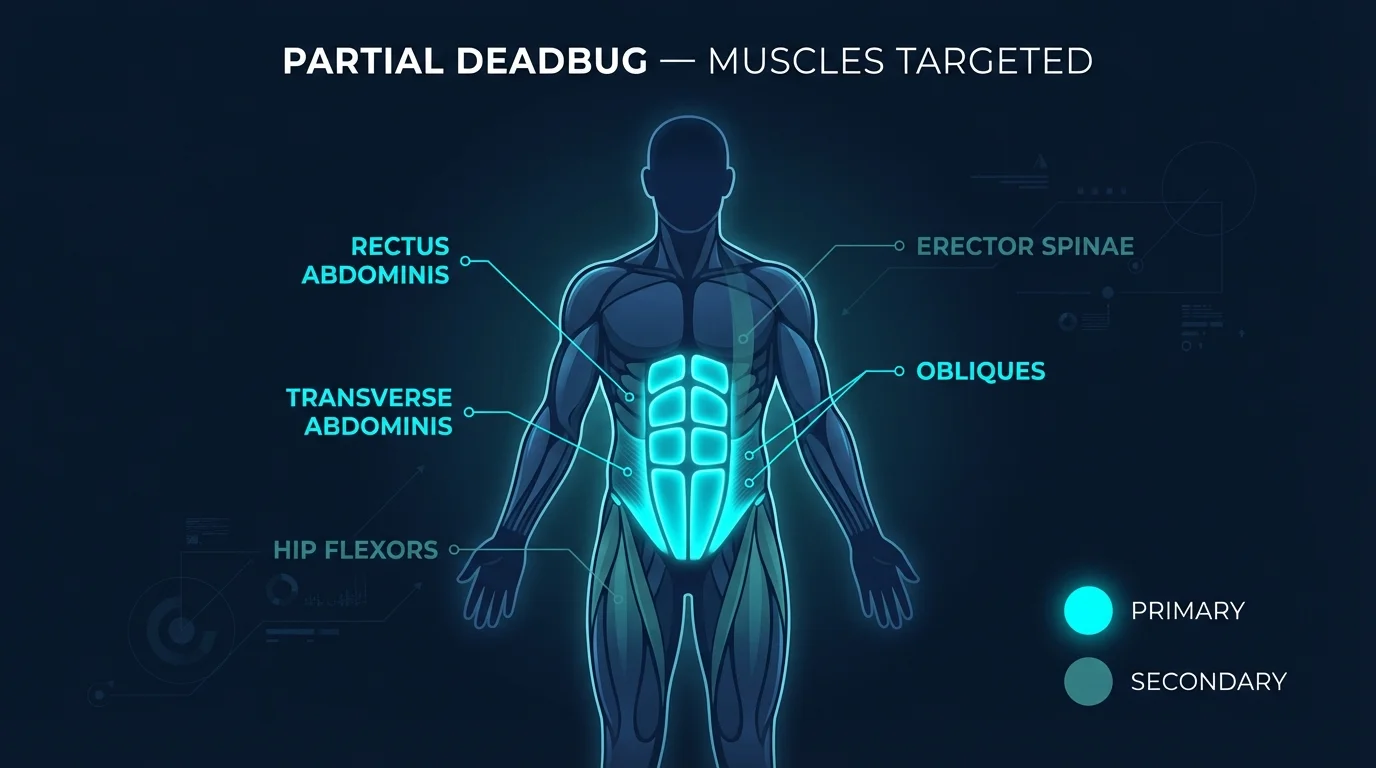
Primary movers: the rectus abdominis, transverse abdominis, and internal and external obliques. These work isometrically (not concentrically) throughout every rep. Their job is to resist the lower back from arching as the lengthening leg pulls the pelvis into anterior tilt. The transverse abdominis is the most active player because it wraps the trunk like a corset and is the primary muscle for spinal stability under changing limb load.
Secondary movers: the hip flexors (iliopsoas, rectus femoris) on the working leg work concentrically to control the lowering phase and pull the leg back to the start. On the non-working leg, the hip flexors hold the 90-degree position isometrically.
Stabilizers: the diaphragm and pelvic floor (the deep core canister), the erector spinae (for posterior support of the neutral spine), and the shoulder girdle (to keep the arms still and pointing vertically). The breath is itself a key stabilizer here: exhaling as the leg extends reinforces transverse abdominis activation and reduces intra-abdominal pressure spikes that would otherwise mask poor core engagement.
Mechanism: the partial deadbug is an anti-extension exercise. As one leg straightens and lowers toward the floor, gravity acts on a progressively longer lever arm and the pelvis is pulled into anterior tilt. The core has to fire harder and harder to keep the lumbar spine flat against the floor. That isometric demand, sustained through a slow tempo, is what drives the training effect. Because the spine itself never moves under load, the exercise is one of the safest ways to build deep-core strength, which is why it appears in nearly every evidence-based protocol for chronic lower-back pain rehabilitation.
Step-by-Step: How to Perform a Partial Deadbug
The setup matters as much as the movement. Take the time to anchor your lower back before you start the first rep.
Step 1: Set Your Starting Position
Lie face up on the floor. Extend both arms straight toward the ceiling, directly above your shoulders. Bend your knees to 90 degrees and lift your feet off the floor so your shins are parallel to the ground. This is your starting position.
Coach Ty's cue: "Arms straight up like you're holding a tray. Knees stacked over your hips. Shins parallel to the floor."
Step 2: Flatten Your Lower Back into the Floor
Brace your core and press your lumbar spine against the ground. There should be zero gap between your lower back and the floor. Imagine you are trying to push your belly button through your spine and into the ground.
Ty's key cue: "Keep your lower back pressed against the floor for ultimate core engagement." This is the non-negotiable. The moment your lower back lifts off the floor, the exercise stops working your core and starts stressing your spine. If you cannot maintain contact, shorten your range of motion.
Step 3: Slowly Extend One Leg
Exhale and straighten your right leg, lowering it toward the floor without touching it. Keep your arms pointing at the ceiling. They do not move. Your left knee stays at 90 degrees. The movement should take 2 to 3 seconds.
Ty's tempo cue: "The slower the movement, the more you will engage your abs. Don't rush." Speed is the enemy of a good partial deadbug. Slow tempo eliminates momentum and maximizes time under tension.
Step 4: Return to Start
Inhale as you bring your right leg back to the 90-degree starting position. Maintain lower back contact with the floor throughout.
Ty's alignment cue: "Keep your spine neutral and head resting on the floor." Lifting your head creates unnecessary neck strain and can subtly arch your lower back. Let your head rest naturally and keep your gaze toward the ceiling.
Step 5: Alternate Sides
Repeat with your left leg. Continue alternating for the prescribed number of reps. Move slowly and with full control. The slower you go, the harder your core works.
Ty's reset cue: "Avoid letting your shoulders lift from the floor." Your upper body should remain anchored. If your shoulders lift, you're compensating for a weak core. Reduce the range on the leg extension until your strength catches up.
Get this exercise in a personalized workout
FitCraft, our mobile fitness app, uses its AI coach Ty to program core stability work like this into your plan at the right volume and intensity, based on your level, goals, and equipment. Ty was designed and trained by Domenic Angelino, MPH (Brown University) and NSCA-CSCS, with research published in the Journal of Strength and Conditioning Research and Medicine & Science in Sports & Exercise.
Take the Free Assessment Free · 2 minutes · No credit card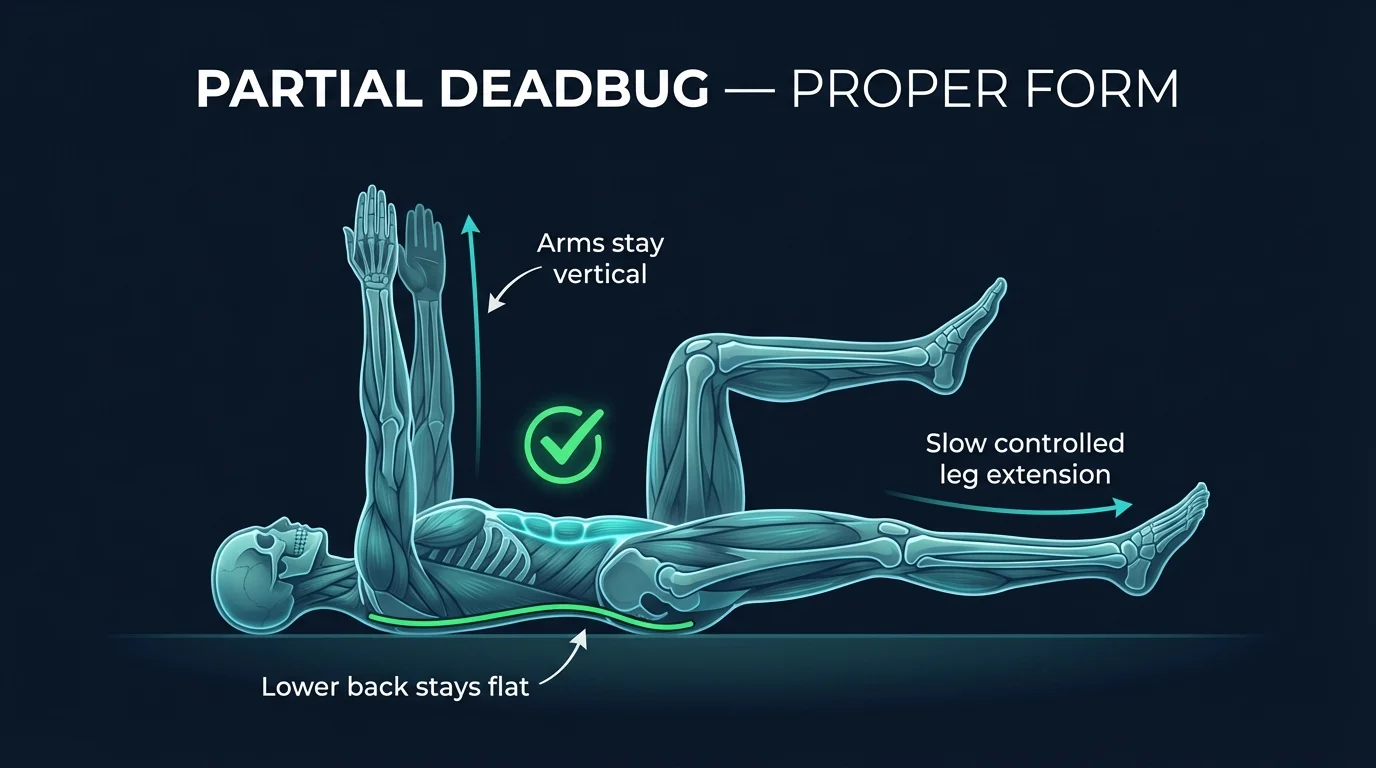
Common Mistakes (and How to Fix Them)
These are the four mistakes Ty corrects most often.
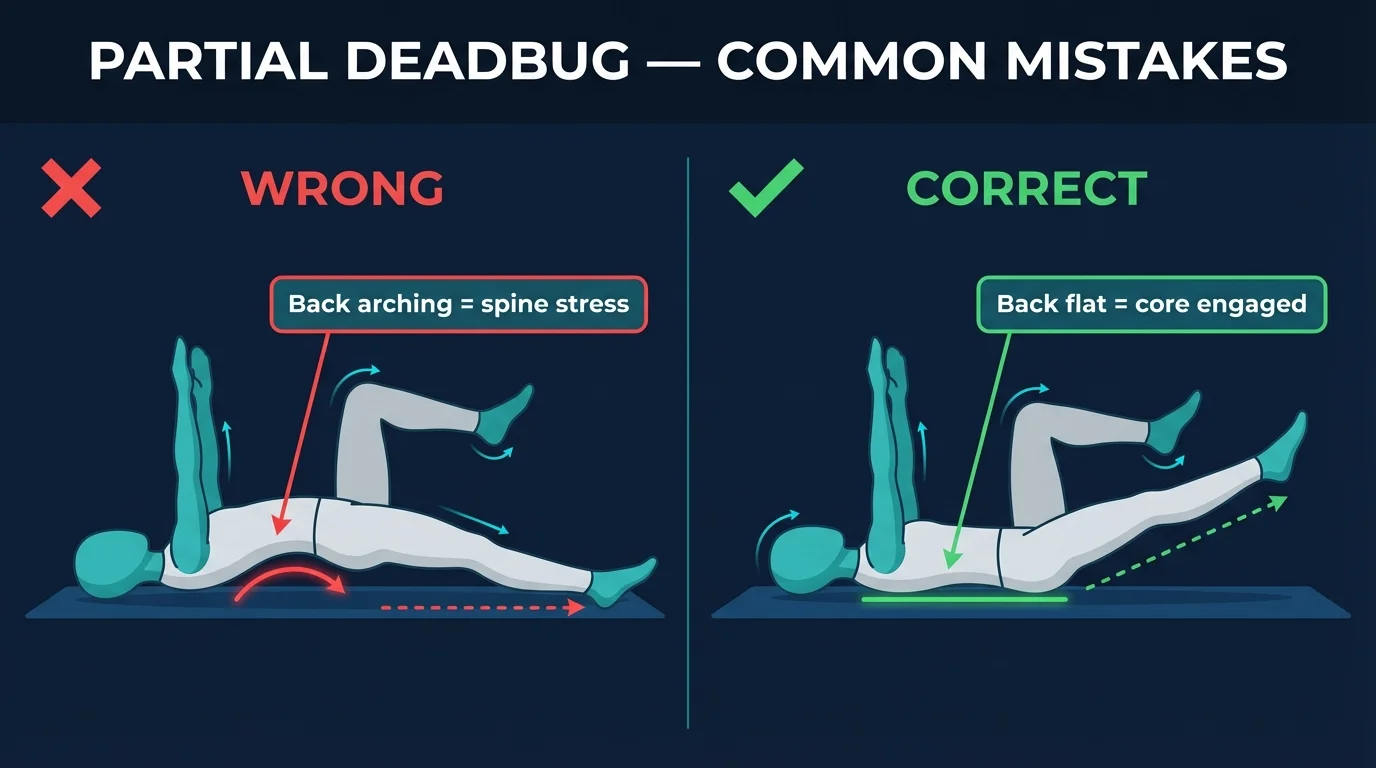
- Lower back arching off the floor. A visible gap appears between your lumbar spine and the floor as the leg extends. The load transfers from your core to your spine and the exercise stops working. Fix: shorten the range of motion. For most beginners, that means stopping with the foot about 12 inches above the ground rather than 2 inches. Only lower as far as you can maintain floor contact.
- Moving too fast. Legs pump up and down like pistons with no pause or control. Fast reps use momentum instead of muscle. You can do 20 sloppy reps and get less core activation than 6 slow ones. Fix: count 2 to 3 seconds on the way down and 2 to 3 seconds on the way up. If you finish a set of 8 per side in under 30 seconds, you are moving too fast.
- Holding your breath. Face turns red, jaw clenches, no visible breathing during the set. Breath-holding creates excessive intra-abdominal pressure that masks poor core engagement. You feel tight, but the deep stabilizers are not doing the work. Fix: exhale as you extend the leg. Inhale as you return. Breathing through the movement forces the transverse abdominis to stabilize without relying on pressure.
- Arms drifting or wobbling. Arms sway forward, backward, or to the sides as the legs move. Arm drift means your torso is rotating or shifting to compensate for a weak core. Fix: lock your arms in place and stare at your hands. If they move, your core has lost control. Reset and try again with a smaller leg range.
Partial Deadbug Variations: Regressions and Progressions
Start where you are and progress when your form is solid at the current level.
Heel Slides (Beginner Regression)
Instead of lifting your feet off the floor, keep your heels on the ground and slide one leg out at a time. This reduces the lever arm and makes it much easier to maintain lower-back contact. A good entry point if you cannot keep the lumbar pinned in the standard starting position.
Reduced-Range Partial Deadbug
Perform the standard partial deadbug but only extend the leg to about 45 degrees rather than full extension. As your core strength improves, gradually increase the range until you can lower the foot to within 2 inches of the floor.
Standard Partial Deadbug (Intermediate)
Full range, alternating legs, arms still. Once you can complete 3 sets of 10 reps per side with perfect form and zero lower-back lift, you are ready to progress.
Full Alternating Deadbug (Advanced Progression)
Extend the opposite arm and leg simultaneously. The added upper body movement increases the lever arm and challenges your core significantly more. This is the natural next step once partial deadbugs feel comfortable.
Banded Partial Deadbug (Loaded Progression)
Anchor a resistance band behind your head and hold it with both hands. The band pulls your arms into extension, forcing your core to work harder to stay flat against the floor. A loaded option for intermediate trainees not yet ready for the full alternating deadbug.
When to Avoid or Modify Partial Deadbugs
Partial deadbugs are safe for most healthy adults and are routinely prescribed even in rehabilitation contexts. A few conditions still warrant modification or clearance. Always consult your physician or physical therapist for personalized guidance.
- Acute lower-back pain or known disc pathology. Partial deadbugs are usually the right exercise in this case, but acute flare-ups (within the past few days) deserve a check-in with a PT first. If the movement itself reproduces or worsens pain, stop and substitute with diaphragmatic breathing and gentle bird-dogs on hands and knees until the acute phase resolves.
- First 6-8 weeks postpartum or active diastasis recti. The supine position is fine, but watch for doming or coning of the abdomen during the leg extension. Doming means intra-abdominal pressure is exceeding what the connective tissue can hold. If you see doming, regress to heel slides and prioritize diaphragmatic breathing and transverse abdominis activation until the connective tissue knits back together.
- Recent abdominal surgery (C-section, hernia repair, appendectomy). Get clearance from your surgeon before any active core work. Most post-surgical protocols start with diaphragmatic breathing, then gentle bracing in a neutral spine, then progressive loading. Partial deadbugs typically enter around weeks 6-8 with surgeon approval.
- Pregnancy (second and third trimesters). Avoid extended supine positions because the weight of the uterus can compress the vena cava. Substitute with quadruped bird-dogs or side-lying core work that keeps you off your back.
- Hernia (umbilical, inguinal, ventral). Some core movements can worsen abdominal-wall hernias. Get a clear opinion from your physician about which exercises are safe before adding any loaded core work.
- Neck strain or cervical spine issues. If holding your head and arms up triggers neck pain, place a small folded towel under your head and keep your gaze steady on the ceiling. Do not lift your chin or crane your neck forward.
Related Exercises
If partial deadbugs are part of your routine, these movements complement or extend the same anti-extension training pattern:
- Same plane (anti-extension): Full Alternating Deadbugs and Forearm Planks train the same lumbar-stability demand with different lever arms and positions.
- Anti-rotation foundation: Bird-Dogs hit the same deep stabilizers from a quadruped position and pair well with deadbugs in any core block.
- Anti-lateral-flexion: Side Planks round out the trunk by training the obliques and quadratus lumborum in a third plane.
- Glute foundation (often paired): Glute Bridges activate the posterior chain that supports neutral pelvis position, a useful pairing for anyone whose hips drift into anterior tilt during deadbugs.
- Hand-supported plank base: Hand Planks add wrist load to the same anti-extension demand and translate the bracing pattern from supine to prone.
How to Program Partial Deadbugs
Partial deadbug programming follows the same evidence-based ranges as any dynamic core stability exercise. The American College of Sports Medicine (ACSM) Position Stand on resistance training recommends slow, controlled tempo for stabilization work, with at least 48 hours between sessions of the same muscle group for novice trainees and shorter recovery intervals for trained individuals (Ratamess et al., 2009).
| Level | Sets × Reps per side | Rest between sets | Frequency |
|---|---|---|---|
| Beginner | 2–3 × 6–8 | 45–60 seconds | 2–4 sessions/week |
| Intermediate | 3 × 8–12 | 45–60 seconds | 3–5 sessions/week |
| Advanced | 3–4 × 10–15 (slow tempo) | 60 seconds | 4–6 sessions/week |
Where in your workout: partial deadbugs work well at the start of a session as a core activation drill (a few low-rep sets to wake up the deep stabilizers before compound lifts), inside a dedicated core block, or as the first movement of a core finisher at the end of a session. Avoid programming them after heavy spinal loading (deadlifts, squats), because fatigued core stabilizers won't get the most from the slow-tempo work.
Form floor over rep targets: if your lower back lifts off the floor at any point during a set, stop. That is your current limit, regardless of the rep target. Six perfect reps build more deep-core strength than twelve sloppy reps that load your spine.
How FitCraft Programs This Exercise
FitCraft's AI coach Ty is a 3D personal trainer who talks to you, demonstrates every exercise with interactive 3D models, and adapts your plan in real time. When Ty programs the partial deadbug, your personalized diagnostic assessment maps your core strength, training history, and movement quality, and Ty uses that data to select the right starting point.
If your anti-extension strength is still developing, Ty starts you with partial deadbugs at a controlled tempo and moderate rep counts. As you build consistency and can maintain perfect lower-back contact through full sets, Ty progresses you to the full alternating deadbug. Ty may pair the movement with complementary work like bird-dogs and forearm planks to build a comprehensive core routine.
The gamification layer makes the unsexy work stick. Streaks keep you accountable. Quests give each session direction. The collectible cards and avatar progression turn routine core work into something you actually look forward to.
Frequently Asked Questions
Can I do partial deadbugs with lower-back pain?
Partial deadbugs are one of the most commonly recommended exercises for people with chronic lower-back pain because they strengthen the deep core stabilizers without loading the spine. The floor gives you direct feedback to keep a safe position. That said, if your pain is acute (within the past few days), worsens during the movement, or stems from a known disc issue, stop and consult a physical therapist before progressing. For most chronic-pain populations, partial deadbugs are an appropriate entry point and a frequent first prescription.
What muscles does the partial deadbug work?
The partial deadbug primarily targets the rectus abdominis, transverse abdominis, and obliques. It also engages the hip flexors and erector spinae as stabilizers. Because your arms stay stationary, the core demand is concentrated on anti-extension, which means resisting your lower back from arching as your legs move.
What is the difference between a partial deadbug and a full deadbug?
In a partial deadbug, only your legs move while your arms stay pointed at the ceiling. In a full deadbug, the opposite arm and leg extend simultaneously, which increases the lever arm and makes the exercise significantly harder. The partial version builds the foundational anti-extension strength needed before progressing to the full variation.
How many partial deadbugs should a beginner do?
Beginners should start with 2 to 3 sets of 6 to 8 reps per side, focusing on slow, controlled movement. Each rep should take about 4 to 6 seconds total. If your lower back lifts off the floor at any point, stop the set. That is your current limit. Quality always beats quantity with this exercise.
Can I do partial deadbugs every day?
You can do partial deadbugs daily because they are a low-impact core stability exercise that does not create significant muscle damage. Most people get better results training them 3 to 4 times per week, giving the core time to recover and adapt. If you feel soreness, take a rest day.