The standard glute bridge is one of the best glute exercises you can do with zero equipment. But there's a problem a lot of people run into: their hamstrings fire first, their lower back takes over, and their glutes barely do any work. The partial glute bridge fixes that by cutting the range of motion in half and forcing the glutes to stay engaged the entire time.
Quick Facts: Partial Glute Bridges
- Equipment needed: None. Bodyweight only (optional yoga block as a height marker for the supported regression)
- Difficulty: Beginner to intermediate (scales up via tempo, holds, and the single-leg progression)
- Modality: Strength and activation (controlled isotonic with an isometric squeeze at the top)
- Body region: Posterior chain (glute-dominant, hip extension)
- FitCraft quest category: Lower body
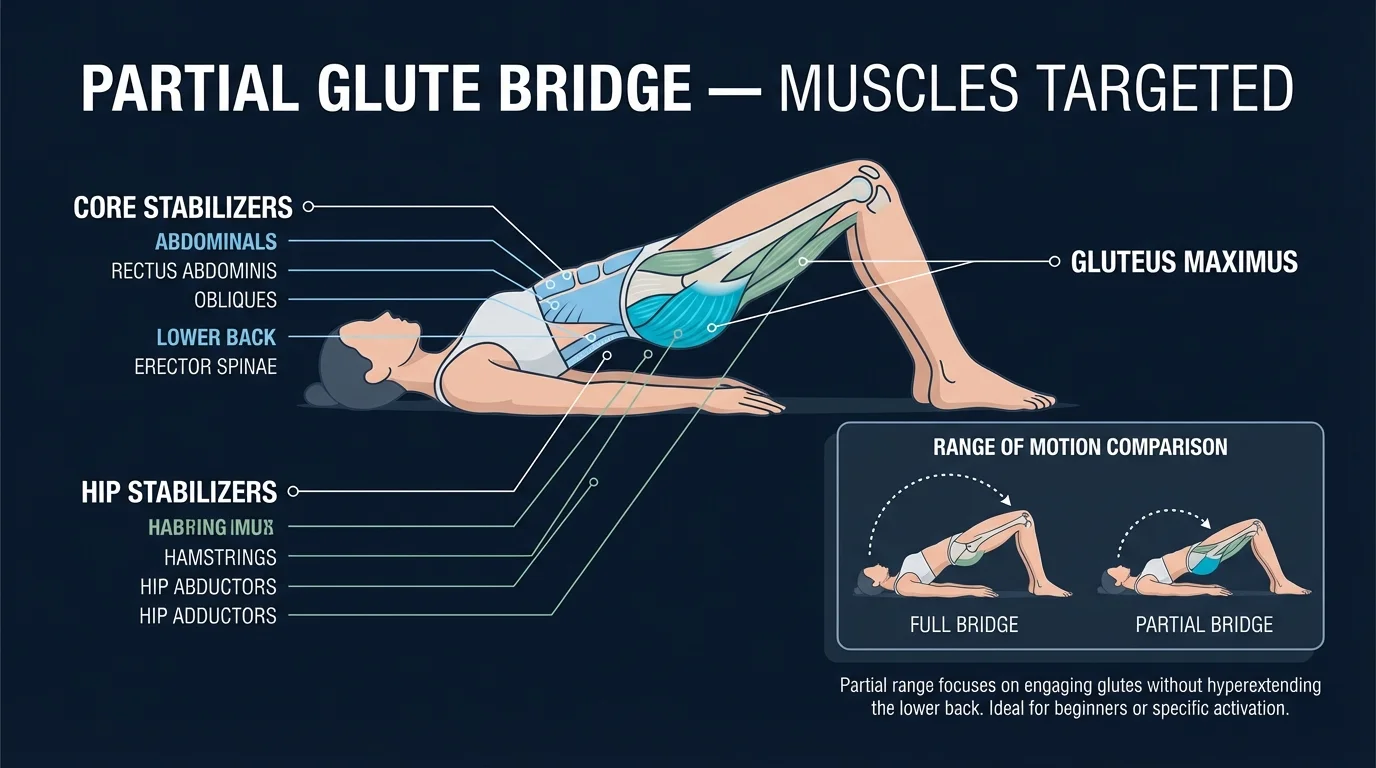
Muscles Worked
Primary movers: the gluteus maximus drives hip extension concentrically as the hips rise to the halfway point, then works eccentrically to control the descent back to the floor. The shortened range keeps the glute in its lengthened and mid-range positions, where activation is highest, without unloading at the top.
Secondary movers: the gluteus medius and minimus assist hip stabilization and prevent the knees from collapsing inward. The hamstrings contribute a small amount of hip extension force, but their role is intentionally minimized by stopping short of full lockout (where they would otherwise dominate).
Stabilizers: the transversus abdominis and obliques work isometrically to keep the rib cage stacked over the pelvis and prevent the lower back from arching. The hip abductors hold knee alignment. The trunk stays neutral; an arched or sagging spine signals that the glutes have disengaged.
Evidence: Selkowitz et al. (2016) compared gluteal and hamstring activation across bridge variations and found that knee position and range of motion shifted EMG activity meaningfully between the two muscle groups. Modifications that reduce hamstring contribution increase the relative load on the gluteus maximus, which is the mechanism the partial bridge exploits. The same principle is why physical therapists use bridge variations as a graded loading tool for glute activation and lumbopelvic control.
How to Do a Partial Glute Bridge (Step-by-Step)
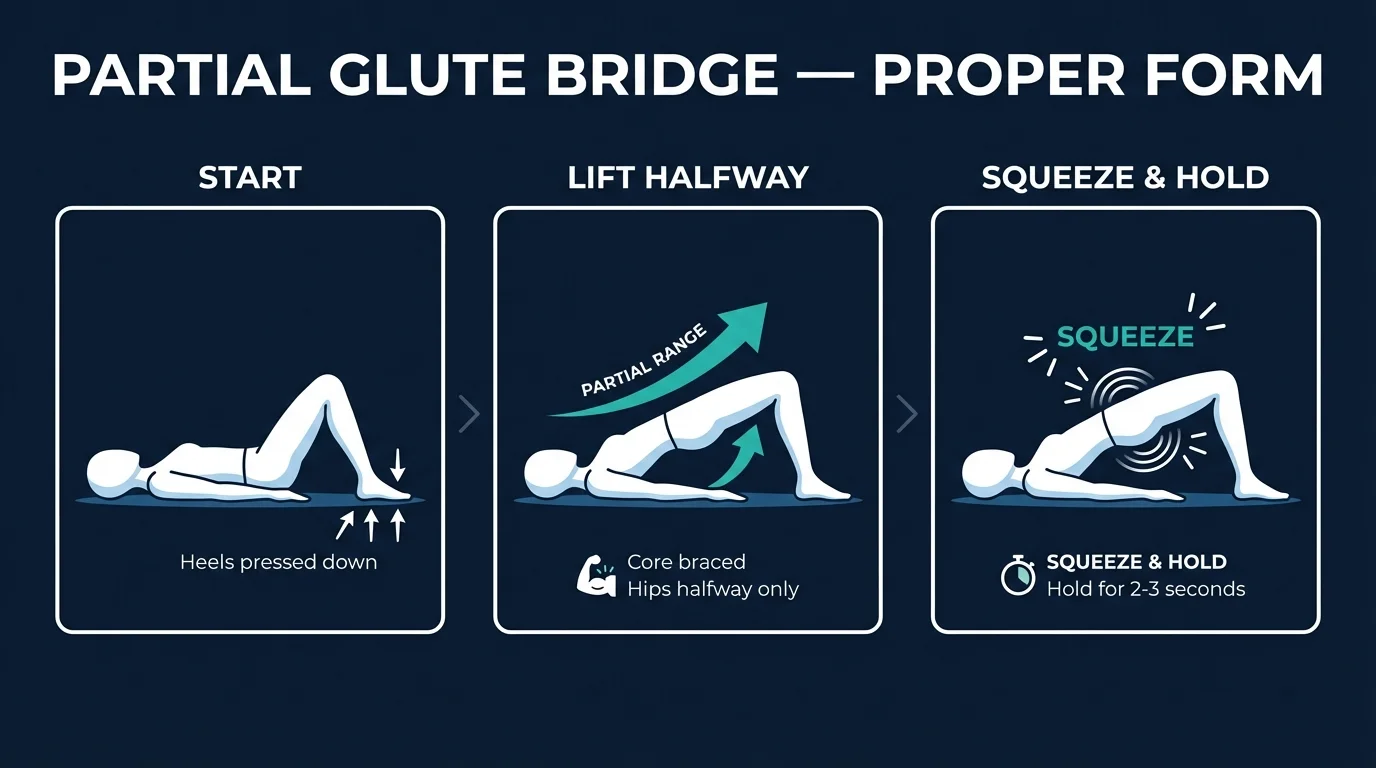
- Set up your starting position. Lie flat on your back with your knees bent and feet flat on the floor, hip-width apart. Place your arms at your sides with palms pressing gently into the floor for stability.
- Brace your core. Pull your belly button toward your spine and lightly squeeze your glutes before you move. This pre-tension keeps the right muscles engaged from the start. Coach Ty's cue: "Squeeze the glutes before the hips move. If you wait, the hamstrings will lead."
- Lift your hips to the halfway point. Press your heels into the floor and raise your hips roughly halfway toward full extension. Only a few inches off the ground. Stop well before your body forms a straight line from knees to shoulders. The top of the partial bridge should feel like you're about 50% of the way through a full glute bridge. Coach Ty's cue: "Think 'half bridge.' If your hamstrings are burning more than your glutes, you've gone too high."
- Squeeze and hold. At the top of the partial range, squeeze your glutes hard for one to two seconds. You should feel the contraction concentrated in the glutes, not the lower back or hamstrings.
- Lower with control. Slowly return your hips to the starting position, resisting gravity the entire way down. Don't drop. The eccentric phase builds strength and keeps tension where it belongs.
- Repeat. Perform the prescribed number of reps while maintaining the shortened range of motion throughout every rep. Beginners should aim for 12 to 20 reps per set.
Common Mistakes (And How to Fix Them)
Lifting too high
What it looks like: Your hips reach full extension. The same end position as a standard glute bridge.
Why it's a problem: Once you pass the halfway point, the hamstrings and lower back start taking over. The entire purpose of the partial variation is the shortened range.
The fix: Think "half bridge." Your hips should only rise a few inches off the ground. If you feel your hamstrings working hard, you're probably going too high.
Rushing through reps
What it looks like: Fast, bouncy reps with no pause at the top.
Why it's a problem: Momentum replaces muscle engagement. The partial bridge works because of controlled tension. Take that away and you're wasting your time.
The fix: Use a 2-1-2 tempo: two seconds up, one-second squeeze, two seconds down. Every rep should feel deliberate.
Pushing through the toes
What it looks like: The heels lift slightly or the weight shifts forward onto the balls of the feet.
Why it's a problem: This activates the quads and calves instead of the glutes. Same mistake as the full glute bridge, but it's even more important to avoid it here because the shortened range gives you less margin for error.
The fix: Actively press your heels into the floor. You should be able to wiggle your toes throughout the movement.
Losing core tension
What it looks like: The ribs flare up, the lower back arches, and the pelvis tilts anteriorly.
Why it's a problem: Without core bracing, the lower back compensates for the glutes. This defeats the purpose of the exercise and can cause discomfort.
The fix: Maintain a slight posterior pelvic tilt throughout the movement. Think about pulling your ribcage toward your pelvis. This locks the core in and forces the glutes to do the work.
Get this exercise in a personalized workout
FitCraft, our mobile fitness app, uses its AI coach Ty to program isolation exercises like this into your plan at the right volume and intensity, based on your level, goals, and equipment. Ty was designed and trained by Domenic Angelino, MPH (Brown University) and NSCA-CSCS, with research published in the Journal of Strength and Conditioning Research and Medicine & Science in Sports & Exercise.
Take the Free Assessment Free · 2 minutes · No credit cardVariations
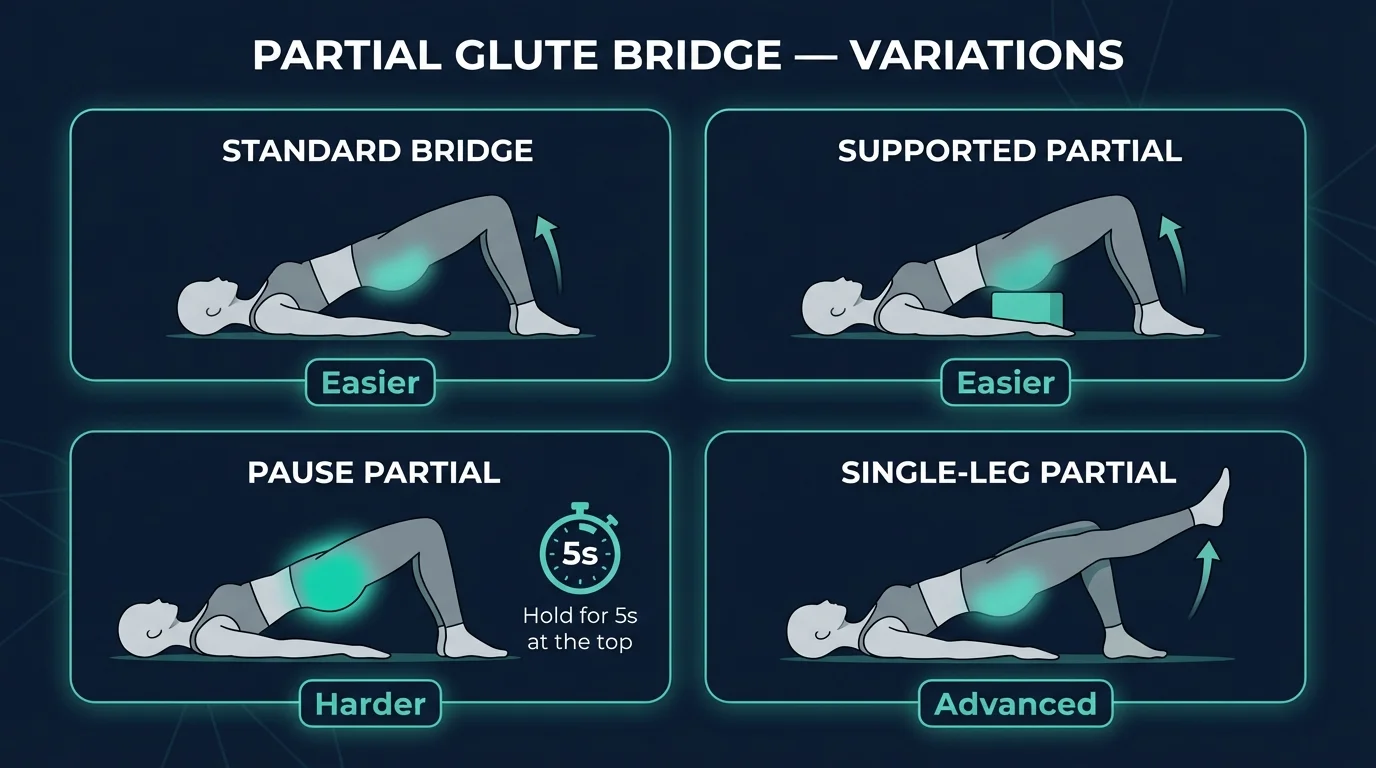
Easier (Regression)
Standard glute bridge. If the partial variation feels awkward or you're having trouble controlling the range, start with the full glute bridge first. The full range of motion is more intuitive and easier to feel. Once you can consistently squeeze at the top and control the descent, you're ready for the partial version.
Supported partial bridge. Place a yoga block or rolled towel under your lower back as a height reference. Bridge up until your hips barely contact the support, then lower. The physical marker removes the guesswork about how high to go.
Harder (Progression)
Partial bridge with pause. Hold the top position for 3 to 5 seconds instead of 1 to 2. The extended isometric contraction increases glute time under tension and builds end-range strength in the shortened position.
Single-leg partial bridge. Extend one leg straight out and perform the partial bridge with one foot. This doubles the load on each glute and adds a balance and stability challenge. Only progress to this once you can hold the two-leg version with a 5-second pause for 3 sets of 15 reps.
Alternative Exercises
Standing glute squeeze. A zero-equipment isometric that trains the same glute contraction. Stand tall, squeeze your glutes as hard as you can for 5 to 10 seconds, relax, and repeat. Useful when lying on the floor isn't practical.
Clamshell. Targets the gluteus medius and hip stabilizers from a side-lying position. Pairs well with partial bridges for complete glute development.
When to Avoid or Modify Partial Glute Bridges
Partial glute bridges are safe for most healthy adults and are often used in rehab settings precisely because the load and range are easy to control. A few situations warrant modification. Always consult a qualified healthcare provider or physical therapist before starting or returning to any exercise program, especially if you have acute lower-back pain, a recent disc injury, hip labral pathology, late-pregnancy positional restrictions, or symptomatic sacroiliac joint dysfunction.
- Acute lower-back pain or recent disc injury. Skip the lift entirely until you have clearance. Begin with isolated glute squeezes lying on your back (no hip movement), then progress to one-inch hip lifts with a strong posterior pelvic tilt before attempting the partial range.
- Hip labral pathology or hip impingement. The supine position usually loads the hip joint less than standing variations, but symptom flare-ups vary. Stay in a pain-free range, avoid forcing the hip into deep flexion at the bottom, and consult a physical therapist before progressing to the single-leg variation.
- Late pregnancy (second and third trimester). Many practitioners recommend avoiding extended supine positions after the first trimester due to venal cava compression. Substitute with standing glute squeezes, side-lying clamshells, or quadruped donkey kicks for hip-extension training.
- Symptomatic sacroiliac joint dysfunction. Asymmetric load (single-leg variations) can aggravate the SI joint when one side is irritated. Stick with bilateral bridges, focus on even foot pressure, and consider bird-dogs as an alternative posterior-chain drill that doesn't load the SI joint asymmetrically.
- Weak core control. If you can't hold a neutral pelvis during the lift, the lumbar spine will arch and the glutes will disengage. Build a foundation with deadbugs and bird-dogs first, then return to the partial bridge once you can brace consistently.
- Hamstring cramping during the lift. Common in beginners and a sign that the glutes aren't taking over the work yet. Step back to the standard glute bridge to build the activation pattern, shorten the range further (one inch instead of three), or perform an extended glute pre-activation set of standing squeezes before lying down.
Related Exercises
- Foundation glute drill: the standard glute bridge is the prerequisite. Master the full range first before moving to the partial variation.
- Gluteus medius isolation: clamshells and fire hydrants target the abductor and lateral stabilizer functions that partial bridges don't fully cover.
- Quadruped hip extension: donkey kicks and straight-leg kickbacks train the gluteus maximus from a different position and add a stability demand.
- Hip mobility pair: hip abductor stretch opens up the hip capsule and complements activation work.
- Compound lower-body progression: once activation is solid, squats, Romanian deadlifts, and single-leg deadlifts apply the glute-firing pattern to loaded multi-joint movements.
- Core foundation: deadbugs and bird-dogs build the lumbopelvic control that keeps the lower back out of the partial bridge.
How to Program Partial Glute Bridges
Programming guidance follows the ACSM Position Stand on Resistance Training (Ratamess et al., 2009), adjusted for a single-joint glute isolation exercise. Because the partial bridge is bodyweight with minimal joint stress, frequency can be high and rest periods short when used as an activation drill, with longer rest when used for strength.
| Level | Sets × Reps | Rest between sets | Frequency |
|---|---|---|---|
| Beginner | 2-3 × 15-20 (no hold) | 30-45s | 3-5 sessions/week as activation |
| Intermediate | 3 × 12-15 with 2-second hold | 45-60s | 2-4 sessions/week (mix of activation and strength) |
| Advanced | 3-4 × 10-12 with 5-second hold, or single-leg 3 × 10/side | 60-90s | 2-3 strength sessions/week, daily activation OK |
Where in your workout: partial glute bridges work best at the beginning of a lower-body session as a glute activation drill before compound lifts like squats and deadlifts. The pre-activation primes the gluteus maximus so it fires correctly under heavier loads. They can also be programmed at the end of a session as a burnout finisher with high reps and short rest.
Form floor over rep targets: if the glute squeeze fades, the hips drift past halfway, or the lower back starts arching, stop the set. The partial bridge only works as long as the constraints hold. Hitting a rep target with broken form trains the wrong muscles. Cap each set at the rep where form starts to slip.
Frequently Asked Questions
Can I do partial glute bridges with lower-back pain?
Partial glute bridges are often more tolerable than full glute bridges for people with lower-back sensitivity because the shortened range reduces the chance of overextending into the lumbar spine. If you have acute back pain, stop and consult a physical therapist before resuming. For chronic mild discomfort, start with very small hip lifts (one to two inches), focus on the glute squeeze rather than how high you go, and maintain a slight posterior pelvic tilt throughout. If pain increases during the set, stop and regress to a glute squeeze in the starting position.
What muscles do partial glute bridges work?
Partial glute bridges primarily target the gluteus maximus, with the gluteus medius and minimus assisting hip stabilization. The core stabilizers (transversus abdominis and obliques) work isometrically to prevent the lower back from arching. Because the range of motion is shortened, hamstring involvement is reduced compared to a full glute bridge, making this a more glute-dominant variation.
What is the difference between a partial glute bridge and a full glute bridge?
A full glute bridge lifts the hips until the body forms a straight line from knees to shoulders. A partial glute bridge uses a reduced range of motion, lifting the hips only halfway. This shortened range keeps constant tension on the glutes and reduces hamstring compensation, making it useful for glute activation and for people working around lower-back sensitivity.
Who should use partial glute bridges?
Partial glute bridges are useful for intermediate lifters who want to isolate their glutes more effectively, people rehabbing lower-back or hamstring issues, and anyone who feels their hamstrings take over during standard glute bridges. They also work well as a warm-up activation drill before heavier lower-body training.
How many partial glute bridges should I do?
For glute activation, 2 to 3 sets of 15 to 20 reps works well. For strength building with a pause at the top, 3 to 4 sets of 10 to 15 reps is more appropriate. Beginners should start at the lower end of these ranges and add a hold only once the bodyweight version feels controlled.
Can I do partial glute bridges every day?
Yes. Because partial glute bridges are bodyweight and use a limited range of motion, they are low-impact enough for daily use as an activation exercise or warm-up. For higher-intensity sessions with holds and slow tempos, allow at least 24 hours of recovery between hard sessions.