Your hip abductors do more than you think. Every time you take a step, your gluteus medius fires to keep your pelvis from dropping on the opposite side. Every time you stand on one leg, getting dressed, climbing stairs, running, these muscles are working. If they're tight, the downstream effects show up as knee pain, IT band problems, lower back stiffness, and a general feeling that your hips just don't move the way they should.
Most people stretch their adductors (inner thighs) and hip flexors but completely ignore the abductors (outer hip). That imbalance matters. Two variations. Zero equipment. Five minutes total.
Quick Facts: Hip Abductor Stretch
- Equipment needed: None (optional wall or chair for balance)
- Difficulty: Beginner
- Modality: Stretching / Mobility
- Body region: Lower body (outer hip)
- FitCraft quest category: Flexibility
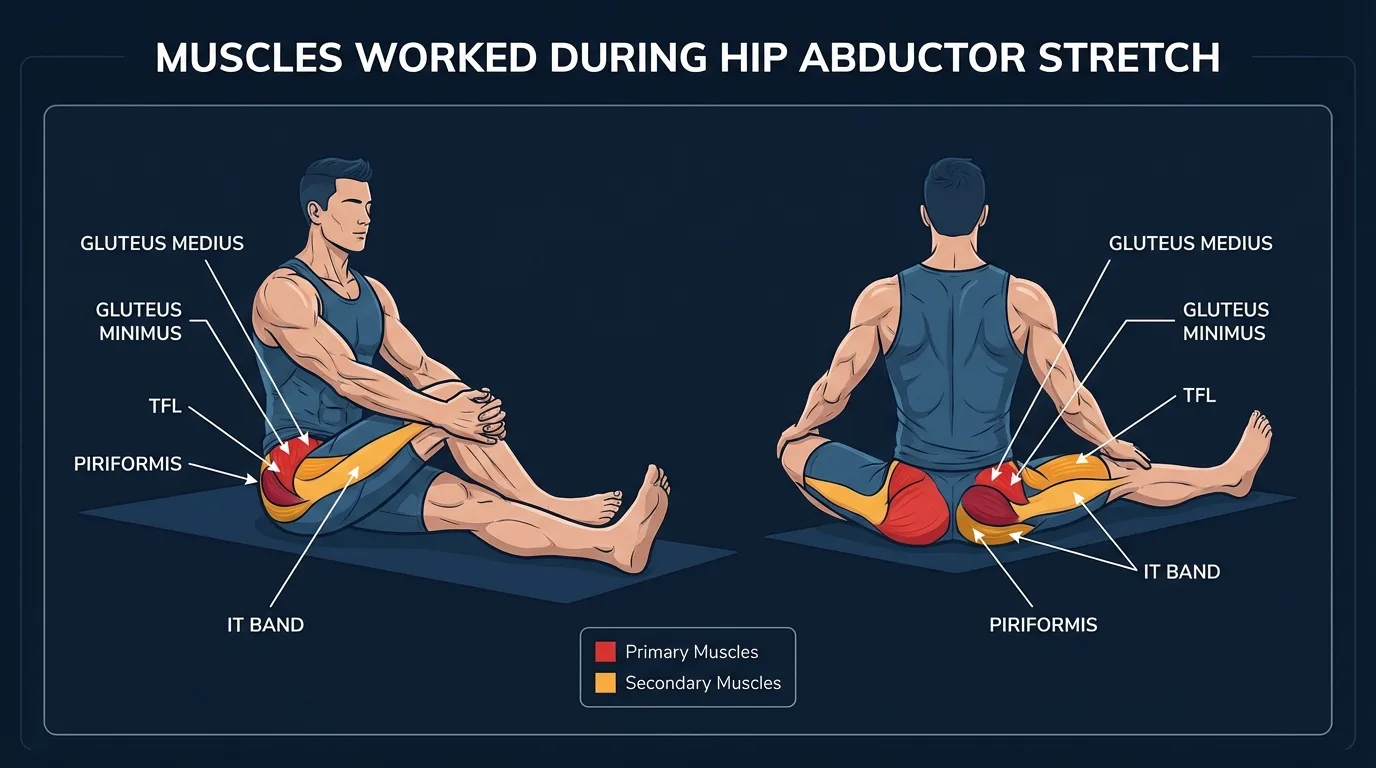
Areas Stretched and Mobilized
Primary stretch targets: the gluteus medius and the tensor fasciae latae (TFL). The gluteus medius is the largest of the hip abductors and sits on the outer surface of the pelvis. The TFL is a small but mighty muscle running along the front-outside of the hip that attaches into the iliotibial band. Both lengthen through the standing crossover position as the hip is pushed laterally away from the supporting foot.
Secondary stretch targets: the gluteus minimus (the deepest of the three glutes, sitting underneath the medius), the upper portion of the iliotibial band, and the piriformis (a deep hip rotator that often goes along for the ride during outer-hip stretches).
Stabilizers: the supporting leg's quadriceps, glutes, and core hold the upright posture, while the small muscles of the foot and ankle keep both feet flat through the lateral hip shift. Active stabilization is minimal because this is a static stretch rather than a loaded movement.
Why this stretch matters: hip muscle stretching produces measurable downstream effects on pain and function. Kim and Yim (2020), writing in the Journal of Physical Therapy Science, found that hip muscle stretching combined with core stability exercises significantly improved physical function and reduced pain in people with non-specific low back pain compared to core work alone. The mechanism is straightforward: chronically tight hip abductors restrict pelvic motion and force the lumbar spine to compensate during gait and single-leg stance. Restoring outer-hip length reduces that compensation.
Step-by-Step: How to Do the Hip Abductor Stretch
The standing crossover version is the most practical. You can do it anywhere, next to a wall, a door frame, a desk.
Step 1: Set Up Against a Wall or Sturdy Surface
Stand sideways next to a wall, countertop, or chair back. Place the hand closest to the wall on the surface for balance. Stand tall with your feet together and a slight bend in both knees. This is your anchor. You'll lean your hip away from the wall in a moment.
Coach Ty's cue: "Your supporting hand is just for balance. Don't hang on it or push into it. Stay tall."
Step 2: Cross Your Outside Leg Behind the Inside Leg
If your left side is toward the wall, cross your right foot behind your left foot, placing it about 12 inches past. Both feet stay flat on the floor. From the front, your legs should look like they're forming an X shape. This crossed position is what puts the outer hip of the inside leg on stretch.
Ty's cue: "Cross further than feels natural. A short cross gives you almost no stretch."
Step 3: Push Your Hip Laterally Away From the Wall
Drive the hip of the leg closest to the wall away from the wall, sideways through space, while keeping your torso upright. You should feel a clear stretch along the outer hip and side of the thigh on the leg closest to the wall. If you don't feel it, push your hip further out. The stretch lives in the lateral hip displacement, not in bending forward at the waist.
Ty's key cue: "Push your hip sideways, not forward. If you're folding at the waist, you're missing the stretch."
Step 4: Hold and Breathe
Hold for 30-60 seconds. Breathe slowly through your nose. With each exhale, see if you can push your hip a fraction further without losing your balance. Keep your upper body tall. Don't fold forward at the waist or twist your torso.
Ty's cue: "The exhale is where you gain ground. Inhale, hold, exhale and sink a touch deeper."
Step 5: Switch Sides
Release the stretch slowly. Uncross your legs and turn so your other side faces the wall. Repeat the same hold time on the second side. Both sides matter, even if one feels much tighter than the other (which is normal).
Get this exercise in a personalized workout
FitCraft, our mobile fitness app, uses its AI coach Ty to program mobility work like this into your plan at the right volume and intensity, based on your level, goals, and equipment. Ty was designed and trained by Domenic Angelino, MPH (Brown University) and NSCA-CSCS, with research published in the Journal of Strength and Conditioning Research and Medicine & Science in Sports & Exercise.
Take the Free Assessment Free · 2 minutes · No credit card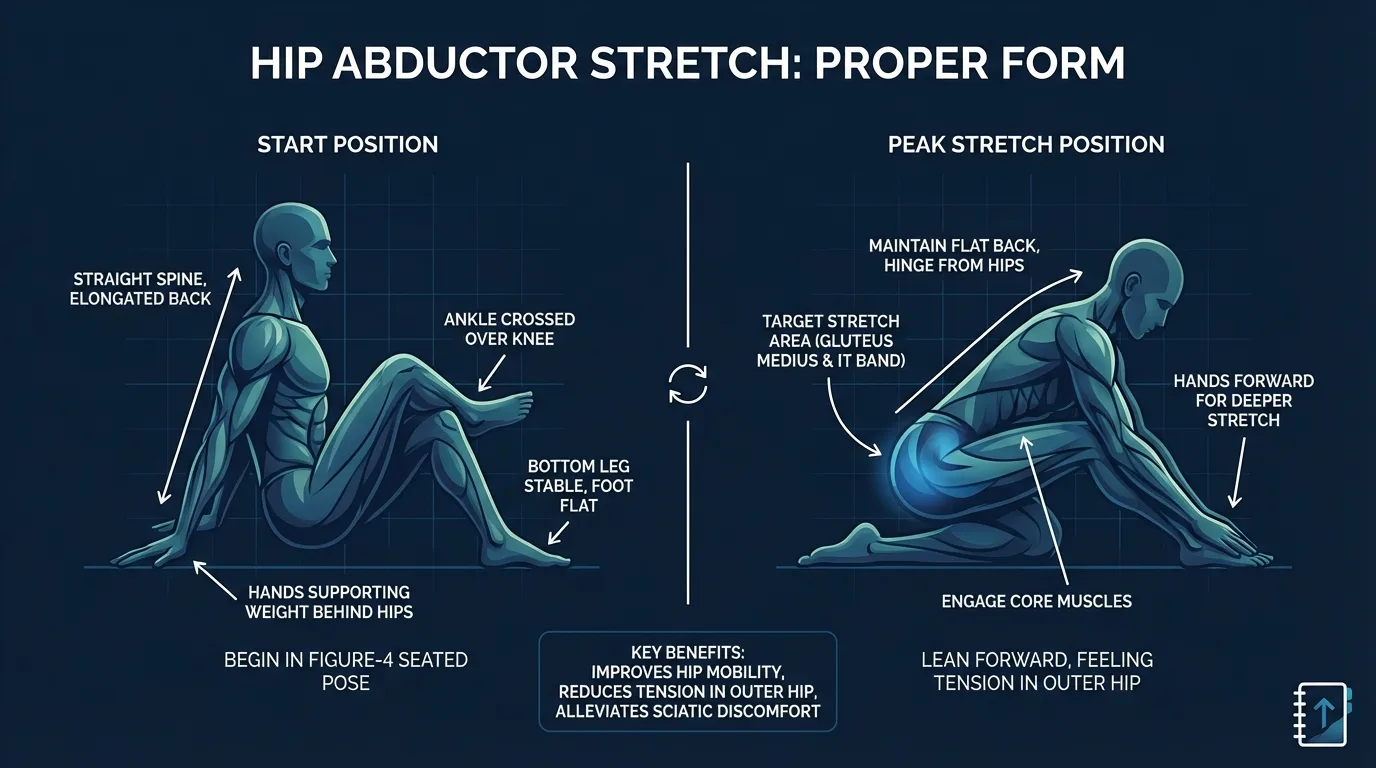
Common Mistakes (and How to Fix Them)
The hip abductor stretch looks simple but most people miss the stretch entirely because of one of these errors.
- Bending forward instead of pushing sideways. The number one mistake. The stretch happens through lateral hip displacement (pushing your hip bone out to the side). If you bend forward at the waist, you shift the stretch away from the abductors and into the lower back. Stand tall. Think sideways.
- Not crossing the legs enough. If your back foot is barely past your front foot, the stretch will be minimal. Cross further (about 12 inches) so the outer hip gets a meaningful pull. You can adjust the cross distance to dial the intensity up or down.
- Letting the outside foot lift off the floor. Both feet need to stay flat. When the outside foot lifts, you lose the base of the stretch and start loading your ankle awkwardly. If you can't keep both feet flat, reduce how far you're pushing your hip.
- Holding your breath. Tension builds when you stop breathing. Your muscles tighten reflexively and fight the stretch. Breathe slowly through your nose and exhale fully. The outer hip muscles relax most during the exhale.
- Rushing through it. A 10-second hold won't change anything. Your connective tissue needs time under stretch to adapt. Thirty seconds is the floor for any real flexibility benefit. Research on static stretching consistently shows that holds under 15 seconds produce negligible range-of-motion improvements.
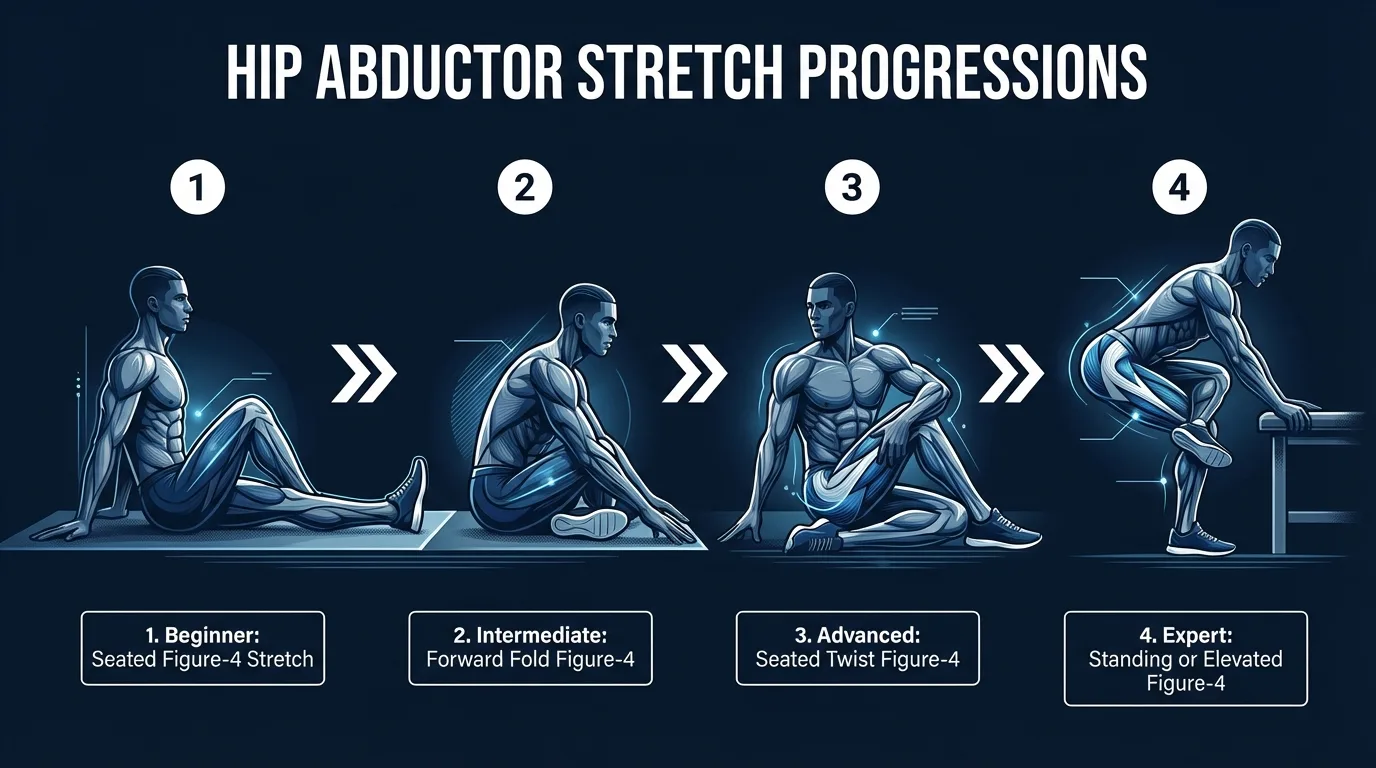
Variations
Seated Figure-Four Hip Abductor Stretch (Beginner)
Sit on the floor with your legs extended in front of you. Cross your right ankle over your left thigh, just above the knee. Gently press your right knee toward the floor with your right hand while keeping your spine tall. You'll feel the stretch along the outer hip of the crossed leg (the gluteus medius and piriformis). This version is less intense than the standing crossover because gravity assists the stretch rather than requiring balance. Hold 30-60 seconds per side. If sitting on the floor is uncomfortable, do this in a chair by crossing your ankle over the opposite knee and leaning your torso gently forward.
Side-Lying Hip Abductor Stretch (Beginner-Intermediate)
Lie on your side with your bottom leg straight. Bend your top knee and bring it in front of your body so your knee and shin rest on the floor (or on a pillow). Let gravity pull the top knee down toward the floor. You should feel a stretch through the outer hip and TFL of the top leg. This variation is excellent because it removes balance from the equation entirely and lets you relax into the stretch. Hold 30-60 seconds, then switch sides. For a deeper stretch, use your hand to gently press the top knee closer to the floor.
Dynamic Crossover Walk (Active Mobility)
For an active warm-up version, perform 10-15 walking crossover steps in each direction. Step laterally with your trailing leg crossing behind your lead leg, then bring the lead leg out to restart. The repeated lateral hip displacement primes the abductors through their range without sustained tension. Use this before runs, lateral lower-body workouts, or hiking. Pair with side lunges for full lateral plane mobility prep.
When to Avoid or Modify the Hip Abductor Stretch
The hip abductor stretch is safe for most healthy adults, but a few conditions warrant modification or temporary avoidance. None of these are permanent restrictions. Always consult your physician or physical therapist for personalized guidance, especially before starting or returning to any exercise program.
- Acute hip injury, labral tear, or recent hip surgery. Wait for medical clearance before any end-range hip stretching. Lateral hip displacement can aggravate healing labral tissue or impinge on the joint capsule. Once cleared, restart with the seated figure-four variation rather than the standing crossover.
- Hypermobility, Ehlers-Danlos, or other connective tissue disorders. Avoid passive end-range static stretching. The outer hip in particular is prone to overstretch in hypermobile individuals, which can destabilize the SI joint and hip capsule. Emphasize active controlled mobility (slow side-lunges, controlled lateral hip CARs) and work with a physical therapist who specializes in hypermobility.
- Acute gluteus medius or TFL strain. Stretching a freshly strained muscle can worsen the tear. Use the standard injury protocol (relative rest, ice, gradual reloading) and reintroduce gentle stretching only after the acute phase resolves, usually 5-10 days depending on severity.
- Pregnancy (second and third trimesters). Relaxin loosens ligaments, increasing the risk of overstretching the hip capsule and SI joint. Stay within a comfortable, sub-maximal range. Skip aggressive lateral hip displacement. The seated figure-four variation done gently in a chair is the safer default.
- Active sciatica or known disc pathology. The standing crossover position can incidentally rotate or sidebend the lumbar spine if your torso doesn't stay perfectly tall, which can flare sciatic symptoms. Use the seated figure-four (in a chair if floor sitting bothers you) and avoid any spinal flexion or rotation during the hold.
- Sharp lateral knee pain during the stretch. If lateral knee pain appears or worsens during the standing crossover, the IT band insertion at the knee may be irritated. Switch to butterfly pose or the seated figure-four (which load the lateral knee much less) and consult a physical therapist if pain persists for more than a week.
Related Exercises
If the hip abductor stretch is part of your routine, these movements complement or extend the same mobility pattern:
- Same joint, different stretch direction: Butterfly Pose opens the hip adductors (inner thigh), the direct counterbalance to the outer-hip work this stretch does. Pair both for balanced hip mobility.
- Deep external hip rotator complement: Royal Pigeon Pose targets the piriformis and deep external rotators that often accompany TFL tightness in runners and desk workers.
- Active mobility pairing: Cat-Cow and the Half-Kneeling Triplanar Stretch add spinal and hip flexor mobility to the same warm-up sequence. Useful for runners and anyone who sits for long stretches.
- Dynamic lateral hip warm-up: Side Lunges take the hip abductors through their range under light load, useful before running or any lateral-movement training.
- Hip stability prerequisite: Clamshells and Fire Hydrants build strength in the same muscle group this stretch lengthens. Restored hip abductor length without restored strength is a missed opportunity.
- Whole posterior chain complement: Downward Dog stretches the calves, hamstrings, and lats while opening the outer hips through the alternating heel press. A natural full-body addition to any hip abductor mobility session.
How to Program the Hip Abductor Stretch
Mobility programming follows a different logic than resistance training. Frequency matters more than intensity, and consistency over weeks beats heroic single sessions. The American College of Sports Medicine recommends that static stretching of any given muscle group be performed on most days of the week, with each stretch held 10-30 seconds for beginners and progressing to 30-60 seconds as tolerance builds (Ratamess et al., 2009).
| Level | Hold time × Reps | Rest between holds | Frequency |
|---|---|---|---|
| Beginner (seated figure-four) | 15-30 seconds × 1-2 per side | 10-15 seconds | 5-7 sessions/week |
| Intermediate (standing crossover) | 30-60 seconds × 2-3 per side | 10-20 seconds | 5-7 sessions/week |
| Advanced (side-lying with active engagement) | 30-90 seconds × 2-4 per side | 15-30 seconds | Daily |
Where in your workout: the hip abductor stretch fits in three slots. As a pre-workout primer before lower-body or lateral-plane training, use the dynamic crossover walk variation rather than a long static hold (long static holds before strength or power work can transiently reduce force output). As a cool-down, the standing crossover or side-lying versions work well when tissue is warm. As a standalone mobility session, pair with butterfly pose, cat-cow, and triplanar stretching for a 10-15 minute hip-and-spine reset on recovery days. Runners and cyclists benefit from 2 sets of 30 seconds per side before and after every session because tight hip abductors and TFL are major contributors to IT band syndrome.
Form floor over hold-time targets: if your torso starts to fold forward during a 60-second hold, end the hold at 30-40 seconds and reset. A clean 30-second hold beats a contaminated 60-second one. The stretch only works if the hip is moving laterally, not if the spine is doing the work for it.
How FitCraft Programs This Exercise
Knowing how to stretch the hip abductors is step one. Knowing when, how often, and what to pair it with is where most people get stuck.
FitCraft's AI coach Ty handles that. During your personalized diagnostic assessment, Ty maps your fitness level, goals, available equipment, and the patterns you sit or move in most often. Then Ty builds a personalized program that slots the hip abductor stretch into the right variation for your current mobility (seated figure-four if you're starting out, standing crossover or side-lying as you progress) and into the right session type (pre-run primer, post-workout cool-down, or standalone recovery work).
As your hip mobility improves, Ty adjusts hold times and pairs the stretch with strength work for the same muscle group. Every program is designed by an Ivy League-trained exercise scientist and NSCA-certified strength coach using evidence-based mobility principles, then adapted to you by the AI.
Frequently Asked Questions
Can I do the hip abductor stretch if I have lateral knee pain or IT band syndrome?
Yes, in most cases. Tight hip abductors (particularly the TFL) are a common contributor to lateral knee pain and iliotibial band syndrome, and gentle stretching is often part of ITBS rehabilitation protocols. Start with the seated figure-four variation to avoid loading the knee. If the stretch reproduces sharp lateral knee pain, stop and consult a physical therapist for a proper assessment before continuing.
What muscles does the hip abductor stretch target?
The hip abductor stretch primarily targets the gluteus medius, gluteus minimus, and tensor fasciae latae (TFL). The gluteus medius is the largest hip abductor and sits on the outer surface of the pelvis. The TFL runs along the side of the hip and connects to the IT band. The standing crossover variation also stretches the upper portion of the iliotibial band.
How long should I hold a hip abductor stretch?
Hold each hip abductor stretch for 30-60 seconds per side. Beginners should start with 30-second holds and build up to 60 seconds as tolerance improves. For meaningful flexibility gains, stretch at least 3-5 times per week. Consistent static stretching over 4 or more weeks produces the most reliable improvements in range of motion.
Is the hip abductor stretch safe to do every day?
Yes. The hip abductor stretch is a low-intensity static stretch that is safe for daily practice. Daily stretching is ideal for improving hip mobility because connective tissue responds best to frequent, gentle loading. Avoid bouncing or forcing the stretch past the point of mild discomfort. If you feel sharp pain in the hip or knee, reduce the intensity or consult a physical therapist.
What is the difference between hip abductors and hip adductors?
Hip abductors move your leg away from your body's midline (out to the side), while hip adductors move your leg toward the midline (inward). The main hip abductors are the gluteus medius, gluteus minimus, and TFL. The main hip adductors are the adductor longus, adductor brevis, adductor magnus, and gracilis. Stretching both groups is important for balanced hip mobility.