Most people stretch their hip flexors in one direction. Forward. They kneel down, shift forward, feel something in the front of the hip, and call it done. And they wonder why their hips still feel cemented shut after weeks of stretching.
The problem is that your hip flexors don't just work in one plane. The iliopsoas flexes and externally rotates. The rectus femoris crosses two joints. The TFL pulls into abduction and internal rotation. Hitting all of them requires moving through all three planes of motion (sagittal, frontal, and transverse) from the same half kneeling position. That's what makes the triplanar stretch so effective. You address the full three-dimensional architecture of the hip in a single sequence.
A 2004 randomized clinical trial in Physical Therapy compared active and passive hip flexor stretching methods and found both produced significant improvements in hip extension range of motion in subjects with limited flexibility (Godges et al., 2004). But here's the part most people miss: the stretch only works if your pelvis is in the right position. Without a posterior pelvic tilt, every degree of "stretch" you feel is just your lower back arching.
Quick Facts: Half Kneeling Triplanar Stretch
- Equipment needed: None (folded towel under the rear knee on hard floors)
- Difficulty: Advanced (full triplanar); Beginner-Intermediate variations available
- Modality: Mobility / stretching
- Body region: Lower body (hips), upper body (thoracic spine)
- FitCraft quest category: Yoga / Mobility
Areas Stretched and Mobilized
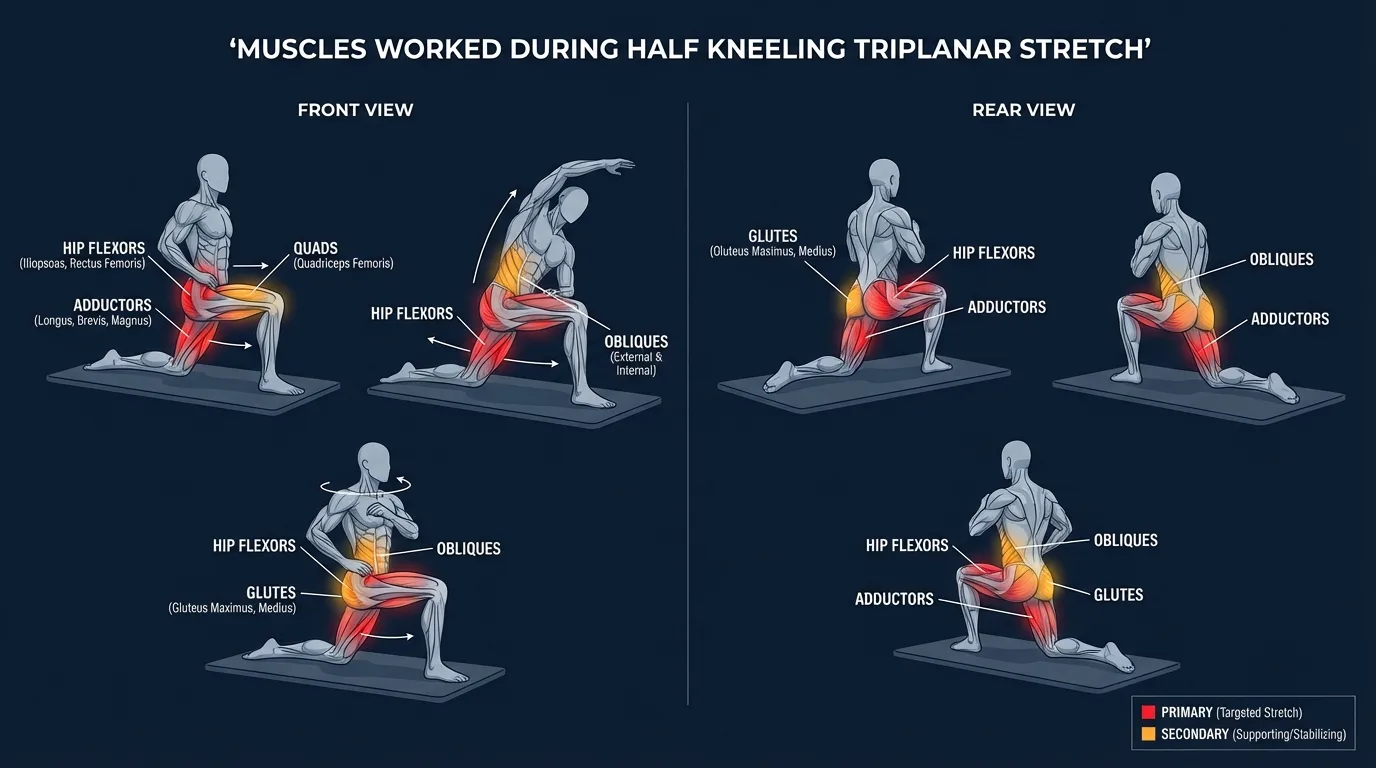
Primary tissues stretched: the iliopsoas (the deep hip flexor that runs from the lumbar spine to the femur), the rectus femoris (the only quadriceps head that crosses the hip), and the tensor fasciae latae (TFL) of the rear leg. These three muscles dominate hip flexor architecture, and they only fully lengthen when the femur is extended behind the body AND the pelvis is in posterior tilt. Either condition alone is incomplete.
Secondary tissues: across the three planes, the lateral obliques and quadratus lumborum stretch during the frontal-plane reach, the adductors lengthen as the rear hip drops forward, and the thoracolumbar fascia gets loaded during the transverse-plane rotation. The thoracic spine extensors and rotators mobilize as the chest opens toward the front knee.
Stabilizers: the rear glute fires isometrically and continuously to maintain the posterior pelvic tilt. This is the single most important muscle in the entire sequence. The core (transverse abdominis and obliques) holds the trunk stable during the lateral and rotational phases. The front-leg quadriceps and glute provide a stable base for the torso to move over.
Evidence and mechanism: stretching the hip flexors only works when the pelvis is anchored in posterior tilt. Anterior tilt allows the lumbar spine to extend and creates the illusion of a "stretch" without lengthening the iliopsoas at all. A 2004 randomized trial in Physical Therapy compared active and passive hip flexor stretching protocols and found both methods produced significant gains in hip extension range of motion when the pelvic position was controlled (Godges et al., 2004). The triplanar approach addresses the multi-axial nature of the hip flexor group: the iliopsoas externally rotates as it flexes, the TFL abducts and internally rotates, and the rectus femoris crosses both the hip and the knee. A single-plane stretch hits one fiber direction. Three planes hits all of them.
How to Do the Half Kneeling Triplanar Stretch (Step-by-Step)
Phase 1: Sagittal Plane (Forward Shift)
- Set up the half kneeling position. Kneel on your right knee with your left foot flat on the floor in front of you. Both the front hip and front knee should form 90-degree angles. Place a folded towel under your knee if the floor is hard. Tuck your tailbone under you by squeezing your right glute as hard as you can. This posterior pelvic tilt is non-negotiable. It's what creates the actual stretch. Brace your core. Torso tall and vertical.
Coach Ty's cue: "Glute squeeze is everything. If your rear glute is relaxed, your pelvis is in anterior tilt, and you're stretching your lower back instead of your hip flexors. Squeeze as if you're trying to crack a walnut between your glutes."
- Shift forward. Keeping the glute squeeze and pelvic tilt locked in, shift your entire torso forward over the front knee. You should feel a deep stretch through the front of the right hip. That's the iliopsoas and rectus femoris lengthening. Hold for 5-10 seconds during a warm-up, or 20-30 seconds for a dedicated stretch. Do not let the lower back arch. The moment you lose the tuck, the stretch moves from hip flexors to lumbar spine.
Ty's cue: "Check your front knee. It should stay stacked over the front ankle. If the knee drifts forward past the toes during the forward shift, you've gone too far. Shorten your stance or reduce the shift."
Phase 2: Frontal Plane (Lateral Reach)
- Reach and lean. From the forward-shifted position, reach your right arm (same side as the kneeling knee) overhead and lean your torso to the left. This adds a lateral stretch through the right-side hip flexors, the lateral fascial line, the obliques, and the quadratus lumborum. Hold for 5-10 seconds (warm-up) or 20-30 seconds (stretch session). Keep the right glute engaged and your weight centered. Don't collapse into the lean. Think about creating length through the right side of your body from knee to fingertips.
Ty's cue: "Reach up and over, creating as much distance as possible between the kneeling-side hip and the reaching fingertips. If your torso flops to the side, you're compressing the opposite side instead of stretching the target side."
Phase 3: Transverse Plane (Rotation)
- Rotate and open. Return to center from the lateral lean, then rotate your torso to the left, opening your chest toward the front knee. You can extend both arms to help drive the rotation. This adds a rotational stretch through the right hip flexors and the thoracolumbar fascia while mobilizing the thoracic spine. Hold for 5-10 seconds (warm-up) or 20-30 seconds (stretch session). The rotation should come from the thoracic spine. Your hips and lower back stay square and stable. Switch sides and repeat the entire three-phase sequence on the left.
Ty's cue: "The rotation comes from the ribcage. Lock your hips forward and rotate from the mid-back. Think about turning your sternum, not your belly button."
Get this exercise in a personalized workout
FitCraft, our mobile fitness app, uses its AI coach Ty to program mobility work like this into your plan at the right volume and intensity, based on your level, goals, and equipment. Ty was designed and trained by Domenic Angelino, MPH (Brown University) and NSCA-CSCS, with research published in the Journal of Strength and Conditioning Research and Medicine & Science in Sports & Exercise.
Take the Free Assessment Free · 2 minutes · No credit card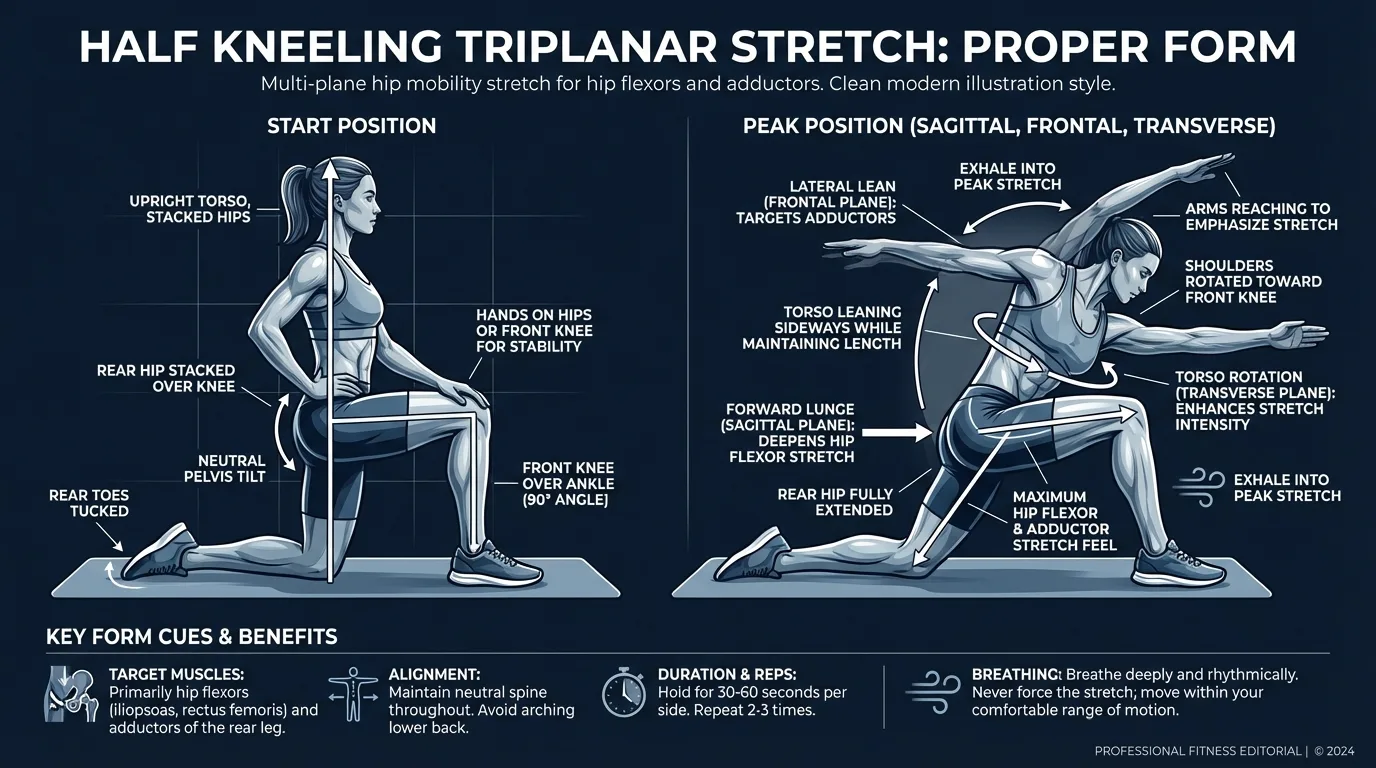
Common Mistakes to Avoid
- Losing the posterior pelvic tilt. This is mistake number one, two, and three. Every time someone tells me the half kneeling stretch "doesn't do anything," they're arching their lower back. The hip flexors only stretch when the pelvis is tucked. Without the tilt, you're just compressing the lumbar spine. Reset: squeeze the glute, tuck the tailbone, brace the core. Every single rep.
- Rotating from the hips or lumbar spine. During the transverse plane phase, the hips should stay square to the front. If your kneeling-side hip swings back, you're rotating from the wrong place. The mobility should come from the thoracic spine. Place your hands on your hip bones. If they move during the rotation, you've lost the position.
- Collapsing into the lateral lean. The frontal plane reach should be an active stretch, not a passive collapse. Think about reaching up and over, creating as much distance as possible between the kneeling-side hip and the reaching fingertips. If your torso just flops to the side, you're compressing the opposite side instead of stretching the target side.
- Rushing through the transitions. Each plane change is a transition that can compromise your base position. Before you move into the next plane, check: is the glute still engaged? Is the pelvic tilt still locked? Is the core still braced? Transitions are where form breaks down. Slow down between phases.
- Forcing range through aggressive pushing. Pushing past your current limit triggers protective muscle guarding and actually reduces the stretch. Each exhale is an opportunity to sink a millimeter deeper. Slow, steady breathing. Let gravity and the exhale do the work.
Variations
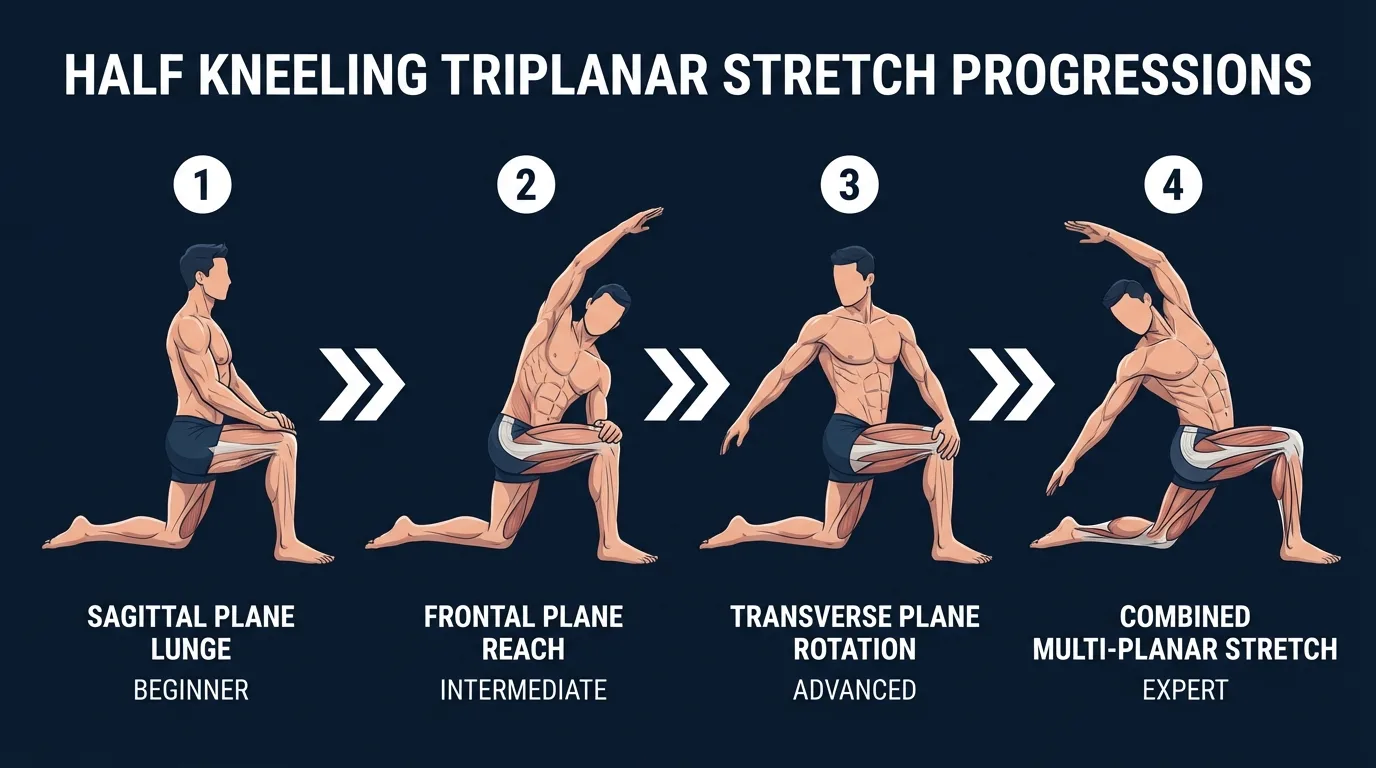
Sagittal-Only Half Kneeling Stretch (Beginner)
Skip the frontal and transverse planes entirely. Just perform the half kneeling hip flexor stretch with a proper posterior pelvic tilt and forward shift. This is where everyone should start. Master the glute squeeze, the tuck, and the forward shift before adding complexity. Hold for 30 seconds per side. If you can maintain the pelvic tilt consistently for 30 seconds, you're ready to add the second plane.
Two-Plane Version: Sagittal + Frontal (Intermediate)
Add the lateral reach after the forward shift, but leave out the rotation. This is a natural progression because the lateral reach doesn't require thoracic mobility. It primarily challenges the lateral hip and oblique flexibility. Hold each plane for 15-20 seconds. This version works well as a warm-up stretch before lower body training.
Full Triplanar with Sustained Holds (Advanced)
Perform all three planes with 30-second holds in each position. This is the deep-stretch version for dedicated mobility sessions or cooldowns. Total time per side: 90 seconds. Total for both sides: 3 minutes. This approach aligns with research showing that hip flexor stretching durations up to 120 seconds produce significant flexibility gains (Konrad et al., 2021).
Elevated Rear Foot Triplanar Stretch (Advanced+)
Place the top of your rear foot on a bench, couch, or chair behind you (like a Bulgarian split squat setup) then perform the triplanar sequence. Elevating the rear foot increases the hip extension demand and adds a rectus femoris stretch (since the knee is now in greater flexion). This is the most intense version. Only attempt it after you've mastered the floor version with sustained holds. Use padding under the front of the rear ankle.
When to Avoid or Modify the Half Kneeling Triplanar Stretch
The half kneeling triplanar stretch is safe for most healthy adults, but a few conditions warrant modification or temporarily skipping the more demanding planes. Always consult a qualified healthcare provider or physical therapist before starting or returning to any exercise program, especially if any of the conditions below apply to you.
- Knee pain on the kneeling side, or recent knee surgery. Direct pressure on a sore knee makes the position untenable. Modify with a thick folded towel, a yoga block, or a knee pad under the rear knee. If pain persists with padding, swap to a cobra pose or standing hip flexor stretch instead. Wait for clearance after any knee surgery.
- Hypermobility, Ehlers-Danlos, or other connective tissue disorders. Avoid pushing into end range on any plane. Stay in the early stretch phase where you feel gentle tension only. Emphasize active glute engagement to stabilize the joint rather than passive overstretching. Consult a PT with hypermobility expertise for tailored guidance.
- Acute hip flexor strain. Stretching a strained muscle can worsen the tear. Use ice, rest, and anti-inflammatories per medical guidance. Reintroduce gentle sagittal-plane work only after the acute phase resolves and pain-free walking returns. Skip the frontal and transverse phases until full sagittal-plane comfort is restored.
- Pregnancy (second and third trimesters). Relaxin loosens ligaments, increasing the risk of overstretching the SI joint. Stay within a comfortable range, skip the deep transverse-plane rotation, and use a chair or wall for balance. Consult your obstetric provider before adding hip mobility work.
- Acute lumbar disc pathology or active sciatica. The transverse-plane rotation can aggravate disc-related nerve irritation. Modify by performing only the sagittal plane with reduced range, or skip the stretch entirely until cleared by a spine specialist. Build the bracing foundation first with deadbugs and bird-dogs.
- Low back pain that worsens during the forward shift. This usually means you've lost the posterior pelvic tilt and are loading the lumbar spine instead of the hip flexors. Reduce the forward shift to a smaller range, hyper-focus on the glute squeeze, and rebuild bracing strength with forearm planks and cat-cow before progressing.
Related Exercises
If the half kneeling triplanar stretch is part of your mobility routine, these movements complement or extend the same hip and spine pattern:
- Same area, gentler entry point: Cobra pose stretches the hip flexors passively through spinal extension. Less targeted than the triplanar stretch but accessible for all levels and a useful regression when kneeling isn't comfortable.
- Standing alternative: Warrior I pose is a standing hip flexor stretch that also builds lower body strength. Easier to balance but harder to isolate the pelvic tilt cue.
- Active mobility pairing: Cat-cow mobilizes the lumbar and thoracic spine through flexion and extension. Pair before the triplanar stretch as a spinal warm-up.
- Deeper hip opener: Royal pigeon pose targets the deep external rotators and the front of the hip simultaneously. Best after the triplanar stretch has already opened the front of the hip.
- Core foundation for the kneeling base: Deadbugs and bird-dogs build the anti-extension core control needed to hold the posterior pelvic tilt cleanly.
- Adductor and inner thigh complement: Butterfly pose opens the inner thighs and complements the hip flexor work without overlapping it.
How to Program the Half Kneeling Triplanar Stretch
Mobility programming follows different rules than resistance training. Frequency can be daily. Hold duration and consistency matter more than sets. The American College of Sports Medicine (ACSM) Position Stand on resistance training emphasizes that flexibility work should be performed regularly with each major muscle group, ideally 2-3 days per week at minimum, with daily practice tolerated and often beneficial (Ratamess et al., 2009).
| Level | Sets × Hold Time | Rest between sides | Frequency |
|---|---|---|---|
| Beginner (sagittal plane only) | 2 × 20-30 sec per side | No rest needed (transition directly) | 5-7 sessions/week |
| Intermediate (sagittal + frontal) | 2 × 15-20 sec per plane per side | No rest needed | 5-7 sessions/week |
| Advanced (full triplanar) | 1-2 × 20-30 sec per plane per side | No rest needed | Daily |
Where in your workout: during pre-workout warm-ups, use shorter holds (5-10 seconds per plane) with dynamic movement between phases. During post-workout cooldowns, use longer holds (20-30 seconds per plane) for static flexibility gains. As a standalone mobility session, pair with cat-cow, butterfly pose, and a hip abductor stretch for a complete hip-and-spine mobility circuit. Desk workers benefit from micro-breaks of 60-120 seconds every hour during the workday.
Form floor over hold targets: if your posterior pelvic tilt breaks down before the hold is complete, end the hold early. Twenty seconds with a clean tuck beats forty seconds with an arched lower back every time. The whole point of the stretch is the position. Lose the position, lose the benefit.
How FitCraft Programs This Exercise
Knowing how to do a half kneeling triplanar stretch is step one. Knowing when to do it, how long to hold each plane, and when to progress from one plane to the next is where most people get stuck.
FitCraft's AI coach Ty handles that. During your personalized diagnostic assessment, Ty maps your fitness level, mobility restrictions, and goals. Then Ty builds a personalized program that slots the half kneeling triplanar stretch (or its sagittal-only regression) into a balanced routine at the right intensity for your level.
As your control improves, Ty adjusts the variation and hold time to match your progress. Sagittal-only becomes two-plane. Two-plane becomes full triplanar. Hold times extend. Every program is designed by an Ivy League-trained exercise scientist and NSCA-certified strength coach using evidence-based programming principles, then adapted to you by the AI.
Frequently Asked Questions
Why does my lower back hurt during the half kneeling stretch?
Lower back pain during a half kneeling stretch almost always means you have lost your posterior pelvic tilt. When the pelvis tips forward into anterior tilt, the stretch transfers from the hip flexors into the lumbar spine. Reset by squeezing the glute of the kneeling leg hard and tucking the tailbone under. If back pain persists, stop and consult a qualified healthcare provider or physical therapist.
What does the half kneeling triplanar stretch target?
The half kneeling triplanar stretch primarily targets the hip flexors (iliopsoas, rectus femoris, and tensor fasciae latae) of the rear leg. By moving through three planes of motion, it also stretches the lateral obliques, thoracolumbar fascia, quadratus lumborum, and adductors. It is one of the most comprehensive single-position hip mobility exercises available.
How long should I hold each position in the triplanar stretch?
Hold each plane for 5-10 seconds during dynamic mobility work like warm-ups, or 20-30 seconds per plane for deeper static stretching during cooldowns or dedicated mobility sessions. A full cycle through all three planes on both sides takes about 2-4 minutes depending on hold duration.
Can beginners do the half kneeling triplanar stretch?
The full triplanar version is an advanced stretch because it requires balance, body awareness, and the ability to maintain a posterior pelvic tilt through three different movement patterns. Beginners should start with the standard half kneeling hip flexor stretch in the sagittal plane only, then add the frontal and transverse planes as they build control.
Is the half kneeling triplanar stretch good for desk workers?
The half kneeling triplanar stretch is one of the best stretches for people who sit for long periods. Prolonged sitting shortens the hip flexors and locks the thoracic spine in flexion. This stretch directly addresses both issues by opening the hip through three planes while mobilizing the thoracic spine through lateral flexion and rotation.