Royal pigeon looks dramatic because it stacks several hard ranges into one shape. The front hip externally rotates, the back hip extends, the back knee flexes, the spine bends, and the shoulders reach overhead. If one link is missing, the body usually steals motion from the knee or lower back.
Quick Facts: Royal Pigeon Pose
- Equipment needed: Yoga mat; strap, block, or folded blanket recommended
- Difficulty: Advanced to expert
- Modality: Yoga and mobility
- Body region: Hips, quads, spine, chest, and shoulders
- FitCraft quest category: Yoga
Muscles Engaged & Stretched
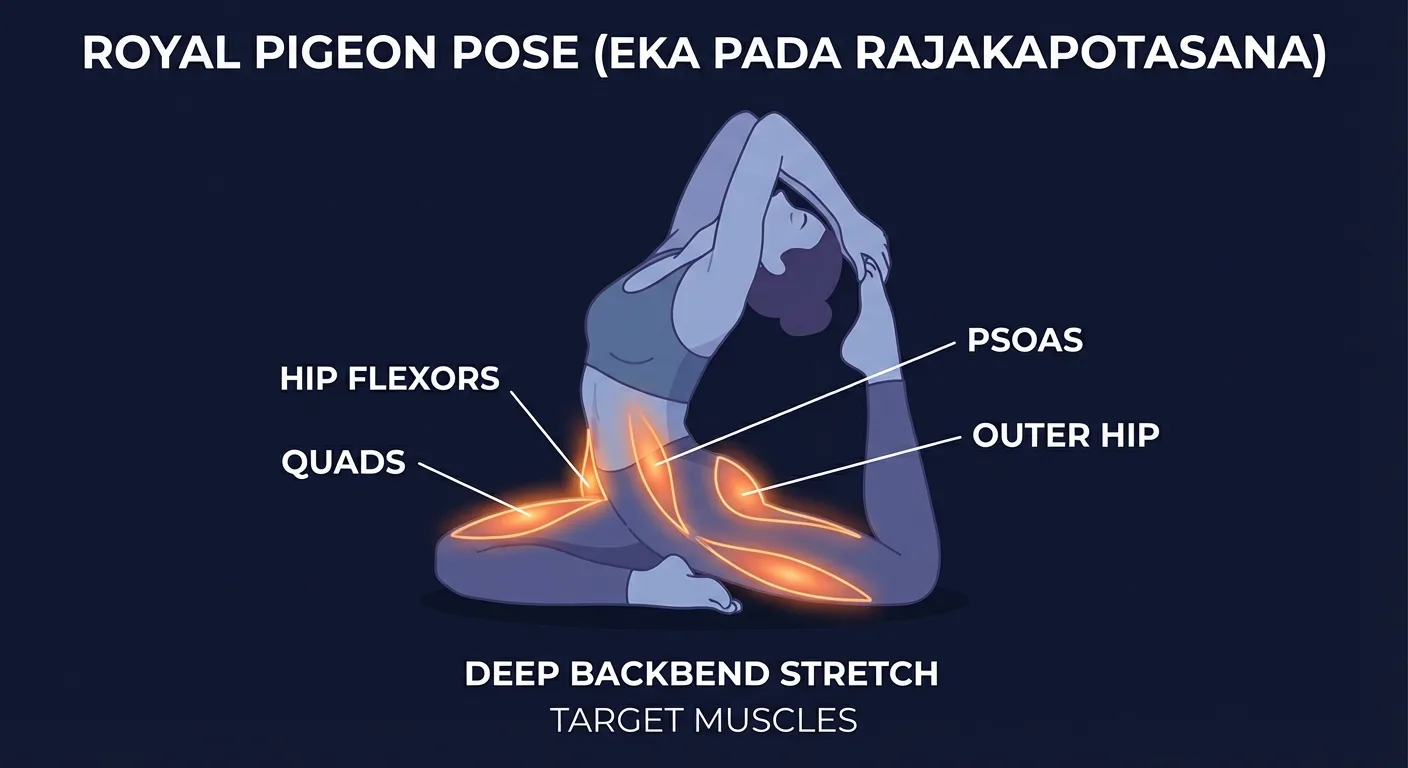
The primary stretch lands in the back-leg hip flexors and quadriceps, especially the rectus femoris because the hip is extended while the knee is flexed. The front-leg outer hip also opens through the glutes, piriformis, and deep external rotators as the shin angles across the mat.
Secondary emphasis shows up through the psoas, adductors, chest, anterior shoulders, and lats. When you reach for the back foot, the shoulder line has to open without yanking the spine into a pinch.
The stabilizers do more than people expect. The gluteus medius and deep hip rotators keep the pelvis from dumping to one side, while the rectus abdominis, transverse abdominis, obliques, and erector spinae help you hold a long, lifted trunk. Slow diaphragmatic breathing is part of the stabilization strategy because it keeps the rib cage from flaring as the backbend deepens.
No exercise-specific PubMed, PMC, or DOI citation is included for royal pigeon pose in the verified FitCraft citation library. The safest evidence framing here is mechanism-based: the pose combines hip external rotation, hip extension, knee flexion, spinal extension, and shoulder flexion, so it should be progressed only when each range is comfortable on its own.
Use pigeon pose, butterfly pose, and cobra pose as building blocks. Downward dog also works well between sides because it gives the hips and spine a neutral reset before you repeat the shape.
Step-by-Step: How to Do Royal Pigeon Pose
- Warm up thoroughly. Spend 5-10 minutes on hips, quads, shoulders, and spine before trying the pose. Low-lunge quad stretches, standard pigeon, cobra pose, and a few rounds of cat-cow prepare the tissue without rushing it.
- Set up classic pigeon. From hands and knees, slide your right knee toward your right wrist. Angle the shin across the mat so the right foot sits somewhere between your left hip and the front of the mat, then extend your left leg behind you.
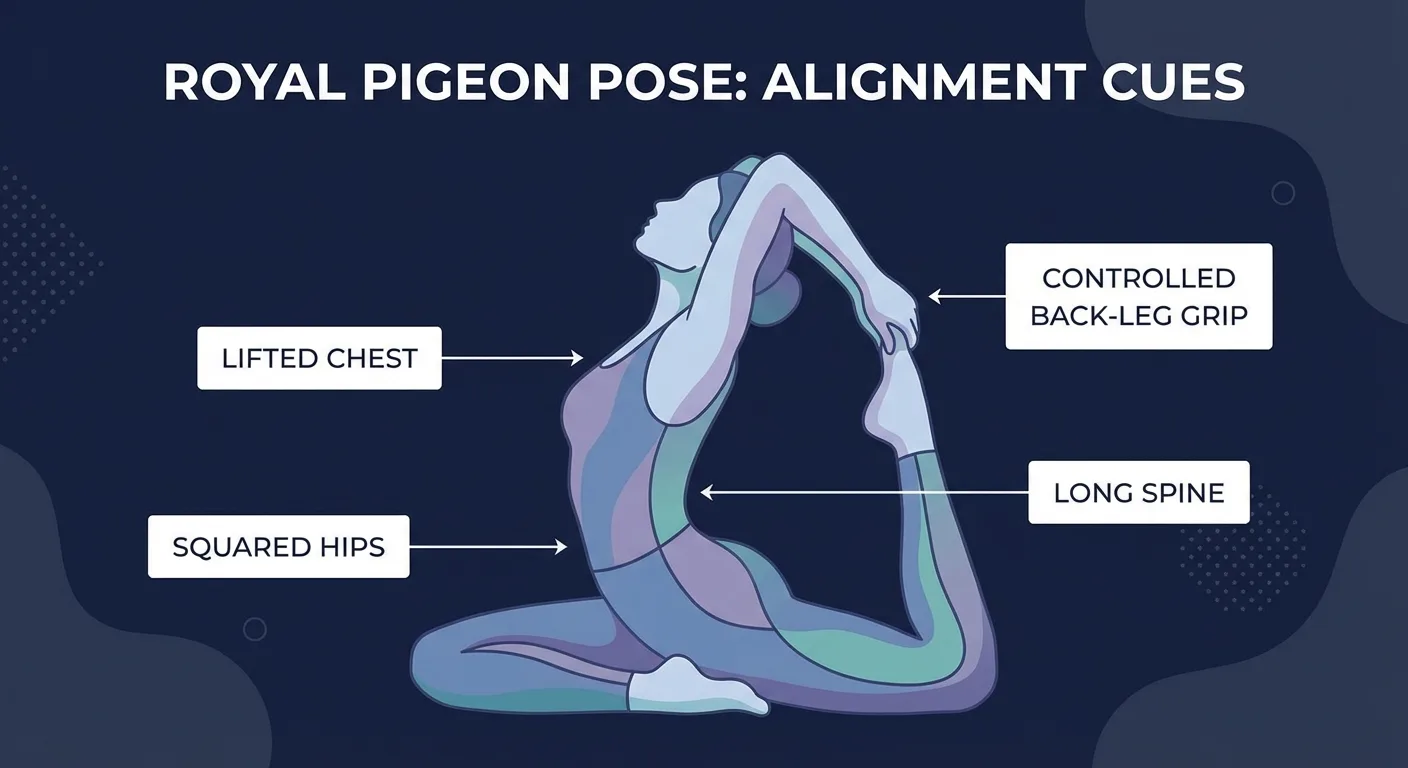
- Square the hips. Draw both hip points toward the front of the mat. If the back hip lifts, place a folded blanket or block under the front hip so the pelvis can stay level.
- Lift the chest tall. Press your fingertips into the floor, lengthen your spine, and lift your chest up and away from the front thigh. Coach Ty's cue: "Earn the lift before you reach for the foot."
- Bend the back leg. Bend your left knee and bring the heel toward your glutes. Reach back with the left hand, or loop a strap around the foot if direct contact makes you twist or compress.
- Deepen only if the breath stays smooth. If you have more range, rotate the left elbow upward so the biceps frames the ear. Advanced practitioners may reach the right arm back and clasp both hands around the foot.
- Release with control. Hold for 5-10 slow breaths. Let go of the foot first, return to neutral pigeon, then take a few breaths in downward dog before switching sides.
Get this exercise in a personalized workout
FitCraft, our mobile fitness app, uses its AI coach Ty to program yoga poses like this into your plan at the right volume and intensity, based on your level, goals, and equipment. Ty was designed and trained by Domenic Angelino, MPH (Brown University) and NSCA-CSCS, with research published in the Journal of Strength and Conditioning Research and Medicine & Science in Sports & Exercise.
Take the Free Assessment Free • 2 minutes • No credit cardCommon Mistakes
Collapsing the Chest Forward
What it looks like: The shoulders round, the chest falls toward the front thigh, and the spine loses length.
Why it's a problem: You lose the backbend component. The pose turns into a forced hip shape with extra pressure on the front knee.
The fix: Press your fingertips into the floor and lift your sternum before reaching for the foot. Keep the strap version if the direct grip costs you the chest lift.
Letting the Hips Roll Open
What it looks like: The back-leg hip lifts, the pelvis rolls away from the front leg, and the weight dumps into one side.
Why it's a problem: The front knee takes more rotational stress while the back-leg hip flexor stretch gets weaker.
The fix: Support the front hip with a blanket or block. A supported, square pelvis beats a deeper-looking shape that you cannot control.
Pulling Hard on the Back Foot
What it looks like: You yank the foot closer by arching the lower back or twisting the shoulder.
Why it's a problem: The knee, lumbar spine, and shoulder absorb the force that should be managed by gradual mobility work.
The fix: Use a strap around the foot and walk the hands in over time. Stop at the first range where the breath gets tight or the knee complains.
Skipping the Regressions
What it looks like: You jump from a basic pigeon straight into the overhead clasp.
Why it's a problem: Royal pigeon needs hip, quad, spine, and shoulder range. Trying to solve all of that in one pose usually creates compensation.
The fix: Spend weeks in supported pigeon, pigeon with a strap, cobra pose, and mermaid pose. The full clasp should feel like the next small step instead of a rescue mission.
Royal Pigeon Pose Variations: Regressions and Progressions
Easier Regressions
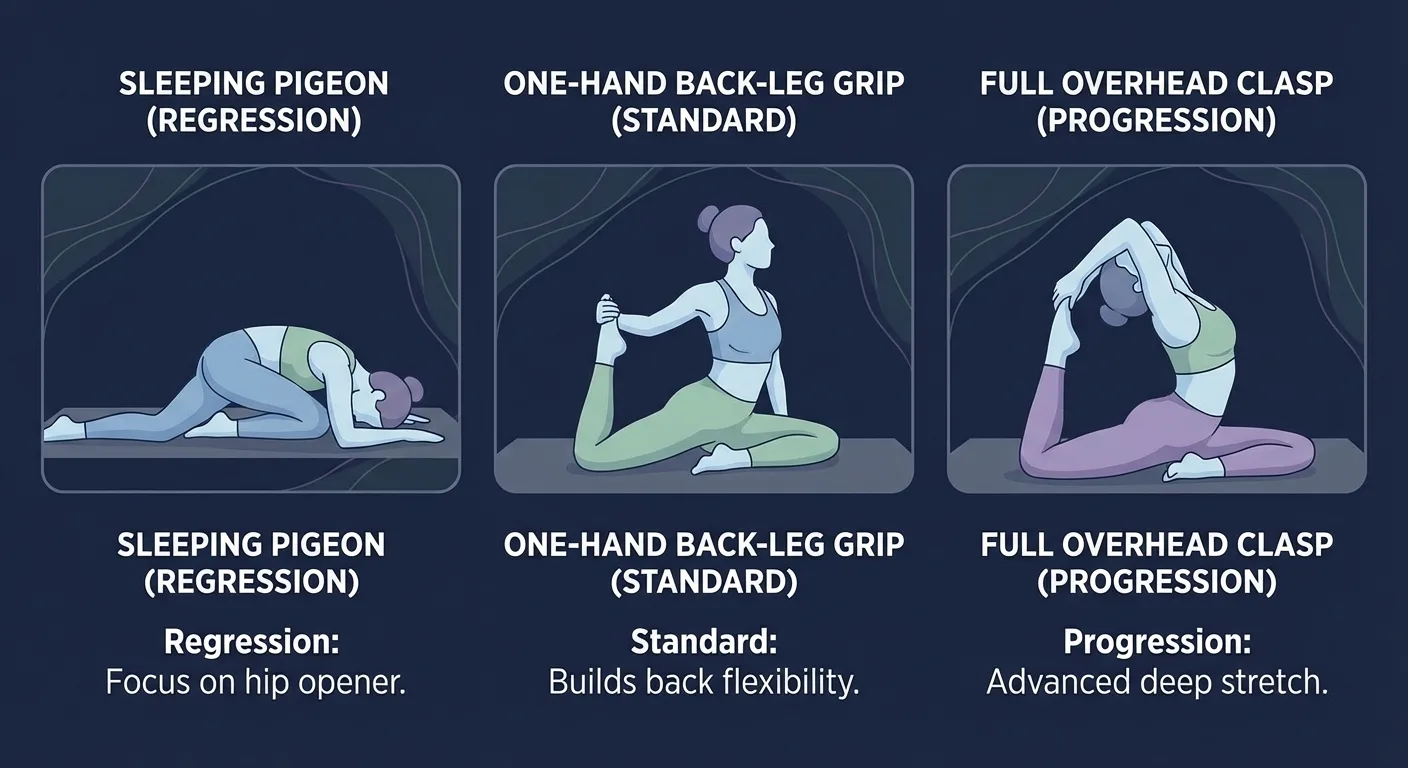
- Supported Pigeon Pose. Stay in classic pigeon with a block or folded blanket under the front hip. This lets you work the hip position without adding the backbend.
- One-Hand Back-Leg Grip. Bend the back knee and hold the foot with one hand. Keep the chest lifted and skip the elbow rotation until the quad stretch feels manageable.
- Strap Royal Pigeon. Loop a strap around the back foot and hold one end in each hand. The strap lets you train the direction of the pose without forcing contact.
Harder Progressions
- Full Overhead Clasp. Reach both arms overhead, clasp the back foot, and draw it toward the crown of the head while keeping the front knee quiet.
- Mermaid Pose. Hook the bent back foot into the elbow crease and clasp the hands behind the head. It trains a similar hip and quad opening with a different shoulder pathway.
Preparation Exercises
- Cobra Pose. Builds the spinal extension and chest opening needed for the lifted torso.
- Butterfly Pose. Opens the hips and groin with less knee and spine demand.
- Warrior Pose. Builds standing hip control and quad strength that carry into pigeon-family poses.
When to Avoid or Modify Royal Pigeon Pose
Royal pigeon pose is safe for many experienced yoga practitioners, but the combination of deep hip rotation, knee flexion, spinal extension, and shoulder reach deserves respect. Always consult your physician or physical therapist when you are unsure, and choose the regression that lets you breathe steadily.
- Knee pain, meniscus irritation, or recent knee surgery. Skip the full pose and use supported pigeon pose or a reclined figure-four stretch. The front knee should never be the place you feel the pose most.
- Hip impingement or sharp pinching in the front hip. Reduce the shin angle, support the hip, or switch to butterfly pose until the hip feels like a stretch instead of a pinch.
- Lower-back pain or spinal extension intolerance. Keep the torso upright, skip the back-foot pull, and build extension with cobra pose and cat-cow.
- Shoulder injury or limited overhead range. Use a strap and keep the elbow lower. Forcing the overhead clasp can irritate the shoulder before the hips are ready.
- Late pregnancy, recent surgery, uncontrolled hypertension, balance disorders, or hypermobility. Work with a qualified clinician or prenatal yoga instructor and choose a supported variation.
- Breath holding, numbness, or tingling. Back out immediately. A strong stretch can be productive; nerve symptoms and breath strain are stop signs.
Related Exercises
- Same pose family: Pigeon pose gives you the hip base without the full backbend.
- Advanced hip opener: Mermaid pose bridges the gap between pigeon and royal pigeon.
- Mobility prep: Half-kneeling triplanar stretch opens hip flexion, rotation, and lateral reach.
- Spine and pelvis prep: Cat-cow trains controlled spinal movement before deeper backbends.
- Core foundation: Deadbugs build the trunk control needed to keep the ribs and pelvis organized.
How to Program Royal Pigeon Pose
Yoga programming differs from resistance training because the main variables are breath quality, hold time, range, and weekly exposure. The broader progression framework still follows the same principle described by Ratamess et al., 2009: match the dose to your current ability and progress gradually.
| Level | Sets × Reps | Rest between sets | Frequency |
|---|---|---|---|
| Beginner | 1-2 supported holds of 3-5 breaths (15-30 seconds) per side | 5-10 breaths between sides | 3-5 sessions/week |
| Intermediate | 2-3 strap-assisted holds of 5-10 breaths (30-60 seconds) per side | 30-60 seconds or a neutral reset pose | 4-6 sessions/week |
| Advanced | 3-5 holds of 10-15+ breaths (60-90+ seconds), using deeper variations only when clean | 60-90 seconds, or downward dog between sides | 5-7 sessions/week if joints recover well |
Place royal pigeon late in a yoga flow, after sun salutations, lunges, hip openers, and backbends. It can also work as a cool-down after lower-body training or as part of a standalone mobility session, but it should not be your first deep stretch of the day.
Use the form floor over time targets: stop the hold when the front knee hurts, the pelvis rolls open, the lower back pinches, or the breath gets tight.
FitCraft's AI coach Ty adjusts yoga pose variations and volume to match your level. For a pose this advanced, that means building the pieces first: hip mobility, quad length, spinal extension, shoulder range, and enough core control to keep the shape honest.
Frequently Asked Questions
What's the difference between pigeon pose and royal pigeon pose?
Regular pigeon pose is a hip opener with the front leg bent and the torso either upright or folded forward. Royal pigeon keeps the pigeon base, then adds a back-leg quad stretch, a deep spinal extension, and often an overhead grip on the back foot.
What muscles does royal pigeon pose stretch and engage?
Royal pigeon stretches the hip flexors, quadriceps, psoas, glutes, piriformis, chest, and front shoulder line. The spinal extensors, deep hip stabilizers, glutes, and core work isometrically to keep the pelvis level and the chest lifted.
Is royal pigeon pose safe for beginners?
Royal pigeon is an advanced pose, so beginners should use regressions. Start with reclined figure-four, supported pigeon, low-lunge quad stretch, cobra pose, and strap-assisted pigeon before trying to pull the foot toward the head.
Can I do royal pigeon pose with knee pain?
Do not force royal pigeon through knee pain. Knee discomfort usually means the hip is not accepting the rotation, so reduce the shin angle, support the front hip, flex the front foot, or switch to reclined figure-four until the knee feels quiet.
How long does it take to build up to royal pigeon pose?
For most people, the full overhead clasp takes months or years of consistent practice. Progress tends to come from repeat exposure to hip openers, quad stretches, spinal extension, and shoulder mobility rather than from pulling harder in one session.