Mermaid pose looks like magic. Someone sits on the floor, folds their back foot into their elbow, clasps their hands behind their head, and arches into a graceful curve that looks lifted straight out of a yoga magazine. You see it and think, no way. Not with my hips. Not with my shoulders. Not in this lifetime.
Mermaid pose is really a stack of three things happening at once: a deep front hip opener (the pigeon base), a back leg quad stretch, and a shoulder bind with a gentle backbend. Each of those is hard on its own. Put them together and you get a shape that most people can't safely attempt for months. That isn't a discouragement. It's a roadmap. Every piece of this pose is trainable; you just can't skip the steps.
This guide walks you through the full bind sequence, the common mistakes that wreck your front knee or your lower back, and the regressions that get you there without forcing it. If your hips are tight right now, start at the bottom of the progression chart and stay there until your body is ready. That's the whole secret.
Muscles Engaged and Stretched in Mermaid Pose
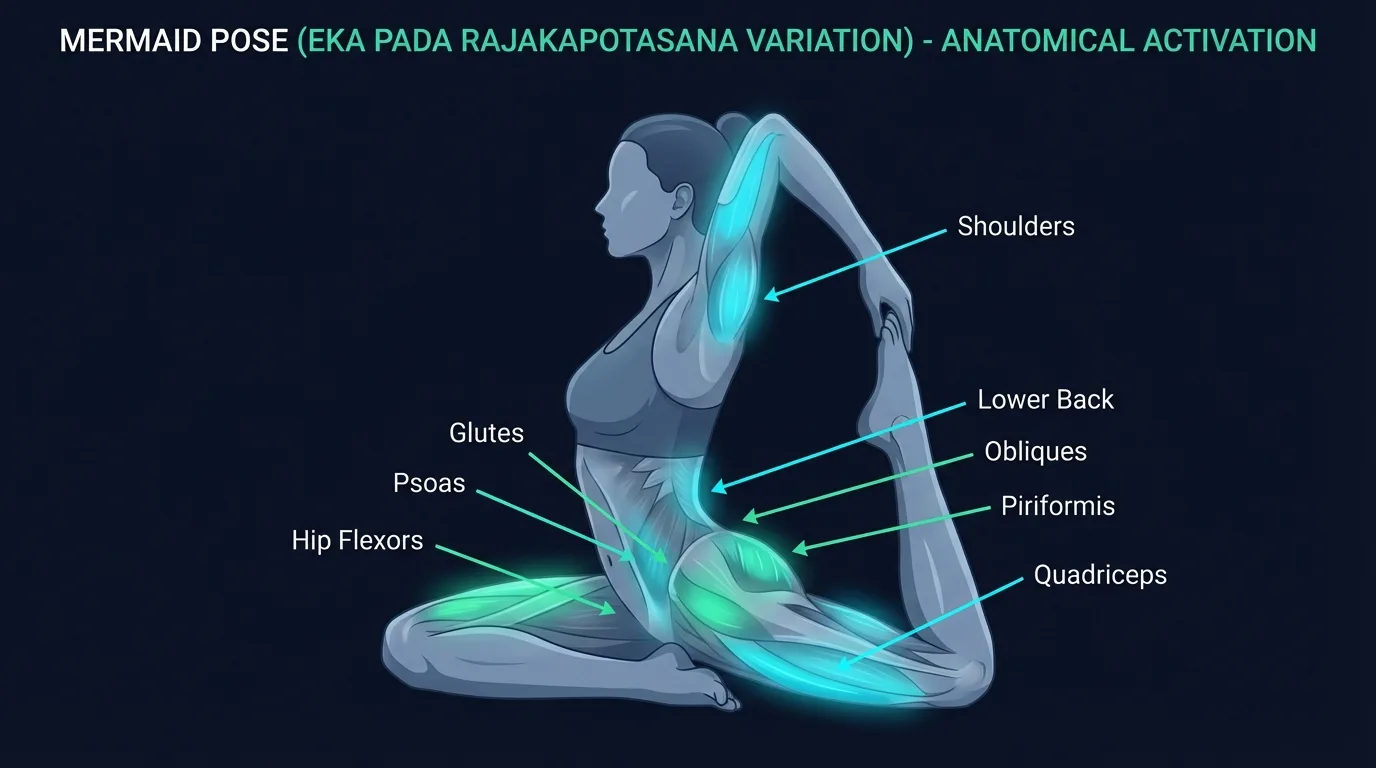
Primary stretched muscles. The hip flexors (psoas major and iliacus), quadriceps (rectus femoris in particular), and piriformis carry the deepest stretch. The front leg is in deep external rotation with the hip in flexion, which lengthens the piriformis and the deep external rotators across the back of the pelvis. The back leg's bent knee combined with hip extension stretches the rectus femoris and psoas of the back leg as a single multi-joint chain. This is the stretch you cannot get from a static lunge or a standing quad pull.
Secondary stretched and engaged muscles. The chest (pectoralis major and minor), the front shoulder (anterior deltoid), and the lats stretch through the overhead bind. The obliques and lower back work to keep the torso lifted and squared rather than collapsing to the side. The glutes of the front leg lengthen, and the inner thigh of the front leg gets a mild stretch through the rotation.
Stabilizers. The core (rectus abdominis, transverse abdominis, obliques, and erector spinae) fires isometrically to keep the pelvis level and the spine long. The deep hip stabilizers (gluteus medius and minimus, the piriformis on the back-leg side) hold the pelvis from twisting. The breath is the quiet stabilizer here: diaphragmatic breathing keeps the chest mobile under the bind and signals to the nervous system that the stretch is safe to release into.
Mechanism and evidence. Held yoga poses build mobility through a combination of mechanical stretch on the connective tissue, neural relaxation of the muscle's stretch reflex, and improved tolerance to lengthened positions over time. Polsgrove and colleagues (2016) ran 14 college male athletes through biweekly yoga for 10 weeks and measured significant gains in sit-and-reach flexibility, shoulder flexibility, and stork-stand balance versus a control group. Mermaid pose specifically targets the hip flexor and quadriceps chain that desk-sitting tends to shorten, and the overhead bind builds the shoulder mobility that bench-pressing and forward-loaded sports tend to lock down. The pose works the way every static yoga shape works: you load the lengthened tissues, you breathe, and you give the nervous system time to lower its guard.
Quick Facts: Mermaid Pose
- Equipment needed: None (yoga mat, block, and strap optional)
- Difficulty: Expert (full bind) · Intermediate with regressions
- Modality: Static hold · Hip opener · Backbend
- Body region: Hips, quads, chest, shoulders, spine
- FitCraft quest category: Yoga / Flexibility
How to Do Mermaid Pose (Step-by-Step)
- Start in half pigeon. From a low lunge, slide your front shin forward so it lies across the front of the mat. Your front foot can stay tucked close to the opposite hip (easier) or angle out toward parallel with the top of the mat (harder). Back leg extends straight behind you, top of the foot pressing into the mat. Square your hips forward. Both hip points face the front wall. If one side is lifting off the mat, slide a block or a folded blanket under that hip so the pelvis stays level. This is non-negotiable.
Coach Ty's cue: "Square the hips before anything else. Every good thing in this pose comes from a level pelvis."
- Bend the back knee. Slowly bend your back knee and lift the foot toward the ceiling. You should feel an immediate stretch down the front of the back thigh. Keep pressing the back thigh down into the mat. This is where most people start to cheat: the front hip wants to hike up and the back hip wants to open out to the side. Resist both. Keep the hips square.
- Reach back and catch the foot. Reach your same-side arm back (if your right leg is in front, use your right arm) and hook the top of your back foot into the crook of your elbow. The sole of the foot points up. The shoelaces side rests inside the bend of your arm. Draw the foot gently toward your body so the bind feels secure. If you can't reach the foot, use a strap looped around the foot and work up to the bind over time.
Coach Ty's cue: "The bind should feel firm, never forced. If the knee pinches, back off and use the strap."
- Clasp your hands overhead. Sweep the opposite arm up and back overhead. Bend that elbow and reach your hand down behind your head. Clasp your hands together behind the base of your skull. If the clasp isn't available, hold a strap between your hands. No shame in the strap. Shoulders take months to open up for this bind.
- Hold and breathe. Lift through the crown of your head. Lengthen the front of your spine. Draw your shoulder blades down your back and open the chest upward. Hold for 5 to 8 slow breaths. To release, unhook the back foot first, then lower the leg, then release the arms. Rest in child's pose for 3 to 5 breaths before switching sides.
Coach Ty's cue: "Exit the same way you entered. Back foot first, then arms, then leg. Wrong order is how shoulders get tweaked."
Common Mistakes to Avoid
Mermaid pose has a higher injury rate than most yoga shapes because so many things happen at once. The mistakes below aren't edge cases. They're what happens to almost everyone who rushes the progression.
- Unsquared hips. This is the number one mistake and it's the one that takes the front knee offline. When the back hip drops out to the side, the front shin rotates and your knee absorbs torque it was never built to handle. The fix is simple: prop the pigeon-side hip with a block until your pelvis is level. If you can't get square even with a block, you're not ready for mermaid yet. Stay in half pigeon for another few weeks.
- Cranking the lower back. The backbend in mermaid should come from the mid and upper spine, not from dumping into the lumbar. If your lower back feels pinchy or hot, you're compressing the lumbar facet joints. Back off the bind, lift taller through the crown, and let the curve live in your thoracic spine. If you still feel pinching, skip the overhead bind entirely and just hold the back foot with the same-side hand.
- Forcing the overhead clasp. Shoulder mobility is the slowest thing to improve. People try to jam the hands together behind the head and end up yanking the front shoulder into a position it can't safely hold. Use a strap. Most practitioners use a strap in mermaid for a year or longer before the full clasp happens naturally. The strap is not a step-down. It's the intelligent version of the pose.
- Holding your breath. The combined hip, quad, shoulder, and backbend load makes this a stressful pose for the nervous system. Your body's first reaction is to clamp down and hold breath. Do the opposite. Slow nasal breathing signals to your nervous system that you're safe, which actually lets the tissues release. Count the breaths. Five to eight slow ones, no more.
Get this exercise in a personalized workout
FitCraft, our mobile fitness app, uses its AI coach Ty to program yoga poses like this into your plan at the right volume and intensity, based on your level, goals, and equipment. Ty was designed and trained by Domenic Angelino, MPH (Brown University) and NSCA-CSCS, with research published in the Journal of Strength and Conditioning Research and Medicine & Science in Sports & Exercise.
Take the Free Assessment Free · 2 minutes · No credit card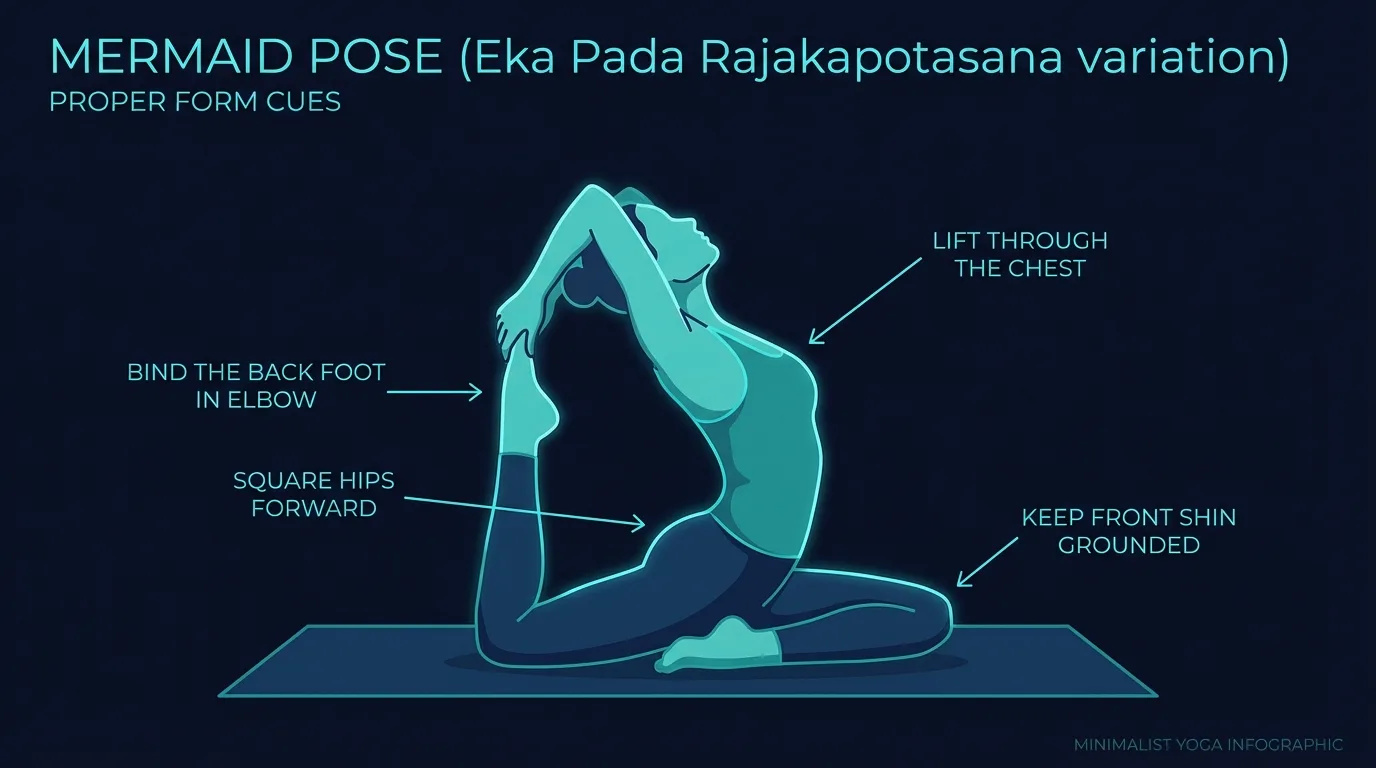
Variations and Progressions
Easier (Regressions)
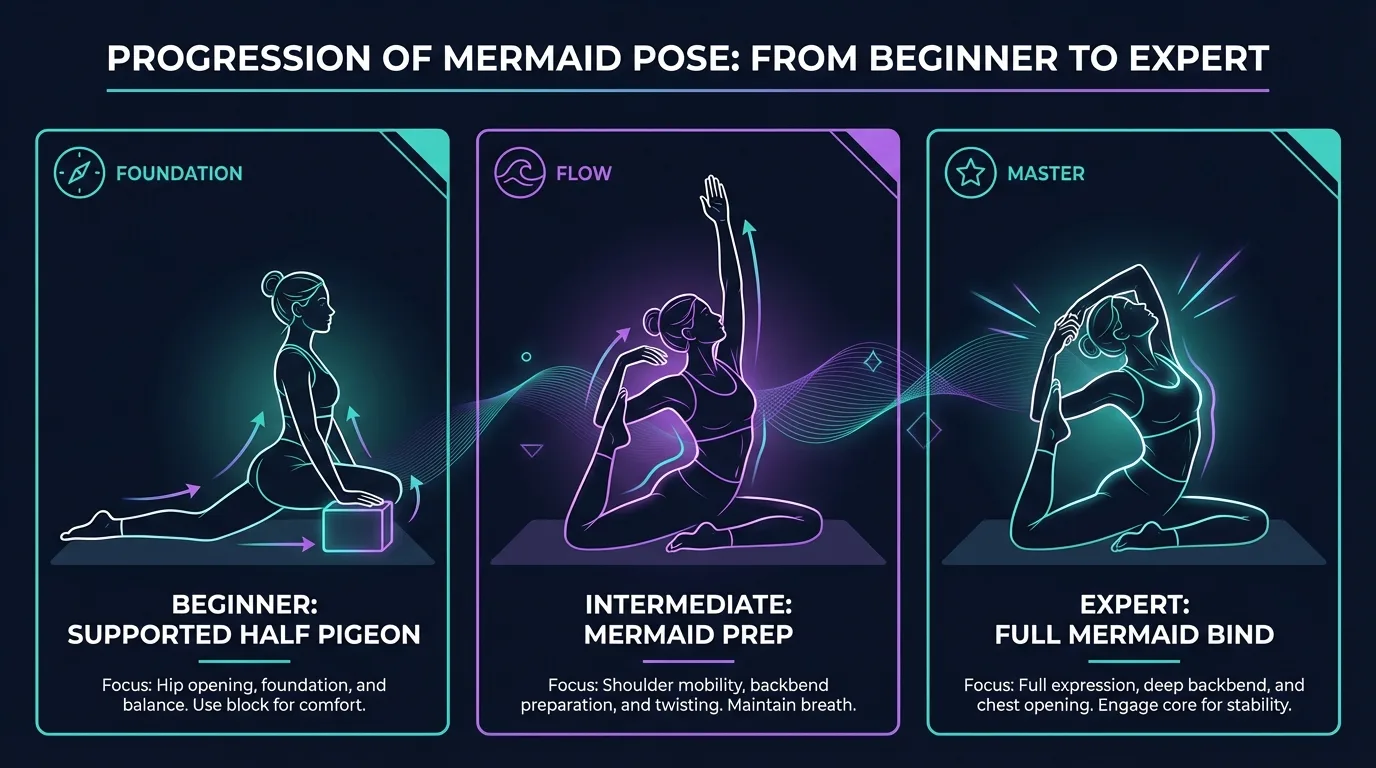
- Supported half pigeon: This is where almost everyone should start. Come into half pigeon with a block or folded blanket under your pigeon-side hip so the pelvis stays level. Rest on your forearms or fold all the way forward over the front shin. Hold for 1 to 2 minutes per side. Do this for 2 to 3 weeks before adding the back leg bend.
- Pigeon with back leg bend, no bind: From supported pigeon, bend the back knee and reach the same-side hand back to hold the foot. Don't pull it into the elbow yet. Just hold the foot and feel the quad and psoas open on that side. This is the real stretch that makes mermaid possible.
- Strap mermaid: Loop a yoga strap around the top of the back foot. Hold one end in the same-side hand, the other end in the opposite hand reached overhead. The strap gives you the shape of the bind without requiring the shoulder mobility to clasp hands. Plan on using a strap for several months. That's normal.
Harder (Progressions)
- Full mermaid with extended backbend: Once the basic bind is solid, deepen the backbend by lifting higher through the crown of the head and drawing the shoulder blades further down the back. Your gaze travels upward. The chest opens more. Hold for 8 to 10 breaths. Don't add this until you can hold the standard bind for at least 5 breaths with zero shoulder strain.
- Double pigeon into mermaid: Start in double pigeon (ankle stacked on opposite knee) for a deeper outer hip opener, then transition into the mermaid bind from that base. This variation assumes very open hips and is reserved for practitioners with months of consistent pigeon work behind them.
- King pigeon (Eka Pada Rajakapotasana): The full king pigeon pose extends the bind into a deep backbend where both hands reach overhead to catch the back foot directly, without the elbow hook. This is the full expression of the Eka Pada Rajakapotasana family and takes years for most people.
When to Avoid or Modify Mermaid Pose
Mermaid pose places the body in a held position that loads the front knee and hip, deeply flexes the back knee, extends the lumbar spine, and asks the shoulders to wrap into a closed bind. It is safe for most healthy adults who have built the prerequisite mobility, but several conditions warrant modification or substitution. Always consult a qualified healthcare provider or physical therapist before adding mermaid to your practice, especially if any of the following apply.
- Knee pain, meniscus injury, or recent knee surgery. The front leg is in deep external rotation and the back knee is in deep flexion. Both load the knee joint in vulnerable positions. Substitute reclined pigeon (figure-four stretch on your back) until cleared.
- Lower back pain or lumbar disc issues. The backbend in mermaid easily collapses into the lumbar spine when the thoracic mobility isn't there. Skip the overhead clasp, hold the back foot with the same-side hand only, and keep the spine long rather than arched.
- Recent shoulder surgery or rotator cuff injury. The overhead bind asks one shoulder into deep external rotation and the other into deep internal rotation. Use a strap or skip the overhead arm entirely.
- Hip replacement or recent hip surgery. The combined external rotation and flexion at the front hip is the exact position most surgeons restrict post-operation. Get explicit clearance.
- Late pregnancy (second and third trimester). The deep abdominal stretch and prone-leaning element become unsafe. Substitute with seated pigeon variations modeled by a prenatal yoga instructor.
- Hypermobility or connective tissue disorders (EDS, Marfan syndrome). Mermaid encourages overstretching at already-lax joints. Focus on muscular engagement and the breath rather than depth, and consider skipping the bind. Build core stability with deadbugs and bird-dogs before chasing range.
Related Exercises
- Hip opener foundation (build this first): Half pigeon and pigeon pose are the prerequisite shapes. Stay here for weeks before attempting mermaid.
- Quad and hip flexor pair: Butterfly pose opens the inner hip and groin, which complements the external rotation work in mermaid.
- Backbend complement: Cobra pose and camel pose train the thoracic extension that makes the mermaid backbend safe. Practice these on days you're not doing mermaid.
- Balance and front-body extension: Dancer pose trains the same back-leg quad stretch and overhead reach as mermaid, but standing and balance-driven.
- Spinal warm-up: Cat-cow is the universal warm-up for any pose that asks the spine to move. Do 5 to 10 rounds before mermaid.
- Whole-body mobility transition: Downward dog and butterfly reach are useful between sides as a neutral reset.
How to Program Mermaid Pose
Yoga programming differs from resistance training. Frequency can be high because the stimulus is mobility and isometric endurance rather than progressive overload. The framework below adapts the principles in the ACSM Position Stand on Resistance Training (Ratamess et al., 2009) to a static yoga pose where hold time replaces reps.
| Level | Hold time | Rounds per side | Rest between sides | Frequency |
|---|---|---|---|---|
| Beginner (supported half pigeon only) | 1 to 2 minutes | 1 round per side | 5 to 8 breaths in child's pose | 3 to 4 sessions/week |
| Intermediate (strap mermaid) | 5 to 8 breaths (~30 to 45 seconds) | 1 to 2 rounds per side | 5 to 8 breaths in child's pose | 2 to 3 sessions/week |
| Advanced (full clasped bind) | 8 to 10 breaths (~60 to 75 seconds) | 2 rounds per side | 8 to 10 breaths in child's pose | 2 to 3 sessions/week |
Where in your workout. Mermaid is a peak pose. It belongs at the end of a yoga session, after a full warm-up and ideally after other hip openers (butterfly pose, supported pigeon) and shoulder openers. Never cold. The pose demands open hips and open shoulders, so build up to it through 10 to 15 minutes of preparatory work. Outside of a yoga session, mermaid also works as a 5-minute cool-down after a heavy leg day or after long sitting, again only after a brief warm-up.
Form floor over rep targets. The hold times above assume you can keep the hips squared, the front knee unstressed, and the breath slow throughout. If any of those breaks down, end the hold early and step back to the next-easier regression. Yoga rewards consistency at the right depth, not maximum depth.
FitCraft's AI coach Ty programs mermaid pose into your personalized yoga routines at the right regression for your current mobility. Ty's 3D demonstrations show the bind sequence from multiple angles, which helps more than a photo when you're trying to figure out where your elbow actually goes. The app tracks your hold times and which regression you're on, so you can watch your hip and shoulder mobility open up across weeks and months.
Frequently Asked Questions
Can I do mermaid pose if I have knee pain?
If you have knee pain, especially meniscus issues, patellar tendinopathy, or a history of knee surgery, skip the full mermaid pose and stay in supported half pigeon with a block under the pigeon-side hip. The deep front hip flexion in pigeon places torque on the front knee when the hips are not square, which is exactly the position that aggravates knee structures. The back leg quad stretch in mermaid also flexes the back knee deeply. Work with a physical therapist before attempting the full bind, and consider a reclined pigeon variation (figure-four stretch on your back) instead until the knee is cleared.
What muscles does mermaid pose work?
Mermaid pose primarily stretches the hip flexors (psoas, iliacus), quadriceps, piriformis, and external rotators of the front hip. Secondary areas include the chest, shoulders, lats, side body, and lower back. It is one of the deepest combined hip opener and backbend shapes in yoga, which is why it targets so many muscle groups in a single hold. The core, deep hip stabilizers, and breath work isometrically to keep the pose stable.
Is mermaid pose hard for beginners?
Mermaid pose is considered an expert-level pose because it combines a deep hip opener, a quad stretch, and a backbend with a shoulder bind all at once. Most beginners are not ready for the full expression. Start with half pigeon for several weeks to open the front hip, then add the back leg bend without the bind, and only try the bind once you can catch the foot comfortably with the hips fully square.
How do I get into the mermaid bind?
To get into the mermaid bind, bend your back knee in half pigeon and reach your same-side arm back. Hook the top of the back foot into the crook of your elbow with the sole facing up. Then sweep the opposite arm overhead, bend it, and clasp your hands behind your head. If the clasp feels far away, use a yoga strap between your hands until your shoulders open up over time. Most practitioners use a strap for months or longer before the natural clasp.
What is the difference between mermaid pose and pigeon pose?
Pigeon pose is a hip opener with the back leg extended straight behind you. Mermaid pose starts from pigeon but adds a bent back knee, a bind of the back foot in the elbow, and a shoulder clasp overhead. Pigeon is a foundation pose. Mermaid is a deep variation that combines a hip opener, a quad stretch, and a backbend with a shoulder bind all at once.
Is mermaid pose good for tight hips?
Mermaid pose is excellent for tight hips, but only once you have enough mobility to enter it safely. It releases the front hip deeply through the pigeon base while the back leg quad stretch opens the psoas and hip flexor on the opposite side. If your hips feel very locked, regress to supported half pigeon with a block under your front hip first and stay there for several weeks.