You have probably seen dancer pose on a yoga magazine cover. One leg rooted. The other leg kicking gracefully behind the head. A soft, serene expression on the person's face. It looks like a still photograph of floating.
It's not floating. Dancer pose is one of the hardest postures in yoga, and the reason is simple. Most poses ask one thing of you. Dancer asks for everything at once. You need a strong, stable standing leg. You need hip flexor length on the lifted side. You need thoracic spine mobility to open the chest. You need shoulder external rotation to catch the foot safely. And you need the focus to hold the whole thing together while gravity does its best to pull you over.
Here's the thing nobody tells you in class. The people who look effortless in dancer pose didn't get there with flexibility alone. They got there with progression. They spent weeks, sometimes months, working a wall-assisted half dancer before they ever let go of the wall. A 2019 review in Complementary Therapies in Medicine analyzed yoga injury data and found that unsupervised progression into advanced asanas is the single biggest predictor of strain injuries (Cramer et al., 2019). Translation. You don't rush this one. You build it.
Quick Facts: Dancer Pose
- Equipment needed: None (yoga strap and wall optional for beginners)
- Difficulty: Expert (regressions accessible to intermediate practitioners)
- Modality: Yoga / Mobility / Balance
- Body region: Full-body (standing leg, core, spine, hip flexors, shoulders)
- FitCraft quest category: Mobility
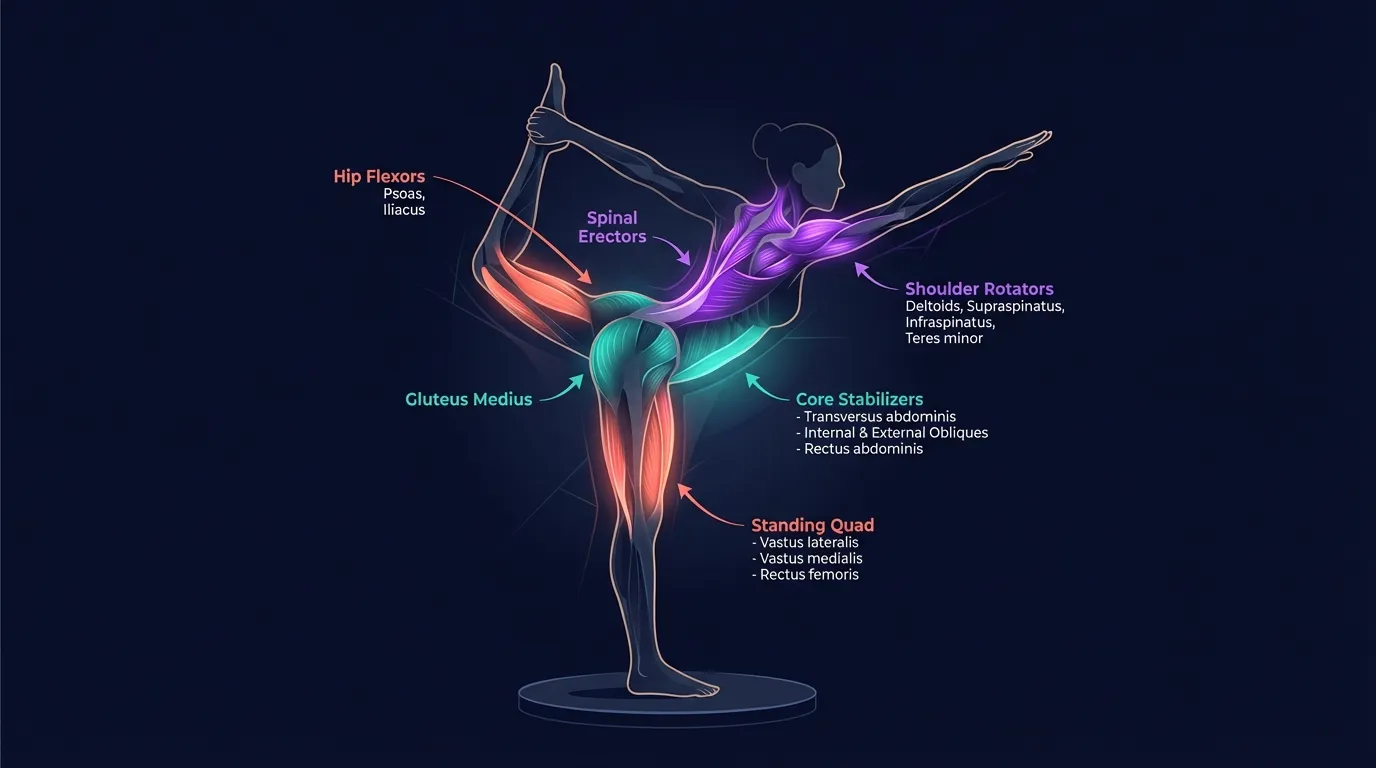
Muscles Engaged & Stretched
Primary movers (engaged isometrically): the quadriceps and gluteus medius of the standing leg hold you upright against gravity, the spinal erectors (multifidus, longissimus, iliocostalis) drive thoracic extension into the backbend, and the gluteus maximus of the lifted leg fires to push the thigh back and up into the catching hand.
Secondary movers and stretched groups: the hip flexors (iliopsoas, rectus femoris) and quadriceps of the lifted leg are stretched under load, which is what makes dancer such a potent hip-opener over time. The shoulder external rotators (infraspinatus, teres minor) of the catching arm support the lift, while the rear deltoids and rhomboids of the extended front arm pull the shoulder blade down and back to open the chest.
Stabilizers: the entire core (rectus abdominis, transverse abdominis, obliques) plus the deep hip stabilizers of the standing leg (gluteus medius, piriformis) and the intrinsic foot muscles all fire isometrically to hold the balance. The breath is also a stabilizer here. Diaphragmatic breathing supports both the working muscles and the front-body stretch that opens during the backbend.
Mechanism note: dancer pose is unusual because it combines a concentric contraction (the spinal erectors actively extend the spine), a loaded passive stretch (the hip flexors of the lifted leg lengthen against the kick), and a sustained isometric balance challenge (the standing leg, core, and foot all hold position). Few single yoga poses load all three patterns at once, which is why dancer builds so much capacity per minute of practice and why it demands such careful progression. The reciprocal kick pressure between the foot and the catching hand is what turns the pose from a passive stretch into an active backbend.
How to Do Dancer Pose (Step-by-Step)
- Ground your standing leg. Start in mountain pose, feet hip-width or together. Shift all your weight onto your left foot. Spread your toes wide and press down through all four corners of the foot. Keep a micro-bend in the standing knee. Fire up the standing quadriceps and glute. Before the other foot ever leaves the ground, lock your gaze on one fixed point at eye level. This is your drishti. If your eyes wander, you will fall.
Coach Ty's cue: "Steady gaze or steady fall. Pick one spot and refuse to look away. The second your eyes move, your body follows." - Bend the back knee and catch the foot. Bend your right knee and lift the heel toward your right glute. Reach back with your right hand and catch the inside of your right foot or ankle, palm facing out, thumb pointing down. This grip matters. Palm-out rotates the shoulder externally and opens the chest. Palm-in closes the shoulder and blocks the lift. If you can't reach the foot cleanly, loop a yoga strap around the arch and hold the strap with the same palm-out grip. No shame in the strap.
Coach Ty's cue: "Palm out, thumb down. The single most common grip error is catching the foot with the palm facing in. It feels more natural, and it kills the pose." - Square your hips before you lift. This is the step nearly everyone skips. Before any backbend, re-square your pelvis so both hip points face forward. The instinct is to let the lifted hip open out to the side, which turns dancer into an awkward twist instead of a clean backbend. Actively draw the lifted hip forward and down toward the floor. Your standing knee should track straight ahead over the middle toes.
Coach Ty's cue: "Imagine headlights on your hip points. Both beams forward. The moment one beam swings out, you are in a twist, and your low back will feel it tomorrow." - Kick the foot back and up into the hand. Here is the move that makes the pose work. Start pressing the lifted foot back and up into your hand. Let the hand resist with equal force. That reciprocal pressure, foot into hand and hand into foot, is what lifts the leg. It's not the arm pulling the foot up. As the foot kicks back, the thigh rises behind you and the chest naturally lifts and opens. Extend your left arm forward from the heart, fingertips at eye level.
Coach Ty's cue: "Kick, do not pull. Your hand becomes a wall that the foot presses against. If you're using bicep strength to yank the foot upward, you're doing it backwards." - Lift the chest, find the backbend, breathe. Draw your shoulder blades down your back and lift your sternum toward the extended front hand. The backbend should come from the upper and mid-thoracic spine. Not from crunching the lower back. Hold a steady gaze on your front fingertips. Hold for 20 to 30 seconds, breathing into the front of the body. To exit, release the foot with control, return to mountain pose, and pause before switching sides. Both sides. Always.
Coach Ty's cue: "Backbend from the upper back. Think about lifting the sternum up and forward, like you're showing someone the logo on your t-shirt from ten feet away."
Get this exercise in a personalized workout
FitCraft, our mobile fitness app, uses its AI coach Ty to program yoga poses like this into your plan at the right volume and intensity, based on your level, goals, and equipment. Ty was designed and trained by Domenic Angelino, MPH (Brown University) and NSCA-CSCS, with research published in the Journal of Strength and Conditioning Research and Medicine & Science in Sports & Exercise.
Take the Free Assessment Free · 2 minutes · No credit card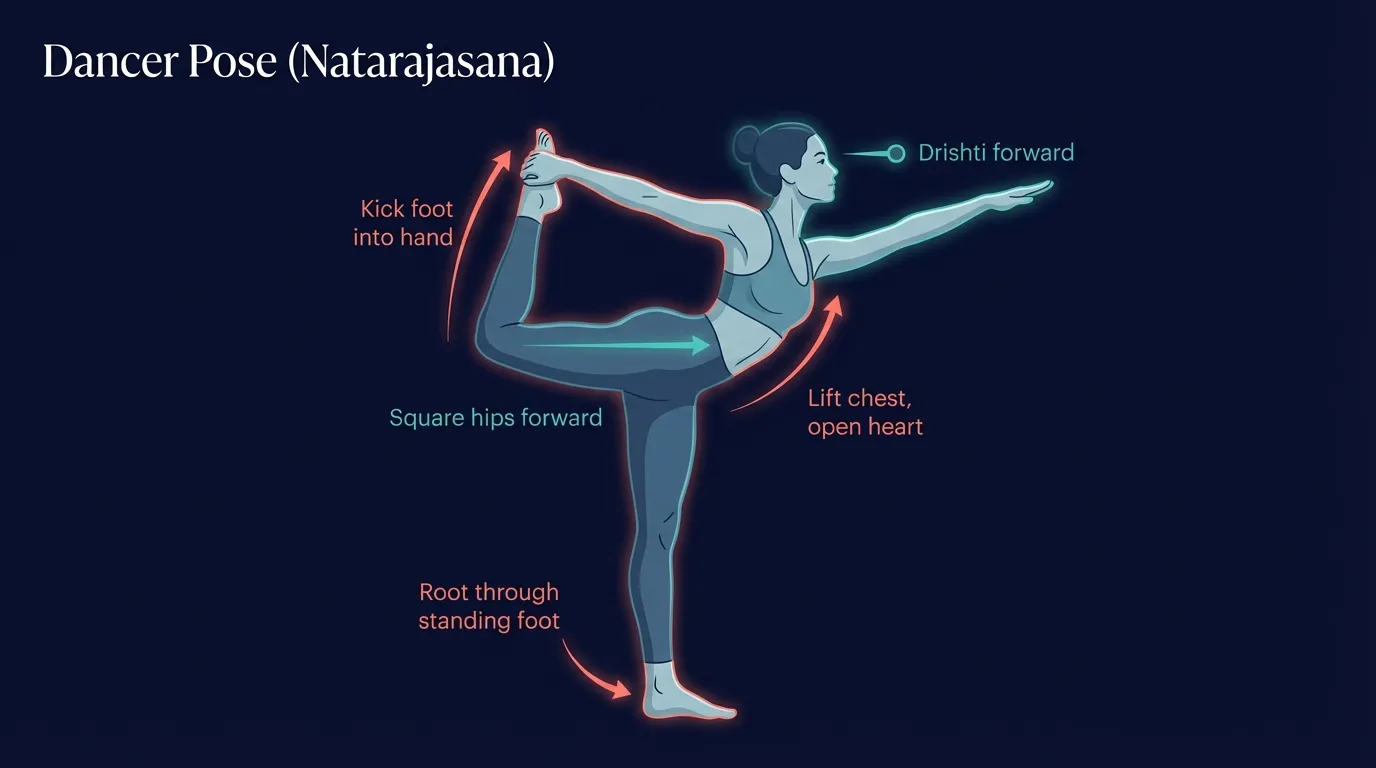
Common Mistakes to Avoid
- Palm-in grip. Catching the foot from the outside with the palm facing in forces the shoulder into internal rotation. The chest closes. The lift dies. You end up muscling the foot upward with bicep strength instead of letting the kick do the work. Fix it by flipping the hand before you catch. Palm out, thumb down. Every time.
- Opening the lifted hip. When the lifted hip swings out to the side, the pose becomes a half-twist, half-backbend mess. It looks higher from the outside, but the load shifts onto the lumbar spine and sacroiliac joint in ways they don't love. Square the pelvis first. If you can't kick the foot high with square hips, you're not ready for the full expression yet. Back off.
- Crunching the low back. The backbend in dancer is supposed to live in the thoracic spine, which is the part of your back between your shoulder blades. Most people try to make it happen at the lumbar spine instead, which is how people walk out of yoga class with sore low backs. Lift the sternum. Draw the shoulder blades down. Let the upper back do the arching.
- Locking the standing knee. When the standing knee hyperextends, balance goes from hard to impossible. Your joints take over the work that your muscles should be doing. Keep a micro-bend. It doesn't look weaker. It looks stable.
- Holding your breath. You're balancing. You're backbending. You're fighting gravity. The instinct is to brace and hold the breath. Don't. Breath-holding spikes intra-abdominal pressure and kills the balance response. Slow, steady breathing into the front of the body. If you can't breathe, the pose is too much for today.
Variations: From Wall-Assisted to King Dancer
Wall-Assisted Half Dancer (Beginner)
Stand an arm's length from a wall. Place your left hand flat on the wall at shoulder height. Catch your right foot behind you with a palm-out grip. Lift the foot only a few inches behind you, keeping the chest mostly upright. The wall hand gives you a balance reference so you can focus entirely on the grip, the squared hips, and the kick. This is where every beginner should live for at least two to three weeks of practice before letting go of the wall.
Half Dancer (Beginner-Intermediate)
Same pose without the wall. Catch the foot, square the hips, lift the leg behind you a moderate amount, and reach the front arm forward. The chest lifts slightly but there is no deep backbend yet. This is the sweet spot for building the balance strength and hip flexor length you'll need for the full version. Hold 15 to 20 seconds per side to start.
Classical Natarajasana (Intermediate-Advanced)
The full expression described in the step-by-step above. Leg kicks high behind you, chest lifts into a clear thoracic backbend, front arm extends at eye level. This is where most people should aim to spend their practice time once they can hold half dancer stable for 30 seconds per side. Don't skip to this version before the scaffolding is built.
King Dancer Pose, Raja Natarajasana (Advanced-Expert)
The elite expression. Instead of catching the back foot with one hand, both hands reach up and over the head to grip the lifted foot, pulling it down toward the crown of the head. This requires deep thoracic extension, open shoulders, and long hip flexors. It should only be attempted after classical Natarajasana feels stable, ideally with guidance from a qualified teacher. Most people never need this version. The classical one is plenty.

When to Avoid or Modify Dancer Pose
Dancer pose is safe for most healthy, intermediate-to-advanced yoga practitioners, but a few conditions warrant modification or substitution. Always consult your physician or physical therapist for personalized guidance, especially when working with an existing injury.
- Active low back pain or lumbar spine injury. The dancer backbend should hinge from the thoracic spine, but most untrained backbends end up driving the curve into the lumbar instead. Skip the full expression while symptoms are active. Substitute with cobra pose for floor-based thoracic extension and cat-cow for general spinal mobility. Return to dancer only after pain has resolved and you can hold a wall-assisted half dancer without symptom return.
- Balance disorders, vestibular conditions, or active vertigo. Single-leg balance with a closed-chain kick at altitude is high-risk for falls. Skip the standalone pose entirely or practice only with both hands on a wall for a balance reference. Talk to your physician before progressing.
- Knee meniscus injury, ACL/PCL tear, or recent knee surgery. The standing leg takes the full bodyweight at near-full extension with active quadriceps contraction. If the standing knee is the injured side, skip the pose. If only the lifted knee is involved, the deep flexion in the catch may still aggravate symptoms. Get surgical clearance and start with tree pose to rebuild standing-leg confidence first.
- Late pregnancy (second and third trimester). Center-of-mass shift makes single-leg balance significantly harder, and the deep backbend stretches an already-loaded linea alba. Substitute with seated or wall-supported hip flexor work taught by a prenatal yoga instructor.
- Hypermobility or connective tissue disorders. Dancer encourages depth, and hypermobile practitioners can dump load into already-lax shoulder, hip, and spinal joints rather than recruiting muscular support. Focus on muscular engagement over depth. Hold the half-dancer regression and prioritize the reciprocal kick pressure over how high the leg goes.
- Uncontrolled hypertension. The held backbend with full-body bracing can briefly raise blood pressure. If your blood pressure is uncontrolled, hold only short durations (10 to 15 seconds) in the half-dancer regression, breathe continuously, and consult your physician.
- Foundational instability. If you can't hold tree pose for 30 seconds per side without wobbling, dancer is premature. Build standing-leg balance and core stability with tree pose, warrior pose, and forearm planks first, then return to wall-assisted half dancer.
Related Exercises
If you're working dancer pose into your practice, these movements either prepare the joint ranges and balance it demands or extend the same back-bending and single-leg patterns:
- Easier single-leg balance regression: Tree pose builds the standing-leg strength and gaze control that dancer demands without the backbend or grip complications.
- Hip flexor and thoracic prep: Warrior pose opens the hip flexors and primes the thoracic extension you'll need before a full dancer backbend.
- Floor-based thoracic extension: Cobra pose trains the upper-back arch without the balance demand. Great way to feel where the backbend should live before taking it into a standing balance.
- Deeper backbend progression: Camel pose trains a kneeling backbend with both shins grounded, useful for building thoracic capacity before chasing king dancer.
- Hip opener pair: Royal pigeon pose opens the deep external hip rotators that contribute to a clean squared pelvis in dancer.
- Hip flexor and side-line mobility: Mermaid pose stretches the hip flexors and obliques that limit how far the lifted leg can travel back.
- Core foundation for the balance hold: Forearm planks and hand planks isolate the bracing pattern that keeps the pelvis level when the leg lifts.
How to Program Dancer Pose
Yoga programming differs from resistance training. Frequency can be daily because the stimulus is mobility, balance, and isometric endurance rather than progressive overload. The general ACSM Position Stand on resistance and conditioning recommendations still inform structure (Ratamess et al., 2009), but yoga-specific framing uses breath counts and hold durations rather than reps.
| Level | Hold time per side | Reps/sets | Frequency |
|---|---|---|---|
| Beginner (wall-assisted half dancer) | 3 to 5 breaths (~15 to 30 seconds) | 1 to 2 holds per side | 3 to 5 sessions/week |
| Intermediate (half dancer, no wall) | 5 to 10 breaths (~30 to 60 seconds) | 2 to 3 holds per side | 4 to 6 sessions/week |
| Advanced (classical Natarajasana) | 10 to 15+ breaths (~60 to 90+ seconds) | 2 to 3 holds per side; occasional king dancer attempts | 5 to 7 sessions/week |
Where in your workout: dancer pose fits in three contexts. First, inside a standalone yoga session, sequenced after warming standing poses (warrior series, triangle) once the hips and spine are open. Second, as a balance and mobility finisher at the end of a strength session when the body is already warm. Third, as a focused practice on its own, with two or three holds per side, paired with hip flexor and thoracic mobility drills like cat-cow and half-kneeling triplanar stretch. Avoid attempting dancer cold or first thing in the morning before the spine and hips have moved through some range.
Form floor over depth targets: if your last hold of a set breaks form (lifted hip opens, pelvis tilts, backbend dumps into the lumbar), stop the set there. Holding a higher leg with broken form is worse than holding a lower, cleaner shape.
How FitCraft Programs This Exercise
Knowing how to do dancer pose is step one. Knowing when to do it, which regression you're ready for, and how often to practice is where most people get stuck.
FitCraft's AI coach Ty handles that. During your personalized diagnostic assessment, Ty maps your fitness level, goals, mobility constraints, and available equipment. Then Ty builds a personalized program that slots dancer pose (or its regressions) into a balanced practice plan at the right variation for your level.
As you build capacity, Ty adjusts the variation, hold time, and frequency to match your level. Wall-assisted half dancer becomes free-standing half dancer. Half dancer pairs with classical Natarajasana over time. Every program is built using evidence-based progression, then adapted to you by the AI.
Frequently Asked Questions
What muscles does dancer pose work?
Dancer pose is a full-body expert posture. The standing leg quadriceps and gluteus medius work isometrically to hold you upright. The spinal erectors and core create the backbend. The hip flexors and quadriceps of the lifted leg get a loaded stretch. The shoulder external rotators of the catching arm support the lift. It's one of the few yoga poses that combines strength, mobility, and balance in one shape.
Can I do dancer pose with low back pain?
If you have active low back pain, skip the full expression and work with wall-assisted half dancer instead. The dancer backbend should hinge from the thoracic spine (upper and middle back), not from compressing the lumbar spine. An untrained backbend that drives the curve into the lower back can aggravate disc, facet, or sacroiliac symptoms. Lift the sternum, draw the shoulder blades down, and let the upper back do the arching. If pain persists across two or more sessions, see a physical therapist before progressing.
Why do I fall out of dancer pose so fast?
Three reasons, usually. Palm-in grip (flip it to palm-out). Open lifted hip (square the pelvis first). No kick pressure (press the foot back into your hand, and let the hand resist). Fix all three and the pose stabilizes almost immediately.
What is the difference between dancer and king dancer?
Dancer pose (Natarajasana) uses one hand to catch the back foot. King dancer (Raja Natarajasana) uses both hands reaching overhead to grip the foot and pull it toward the head. King dancer requires significantly more hip flexor length, thoracic extension, and shoulder flexibility. Master the classical version first.
Is dancer pose hard for beginners?
Yes. It's expert-level. Beginners should start with wall-assisted half dancer and a yoga strap. Research on yoga progressions confirms that prop-supported practice reduces injury risk in advanced postures. Don't skip the scaffolding.
Can dancer pose help with posture and back pain?
Dancer pose can strengthen the spinal erectors and open tight hip flexors, both of which improve posture. Research on yoga for low back pain shows backbends help when taught with proper progression. That said, anyone with existing low back pain should stick with wall-assisted half dancer and always hinge the backbend from the upper back, not the lumbar spine.