If you spend most of your day sitting, your body is stuck in a forward fold you never asked for. Chest collapsed, hip flexors shortened, thoracic spine rounded. Camel pose reverses that pattern in a single movement. It's a full-front-body opener that stretches everything sitting tightens and strengthens everything sitting weakens.
But here's where most people get it wrong. They kneel down, throw their head back, and try to crank their hands to their heels as fast as possible. That's not camel pose. That's compressing your lumbar spine while your thoracic spine (the part that actually needs to extend) stays locked up. The entire point is to lift first, then bend. Your chest goes up before it goes back.
This guide covers both variants you'll see in FitCraft: the supported camel (hands on lower back, great for building thoracic mobility and confidence) and the full camel (hands to heels, the full expression of the pose). Plus the mistakes that turn a chest-opening stretch into a lower back problem, and how to progress safely from one to the other.
Quick Facts: Camel Pose
- Equipment needed: None (yoga mat optional for knee cushioning; yoga blocks optional for the modified version)
- Difficulty: Intermediate (Beginner with hands-on-hips variant)
- Modality: Yoga / Flexibility
- Body region: Anterior chain (front body), thoracic spine, hips
- FitCraft quest category: Mobility
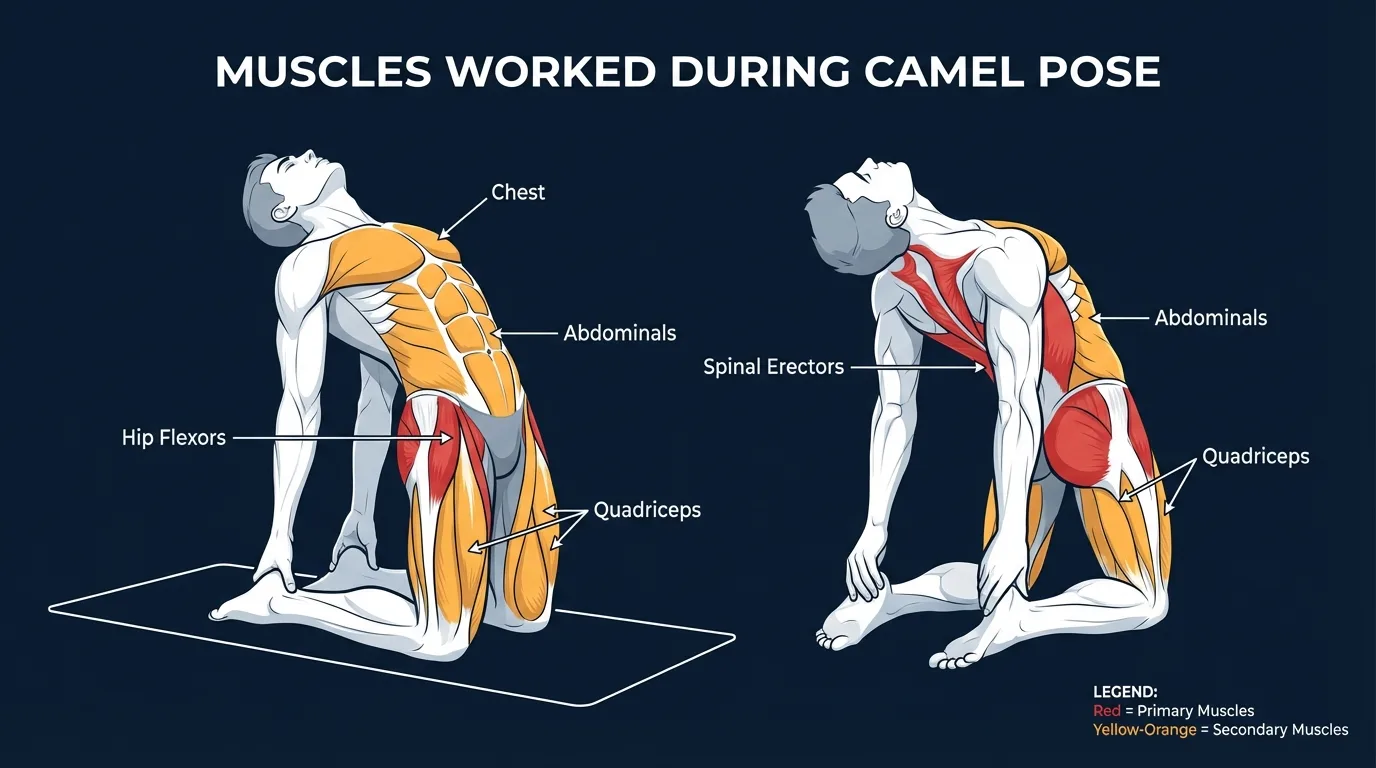
Muscles Engaged & Stretched
Primary engaged (working isometrically): the erector spinae (the long back extensors that run alongside the spine), the rhomboids and mid and lower trapezius (between and below the shoulder blades), and the gluteus maximus. These muscles work as a team to hold the spine in extension, draw the shoulder blades down and together to open the chest, and press the hips forward over the knees so the backbend stays in the thoracic spine rather than collapsing into the lumbar.
Secondary engaged: the posterior deltoids (when you reach for the heels) and the hamstrings (firing lightly to assist the glutes in keeping the pelvis forward). The triceps engage when the arms straighten back toward the heels, and the rotator cuff (especially the infraspinatus and teres minor) works to externally rotate the shoulders and open the chest.
Stretched (lengthened under load): the rectus abdominis and obliques across the front of the trunk, the hip flexors (iliopsoas and rectus femoris) at the front of the hip, the quadriceps down the front of the thighs, and the pectoralis major and minor across the chest, along with the anterior deltoids. This combination of front-body muscles is exactly the set that shortens during prolonged sitting, which is what makes camel pose such a direct antidote to desk posture.
Stabilizers: the deep core (transverse abdominis and the diaphragm) bracing the lumbar spine, the deep hip stabilizers (gluteus medius and piriformis) keeping the pelvis level, and the breath itself, which lets the front-body stretch deepen on each exhale without losing the back-body engagement. Camel pose is a clear example of how a "stretch" pose is actually a coordinated effort: front body lengthens only because back body shortens with intent.
How to Do Camel Pose (Step-by-Step)
Whether you're working with the hands-on-hips variant or going for the full hands-to-heels expression, the movement pattern is the same. The cues below apply to both.
Step 1: Kneel with Thighs Vertical
Knees hip-width apart, thighs perpendicular to the floor. Press the tops of your feet into the mat with toes pointing straight back. If you want the supported version, tuck your toes under instead, which raises your heels and makes them easier to reach later. Place your hands on your lower back with fingers pointing down, thumbs on your sacrum.
Coach Ty's cue: "Knees stacked directly under your hips. Don't let them splay wider as you go back. That collapses the pose."
Step 2: Engage Before You Bend
This is the step people skip, and it's the one that determines whether camel strengthens your back or hurts it. Press your shins into the mat. Rotate your inner thighs slightly inward. Draw your lower belly in gently. This creates the core stability that keeps the backbend out of your lumbar spine. Without it, all the extension dumps into your L4-L5 and you feel it the next morning.
Ty's cue: "Brace your belly button toward your spine before you move. The core lock is what protects the lower back."
Step 3: Lift Your Chest Toward the Ceiling
Inhale and think "up" before you think "back." Drive your sternum toward the ceiling. Draw your elbows toward each other behind you to open the front of your shoulders. Your rib cage should feel like it's expanding in every direction. This is where the thoracic extension happens. If you skip the lift and go straight to bending, you miss the whole point of the pose.
Ty's key cue: "Imagine a string attached to your sternum pulling you up to the ceiling. Get tall first, then arc back."
Step 4: Reach for Your Heels (or Stay with Hands on Back)
If you have enough extension and your hips are still directly over your knees, release one hand at a time and reach for your heels. If your hips shift behind your knees when you reach, you're not ready for this version yet. Stay with hands on your lower back. That's still camel pose. The hands-to-heels version just adds depth.
Ty's cue: "Hips forward, always. The moment your hips drift behind your knees, you've lost the pose."
Step 5: Hold, Breathe, and Exit with Control
Hold for 30-60 seconds. Keep pressing your hips forward over your knees and lifting through your sternum. Breathe steadily. Let your head drop back only if your neck feels comfortable. To come out, bring your hands back to your lower back, engage your core, and lead with your chest as you rise on an inhale. Never jerk up.
Ty's reminder: "Exit slowly with your chest leading, then rest in a forward fold for a few breaths to decompress."
Get this exercise in a personalized workout
FitCraft, our mobile fitness app, uses its AI coach Ty to program yoga poses like this into your plan at the right volume and intensity, based on your level, goals, and equipment. Ty was designed and trained by Domenic Angelino, MPH (Brown University) and NSCA-CSCS, with research published in the Journal of Strength and Conditioning Research and Medicine & Science in Sports & Exercise.
Take the Free Assessment Free · 2 minutes · No credit card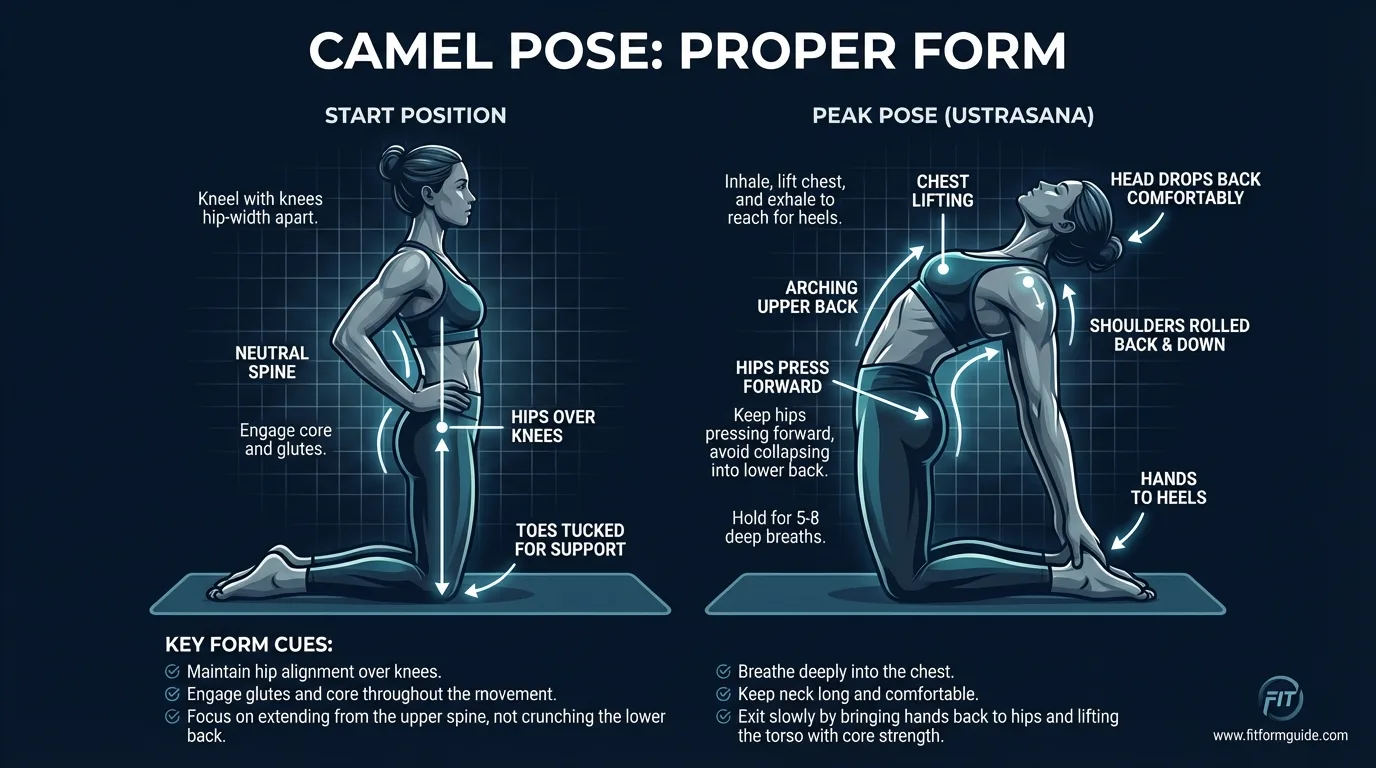
Common Mistakes (and How to Fix Them)
Camel pose is intermediate-level for a reason. Here are the mistakes Ty corrects most often.
- Hinging at the lower back. The number one mistake. People skip the chest-lifting phase and fold backward from the waist. This dumps all the extension into the lumbar spine, which wasn't designed for that much range. Fix: think "up" then "back." If your lower back feels pinched, you've gone too far without enough thoracic extension. Come up, re-lift your chest, and try again with less depth.
- Hips drifting behind the knees. When people reach for their heels, their hips naturally shift backward. Now you're just sitting back toward your feet with a curved spine, not doing a backbend at all. Fix: before you reach for your heels, press your thighs forward. Imagine a wall just in front of your thighs and you're pressing into it. Hold that forward press the entire time.
- Squeezing the glutes too hard. Yes, your glutes should be active. But clenching them at full force compresses your sacrum and tightens the lower back. Fix: think 30-40% glute engagement. Enough to stabilize the pelvis, not enough to lock it down. A gentle squeeze, not a full clamp.
- Dropping the head back aggressively. Throwing your head back is not part of the backbend. Your neck should follow the natural curve of your spine. If letting your head go back causes dizziness, pain, or discomfort, keep your chin slightly tucked and your gaze upward instead. Your cervical spine has enough going on without you cranking it into hyperextension.
- Forgetting to breathe. Deep backbends create an urge to hold your breath. Don't. Steady breathing keeps your muscles from guarding and lets you find a deeper, more relaxed extension. If you can't breathe comfortably, you're too deep. Back off until your breath flows freely. That's your actual working depth.
- Passive shins. Your shins and the tops of your feet are your foundation. If they're just sitting there, you're relying on your lower back to hold you up. Fix: press the shins firmly into the mat to activate the legs and create the stable base the backbend needs.
Camel Pose Variations: From Beginner to Advanced
Start where you are and progress when your form holds at the current level.
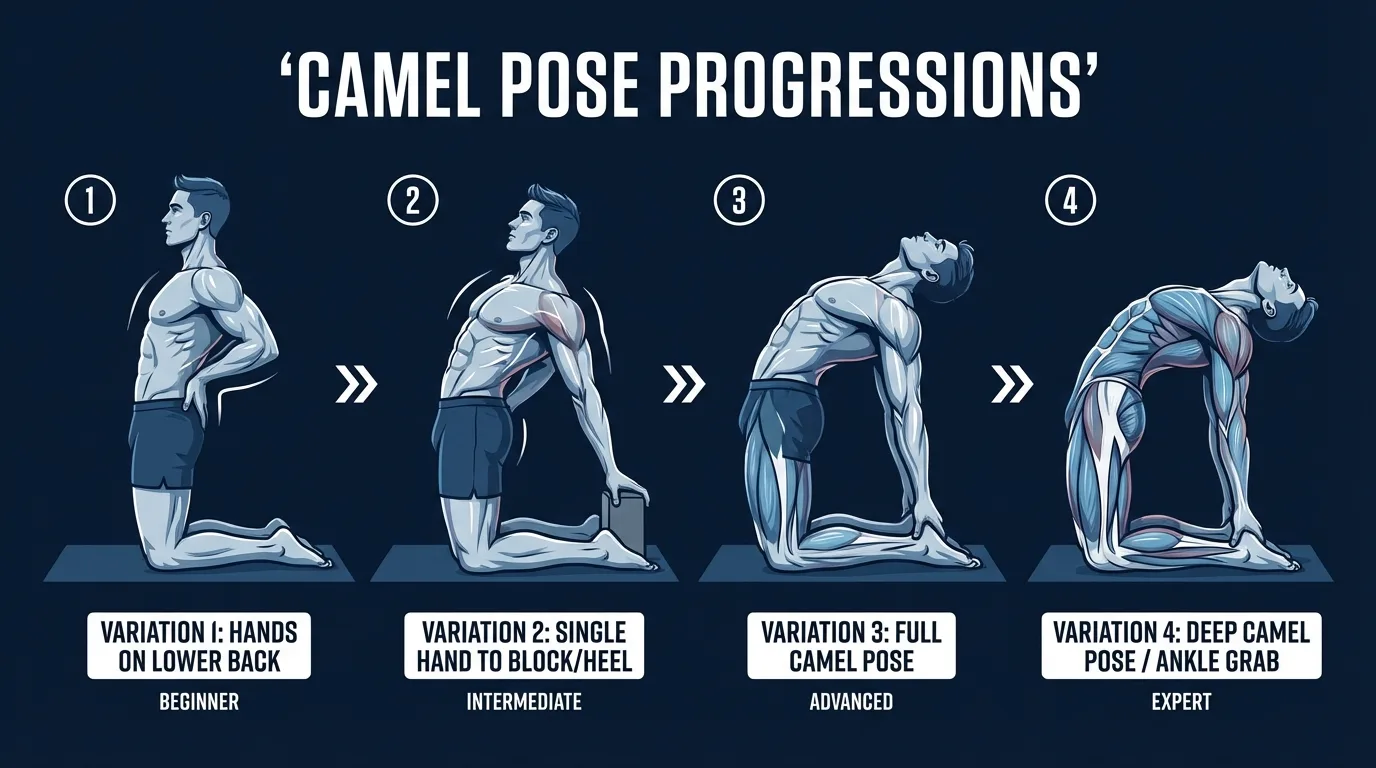
Hands-on-Hips Camel (Beginner)
Same kneeling setup, but your hands stay on your lower back the entire time. Fingers point down, thumbs on your sacrum. Focus on lifting your chest and pressing your hips forward. This builds the thoracic extension and hip flexor flexibility you need before reaching for your heels. If this version gives you a solid stretch across your chest and hip flexors, it's doing its job. There's no rush to progress.
Toes-Tucked Camel (Beginner/Intermediate)
Tuck your toes under before you start. This raises your heels by a couple of inches and significantly shortens the distance your hands need to travel. It's the best stepping stone between hands-on-hips and full camel. You get the experience of reaching for your heels and bearing weight through your arms without needing the same degree of thoracic flexibility. Most people skip this variation, but it's arguably the most useful one in the progression.
Full Camel with Blocks (Intermediate)
Place yoga blocks (on their tallest setting) on the outside of each ankle. Reach for the blocks instead of your heels. This gives you the arm-extended experience of full camel with less range-of-motion demand. Lower the block height as your flexibility improves until you no longer need them.
Full Camel (Intermediate to Advanced)
Hands on heels, fingers wrapping the back of the heels, thumbs on the outside. Hips remain over the knees. Sternum continues to lift even as the hands rest on the feet. This is the full expression of ustrasana. Hold for 30-60 seconds, breathing steadily.
One-Arm Camel (Advanced)
From full camel, keep one hand on its heel and reach the opposite arm overhead and back. This adds an asymmetrical thoracic rotation challenge on top of the backbend. Switch sides. Only attempt after full camel feels stable for two-plus weeks of practice.
When to Avoid or Modify Camel Pose
Camel pose is safe for most healthy adults who already have basic mobility, but the deep spinal extension and kneeling position call for modification in several common scenarios. Always consult your physician or physical therapist for personalized guidance before starting or returning to a yoga practice, especially if any of the conditions below apply.
- Acute or chronic lower back pain (disc, facet, or spondylolisthesis). Camel concentrates extension at the spine. If you have an active disc bulge, facet joint inflammation, or spondylolisthesis, the backbend can compress the affected segment. Substitute with gentle cobra pose (prone, shallower extension), cat-cow for spinal mobility, or glute bridges for posterior chain work without spinal load. Get clearance from a physical therapist before reintroducing deep backbends.
- Knee pain, meniscus issues, or recent knee surgery. The kneeling base position loads the patellae and the front of the shins directly into the floor. Double up your mat or place a folded blanket under the knees to cushion the joint. If pain persists, skip the kneeling version and work on thoracic extension in cobra pose or supported fish pose instead until cleared.
- Late pregnancy (second and third trimesters). Deep prone or supine backbends are generally avoided after the first trimester because of intra-abdominal pressure and balance changes. A gentle hands-on-hips lift with a small chest opening is usually fine, but consult a prenatal yoga instructor or your obstetrician about your specific stage and history.
- Uncontrolled hypertension or recent change in blood pressure medication. Tilting the head back changes blood pressure and can produce dizziness. Keep the chin tucked and the gaze forward instead of letting the head drop back, hold for shorter durations, and exit slowly. If you have known cardiovascular disease, get clearance from your physician.
- Neck injury, cervical disc issue, or chronic neck pain. The traditional pose includes dropping the head back, which hyperextends the cervical spine. This is optional. Keep the chin tucked toward the throat and your gaze toward the ceiling instead. This preserves the thoracic backbend without loading the neck.
- Hypermobility or connective tissue disorders (Ehlers-Danlos, Marfan). The spine and shoulders in hypermobile bodies often go further than is structurally safe. Focus on muscular engagement (active glutes, braced core, strong rhomboids drawing the shoulder blades together) rather than reaching for maximum depth. Stop well before your end range.
Related Exercises
If camel pose is part of your routine, these movements complement, prepare for, or substitute for the same training pattern:
- Easier prone backbend regression: Cobra pose achieves a similar spinal extension and front-body stretch from a prone position, which removes the kneeling demand and gives you control over the depth. A good place to build thoracic mobility before progressing to camel.
- Spinal mobility prep: Cat-cow mobilizes the entire spine through flexion and extension and is the standard warm-up before any deep backbend, including camel.
- Hip flexor opener (companion): Butterfly pose opens the hips and inner thighs from a seated position, addressing the hip flexor tightness camel exposes without requiring the backbend itself.
- Counter pose (cool-down): Downward dog decompresses the spine after deep backbends and lengthens the posterior chain that worked isometrically during camel. Practice 5-8 breaths in down dog after every camel session.
- Posterior chain strength (foundation): Glute bridges strengthen the glutes and hamstrings that hold the hips forward during camel, building the strength to maintain hip-over-knee alignment in the full pose.
- Thoracic mobility (companion): Quadruped thread-the-needle rotates the thoracic spine on each side, complementing camel's pure extension with the rotational range that keeps the upper back mobile in all planes.
How to Program Camel Pose
Camel programming follows yoga-specific holding and frequency ranges rather than rep-based resistance training conventions. The American College of Sports Medicine Position Stand on resistance training establishes that holding durations and tissue-loading principles apply broadly to flexibility and stretching work, with shorter daily exposures supporting mobility gains and longer holds developing isometric endurance (Ratamess et al., 2009).
| Level | Hold Time × Reps | Rest between holds | Frequency |
|---|---|---|---|
| Beginner (hands-on-hips) | 15-30 seconds × 1-2 | 30-45 seconds in a forward fold | 3-5 sessions/week |
| Intermediate (toes-tucked or full) | 30-60 seconds × 2-3 | 30-60 seconds in a forward fold | 4-6 sessions/week |
| Advanced (full or one-arm camel) | 45-90 seconds × 3-5 | 60 seconds in a forward fold or down dog | 5-7 sessions/week |
Where in your workout: Camel fits in three contexts. As a standalone yoga session piece, it belongs in the middle of the sequence (after standing poses, before final seated work). As a warm-up before strength training, a single hands-on-hips hold opens the chest and hip flexors and primes the thoracic spine for overhead pressing or pulling. As a cool-down after sitting all day or after a workout, it counters spinal flexion and quad-dominant work like cycling or squatting.
Form floor over depth targets: if your hips drift behind your knees, your lower back pinches, or your breath becomes shallow, back off the depth. A clean hands-on-hips camel held with steady breathing builds more mobility than a deep hands-on-heels camel held with broken form. Depth is a side effect of competence, not a measure of it.
How FitCraft Programs This Exercise
Knowing how to do camel pose is step one. Knowing when to do it, which variant, and how it fits with your other training is where most people get stuck.
FitCraft's AI coach Ty handles that. During your personalized diagnostic assessment, Ty maps your flexibility, posture goals, training history, and any movement limitations. Then Ty builds a personalized program that slots camel pose into a balanced plan at the right variant for your level.
As your thoracic mobility improves, Ty adjusts the variation and hold duration to match your level. Hands-on-hips progresses to toes-tucked. Toes-tucked progresses to full camel. Hold durations extend gradually based on your breath quality and recovery. Every program is designed by an Ivy League-trained exercise scientist and NSCA-certified strength coach using evidence-based principles, then adapted to you by the AI.
Frequently Asked Questions
What muscles does camel pose work?
Camel pose primarily strengthens the erector spinae, rhomboids, mid and lower trapezius, and glutes while stretching the rectus abdominis, hip flexors (iliopsoas), quadriceps, pectorals, and anterior deltoids. It's one of the most effective bodyweight backbends for opening the entire front body and counteracting the postural effects of prolonged sitting.
Can I do camel pose with lower back pain?
It depends on the cause. Camel pose can aggravate pain when the backbend dumps into the lumbar spine because of poor thoracic mobility or weak core bracing. If you have a current disc issue, spondylolisthesis, or facet joint pain, see a physical therapist before practicing camel. For general stiffness from prolonged sitting, the hands-on-hips variant with strong core engagement often relieves pain rather than causing it, because most of the extension happens in the thoracic spine.
Is camel pose safe for beginners?
Camel is an intermediate yoga pose. Beginners should start with the hands-on-hips variant rather than reaching for the heels. This supported version builds the thoracic extension and hip flexor flexibility needed for the full expression. Tucking the toes under also raises the heels and makes the reach shorter, which is a practical stepping stone.
Why does camel pose make me dizzy or emotional?
Dizziness in camel pose usually comes from the head position and a change in blood pressure when tilting back. Emotional responses are common in deep backbends because they stretch the front body and open the chest, areas where tension from stress and protective postures builds up. Both responses are normal. Come out of the pose slowly and rest in a forward fold if needed.
How long should I hold camel pose?
For the standard hold, 30-60 seconds per repetition with 2-3 reps is a solid starting point. Beginners should start with 15-20 second holds using the hands-on-hips variant. The goal is steady breathing and a feeling of opening across your chest and hip flexors, not pushing through discomfort or chasing depth.
Can I do camel pose every day?
Yes, a moderate camel can be practiced daily and is especially beneficial for people who sit for long periods. Keep the intensity at about 70-80% of your maximum depth for daily practice. If you're working on increasing your range with longer, deeper holds, allow a rest day between sessions for your connective tissue to adapt.