Most people know about push-ups and chin-ups, but the inverted row gets overlooked. That's a problem, because it fills a critical gap: horizontal pulling. Without it, most bodyweight programs end up imbalanced. Heavy on pushing (push-ups, dips) and light on pulling. That imbalance shows up as rounded shoulders, weak mid-back muscles, and eventually shoulder pain.
What makes the inverted row especially useful is the difficulty scaling. Set the bar at chest height and keep your body fairly upright, and most people can do it on day one. Lower the bar and get more horizontal, and it's challenging for intermediate trainees. Elevate your feet on a bench, and it's genuinely hard, even for people who can do chin-ups. A table edge works. A barbell in a rack works. TRX straps work. A playground bar works. The barrier to entry is almost zero.
Quick Facts: Inverted Row
- Equipment needed: Barbell on a rack, Smith machine, TRX or suspension straps, gymnastic rings, or a sturdy low bar or table
- Difficulty: Beginner (high-angle) to Advanced (feet-elevated, single-arm, weighted)
- Modality: Strength
- Body region: Upper body (back, biceps)
- FitCraft quest category: Strength
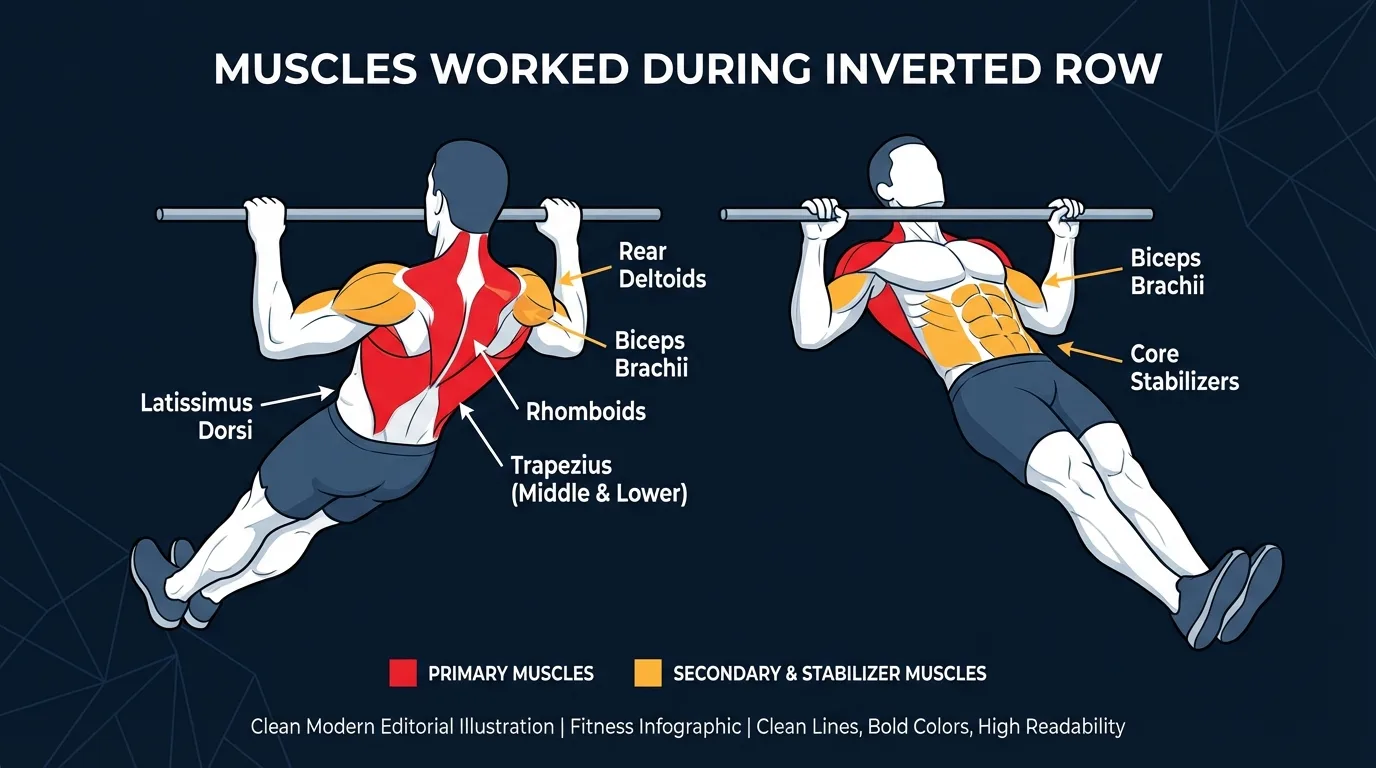
Muscles Worked
Primary movers: the latissimus dorsi, rhomboids (major and minor), and the middle and lower trapezius. These shorten on the way up (concentric phase) as you drive your elbows back and pull your chest to the bar, and they lengthen under tension on the way down (eccentric phase) as you return to the hanging position. The mid-traps and rhomboids do disproportionate work because the bar path is horizontal, which means scapular retraction (squeezing the shoulder blades together) is loaded throughout every rep.
Secondary movers: the biceps brachii and brachialis assist at the elbow flexion phase, and the posterior deltoids contribute to the horizontal pulling pattern. The supinated (underhand) grip variation shifts more load onto the biceps and lower lats. The overhand variation shifts more onto the rhomboids and rear delts.
Stabilizers: the forearm flexors and extensors hold the grip on the bar throughout the set, the rotator cuff controls the shoulder joint during the pull, and the entire anterior and posterior core (rectus abdominis, obliques, transverse abdominis, glutes, erector spinae) works isometrically to hold the rigid plank body line. The serratus anterior and lower trapezius assist with scapular control. If the core fails first, the hips sag and the exercise turns into a back-loaded reach instead of a pull.
Evidence on horizontal pulling activation: Fenwick et al. (2009) measured trunk and upper-body EMG across three rowing variations (inverted row, standing bent-over row, and one-armed cable row) and found that the inverted row produced the highest latissimus dorsi and upper-back activation of the three, with the lowest lumbar spine load. The standing bent-over row produced large symmetrical back activation but the highest spinal load. That trade-off is why the inverted row is often the better default for back development when lumbar tolerance is a concern.
Step-by-Step: How to Perform an Inverted Row
The cues below work for a barbell in a rack, a Smith machine, TRX straps, or any sturdy waist-height grip. The movement pattern is the same.
Step 1: Set the Bar at Waist Height
Place a barbell in a squat rack or Smith machine at roughly waist height. The lower the bar, the harder the exercise becomes. Beginners should start at chest height. Position yourself underneath the bar and grab it with an overhand grip, hands slightly wider than shoulder-width apart.
Coach Ty's cue: "Adjust the bar height, not the rep count. Find the height where 8 to 12 reps is genuinely challenging with good form."
Step 2: Set Your Body Position
Hang from the bar with arms fully extended. Your body should form a straight line from head to heels, like an upside-down plank. Heels on the floor, core braced, glutes squeezed. Tuck your chin slightly. Imagine holding an egg under your chin. This neutral head position protects the cervical spine.
Ty's cue: "Your body is a plank. Same standard as a push-up plank. Rigid line from head to heels."
Step 3: Pull Your Chest to the Bar
Start the pull by squeezing your shoulder blades together first (think about pinching a pencil between them), then drive your elbows back to pull your chest to the bar. Touch the bar to your mid-chest or just below your collarbone. Keep your elbows at roughly 45 degrees to your body, not flared out at 90. Take 1 to 2 seconds on the way up.
Ty's key cue: "Shoulder blades first, elbows second. If you lead with the elbows, the biceps dominate and the back gets shortchanged."
Step 4: Lower with Control
Extend your arms to return to the full hanging position. Take 2 to 3 seconds on the descent. This eccentric phase is where a lot of the strength building happens. Full arm extension at the bottom, no half reps. Re-check your straight body line before the next rep.
Ty's cue: "If your hips are sagging, squeeze the glutes harder. If you can't control the lowering phase, the set is too long, cut the reps."
Get this exercise in a personalized workout
FitCraft, our mobile fitness app, uses its AI coach Ty to program pulling exercises like this into your plan at the right volume and intensity, based on your level, goals, and equipment. Ty was designed and trained by Domenic Angelino, MPH (Brown University) and NSCA-CSCS, with research published in the Journal of Strength and Conditioning Research and Medicine & Science in Sports & Exercise.
Take the Free Assessment Free · 2 minutes · No credit card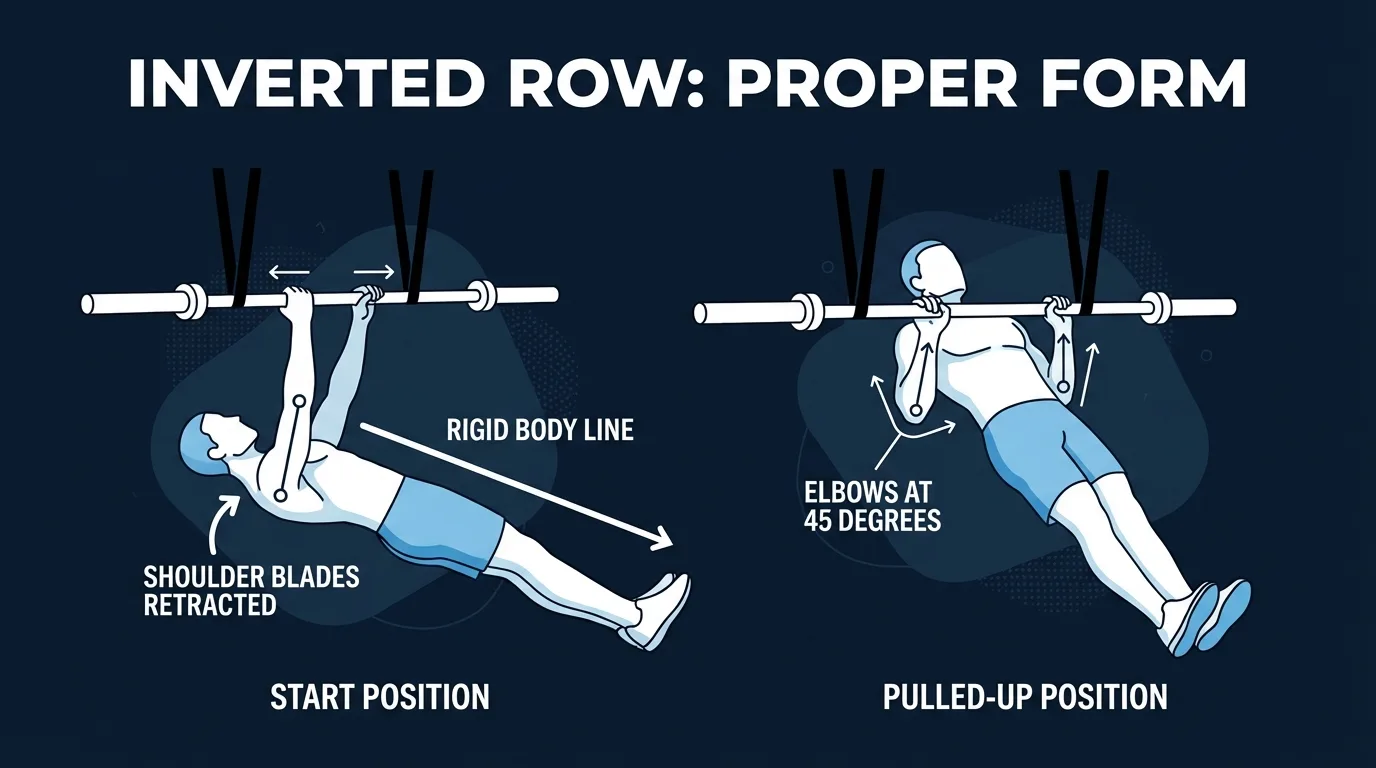
Common Mistakes (and How to Fix Them)
The inverted row looks simple, but a few subtle form errors turn it from a back builder into a bicep curl with extra steps. Here are the mistakes Ty corrects most often.
- Leading with the biceps. Bending the elbows before retracting the shoulder blades. When the arms pull first, the biceps and forearms do most of the work and the back muscles barely activate. Fix: think "pinch the shoulder blades" before you think "pull." This single correction transforms the exercise.
- Sagging hips. The most visible mistake. When the hips drop, the exercise becomes easier (less of your bodyweight is being pulled) and unnecessary stress goes to the lower back. Fix: squeeze the glutes, brace the core, and maintain a rigid body line. If the hips sag, the core is the weak link, and that needs to be addressed separately.
- Half reps. Not pulling the chest all the way to the bar. Half-range inverted rows mostly work the biceps and barely engage the back. Fix: pull until your chest touches or nearly touches the bar on every rep. If you can't get there, raise the bar height to make the angle easier rather than shortening the range.
- Flaring the elbows to 90 degrees. Wide elbow flare shifts emphasis to the rear deltoids and can stress the shoulder joint. Fix: keep the elbows at roughly 45 degrees relative to your torso. This protects the shoulders and keeps the lats and mid-back as the primary movers.
- Craning the neck. Jutting the chin forward to "reach" the bar. This creates the illusion of pulling higher without actually engaging the back through a fuller range of motion. Fix: tuck the chin, keep the head neutral, and pull with the back.
- Dropping back to the hang. Letting gravity do the lowering. A fast, uncontrolled eccentric throws away most of the strength stimulus. Fix: 2 to 3 seconds on the way down, every rep.
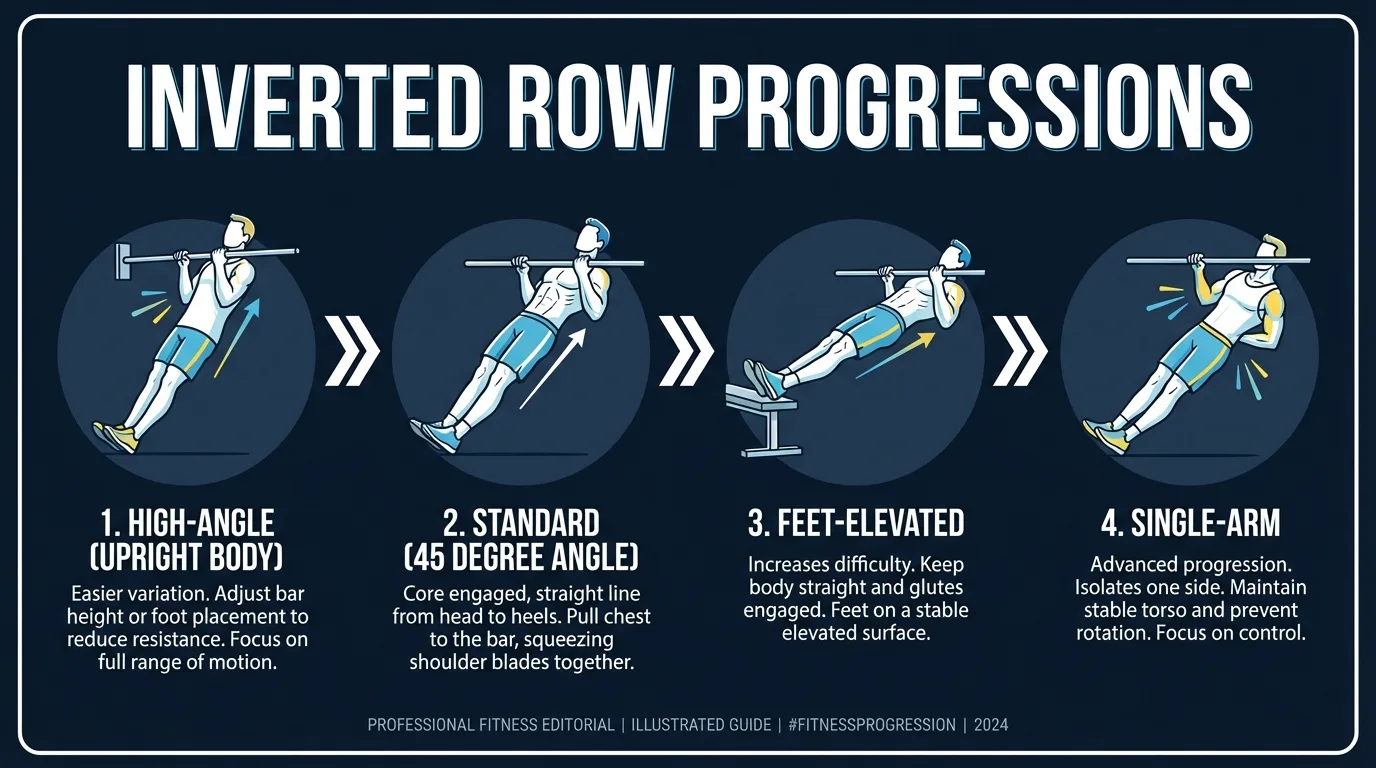
Inverted Row Variations: Regressions and Progressions
Most variations adjust the body angle rather than the movement itself. Start where you are and progress when your form is solid at the current level.
High-Angle Inverted Row (Beginner Regression)
Bar set at chest height. Your body is at a steep angle, so you're pulling a small percentage of your bodyweight. This is the entry point. Most people can do this on day one. Build up to 3 sets of 15 before lowering the bar.
Standard Inverted Row (Beginner-Intermediate)
Bar at waist height, body at roughly 45 degrees. This is the version described in the step-by-step above and the one Coach Ty programs most often. It strikes the right balance between accessible and challenging for most trainees.
Underhand (Supinated) Inverted Row (Intermediate)
Same setup, but grip the bar with palms facing you. The supinated grip increases biceps activation and shifts some emphasis to the lower lats. Useful as a variation day or if you're using inverted rows to build toward chin-ups specifically.
Feet-Elevated Inverted Row (Intermediate-Advanced)
Bar at waist height, feet on a bench or box at the same height as the bar. Now nearly all of your bodyweight goes through the pulling muscles. This is significantly harder than the standard version and rivals barbell bent-over rows for back engagement, with much less lumbar load.
Weighted Inverted Row (Advanced)
Wear a weight vest or place a weight plate on your chest during standard inverted rows. This adds external load without changing the movement pattern. Start with 10 to 15 percent of bodyweight and progress from there.
Single-Arm Inverted Row (Advanced)
Pull with one arm while the other is at your side or on your chest. This roughly doubles the load on the working arm and adds a significant anti-rotation core demand. Use a higher bar angle initially. This variation is much harder than it looks.
TRX or Ring Inverted Row (All Levels)
Use suspension straps or gymnastic rings instead of a fixed bar. The unstable handles increase the stability demand on the shoulders and core. You can also rotate your hands during the pull (starting overhand, finishing underhand), which mimics the natural rotation of the shoulder joint during pulling.
When to Avoid or Modify Inverted Rows
Inverted rows are one of the safer pulling exercises because the angle is adjustable and the bar is fixed (which reduces shoulder instability compared to a hanging exercise). Still, a few conditions warrant modification. Always consult your physician or physical therapist for personalized guidance, especially if you have a current or recent injury.
- Acute shoulder injury or rotator cuff irritation. Reaching full arm extension at the bottom of the rep can flare an irritated rotator cuff. Raise the bar high so you're nearly upright and work within a pain-free range. Avoid the bottom inch of the hang until symptoms resolve. If pain persists past a week or two, see a physical therapist before progressing the angle.
- Tennis or golfer's elbow (lateral or medial epicondylitis). Sustained grip plus elbow flexion under load aggravates these tendinopathies. Reduce volume, use a neutral grip on rings or rotating handles, and consider switching temporarily to chin negatives for eccentric-only loading during the rehab phase.
- Wrist pain. Sustained hang loads the wrists in extension. Use neutral-grip handles on TRX, rings, or rotating bar attachments to keep the wrist in a neutral position. Thick-grip bars or fat-grip attachments also spread the load and reduce wrist strain.
- Lower-back pain that flares with bracing. If your hips sag and you can't hold a flat plank, the lumbar spine takes load it shouldn't. Drop to a high-angle variation, and rebuild bracing strength with deadbugs, bird-dogs, and forearm planks before returning to the standard angle.
- Recent shoulder, elbow, or wrist surgery. Get clearance from your surgeon before any pulling exercise. Most post-surgical protocols start with scapular activation drills like engaged hangs or supported rows on a controlled timeline.
- First 6 to 8 weeks postpartum or active diastasis recti. The plank position demands real deep-core engagement. Start with a high-angle variation, prioritize deadbugs and bird-dogs for transverse abdominis activation first, and progress to lower bar angles only when you can hold a flat plank without doming or coning of the abdomen.
Related Exercises
If inverted rows are part of your routine, these movements complement or extend the same training pattern:
- Same muscle group (pull): Bent-Over Rows and Overhead Pullover load the horizontal pull pattern with external weight, useful when you want heavier loading than bodyweight allows.
- Easier pulling regressions: Supported Rows, Corner Rows, and Reverse Rows use even more upright body angles or surface support, useful in the first weeks of pulling work or as a warm-up.
- Vertical pulling progression target: Chin-Ups are the natural progression from inverted rows once you've built foundational pulling strength. They emphasize the lats more heavily while inverted rows emphasize the mid-back, so both belong in a balanced program.
- Strength-builder eccentric: Chin Negatives (eccentric-only chin-ups) build the pulling strength needed for full chin-ups, useful as a bridge from inverted rows to vertical pulling.
- Grip and shoulder foundation: Engaged Hangs and Top Chin Holds isolate the scapular control and grip endurance that all pulling exercises rely on.
- Core anti-swing foundation: Deadbugs, Bird-Dogs, and Hollow Holds build the anterior core control that keeps the plank rigid during the row.
How to Program Inverted Rows
Inverted row programming follows the same evidence-based ranges as any pulling exercise. The American College of Sports Medicine (ACSM) Position Stand on resistance training recommends roughly 8 to 12 reps per set for strength and 12 to 20 for muscular endurance, with at least 48 hours between sessions training the same muscle group (Ratamess et al., 2009).
| Level | Sets × Reps | Rest between sets | Frequency |
|---|---|---|---|
| Beginner (high-angle bar) | 2 to 3 × 5 to 10 | 60 to 90 seconds | 2 to 3 sessions/week |
| Intermediate (waist-height bar) | 3 to 4 × 8 to 15 | 90 to 120 seconds | 2 to 3 sessions/week |
| Advanced (feet-elevated, weighted, single-arm) | 3 to 5 × 6 to 12 | 90 to 180 seconds | 2 to 4 sessions/week |
Where in your workout: Inverted rows belong early in an upper-body session, when grip is fresh. Pulling is grip-limited, and performing rows after heavy carries or barbell rows will under-train the back. In a push-pull workout, alternate sets of inverted rows with push-ups as a superset, which keeps total session time short and balances the upper body within the same block. As an accessory, they pair well after heavier pulling work (chin-ups, bent-over rows) for additional volume at a lower spinal load.
Form floor over rep targets: if your last 2 reps of a set break form (sagging hips, half range, biceps-only pull), stop the set there. Hitting a target rep count with broken form is worse than hitting fewer reps cleanly. Adjust the bar height before adjusting the rep count.
How FitCraft Programs This Exercise
Knowing how to do an inverted row is step one. Knowing when to do it, what angle, how many reps, and when to progress is where most people get stuck.
FitCraft's AI coach Ty handles that. During your personalized diagnostic assessment, Ty maps your pulling strength, available equipment, and training goals. Then Ty builds a personalized program that slots inverted rows into a balanced training plan at the right variation and body angle for your level.
As you get stronger, Ty adjusts the variation and volume to match your level. High-angle becomes waist-height. Waist-height becomes feet-elevated or weighted. Volume adjusts based on your recovery and consistency. The 3D demonstrations are particularly useful here because the shoulder blade retraction and body angle details are hard to learn from text alone. Every program is designed by an Ivy League-trained exercise scientist and NSCA-certified strength coach using evidence-based periodization, then adapted to you by the AI.
Frequently Asked Questions
Can I do inverted rows with shoulder pain?
Inverted rows are generally one of the most shoulder-friendly pulling exercises because the bar is fixed and the body angle is adjustable. If you have acute rotator cuff irritation or shoulder impingement, raise the bar high to reduce load and stay within a pain-free range. Avoid the bottom of the rep if reaching full arm extension flares symptoms. If pain persists for more than a week or two, get a physical therapist assessment before progressing the angle.
What muscles do inverted rows work?
Inverted rows primarily target the latissimus dorsi, rhomboids, and trapezius (middle and lower), with secondary activation of the biceps brachii, rear deltoids, and core stabilizers. The horizontal pulling pattern emphasizes the rhomboids and mid-traps more than vertical pulling (like pull-downs), which makes inverted rows especially useful for building upper-back thickness and correcting forward-rounded posture.
Are inverted rows as good as pull-ups?
Inverted rows and chin-ups are complementary, not interchangeable. Inverted rows use a horizontal pulling pattern that emphasizes the rhomboids and mid-traps. Chin-ups use a vertical pulling pattern that emphasizes the lats. Both belong in a balanced program. For people who cannot yet do chin-ups, inverted rows build the foundational pulling strength needed to progress, and they remain useful for upper-back development long after.
Can I do inverted rows at home?
Yes. You can do inverted rows under a sturdy table, using a broomstick across two chairs of equal height, with a TRX or suspension trainer anchored to a door frame, or with gymnastic rings. The movement pattern is identical regardless of equipment. Make sure whatever you grip is genuinely stable enough to support your bodyweight at full hanging extension.
How many inverted rows should I do?
For strength building, 3 to 4 sets of 8 to 15 reps. Adjust difficulty by changing body angle rather than rep count: a more horizontal body is harder, a more upright angle is easier. When you can do 3 sets of 15 cleanly at one angle, lower the bar to increase the challenge. Aim for the last 2 to 3 reps of each set to feel genuinely difficult while form holds.
What is the difference between inverted rows and bodyweight rows?
They are the same exercise. Inverted row and bodyweight row are interchangeable names for the movement where you lie underneath a bar or suspension point, grip it, and pull your chest up to the bar while keeping your body rigid. The term inverted row is more commonly used in exercise science literature, while bodyweight row is more common in gym vernacular.