The bent-over row is one of the most important exercises in any dumbbell program. It's also probably the most underrated. Everyone wants to bench press and curl, but the row is what builds the back strength that keeps your shoulders healthy, your posture upright, and your physique actually balanced. Skip rows, and eventually the imbalances catch up with you.
Using dumbbells instead of a barbell has real advantages. Each arm pulls independently, so your stronger side can't compensate. Dumbbells also let you use a neutral grip, which is generally more shoulder-friendly than the fixed pronation of a barbell. This guide covers the dumbbell version end-to-end. If you have gym access, the barbell variation follows the same hip-hinge pattern with a longer lever arm.
Quick Facts: Bent-Over Row
- Equipment needed: Pair of dumbbells (10-50 lb per hand depending on level)
- Difficulty: Beginner (chest-supported) to Advanced (single-arm, renegade)
- Modality: Strength
- Body region: Upper body (back-dominant)
- FitCraft quest category: Strength
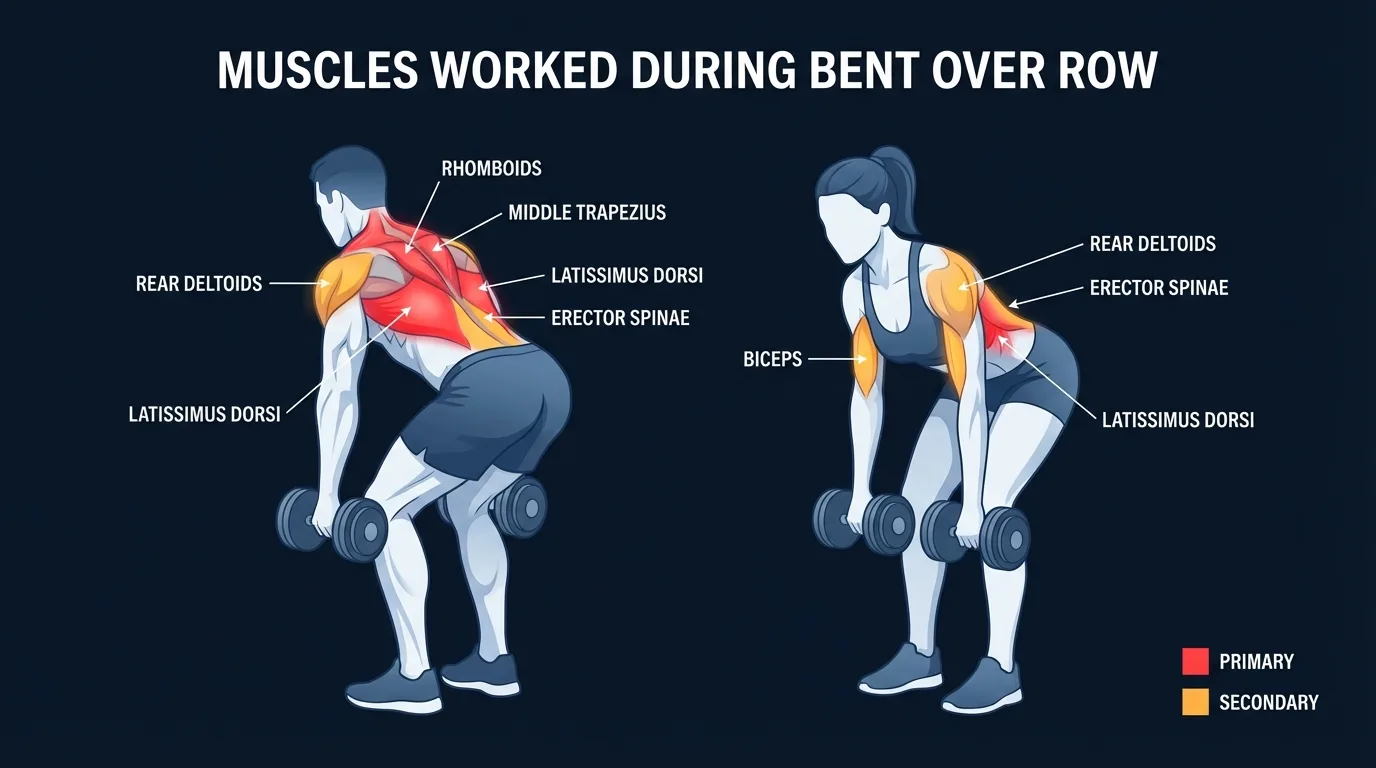
Muscles Worked
Primary movers: the latissimus dorsi, rhomboids, and middle trapezius. The lats drive shoulder extension as the elbow travels back past the torso. The rhomboids and middle traps retract the scapula at the top of every rep. They shorten through the concentric phase (the pull up) and lengthen under tension through the eccentric phase (the controlled lower), which is what produces the strength and hypertrophy stimulus.
Secondary movers: the rear deltoids assist on shoulder extension and external rotation at the top. The biceps brachii and brachialis flex the elbow and assist the pull. The forearm flexors grip the dumbbell, which is why heavy rows are a great grip-strength stimulus as a side effect.
Stabilizers: the erector spinae work isometrically the entire set to hold the hip-hinge position against gravity. The rectus abdominis, transverse abdominis, and obliques brace the trunk to protect the spine under load. The glutes and hamstrings hold the hip-hinge angle. The rotator cuff stabilizes the shoulder joint as the dumbbell travels through its arc. A clean bent-over row is a whole-back exercise even on the static side.
How the dumbbell variation changes activation: Fenwick et al. (2009) measured back-muscle EMG during the bent-over row and found high simultaneous activation across the lats, middle trapezius, and rhomboids, confirming that the row trains the entire upper back in a single movement. A 2015 review by Saeterbakken et al. (2015) compared unilateral and bilateral resistance training and found that unilateral work produces more balanced muscle development and higher stabilizer activation, which is the case for switching from bilateral barbell rows to single-arm dumbbell rows once you've outgrown the bilateral version.
Step-by-Step: How to Perform a Bent-Over Row
The cues below apply to the standard bilateral dumbbell version. The same pattern translates to chest-supported and single-arm variations.
Step 1: Hinge at the Hips
Stand with feet hip-width apart, a dumbbell in each hand. Push your hips back and hinge forward until your torso is roughly 45-60 degrees from vertical. Keep a slight bend in your knees. Your back stays flat, not rounded, with the spine in its natural curve from head to tailbone. Arms hanging straight down, palms facing each other.
Coach Ty's cue: "Flat back is everything. The moment your lower back rounds, the row becomes a lower-back exercise and an injury risk. If you can't hold the position, drop the weight or switch to a chest-supported row."
Step 2: Row the Dumbbells to Your Hips
Pull the dumbbells up toward your hip bones, driving your elbows back past your torso. Your elbows should track close to the body, not flaring out wide.
Ty's key cue: "Pull from the elbows, not the hands. Most people think about pulling the weight with their hands, and that turns it into a biceps exercise. Drive your elbows toward the ceiling and the back muscles engage automatically."
Step 3: Squeeze at the Top
At the top, squeeze your shoulder blades together like you're pinching a pencil between them. Hold that squeeze for a beat.
Ty's cue: "Squeeze at the top. Really squeeze. That contraction at peak is where the rhomboids and middle traps do their best work."
Step 4: Lower with Control
Slowly lower the dumbbells back to the starting position with arms fully extended. Take about 2 seconds on the way down. Let your shoulder blades separate naturally at the bottom for a full stretch in the lats. Don't just drop the weight. The eccentric is half the exercise.
Ty's reminder: "Full range at the bottom. Let your arms extend completely and let the shoulder blades protract. That full stretch in the lats is a big part of the hypertrophy stimulus."
Step 5: Reset and Repeat
Before the next rep, confirm your back is still flat and your hinge angle hasn't changed. Your torso should stay at the same angle from rep 1 to rep 12.
Ty's cue: "Same angle, every rep. If you're rising up as the set progresses, you're using body momentum to cheat the weight up. Set your hinge, lock it, and keep it."
Get this exercise in a personalized workout
FitCraft, our mobile fitness app, uses its AI coach Ty to program compound strength exercises like this into your plan at the right volume and intensity, based on your level, goals, and equipment. Ty was designed and trained by Domenic Angelino, MPH (Brown University) and NSCA-CSCS, with research published in the Journal of Strength and Conditioning Research and Medicine & Science in Sports & Exercise.
Take the Free Assessment Free · 2 minutes · No credit card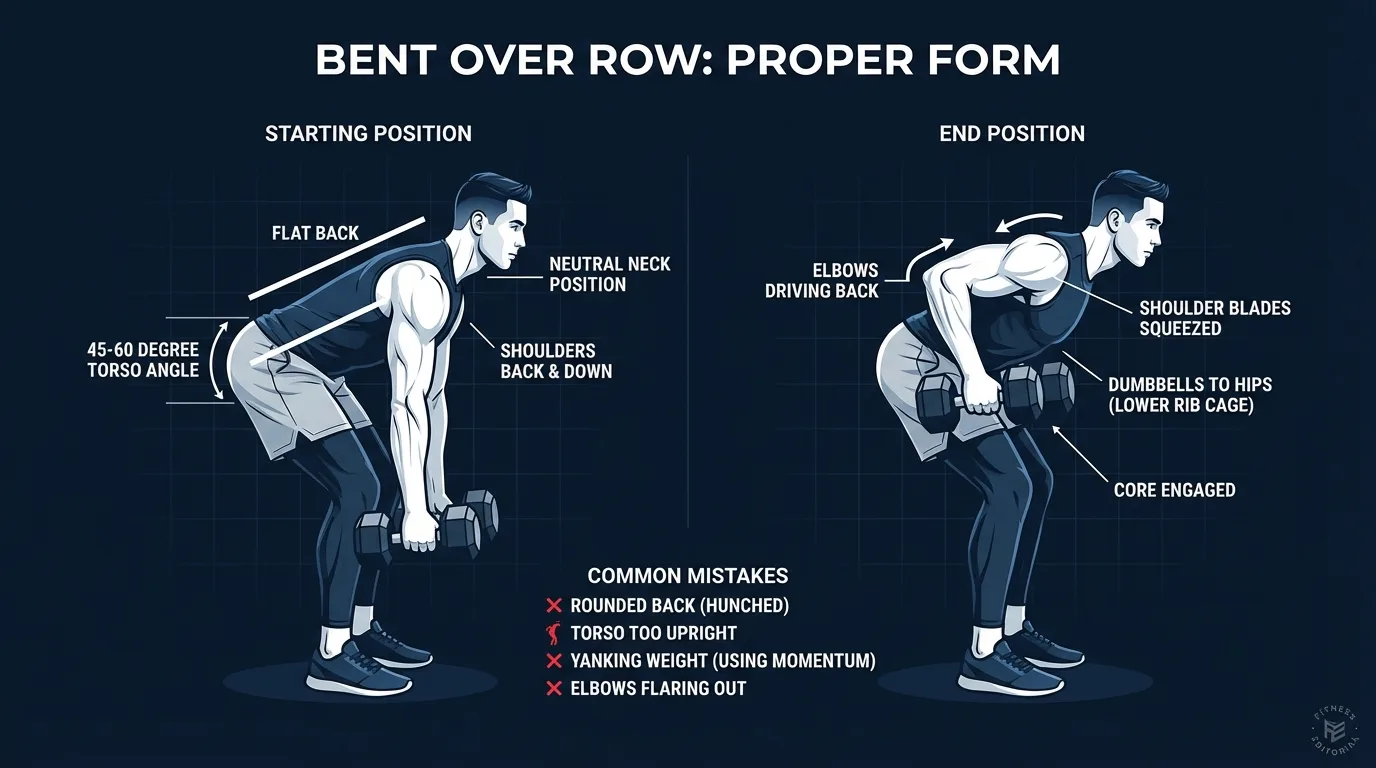
Common Mistakes (and How to Fix Them)
The bent-over row has more moving parts than most exercises. Here's what trips people up.
- Rounding the lower back. This is the big one. A rounded lower back under load is a disc injury waiting to happen. The fix: hinge from the hips, not the waist. Push your butt back like you're closing a car door with it. If you can't maintain the flat back, reduce weight or switch to a supported row on a bench.
- Using body english. Jerking the torso upright to swing the weight up means the back muscles aren't doing the work. Momentum takes over. If you need to heave the weight up, it's too heavy. Your torso angle stays constant.
- Pulling to the chest instead of the hips. When you pull the dumbbells toward your chest, the movement becomes more of an upright row, which shifts load to the upper traps and can compress the shoulder. Pull toward your hip bones for lat-dominant rowing.
- Elbows flaring wide. When the elbows fly out to the sides, you're rowing with the rear delts instead of the lats. Keep elbows tight to the body, tracking back past your ribs. Think about elbowing someone standing behind you.
- Holding your breath. The hip-hinge position compresses the torso, making breathing harder. But holding your breath spikes blood pressure and can cause dizziness. Exhale on the pull, inhale on the lower. Keep breathing.
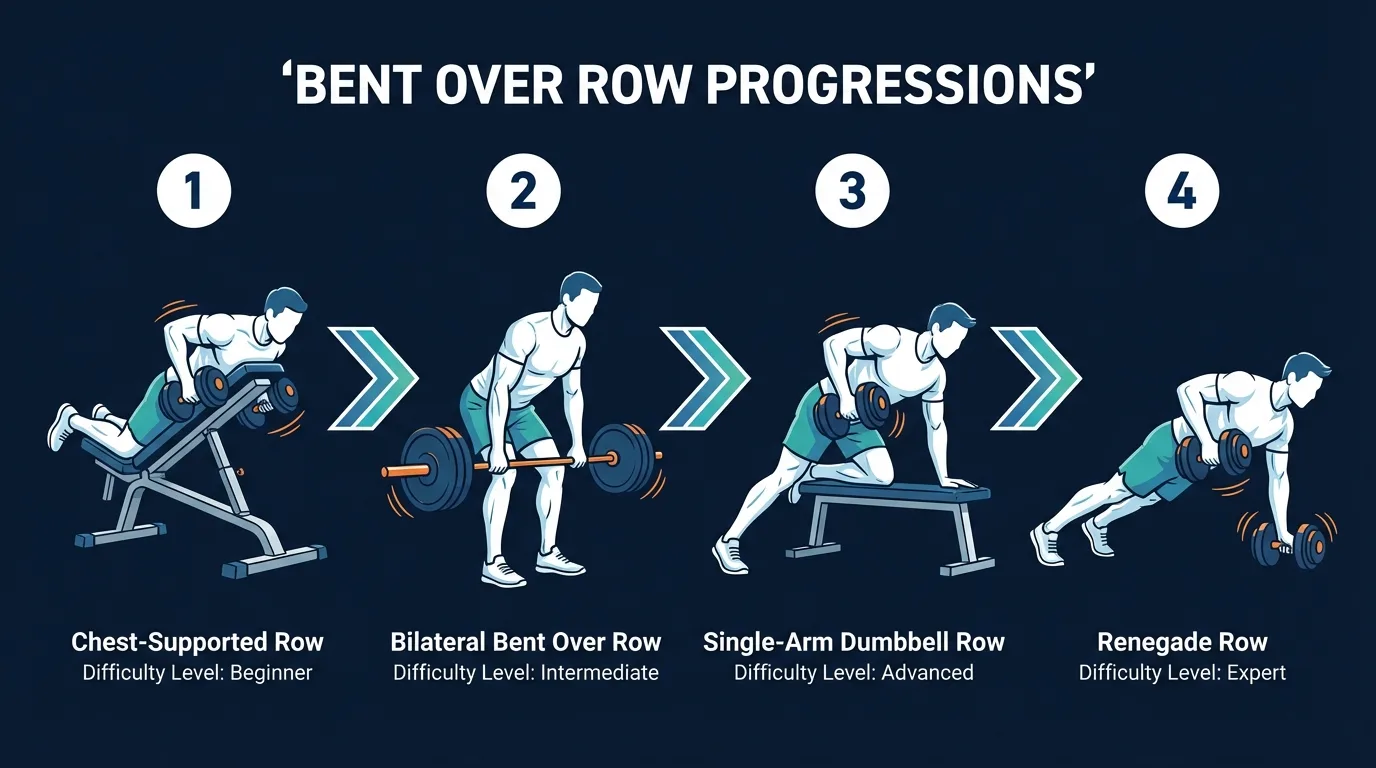
Bent-Over Row Variations: Regressions and Progressions
Chest-Supported Row (Beginner-Intermediate)
Lie face-down on an incline bench (30-45 degrees) and row from there. The bench removes the hip-hinge demand entirely, so your lower back gets a break and you can focus purely on the pulling pattern. Start here if you can't maintain a flat back in the free-standing version, or if you're returning from a lower-back issue.
Bilateral Bent-Over Row (Intermediate-Advanced)
The standard version described above. Both arms pulling simultaneously while you maintain the hip hinge. This is the version Coach Ty programs most often. It builds the most total back mass per set because both sides work together.
Single-Arm Dumbbell Row (Advanced)
One arm rows while the other supports your body on a bench. This allows heavier weight per arm, more range of motion (you can rotate the torso slightly), and isolates each side. It's the gold standard for finding and fixing left-right back-strength imbalances. Use a weight about 20% heavier than what you'd use per arm in the bilateral version.
Renegade Row (Expert)
Start in a push-up position with hands on dumbbells. Row one dumbbell up while stabilizing on the other. This is a full-body exercise that demands anti-rotation core strength, shoulder stability, and pulling power all at once. Only attempt this after you're comfortable with both push-ups and single-arm rows independently.
When to Avoid or Modify Bent-Over Rows
The dumbbell bent-over row is a multi-joint compound movement with external load that imposes real lumbar and cardiovascular stress. It's safe and effective for most healthy adults, but a few conditions call for modification or a different variation. None of these are permanent restrictions. They're starting points. Always consult your physician or physical therapist for personalized guidance.
- Acute lower-back pain or known disc pathology. The hip-hinge under load is the main reason people aggravate the lumbar spine on this exercise. Drop to the chest-supported row, which removes the hinge demand entirely. Rebuild bracing strength with deadbugs, bird-dogs, and forearm planks before returning to free-standing rows.
- Recent spine, shoulder, or hip surgery. Get clearance from your surgeon or PT. Most post-surgical protocols start with isometric and machine-based pulling before reintroducing the free-standing hinge under load.
- Uncontrolled hypertension or known cardiovascular disease. The braced hip-hinge position spikes intrathoracic and intra-arterial pressure during heavy reps. Use lighter loads with longer rest, avoid breath-holding through the rep, and follow your cardiologist's exercise guidance. The chest-supported variation removes most of the bracing demand.
- Pregnancy, especially second and third trimester. The forward hinge becomes mechanically awkward as the bump grows and intra-abdominal pressure during bracing is a concern. Substitute the chest-supported row on a moderate incline, use lighter loads, and prioritize the squeeze over the load.
- First 6-8 weeks postpartum or active diastasis recti. The hip-hinge with load demands deep-core bracing that can widen abdominal separation if the core isn't ready. Restore deep-core function with deadbugs and bird-dogs first, then return through the chest-supported variation before standing rows.
- Tight hamstrings that limit your hinge. If you can't reach a 45-60 degree torso angle without rounding the lower back, your hamstring mobility is the limiter. Increase the knee bend, work on the Romanian deadlift for hinge-pattern strength, and add hamstring mobility work between sessions.
Related Exercises
If bent-over rows are part of your routine, these movements complement or extend the same training pattern:
- Same muscle group (pull): Supported Row, Inverted Rows, Reverse Row, and Corner Row hit the same horizontal pull pattern with different setups and load profiles.
- Vertical pull complement: Overhead Pullover and Stiff-Arm Pulldown bias the lats through a different shoulder-extension angle, useful for hitting the lats from a fresh line.
- Upper-trap and rear-delt isolation: Upright Rows and Band Pull-Apart isolate the smaller muscles bent-over rows hit only secondarily.
- Same hip-hinge pattern: Romanian Deadlift and Good Mornings train the same hinge under load without the pull, useful for building the hinge strength that heavy rows demand.
- Core foundation for spinal bracing: Deadbugs, Bird-Dogs, and Forearm Planks build the bracing pattern that protects the lumbar spine under load.
- Pulling-pattern accessory: Hammer Curls and Seated Rear-Delt Stretch support the assisting muscles bent-over rows hit.
How to Program Bent-Over Rows
Bent-over row programming follows the same evidence-based ranges as any compound pull. The American College of Sports Medicine (ACSM) Position Stand on resistance training recommends roughly 8-12 reps per set for strength and hypertrophy, with at least 48 hours between sessions training the same muscle group (Ratamess et al., 2009).
| Level | Sets × Reps | Rest between sets | Frequency |
|---|---|---|---|
| Beginner (chest-supported) | 2-3 × 8-12 | 90-120 seconds | 2-3 sessions/week |
| Intermediate (bilateral) | 3-4 × 8-12 | 120-180 seconds | 2-4 sessions/week |
| Advanced (single-arm, renegade) | 3-5 × 6-12 per side | 120-180 seconds | 3-4 sessions/week |
Where in your workout: Bent-over rows belong early in a pulling session or in the first half of a full-body workout, when you're fresh. The hip-hinge under load demands maximum CNS recruitment and core bracing, and form is the first thing to go when you're fatigued. Pair pulls with pushes in the same session — bent-over rows complement chest press or shoulder press for balanced upper-body development. Keep total weekly rowing volume under 16-20 sets across all row variations.
Form floor over rep targets: if your last 2 reps of a set break the hinge (torso rising, lower back rounding, elbows flaring), stop the set there. Hitting a target rep count with broken form on a loaded hinge is worse than hitting fewer reps cleanly, and the disc-injury cost of bad rows is higher than the equivalent cost in most other lifts.
How FitCraft Programs This Exercise
Knowing how to do a bent-over row is step one. Knowing when to do it, which variation, how much load, and when to progress is where most people get stuck.
FitCraft's AI coach Ty handles that. During your personalized diagnostic assessment, Ty maps your fitness level, goals, available equipment, and lower-back tolerance. Then Ty builds a personalized program that slots bent-over rows into a balanced training plan at the right variation for your level — supported, bilateral, or single-arm based on your ability to hold the hip hinge.
As you get stronger, Ty adjusts the variation and load to match. Chest-supported becomes bilateral. Bilateral progresses to single-arm. Load and volume adjust based on your recovery and consistency. Every program is designed by an Ivy League-trained exercise scientist and NSCA-certified strength coach using evidence-based periodization, then adapted to you by the AI.
Frequently Asked Questions
Can I do bent-over rows if I have lower-back pain?
Not in the free-standing version, no. The hip hinge under load is the main reason people aggravate the lumbar spine on this exercise. Switch to the chest-supported version on an incline bench, which removes the hinge demand entirely so the lower back gets a break. If pain persists for more than a week or two, see a physical therapist before returning to free-standing rows. Rebuild the bracing pattern with deadbugs and bird-dogs first.
What muscles does the bent-over row work?
The bent-over row primarily targets the latissimus dorsi, rhomboids, and middle trapezius. Secondary muscles include the rear deltoids, biceps, forearms, erector spinae, and core stabilizers. It's one of the most comprehensive upper-back exercises available with dumbbells.
What torso angle should I use for bent-over rows?
Aim for a torso angle between 45 and 60 degrees from vertical. More horizontal (closer to parallel with the floor) emphasizes the upper back and rear delts but demands more from the lower back. More upright shifts emphasis toward the traps. Start around 45 degrees and adjust based on your lower-back tolerance and target muscles.
Should I use an overhand or neutral grip for rows?
Both work, and they bias different muscles. Neutral grip (palms facing each other) is the most common with dumbbells and tends to be easier on the shoulders. Overhand grip (palms facing back) increases upper-back and rear-delt activation. With dumbbells, neutral grip is the default and a solid choice.
How heavy should I go on bent-over rows?
Heavy enough to challenge your back without compromising your hip hinge position. Most beginners start with 15-20 lb dumbbells. Intermediate lifters typically use 25-45 lb per hand. If your torso rises with each rep or your lower back rounds, the weight is too heavy. Form quality of the hinge matters more than row weight.