The in-and-out exercise looks simple enough. Sit on the floor, pull your knees in, push them back out. Repeat. But there's a reason most people's lower backs start screaming by rep six. This exercise demands constant core engagement with zero downtime between reps, and the moment your form breaks down, the load shifts from your abs to your spine.
And honestly? That's what makes in-and-outs both effective and risky. When you do them right, your rectus abdominis never gets a break. No resting at the top. No relaxing at the bottom. Every phase of the movement requires active stabilization, which is why EMG research consistently ranks exercises involving simultaneous trunk and hip flexion among the highest for abdominal activation (Oliva-Lozano and Muyor, 2020). Do them wrong though, and your hip flexors take over, your lower back rounds, and you end up doing a sloppy rocking motion that builds nothing except frustration.
So this guide covers the real technique for in-and-outs, the form errors that turn it into a back exercise, and how to scale it whether you're working up to your first clean rep or looking for ways to make it brutal.
Quick Facts: In-and-Outs
- Equipment needed: None (bodyweight only, mat optional). Optional 5 to 15 lb dumbbell for the weighted advanced variation.
- Difficulty: Advanced. Requires baseline V-sit endurance and neutral-spine control under continuous load.
- Modality: Dynamic core under continuous tension; combined trunk flexion and hip flexion.
- Body region: Anterior core (rectus abdominis, deep core) with hip-flexor co-contribution.
- FitCraft quest category: Core strength / advanced ab progression.
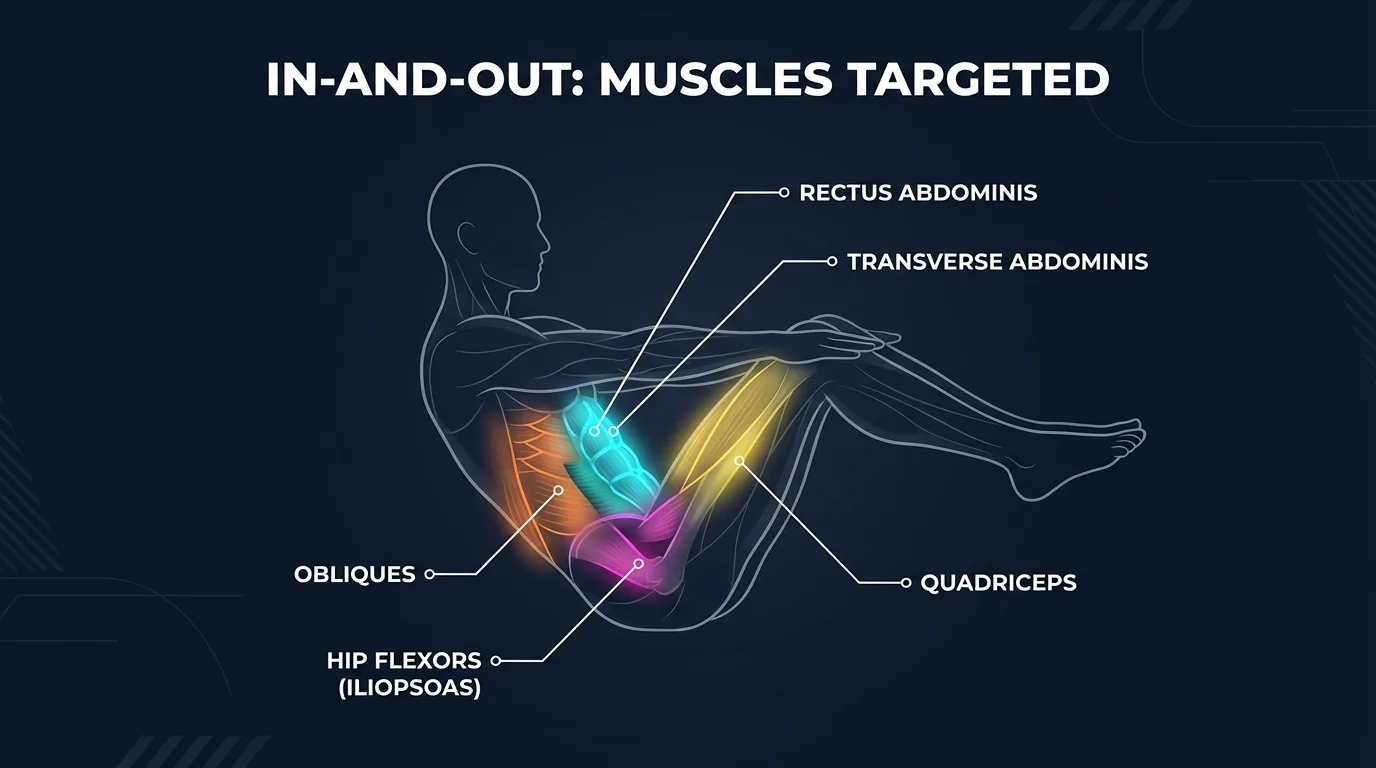
Muscles Worked
Primary movers. The in-and-out is driven by the rectus abdominis through its full length. During the "in" phase the rectus shortens concentrically to flex the spine and pull the ribcage toward the pelvis. During the "out" phase it works eccentrically (and isometrically at the bottom) to control the extension and prevent the lower back from collapsing into hyperextension. The continuous tension across both phases is what makes this exercise so demanding compared to a standard crunch, which gets a rest at the bottom of each rep.
Secondary movers. The hip flexors (iliopsoas and rectus femoris) drive the leg-tuck portion and resist gravity during the extension. The obliques (external and internal) co-contract to prevent the trunk from rotating off the sagittal plane, especially as fatigue sets in. The quadriceps fire to keep the knees in position during the "out" phase and assist the hip flexors in the leg movement.
Stabilizers. The transverse abdominis braces the deep core throughout the rep, especially during the extension where intra-abdominal pressure protects the lumbar spine. The diaphragm and pelvic floor co-contract with the transverse abdominis to form the deep-core canister. The spinal erectors fire isometrically to maintain neutral spine during the "out" phase and prevent lumbar rounding. The shoulder girdle stabilizes the upper body when the hands lightly touch the floor for balance. Breathing is itself a stabilizer here: exhaling on the crunch reinforces transverse abdominis activation and helps maintain the brace.
Evidence. A 2020 systematic review of EMG studies on core fitness exercises (Oliva-Lozano and Muyor, 2020) reported that V-sits (the static end position of the in-and-out's "out" phase) produce approximately 80% of maximum voluntary isometric contraction in the rectus abdominis. That ranks them among the highest-activation core exercises measured. The same review found that combined trunk-and-hip-flexion patterns consistently outperform isolated trunk-flexion patterns for rectus abdominis recruitment, because the muscle has to do two jobs at once: flex the spine AND stabilize the pelvis against the constant pull of the hip flexors.
How to Do In-and-Outs (Step-by-Step)
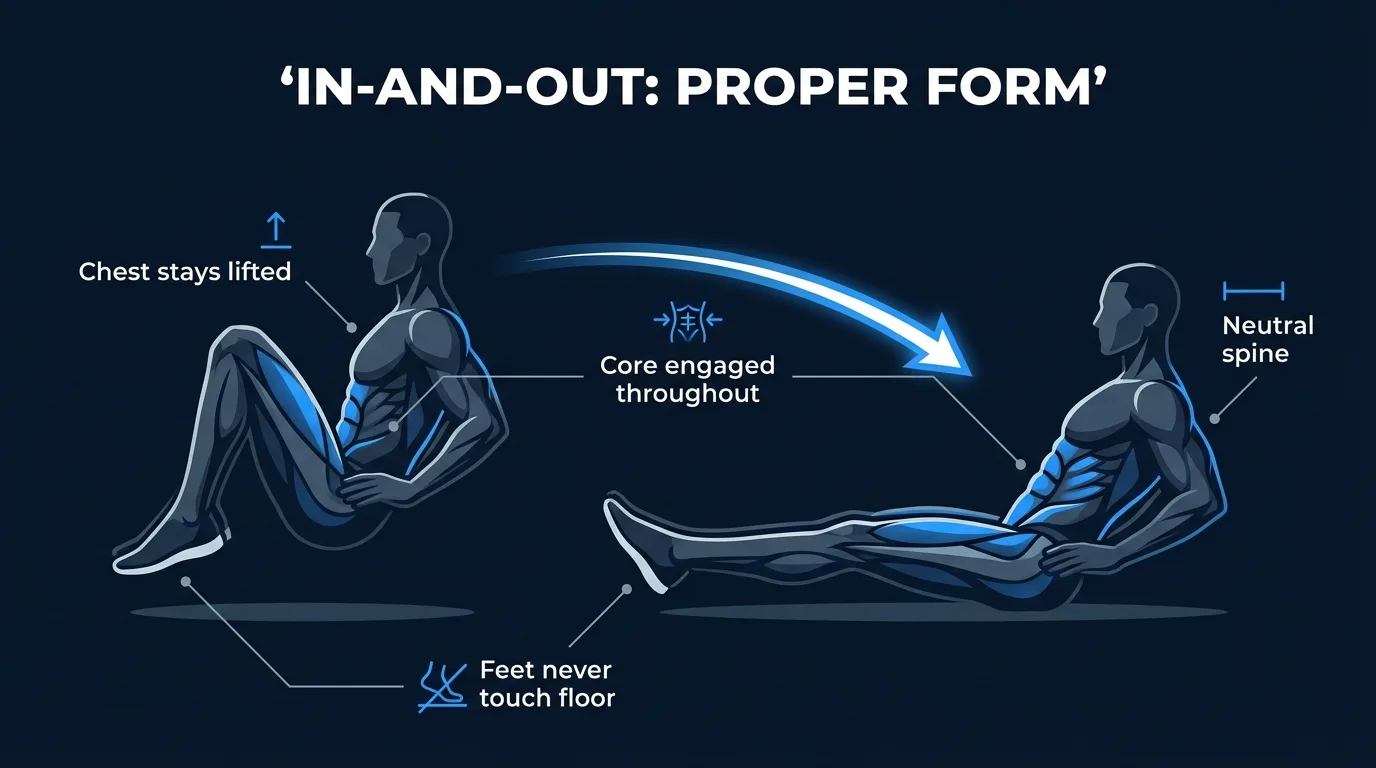
- Find your balance point. Sit on the floor with your knees bent and feet flat. Place your hands lightly behind your hips for support (or hold them out front for more difficulty). Lean back about 30 degrees until you feel your abs kick in, then lift your feet off the ground. Knees stay bent at roughly 90 degrees. This balanced V-sit position is your home base for the entire set. Coach Ty's cue: "Keep your chest proud. The second your shoulders round forward, your spine follows, and you're straining your lower back instead of working your abs."
- Pull your knees in. Contract your abs to draw your knees toward your chest. At the same time, bring your torso slightly more upright so your upper body and lower body are compressing toward each other. You should feel a strong contraction through your entire midsection. Feet stay off the ground. That's the "in" phase. Coach Ty's cue: "Curl your pelvis toward your ribcage as you draw in. Drive with your abs (you should feel the contraction deep in your abs, not in the front of your thighs)."
- Extend out with control. Extend your legs forward (keep them hovering above the floor) while leaning your torso back. Your body opens up into a wide, shallow V shape. Keep your chest open and your spine as neutral as possible. Don't let your lower back collapse into a deep round. This is the "out" phase. And it's where most people lose it. Coach Ty's cue: "Take a full 2 seconds to extend out. The eccentric is where a huge chunk of the stimulus lives. Rush it and you're training momentum, not muscle."
- Reverse direction smoothly. Without pausing, pull your knees back in while bringing your torso forward. The transition should flow continuously without any jerk. Think about your abs shortening to bring your ribcage and pelvis closer together. Not about yanking your legs with momentum. Coach Ty's cue: "Feet never touch. Even in the fully extended position, your feet should hover at least two inches off the ground. The moment your heels hit the floor, your abs get a vacation."
- Breathe and maintain tension. Exhale on the "in" phase when your abs are crunching. Inhale on the "out" phase as your body extends. Your feet never touch the floor between reps. Beginners: aim for 2 to 3 sets of 8 to 12 reps with full control. If your lower back rounds or your form breaks by rep 5, that's your working set for now.
Common Mistakes to Avoid
In-and-outs have a tiny margin for error. The balance demand is high, the range of motion is long, and there's no rest position to reset in. Here are the mistakes that turn this from one of the best ab exercises into one of the worst:
- Rounding the lower back. This is the big one. When you extend your legs out and lean back, your lower back wants to round into flexion. That puts compressive load on your lumbar discs instead of your abs. The fix: only extend as far as you can while keeping a neutral spine. For most people starting out, that means their legs extend to about a 45-degree angle. Not parallel to the floor. Range of motion earns itself over time as your core gets stronger.
- Using momentum to rock back and forth. If you're rocking like a boat in rough water, momentum is doing the work. Slow the tempo way down. Each "in" and "out" phase should take at least one full second. Can't do it slowly? Reduce reps or switch to the feet-down regression until your abs can handle the load without cheating.
- Holding your breath. Bracing matters, sure. But holding your breath through a high-rep set of in-and-outs will gas you before your abs give out. Exhale on the crunch (in), inhale on the extension (out). Rhythmic breathing keeps you going and helps maintain intra-abdominal pressure without spiking blood pressure.
- Gripping the floor too hard with your hands. If you're pressing your hands into the floor behind you and using your arms to prop yourself up, your abs aren't doing the full job. Your hands should be lightly touching the floor for balance. Not bearing weight. Actually, here's a good test: try holding your arms in front of you or crossing them over your chest. If the exercise suddenly feels twice as hard, your hands were doing too much.
Get this exercise in a personalized workout
FitCraft, our mobile fitness app, uses its AI coach Ty to program core stability work like this into your plan at the right volume and intensity, based on your level, goals, and equipment. Ty was designed and trained by Domenic Angelino, MPH (Brown University) and NSCA-CSCS, with research published in the Journal of Strength and Conditioning Research and Medicine & Science in Sports & Exercise.
Take the Free Assessment Free · 2 minutes · No credit cardVariations: From Beginner to Advanced
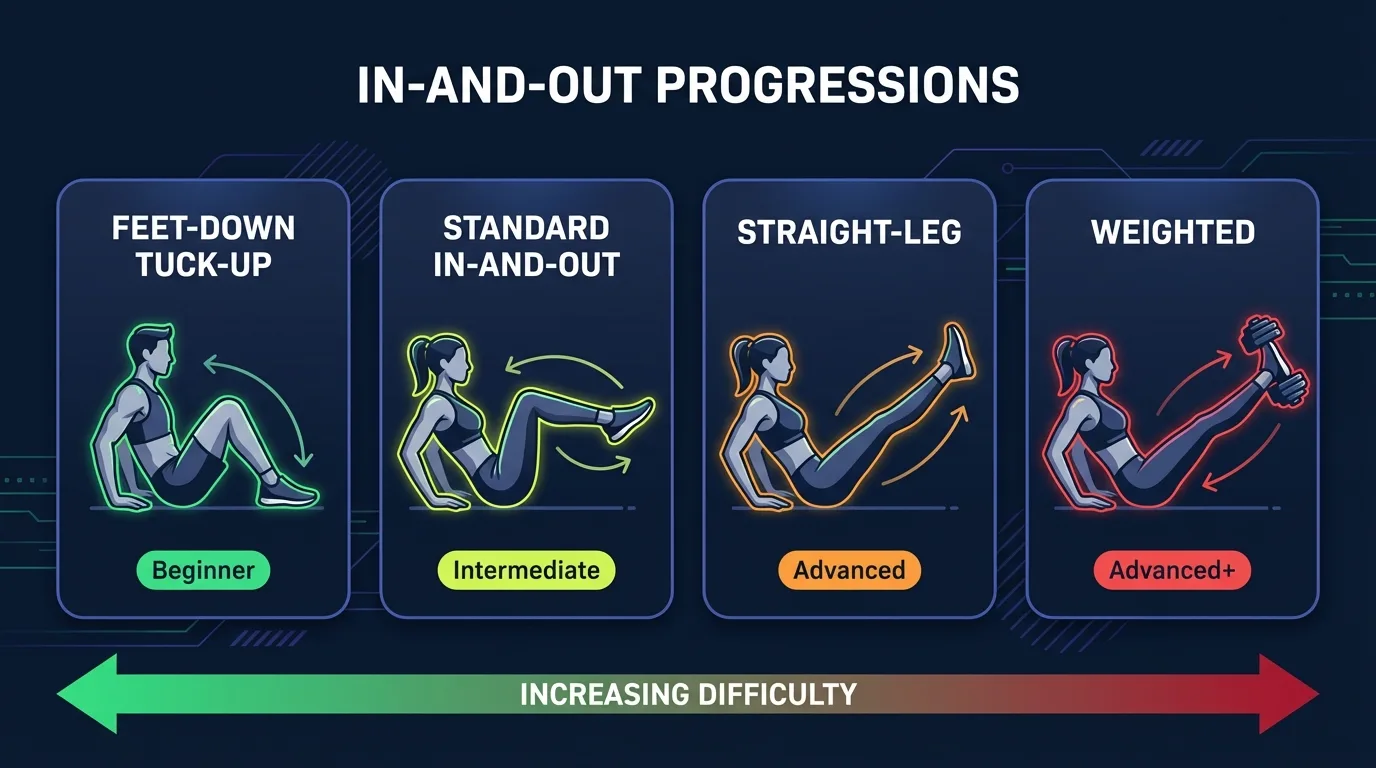
Feet-Down Tuck-Ups (Beginner Regression)
Same movement pattern, but your feet tap the floor between each rep. This gives your abs a brief reset and cuts the balance demand way down. Focus on the pelvic curl as you draw your knees in, keeping your chest lifted throughout. Once you can knock out 3 sets of 15 with solid control, try keeping your feet off the ground for the entire set.
Standard In-and-Outs (Intermediate)
This is the version described in the step-by-step above. Knees bend during the "out" phase, feet stay hovering, hands lightly on the floor for balance. When you can do 3 sets of 15 with a smooth, controlled tempo and no lower-back rounding, you're ready to level up.
Straight-Leg In-and-Outs (Advanced)
Instead of bending your knees during the "out" phase, keep your legs fully extended. This dramatically increases the lever arm and makes your abs work way harder to control the movement. Fair warning: your rep count will drop by at least half. Your legs feel so much heavier in this position. Keep a slight bend in your knees to protect your hamstrings, but the legs should be mostly straight.
Weighted In-and-Outs (Advanced)
Hold a light dumbbell (5-15 lbs) between your feet or wear ankle weights. The added resistance increases the load during the "out" phase and forces your abs to work harder to decelerate the weight. Start light. Seriously. Even 5 lbs feels like 20 when it's at the end of that lever arm.
When to Avoid or Modify In-and-Outs
In-and-outs are safe and effective for most healthy adults with baseline core strength, but the exercise combines spinal flexion and hip flexion under continuous load, which makes it a poor fit for several conditions. Always consult a qualified healthcare provider or physical therapist before starting or returning to demanding core work, especially in the situations below.
- Acute lower-back pain, disc pathology, or sciatica. The "out" phase loads the lumbar spine in a position prone to rounding under fatigue, which can aggravate disc-related symptoms. Substitute with anti-extension and anti-rotation patterns like dead bugs, bird-dogs, and forearm planks until cleared by a PT.
- First 6 to 8 weeks postpartum or active diastasis recti. Combined trunk-and-hip-flexion movements widen abdominal separation and increase intra-abdominal pressure. Restore deep-core function first with diaphragmatic breathing, transverse abdominis activation, and progressive dead bugs and bird-dogs.
- Recent abdominal surgery (C-section, hernia repair, appendectomy). Get clearance from your surgeon. Most post-surgical protocols start with diaphragmatic breathing, progress to gentle bracing, and only then to loaded core flexion.
- Hernia (umbilical, inguinal, ventral). High intra-abdominal pressure during the "in" phase can worsen the herniation. Talk to your physician about safe core options before attempting this.
- Pregnancy (second and third trimesters). Avoid supine and long V-sit positions; the vena cava compression and flexion-based abdominal work are contraindicated. Use upright or side-lying alternatives.
- Hip-flexor strain or sports hernia. The continuous hip-flexion demand will provoke the symptoms. Substitute with anti-extension patterns until the strain has fully resolved.
- Pelvic-organ prolapse or pelvic-floor dysfunction. The intra-abdominal pressure spikes during the "in" phase can worsen symptoms. Work with a pelvic-floor PT before attempting loaded core flexion.
Related Exercises
If in-and-outs aren't clicking for you yet, or you want complementary core movements to round out a program, these are the most useful neighbors in the same taxonomy:
- Easier regression (same pattern): Reverse crunches teach the pelvic-curl pattern lying flat, without the balance demand. The fastest way to build the lower-ab strength you need for in-and-outs.
- Foundation for spinal bracing: Dead bugs and bird-dogs teach the anti-extension and anti-rotation patterns that protect your lumbar spine when the in-and-out gets hard. Universal foundations; do these even if you can already crank out 30 in-and-outs.
- Same plane, dynamic alternative: Bicycle crunches are another dynamic flexion-plus-rotation movement, performed lying down. Adds the rotational work in-and-outs don't give you.
- Same plane, hip-flexor dominant alternative: Leg raises hit similar muscles with a different movement pattern. Lying leg raises remove the balance challenge while still demanding strong hip-flexor and lower-ab control.
- Isometric anti-extension pair: Forearm planks superset well with in-and-outs to build complementary core endurance under both static and dynamic load.
- Anterior-core advanced peer: Hollow holds are the isometric cousin. If you can hold a hollow for 45 seconds, you have the bracing endurance to handle straight-leg in-and-outs.
How to Program In-and-Outs
The American College of Sports Medicine's position stand on resistance training (Ratamess et al., 2009) recommends progressive overload through manipulation of volume, intensity, rest, and frequency. Core work like in-and-outs falls into the dynamic rep-based camp; here's how to dose it across training levels:
| Level | Sets × Reps | Rest between sets | Frequency |
|---|---|---|---|
| Beginner (feet-down tuck-up regression) | 2-3 × 8-12 | 45-60 seconds | 2-4 sessions/week |
| Intermediate (standard, feet hovering) | 3 × 10-20 | 45-60 seconds | 3-5 sessions/week |
| Advanced (straight-leg or weighted, slow tempo) | 3-4 × 15-30 | 60 seconds | 4-6 sessions/week |
Where in your workout. Place in-and-outs at the end of a resistance-training session or as a finisher. Doing them before compound lifts pre-fatigues the core and compromises spinal stability under heavier load. They also work well in a dedicated core circuit paired with anti-extension and anti-rotation exercises, or as part of a "core day" with planks, hollow holds, and bird-dogs.
Form floor over rep targets. The rep ranges above assume clean reps with neutral spine and continuous tension. If your lower back starts rounding at rep 7 of a planned set of 12, that set ends at rep 7. Rounding under load is how this exercise transfers stress from the abs to the lumbar discs. Range of motion earns itself over time as your core gets stronger; chasing the rep target with broken form just builds an injury timeline.
FitCraft's AI coach Ty adjusts the variation and rep range of core work like in-and-outs based on your assessment results, so you don't have to guess which regression or progression fits today. Ty's 3D demonstrations show the balance point, the pelvic curl, and the extension from multiple angles, which makes the movement click faster than reading about it.
Frequently Asked Questions
What muscles do in-and-outs work?
In-and-outs primarily target the rectus abdominis across its full length, with strong activation of the transverse abdominis for stabilization, the obliques for anti-rotation, and the hip flexors (iliopsoas and rectus femoris) for leg movement. Your lower back and quadriceps also work as secondary stabilizers during the extended "out" phase.
Are in-and-outs good for losing belly fat?
No single exercise spot-reduces belly fat. But in-and-outs are a high-intensity core exercise that burns more calories per rep than static exercises like planks, because they demand continuous movement and stabilization. Combined with a caloric deficit and consistent training, stronger abs become visible as overall body fat drops.
How many in-and-outs should I do?
Beginners should start with 3 sets of 8-10 reps, focusing on control rather than speed. Intermediate trainees can aim for 3-4 sets of 12-15 reps. Advanced athletes can do 4 sets of 15-20 reps or add resistance by holding a light dumbbell between the feet. Quality always beats quantity with this one.
Can beginners do in-and-outs?
Honestly, they're advanced. You need solid abdominal strength and hip flexor endurance before attempting them. Beginners should build up by mastering dead bugs, reverse crunches, and tuck-ups first. Once you can hold a V-sit for 20 seconds, you probably have the baseline strength to try in-and-outs with reduced range of motion.
What is the difference between in-and-outs and V-ups?
In-and-outs are performed from a seated balance point where you alternate between pulling the knees in and extending the legs out, with your feet never touching the ground. V-ups start flat on the floor and involve lifting the torso and straight legs to meet in the middle. V-ups demand more hamstring flexibility and generate a harder peak contraction, while in-and-outs maintain constant tension and lean more endurance-focused.