The kickback is what happens when the standard donkey kick stops being hard enough. Same all-fours position. Same hip extension movement. But instead of keeping your knee bent at 90 degrees, you straighten the leg completely. That one change turns a moderate glute isolation drill into an expert-level posterior chain exercise that most people can't do correctly on the first try.
It's just physics. A straight leg is a longer lever. It weighs the same as a bent leg, but the weight sits further from the hip joint, so your glute has to generate more force to lift it the same distance. Your core also has to work harder to keep your lower back from arching under the increased demand. The longer the lever, the bigger the consequence of any form break.
If you've been doing donkey kicks for a while and they feel easy, this is your next step. But only if your form on the bent-knee version is already locked in. Rushing to the kickback without mastering the donkey kick first is how people end up feeling it in their lower back instead of their glute.
Quick Facts: Kickbacks
- Equipment needed: None (bodyweight); optional long resistance band for the banded progression
- Difficulty: Expert (regression: donkey kicks)
- Modality: Isolation, unilateral, hip extension
- Body region: Lower body, glutes and hamstrings
- FitCraft quest category: Strength (glute accessory)
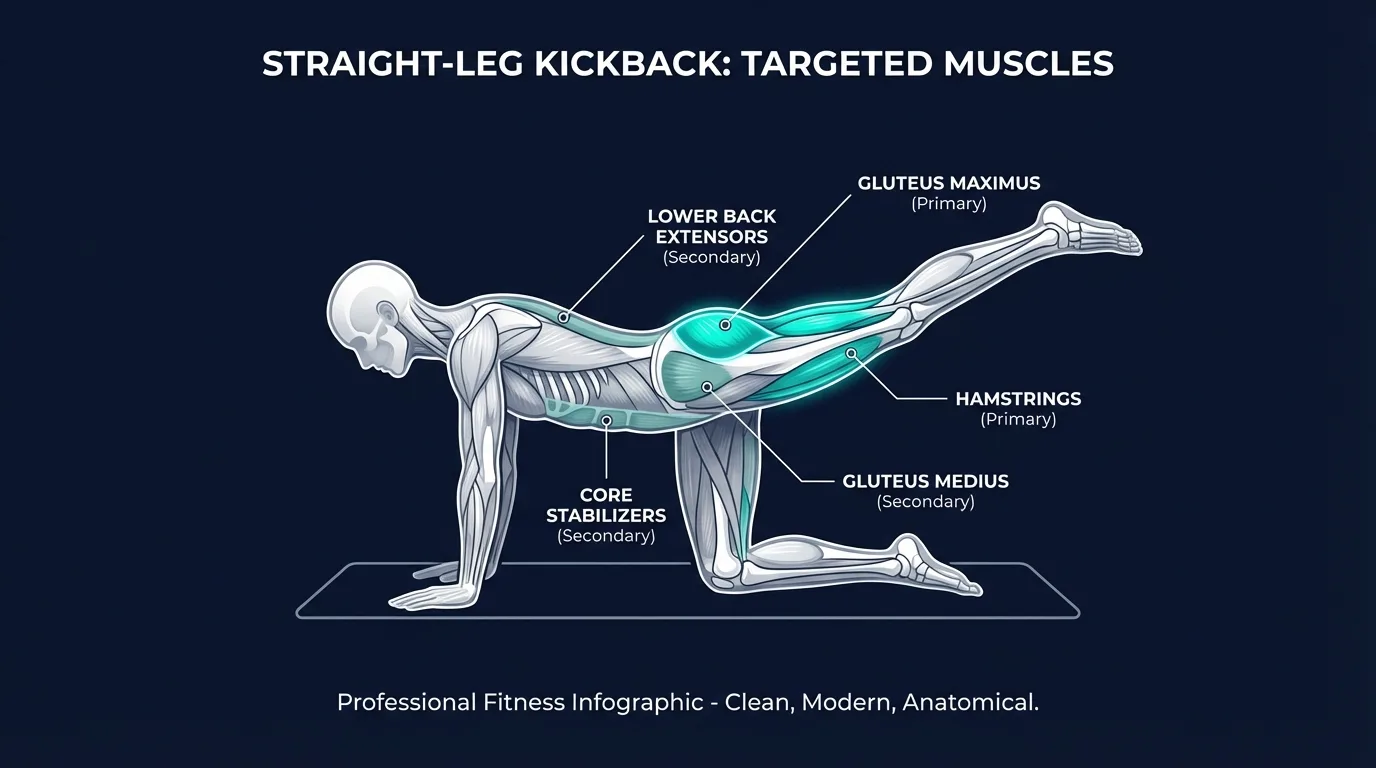
Muscles Worked
Primary movers: the gluteus maximus and the hamstrings (biceps femoris, semitendinosus, semimembranosus). The glute drives hip extension concentrically as the straight leg lifts; the hamstrings assist hip extension throughout and contribute meaningfully because of the extended-knee position. Both muscle groups also work eccentrically on the controlled descent.
Secondary movers: the gluteus medius and minimus fire to keep the pelvis level and prevent the working-side hip from rotating upward. The lower-back extensors (erector spinae) work isometrically to resist trunk flexion as the leg rises behind the body.
Stabilizers: the entire anterior core (rectus abdominis, transverse abdominis, obliques) braces hard to prevent lumbar hyperextension as the leg lifts. The shoulder girdle (deltoids, rotator cuff, scapular retractors) stabilizes the upper body in the quadruped position. The non-working hip and the wrists carry static load.
Evidence: Reiman et al. (2012) reviewed electromyographic data across rehabilitation exercises and identified quadruped hip extension among the patterns producing high gluteus maximus activation when performed with controlled form. The straight-leg variant studied here extends the same kinesiological principle: longer lever, higher hip-extension torque demand, more glute recruitment, more core demand. The mechanism is straightforward: with the knee locked, all hip-extension work flows through the gluteus maximus and hamstring group rather than being shared with the bent-knee position's shorter lever.
How to Do the Kickback Exercise (Step-by-Step)
- Get on all fours. Hands directly under your shoulders, knees directly under your hips. Spine neutral, not arched up and not sagging down. Look at a spot on the floor about a foot in front of your hands to keep your neck in line.
Coach Ty's cue: "Both hip bones point straight down at the floor. If one is higher than the other before you've even moved, reset your setup."
- Brace your core and extend your working leg. Tighten your abs hard. Extend one leg straight behind you, knee fully locked out, toes pointing down. The leg should hover just off the ground. That's your starting position. If your lower back is already arching here, your core isn't braced enough.
Coach Ty's cue: "Lock the knee, not the back. Leg is rigid. Spine stays neutral. Those are two different things."
- Drive your heel toward the ceiling. Keep the leg fully extended and use your glute to lift it upward. Push through the heel. Lift until your leg is roughly in line with your torso or slightly above. That's your end range. Go higher and your back arches and the glute stops doing the work.
Coach Ty's cue: "Think heel stamp, not leg swing. It's a controlled press into an imaginary ceiling, not a momentum kick."
- Squeeze at the top. Hold for one to two seconds. Squeeze the glute as hard as you can. You should feel it deep in the glute and along the back of your thigh. If you feel it mainly in your lower back, you've lifted too high or your core has relaxed.
Coach Ty's cue: "Hips stay square the whole time. If the working hip rotates up, your obliques and lower back are stealing the work from the glute."
- Lower slowly. Bring the leg back down under control. Two-second descent, ideally. Stop just before your toes touch the floor and drive back up for the next rep. Complete all reps on one side before switching.
Coach Ty's cue: "Re-brace the core at the bottom of every single rep. It's not something you set once and forget. This is the difference between feeling kickbacks in your glutes and feeling them in your back."
Common Mistakes to Avoid
The kickback amplifies every form error that exists in the donkey kick. Longer lever arm, bigger consequences. Here's what to watch for:
- Arching the lower back. The number one mistake, even more common here than with donkey kicks. The straight leg is harder to lift, so people compensate by arching the spine to create the illusion of more height. The extra range comes from spinal extension, and the glute checked out several inches ago. Fix: reduce the height, brace your abs harder, and accept that less range with good form beats more range with bad form. Every time.
- Bending the knee during the lift. If your knee bends as you lift, you're turning the kickback back into a donkey kick. Defeats the purpose. The knee stays locked throughout the entire range of motion. Can't keep it straight? The exercise is too advanced right now. Drop back to donkey kicks and build strength there first.
- Swinging the leg with momentum. The straight-leg position makes it tempting to use momentum because the lever is harder to control. If you swing the leg up fast and let it drop, you're getting a fraction of the benefit. Take two seconds up, hold one to two seconds, take two seconds down. If it suddenly feels twice as hard? You were definitely swinging.
- Rotating the hip open. As the straight leg lifts, the hip on the working side wants to rotate outward. This shifts the load from the gluteus maximus to the lower back and obliques. Keep both hip bones pointing directly at the floor. Imagine balancing a glass of water on your sacrum.
- Pointing the toes. Sounds minor. It isn't. Pointing your toes shifts the muscular emphasis toward the calf and reduces glute engagement. Flex the foot and drive through the heel. That keeps the glute and hamstring as the primary movers.
Get this exercise in a personalized workout
FitCraft, our mobile fitness app, uses its AI coach Ty to program isolation exercises like this into your plan at the right volume and intensity, based on your level, goals, and equipment. Ty was designed and trained by Domenic Angelino, MPH (Brown University) and NSCA-CSCS, with research published in the Journal of Strength and Conditioning Research and Medicine & Science in Sports & Exercise.
Take the Free Assessment Free · 2 minutes · No credit card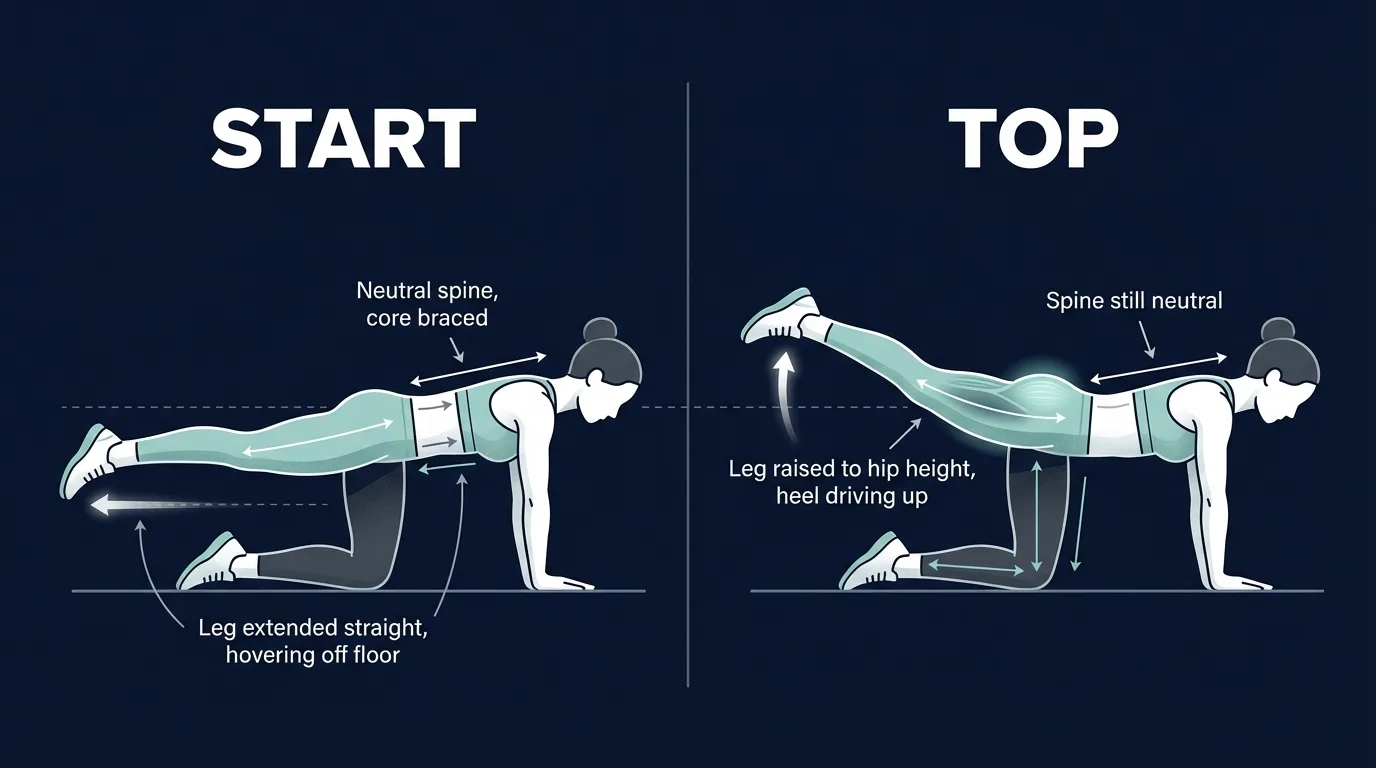
Variations and Progressions
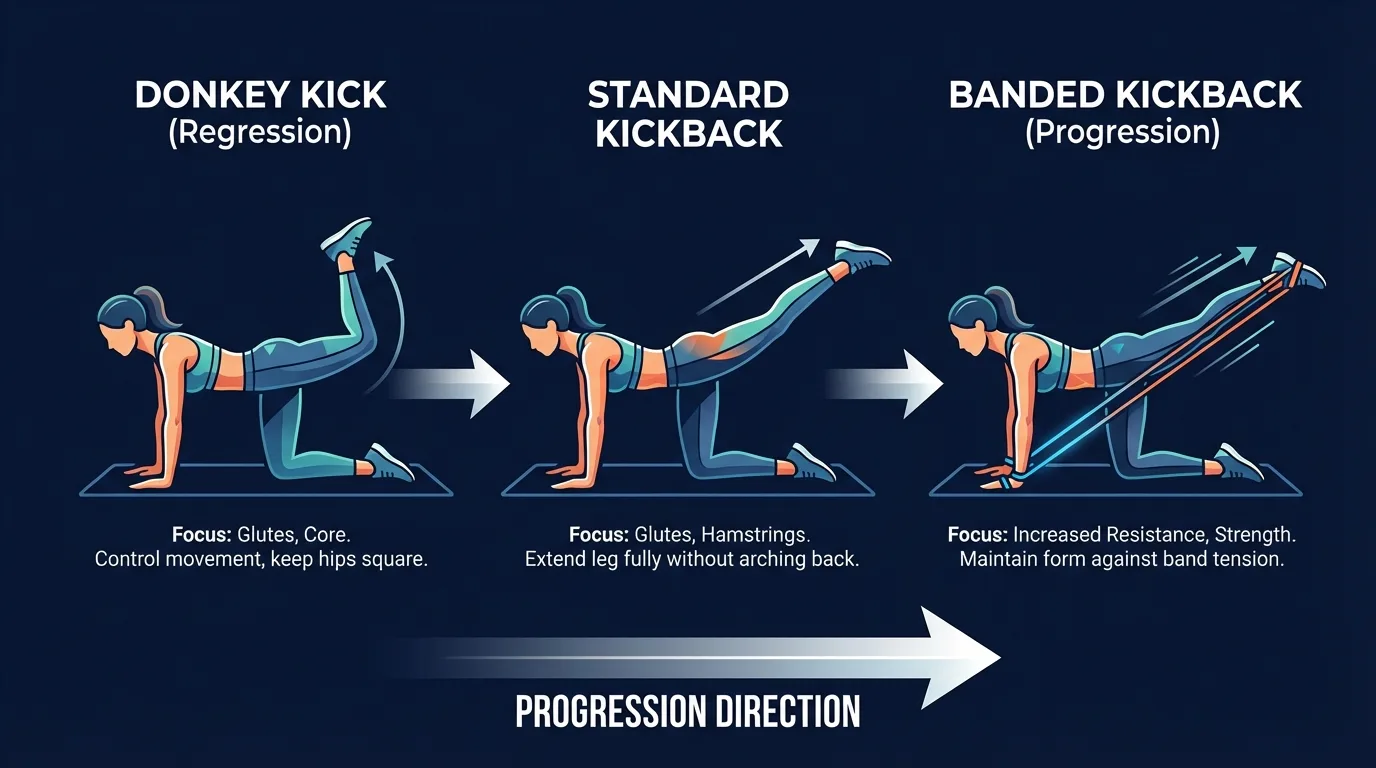
Standard Kickback (Expert)
The version described above. Bodyweight, all fours, leg fully extended. This is your baseline. Most people should stay here until they can do 3 sets of 15 with a controlled 2-second tempo in each direction and a full squeeze at the top. No back arching. No hip rotation. No momentum.
Resistance Band Kickback (Expert+)
Loop a long resistance band around the sole of your working foot and anchor the other end under your hands. The band adds resistance at the top of the range where the glute is in its most shortened position. That makes the squeeze significantly harder and adds a loading curve that bodyweight alone can't provide. Start with a light band. The straight-leg position already makes this demanding enough.
Pulse Kickback (Expert+)
At the top position, instead of holding for one squeeze, perform 3 to 5 small pulse movements through 2 to 3 inches of range. Then lower all the way down. The pulses keep the glute under constant tension at peak contraction. Brutal. Use lower rep counts (8 to 10 per leg) with this one.
Regression: Donkey Kick (Intermediate)
If the straight-leg kickback is too difficult or you feel it in your lower back, go back to the donkey kick. Same all-fours position, same hip extension movement, but with your knee bent at 90 degrees. The shorter lever arm makes it much easier to maintain proper form. Build to 3 sets of 20 with perfect form, then return to the kickback.
When to Avoid or Modify Kickbacks
Kickbacks are safe for most healthy adults who can already hold a neutral spine in the bent-knee donkey kick. A few situations warrant modification or a temporary pause. Always consult a qualified healthcare provider or physical therapist before starting or returning to any exercise program, especially if any of the conditions below apply.
- Acute lower-back pain or known lumbar disc pathology. The long-lever hip extension easily becomes lumbar hyperextension under fatigue. Skip kickbacks during an active flare. Rebuild core control first with deadbugs and bird-dogs, then return to the bent-knee donkey kick before progressing.
- Active gluteal or hamstring strain or tendinopathy (especially proximal hamstring tendinopathy). Isolation work on a healing tendon aggravates symptoms. Work in a pain-free range of motion with reduced lift height, or pause until cleared by a physical therapist.
- Wrist pain, carpal tunnel syndrome, or recent wrist injury. The quadruped position loads the wrists statically. Drop to forearms (forearm kickback variation) or substitute a glute bridge until wrists tolerate weight bearing.
- Knee pain in full extension. Locking the knee under load can irritate patellofemoral or meniscal symptoms. Allow a soft (non-locked) knee, accept reduced lever-arm intensity, or regress to the bent-knee donkey kick.
- Second or third trimester of pregnancy and the first 6 to 12 weeks postpartum. The all-fours position is generally well tolerated late in pregnancy, but the anti-extension core demand is high. Get clearance from your OB or a pelvic-floor physical therapist, and skip the straight-leg version if you cannot maintain a neutral spine. Diastasis recti and pelvic-floor recovery take priority over lever-arm progression.
- Cannot brace the core hard enough to prevent lumbar arching. This is the universal regression trigger. If your back arches before your leg reaches hip height, the lever is too long for your current core strength. Drop to the donkey kick and build there.
Related Exercises
- Direct regression: Donkey kicks. Bent-knee version, shorter lever, the prerequisite for kickbacks.
- Same target muscle, different pattern: Glute bridges. Supine hip extension; tolerates heavier loading and complements isolation work like kickbacks.
- Complementary glute pattern: Fire hydrants. Hip abduction (gluteus medius) rather than extension (gluteus maximus); pair with kickbacks for complete glute complex coverage.
- Core stability foundation: Bird dogs. Same quadruped position with an anti-rotation challenge; builds the core stability that kickbacks demand.
- Core stability foundation: Deadbugs. Supine anti-extension drill; the most direct way to train the brace pattern that kickbacks require.
- Compound posterior chain progression: Bulgarian split squats. Unilateral lower-body compound that develops the glute under heavier load and through a longer range than any isolation drill can.
How to Program Kickbacks
The American College of Sports Medicine's position stand on resistance training (Ratamess et al., 2009) recommends moderate-volume, controlled-tempo work for single-joint isolation exercises like the kickback. Use the table below as a starting point and adjust based on how your form holds up under fatigue.
| Level | Sets × Reps | Rest between sets | Frequency |
|---|---|---|---|
| Beginner (bent-knee donkey kick first) | 2-3 × 10-15 | 45-60s | 2-3 sessions/week |
| Intermediate (standard kickback) | 3 × 12-15 | 45-60s | 2-3 sessions/week |
| Advanced (banded or pulse variation) | 3-4 × 8-15 | 60-90s | 2-4 sessions/week |
Where in your workout: kickbacks work best as accessory work after your main compound lifts. Slot them in after squats, deadlifts, or Bulgarian split squats, when the glute is already warm but not exhausted. They also work as a glute finisher at the end of a lower-body session, often paired with fire hydrants for a complete glute complex superset. Avoid placing isolation work first; doing kickbacks before your compound lifts fatigues the glute and underloads the bigger movements.
Form floor over rep targets: end the set when your spine starts to arch or your hips start to rotate, not when the rep count is hit. A clean set of 10 with a hard squeeze beats a sloppy set of 15 with momentum every time. The kickback's value comes from the controlled top contraction; if you've lost that, the set is over regardless of how many reps remain on paper.
FitCraft's AI coach Ty adjusts the variation and volume of glute isolation work like kickbacks to match your level, programming the bent-knee donkey kick first for beginners and progressing you to the straight-leg version once your assessment indicates your core stability and hip extension control are ready. The 3D demonstrations show the exact leg height, and Ty flags the two form breaks that are hardest to catch on your own: when your back starts to arch and when your hip rotates open.
Frequently Asked Questions
Can I do kickbacks with lower back pain?
If you are in an acute lower-back-pain episode, no. Skip kickbacks until the flare settles and you have clearance from a physical therapist. The straight-leg position creates a long lever that demands strong anti-extension core control; without it, the lower back arches to compensate and the load shifts off the glute and onto the lumbar spine. Once cleared, rebuild core stability first with deadbugs and bird-dogs, then return to the bent-knee donkey kick, and only progress to the straight-leg kickback when you can hold a neutral spine throughout the full range.
What's the difference between a kickback and a donkey kick?
Leg position. In a donkey kick, your knee stays bent at 90 degrees. In a kickback, your leg is fully extended. The straight-leg position creates a longer lever arm, which makes the exercise significantly harder and shifts more work to the hamstrings alongside the glutes. Kickbacks are an expert-level progression of the donkey kick.
Do kickbacks build glutes?
Yes. Kickbacks isolate the gluteus maximus through hip extension, with secondary involvement from the hamstrings. EMG research on quadruped hip extension shows high gluteus maximus activation when the movement is controlled and the spine stays neutral (Reiman et al., 2012). The straight-leg position recruits the hamstrings more than the bent-knee version, so it's a more demanding posterior chain exercise overall.
How many kickbacks should I do per set?
For most people, 3 sets of 12 to 15 reps per leg. The straight-leg position is harder than a standard donkey kick, so you'll reach fatigue at lower rep counts. Focus on controlled tempo and a hard glute squeeze at the top rather than chasing high numbers.
Are kickbacks good for beginners?
No. Kickbacks are an expert-level exercise. The straight-leg position demands strong core stability, good hip extension control, and the ability to maintain a neutral spine under a longer lever arm. Beginners should start with the donkey kick (bent knee) and progress to kickbacks once they can do 3 sets of 20 donkey kicks with perfect form.
Why do I feel kickbacks in my lower back?
You're arching your lower back to lift your leg higher. With a straight leg, this happens more easily than with a donkey kick because the lever arm is longer and the temptation to overextend is greater. Fix: brace your abs hard, reduce your range of motion, and focus on starting the lift from the glute. Your leg only needs to reach hip height.