The walk out looks simple until you slow it down. You hinge forward, place your hands on the floor, walk into a plank, pause, and walk back. That moving entry is the hard part. Your core has to keep your ribs, pelvis, and hips organized while your hands keep changing the base of support.
It also exposes what static planks can hide. Tight hamstrings, wrist irritation, shoulder fatigue, and a sagging lower back all show up fast. Use the walk out as a strength drill only when you can control the plank line. Until then, shorten the range and build it piece by piece.
Quick Facts: Walk Out
- Equipment needed: None
- Difficulty: Intermediate to Advanced
- Modality: Strength
- Body region: Full body with core and upper-body emphasis
- FitCraft quest category: Strength
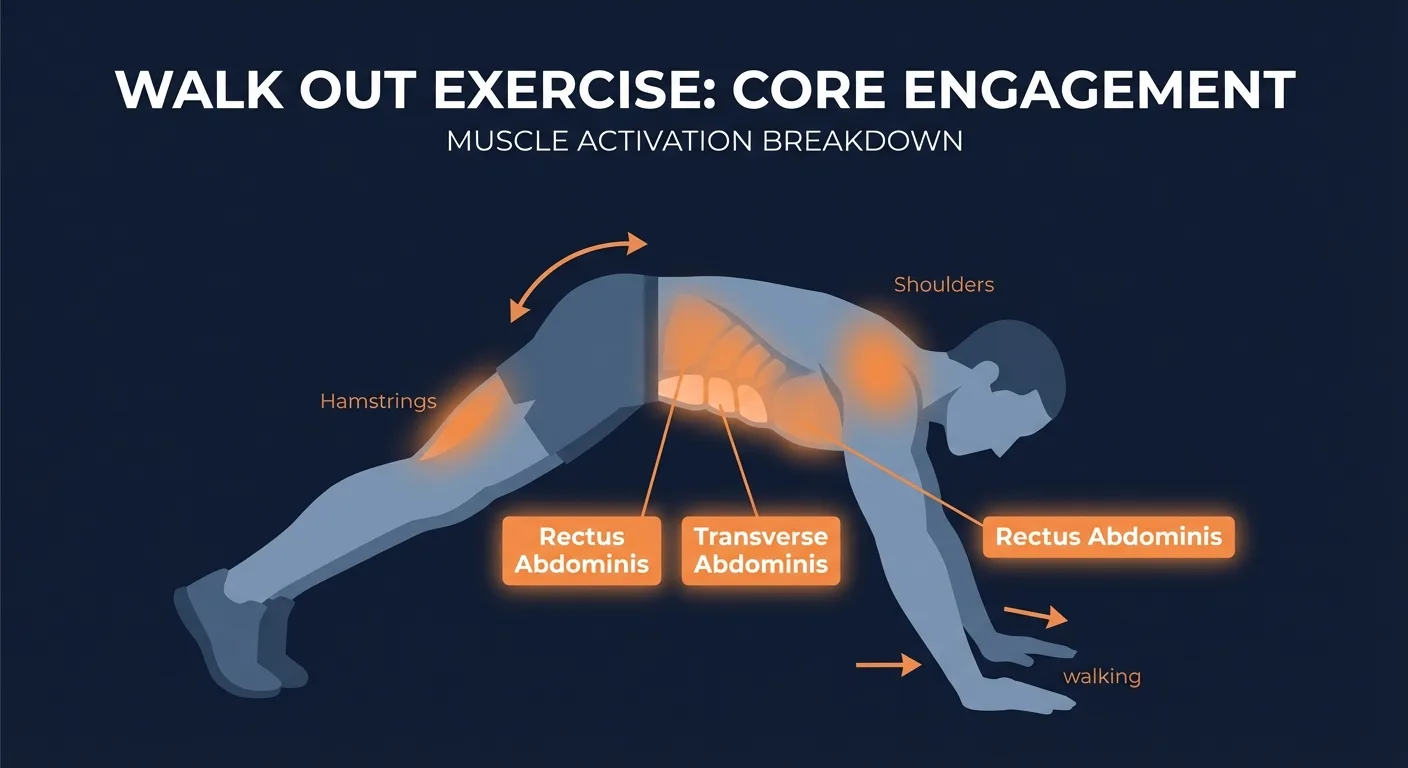
Muscles Worked
Primary movers: the rectus abdominis, transverse abdominis, and obliques. These muscles do not crunch the trunk during the walk out. They resist extension as your hands travel away from your feet, then keep the pelvis from swinging as you walk back.
Secondary movers: the pectoralis major, anterior deltoids, triceps, serratus anterior, glutes, and hamstrings. The upper body holds the high plank and supports each hand step, while the hamstrings and calves tolerate the forward-fold entry.
Stabilizers: the entire anterior core, glutes, posterior deltoids, and rotator cuff work isometrically to maintain the rigid plank position. The deeper spinal stabilizers and hip stabilizers also help keep the pelvis level while one hand moves at a time.
Mechanism: walk outs are an anti-extension drill with a mobility demand at the start. The farther your hands travel from your feet, the longer the lever becomes and the harder your abs have to brace. If hamstring tightness pulls your pelvis under during the fold, bend your knees so the core work stays in the plank instead of shifting into your lower back.
Step-by-Step: How to Do a Walk Out
- Start standing tall. Feet about hip-width apart, knees soft, ribs stacked over pelvis. Take a breath and brace before you move.
- Hinge forward. Fold at the hips and reach your hands toward the floor. Bend your knees as much as needed so your palms can land flat. This is a strength drill with a mobility entry, so do not force a straight-leg stretch.
- Walk your hands out. Move one hand forward at a time. Keep each palm flat, fingers spread, and shoulders active. Stop when your body forms a straight line from head to heels.
- Pause in the high plank. Hold for one to two seconds. Squeeze your glutes lightly, keep your ribs down, and breathe without letting the hips sag or pike.
- Walk your hands back. Reverse the movement one hand at a time. Keep the hips quiet and the abs braced so the pelvis does not swing side to side.
- Stand and reset. Bring your hands close to your feet, bend the knees as needed, then stand tall. Reset your breath before the next rep.
Get this exercise in a personalized workout
FitCraft, our mobile fitness app, uses its AI coach Ty to program pressing exercises like this into your plan at the right volume and intensity, based on your level, goals, and equipment. Ty was designed and trained by Domenic Angelino, MPH (Brown University) and NSCA-CSCS, with research published in the Journal of Strength and Conditioning Research and Medicine & Science in Sports & Exercise.
Take the Free Assessment Free • 2 minutes • No credit card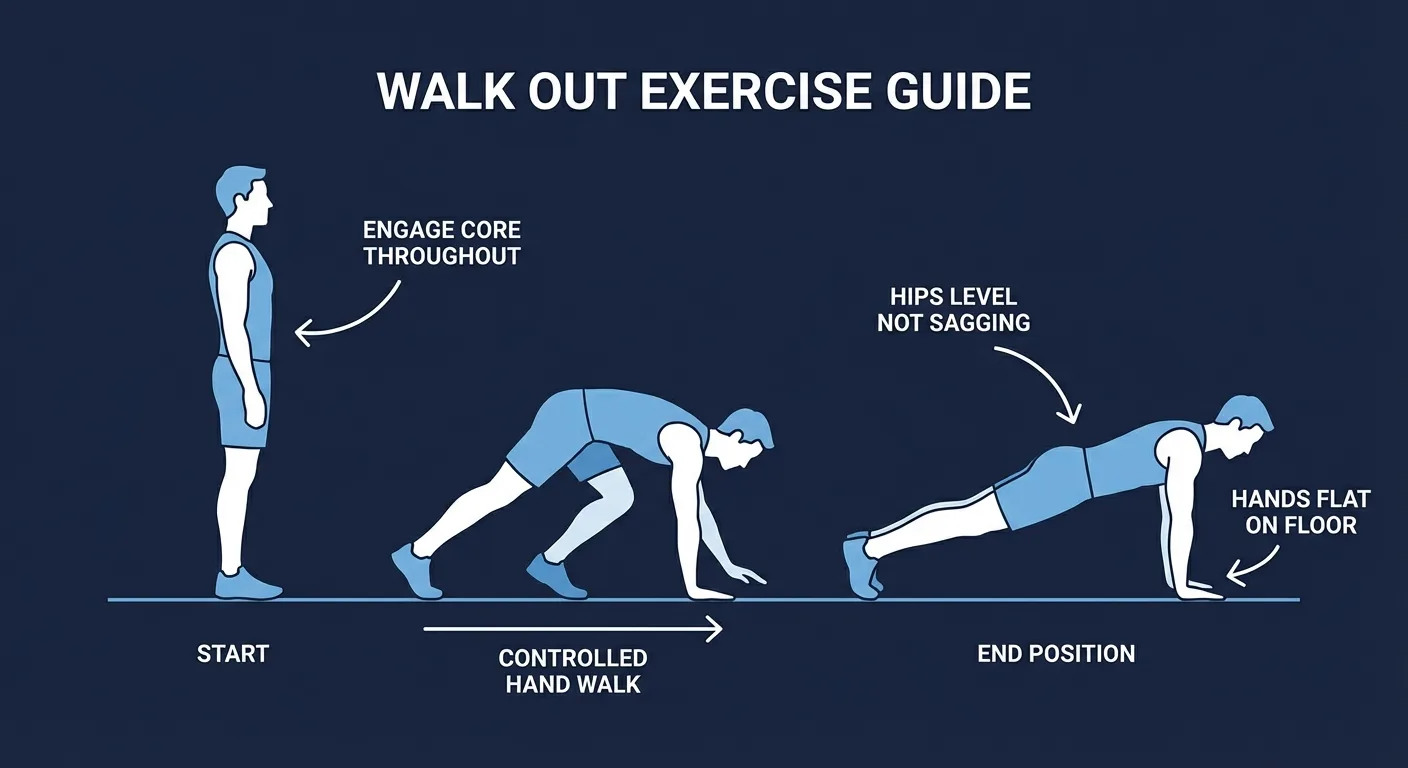
Common Mistakes (and How to Fix Them)
Letting the Hips Sag in the Plank
What it looks like: The hips drop below the line of the shoulders and heels at the end of the walk out.
Why it's a problem: The load shifts from the abs to the lower back.
The fix: Squeeze your glutes, pull the ribs down, and shorten the hand walk. If your hips still sag, use a partial walk out until your plank is stronger.
Swaying the Hips Side to Side
What it looks like: The pelvis rocks left and right as each hand moves.
Why it's a problem: The walk out is supposed to train anti-rotation control. Hip sway means the obliques are losing position.
The fix: Slow down. Plant one hand firmly before moving the other. Think of carrying a bowl of water on your pelvis without spilling it.
Forcing Straight Legs During the Fold
What it looks like: You lock the knees, round the lower back hard, and struggle to reach the floor.
Why it's a problem: Tight hamstrings can pull the pelvis under and make the entry feel like a strained stretch instead of a controlled hinge.
The fix: Bend your knees. Let the hands reach the floor comfortably, then earn straighter legs over time with hamstring mobility work.
Walking Out Too Far Too Soon
What it looks like: You reach past a clean plank, lose rib position, and call the sagging hold a rep.
Why it's a problem: More range only helps if the core can control it.
The fix: Stop at the farthest point where your plank line stays clean. Add one hand step only when the previous range feels stable.
Collapsing Through the Hands
What it looks like: The fingers curl, palms peel off the floor, or weight dumps into the heel of the hand.
Why it's a problem: A loose hand position irritates the wrists and makes the shoulder base unstable.
The fix: Spread your fingers and press through the whole palm. Use push-up handles or dumbbell grips if floor wrist extension bothers you.
Walk Out Variations: Regressions and Progressions
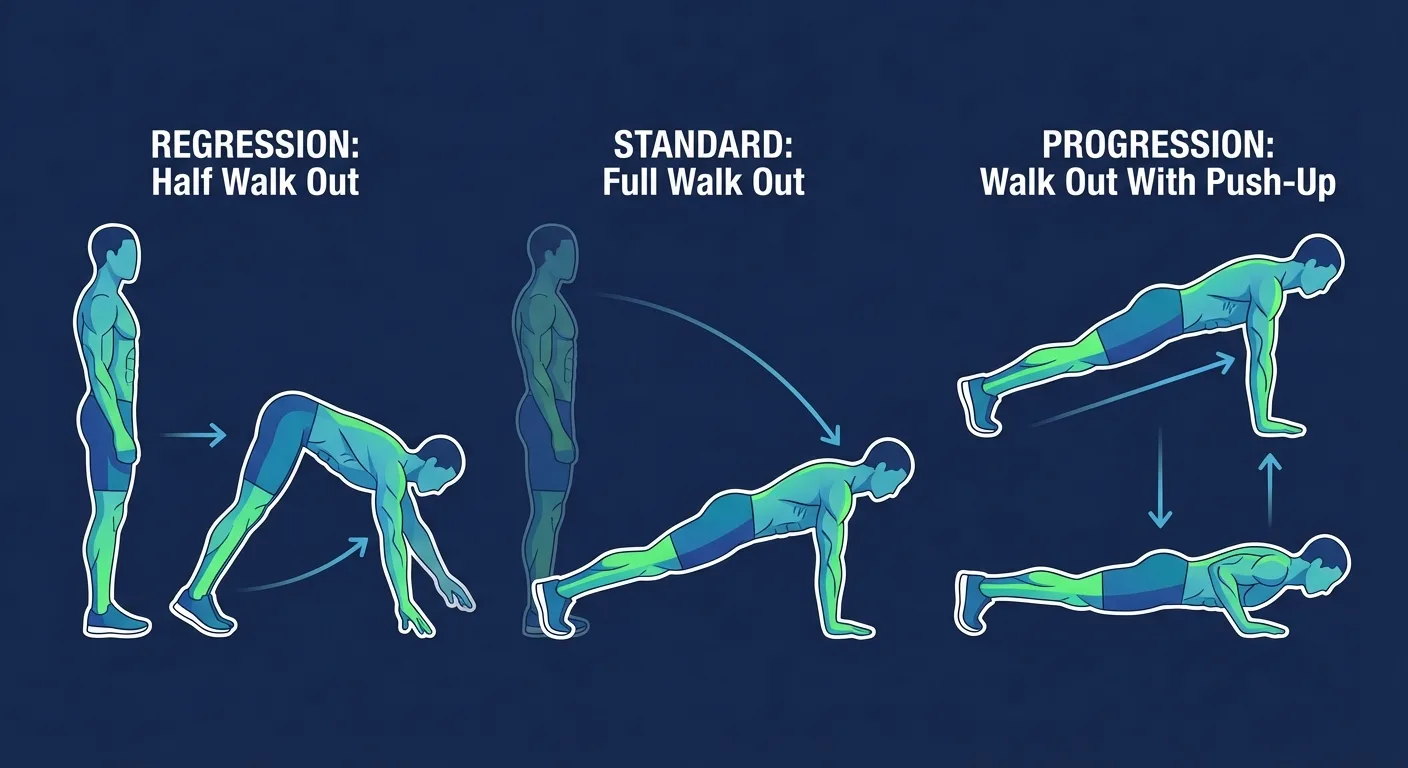
Pick the hardest version you can control without sagging, swaying, or rushing.
Half Walk Out (Beginner Regression)
Walk your hands only halfway toward the plank, then return to standing. This teaches the hinge, hand placement, and core brace without the longest lever.
Hand Plank Hold
Skip the standing entry and hold a high plank. Once you can hold 30-45 seconds with a quiet pelvis, start adding partial walk outs.
Standard Walk Out
Walk from standing to a full high plank, pause briefly, then walk back. Keep the rep slow enough that each hand placement feels deliberate.
Walk Out with Push-Up
Add one push-up at the plank before walking back. This turns the drill into a stronger bodyweight pressing challenge.
Walk Out to Shoulder Tap
At the plank, tap each shoulder with the opposite hand before returning. The single-arm balance raises the anti-rotation demand.
Burpee
Move from a walk out to a higher-speed conditioning pattern once the plank entry is clean. Step-back burpees are the better bridge if jumping feels too abrupt.
When to Avoid or Modify Walk Outs
Walk outs are safe for most healthy adults, but a few conditions call for a shorter range, a higher surface, or a temporary swap. Always consult your physician or physical therapist for personalized guidance.
- Wrist pain or carpal tunnel. Floor walk outs load the wrists in extension. Modify with push-up handles, dumbbell grips, fists, or high-incline walk outs against a sturdy bench or counter.
- Acute shoulder impingement or rotator cuff irritation. The high plank can aggravate irritated shoulders. Use a shorter hand walk, keep the shoulders active, or regress to hand planks on an elevated surface until symptoms settle.
- Recent shoulder, wrist, or elbow surgery. Get clearance from your surgeon before returning to loaded hand positions. Most progressions rebuild through isometrics, wall-supported work, then elevated plank positions.
- First 6-8 weeks postpartum or active diastasis recti. The plank position demands deep-core engagement. Start with deadbugs and bird-dogs, then use wall or incline walk outs only when you can brace without doming or coning.
- Lower-back pain that worsens with bracing. If your hips sag and cueing does not fix it, the lever is too long. Rebuild with forearm planks, deadbugs, and shorter partial walk outs.
- Very tight hamstrings or calves. If reaching the floor forces your pelvis to tuck hard, bend your knees on the descent and ascent. Keep the mobility challenge mild so the main training effect stays in the plank.
Related Exercises
If walk outs are part of your routine, these movements build the same pressing, plank, and bracing pattern:
- Same muscle group (push): Push-Ups, Chest Press, and Chest Fly train the same chest, shoulder, and tricep pattern with different loading options.
- Tricep-focused progression: Diamond Push-Ups and Bench Dips increase upper-body pressing demand after the walk out feels easy.
- Shoulder-focused progression: Pike Push-Ups shift the bodyweight pressing angle toward the shoulders.
- Core foundation: Hand Planks, Forearm Planks, Deadbugs, and Bird-Dogs build the brace that keeps walk outs clean.
- Advanced chest variation: Pseudo Planche Push-Up increases wrist, chest, and anterior-deltoid loading for advanced bodyweight pressing.
How to Program Walk Outs
Walk out programming follows the same progressive resistance-training principles used for bodyweight pressing. The American College of Sports Medicine position stand recommends matching volume, rest, and frequency to training level, then progressing only when technique holds (Ratamess et al., 2009).
| Level | Sets × Reps | Rest between sets | Frequency |
|---|---|---|---|
| Beginner (partial or incline) | 2-3 × 5-10 | 60-90 seconds | 2-3 sessions/week |
| Intermediate (full floor) | 3-4 × 6-10 | 60-90 seconds | 2-4 sessions/week |
| Advanced (push-up or shoulder tap) | 3-5 × 5-8 | 90-120 seconds | 3-4 sessions/week |
Where in your workout: Use walk outs early in an upper-body or full-body session when the wrists, shoulders, and core are fresh. They also work as a dynamic warm-up before pressing exercises, or as a controlled core finisher after heavy lifts.
Form floor over rep targets: stop the set when the plank line breaks. Sagging hips, swaying hips, curled fingers, or a rushed walk back all mean the useful reps are done.
How FitCraft Programs This Exercise
Knowing how to do a walk out is step one. Knowing where it fits, how many reps to use, and when to progress is where most people get stuck.
FitCraft's AI coach Ty uses your assessment to place bodyweight pressing and core stability work inside a balanced program. Walk outs can fit as a warm-up drill, a core exercise, or a bodyweight pressing progression depending on your level and available equipment.
As you get stronger, Ty adjusts the variation and volume to match your level. Partial walk outs can become full walk outs, then push-up or shoulder-tap variations when your plank stays clean. Every program is designed by an Ivy League-trained exercise scientist and NSCA-certified strength coach using evidence-based periodization, then adapted to you by the AI.
Frequently Asked Questions
What muscles do walk outs work?
Walk outs train the rectus abdominis, transverse abdominis, obliques, chest, anterior deltoids, triceps, serratus anterior, glutes, and hamstrings. The core works hardest during the hand walk and plank pause because it has to resist spinal extension and hip sway.
Are walk outs hard?
Walk outs are intermediate to advanced because they combine a forward fold, wrist-loaded hand walking, and a high plank. Beginners can start with partial walk outs or hand plank holds before working toward the full standing-to-plank version.
Do walk outs build abs?
Walk outs build functional abdominal strength by training the abs to resist extension and rotation while your hands move. They are better for bracing and plank control than for high-rep abdominal burn.
How often should I do walk outs?
Most people do well with walk outs 2-3 times per week, using 2-4 sets of controlled reps. Put them early in a bodyweight push or full-body warm-up, or use them as a core finisher when your shoulders and wrists still feel fresh.
Can I do walk outs with wrist pain?
Floor walk outs load the wrists in extension. If that position causes pain, modify with push-up handles, dumbbell grips, fists, or a high-incline hand walk against a stable bench or counter. If wrist pain persists after those changes, see a physical therapist or occupational therapist before progressing.