Calf hops are exactly what they sound like. Small, quick hops powered entirely by your calves. You stay on the balls of your feet, your knees barely bend, and the movement comes from your ankles snapping open and closed. Simple concept. Don't confuse simple with easy.
What makes calf hops worth your time is the stretch-shortening cycle. When you land, your calf muscles stretch quickly under load. When you immediately push off again, that stretch stores elastic energy and releases it, generating more force than a slow, deliberate calf raise ever could. So whether you're sprinting, jumping, or just walking up stairs, your push-off gets more explosive.
The catch? Your Achilles tendon takes the brunt of the impact. Calf hops are a tendon-loading exercise as much as a muscle-building one. Great for tendon health when programmed correctly. A fast track to tendinitis when overdone. So this guide covers the form, the mistakes, and the programming that keeps your calves growing and your Achilles intact.
Quick Facts: Calf Hops
- Equipment needed: None
- Difficulty: Intermediate
- Modality: Plyometric / Conditioning
- Body region: Lower body (calves, ankles)
- FitCraft quest category: Cardio
Muscles & Systems Worked
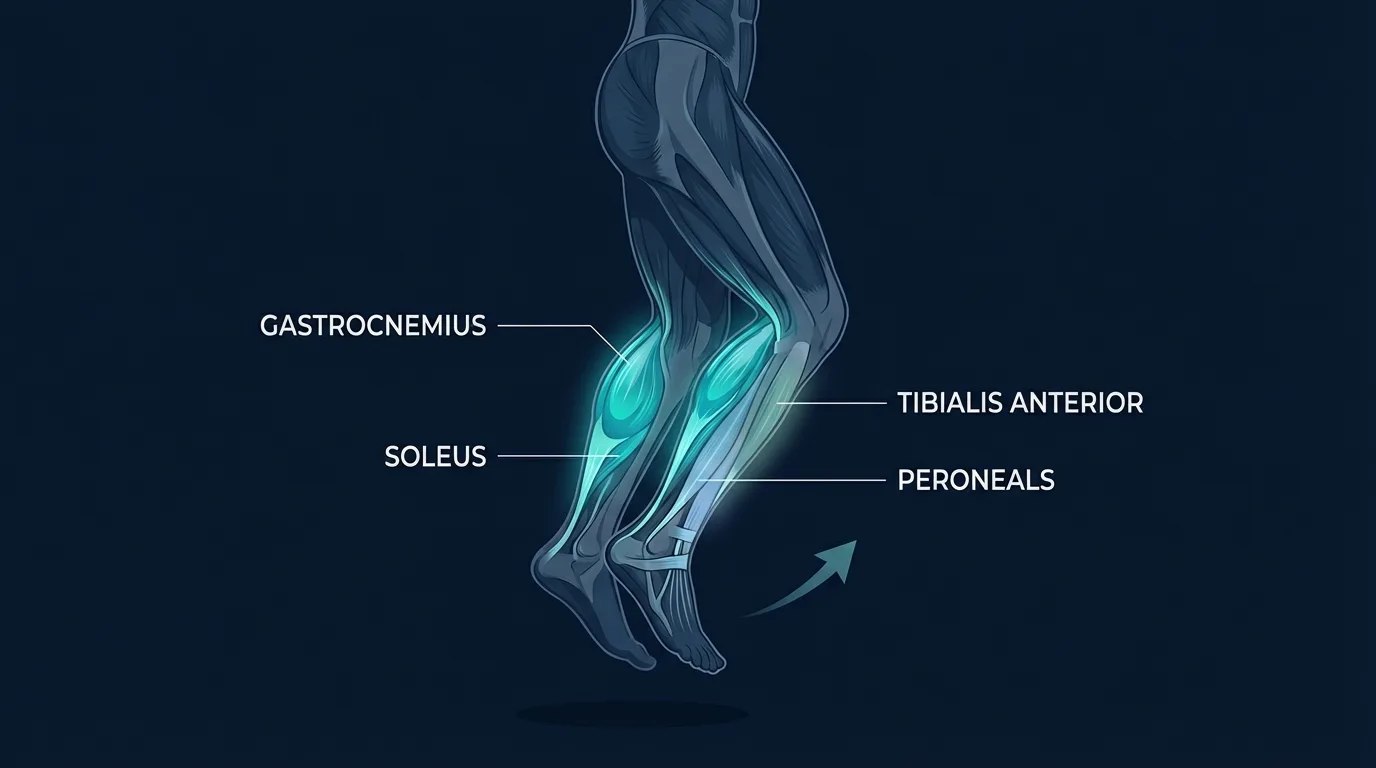
Primary movers: the gastrocnemius (the larger two-headed calf muscle that crosses both knee and ankle) and the soleus (the deeper, single-joint calf muscle under the gastroc). Both fire concentrically to extend the ankle and launch you off the ground, and both fire eccentrically on landing to absorb the impact. The eccentric phase is where the elastic energy gets stored and reused for the next rep.
Secondary movers: the tibialis anterior (front of the shin, decelerates the foot on landing and helps re-cock the ankle for the next rep), the peroneal muscles (outer shin, prevent the ankle from rolling outward), and the small intrinsic foot muscles that grip and stabilize each landing.
Stabilizers: the core (rectus abdominis, transverse abdominis, obliques) holds the trunk upright so you don't waste energy wobbling on each landing; the glutes keep the hips from collapsing inward; and the cardiovascular and energy systems work in the background, primarily the phosphocreatine system for short sets and the glycolytic system as rep counts climb past 20.
The stretch-shortening cycle mechanism: what makes calf hops different from calf raises is that they exploit the elastic properties of the Achilles tendon and gastrocnemius fascia. When you land, the calf-Achilles unit stretches rapidly under load, storing elastic energy like a compressed spring. If you bounce back up within the first ~250 milliseconds of ground contact, that stored energy gets released and adds to the force your muscles generate, producing a more powerful push-off than a slow, deliberate concentric contraction could on its own. Avrillon et al. (2020) found that six weeks of plyometric calf training measurably increased gastrocnemius medialis fascicle length and ankle stiffness, both of which improve power output and reduce injury risk on the running stride.
How to Do Calf Hops (Step-by-Step)
The cues below apply to standard two-foot calf hops. Single-leg and traveling variations use the same pattern with more load and less stability margin.
Step 1: Set Your Stance
Stand with feet hip-width apart on a flat, firm surface. Shift your weight forward onto the balls of your feet. Arms relaxed at your sides or hands on your hips. Look straight ahead.
Coach Ty's cue: "Weight on the balls of your feet before the first hop. Heels are along for the ride, not driving the bus."
Step 2: Rise Onto Your Toes
Push through the balls of your feet and rise up as high as you can, fully extending your ankles. Your knees stay almost straight, just a very slight bend to avoid locking them. This is your starting position.
Ty's cue: "Full ankle extension at the top. If your ankles aren't fully extended, you're leaving range of motion on the table."
Step 3: Hop Off the Ground
From the top of that calf raise, push off with a quick, bouncy hop. You only need to leave the ground by one to two inches. The height is minimal. Speed is what matters.
Ty's key cue: "Think fast feet, not high hops. Imagine the floor is hot and you want to spend as little time touching it as possible."
Step 4: Land on the Balls of Your Feet
Land softly on the balls of your feet. Let your heels dip toward the floor but don't let them touch. You'll feel a quick stretch through your calves on landing. That stretch is loading the elastic energy for your next hop.
Ty's cue: "Heels hover, never tap. The moment your heels hit the floor, the spring is gone."
Step 5: Bounce Immediately into the Next Rep
As soon as you land, spring back up. Minimize the time your feet spend on the ground. The movement should feel springy and rhythmic, like bouncing a ball.
Ty's reminder: "Brace your core like someone's about to tap you on the stomach. A loose trunk wastes energy on every landing."
Get this exercise in a personalized workout
FitCraft, our mobile fitness app, uses its AI coach Ty to program conditioning work like this into your plan at the right volume and intensity, based on your level, goals, and equipment. Ty was designed and trained by Domenic Angelino, MPH (Brown University) and NSCA-CSCS, with research published in the Journal of Strength and Conditioning Research and Medicine & Science in Sports & Exercise.
Take the Free Assessment Free · 2 minutes · No credit card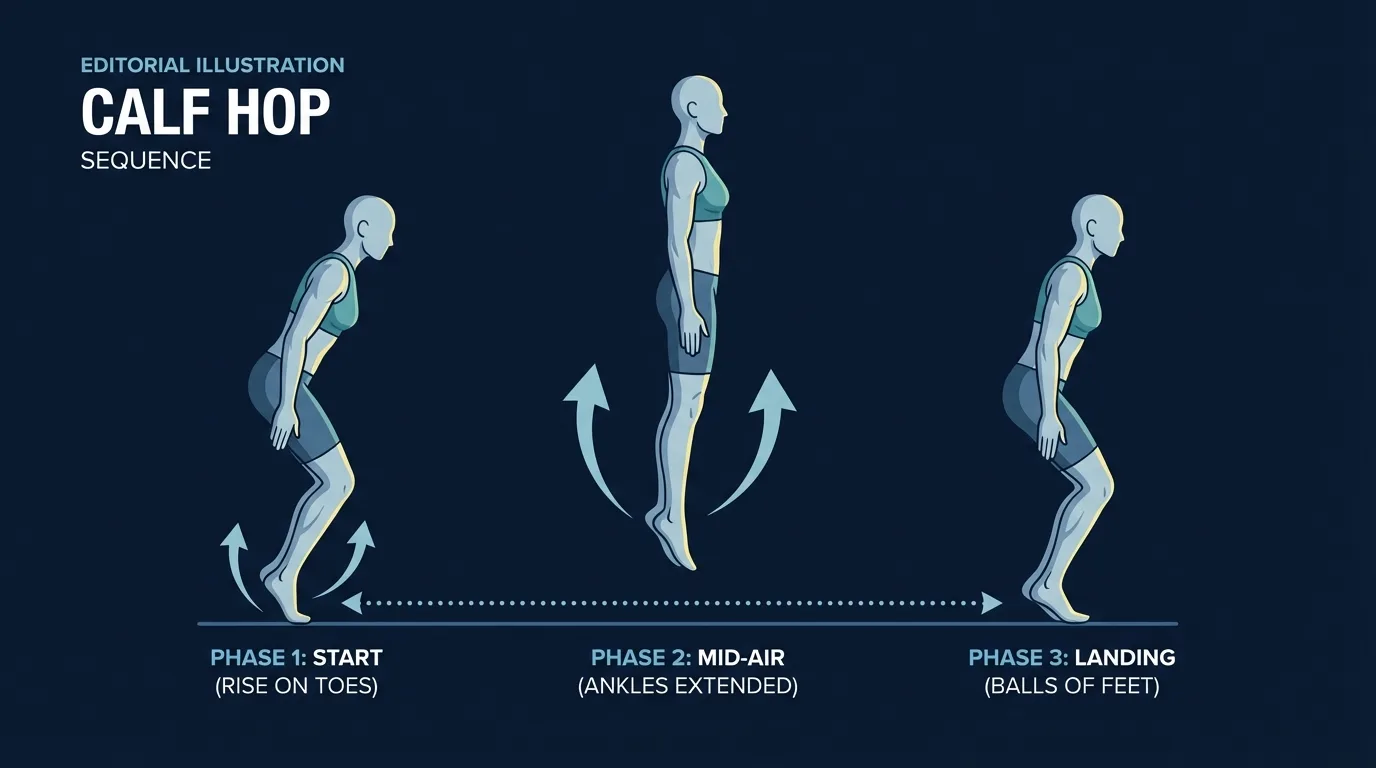
Common Mistakes (and How to Fix Them)
Calf hops look easy. That's exactly why people get sloppy with them. And sloppy calf hops can lead to real Achilles problems. Here are the mistakes Ty corrects most often.
- Letting your heels touch the ground. The most common mistake by far. When your heels drop to the floor between reps, you kill the stretch-shortening cycle and turn the exercise into disconnected calf raises. Fix: keep your heels hovering just above the ground on every landing. If they keep sinking, your calves are done. End the set.
- Too much knee bend. If your knees are bending significantly on each hop, you're using your quads and glutes to jump instead of your calves. Fix: think of your legs as stiff springs. The flex happens at the ankle, with maybe 10 to 15 degrees of knee softness, no more.
- Hopping too high. Calf hops aren't box jumps. You should leave the ground by one to two inches at most. Going higher means longer ground contact time and less plyometric training effect, plus more impact force on the Achilles for zero added benefit.
- Going too long without rest. Your calves and Achilles tendon fatigue quickly during plyometric work. Pushing through sloppy reps with sinking heels and slow ground contact just trains bad movement patterns. Fix: stop when the bounce feels sluggish, even if you're short of your target reps.
- Skipping the warm-up. Cold calf muscles and a cold Achilles tendon are more prone to strains. Fix: do two minutes of light calf raises and ankle circles before your first set of calf hops.
- Hard surface, no shoes. Calf hops on concrete in bare feet load the Achilles much more than the same hops on a wood floor or thin mat in cushioned shoes. Fix: do them on a firm but slightly forgiving surface (gym floor, rubber mat, grass), and wear shoes with at least some heel cushioning.
Calf Hop Variations: Regressions and Progressions
Start where you are and progress when your form is solid at the current level.
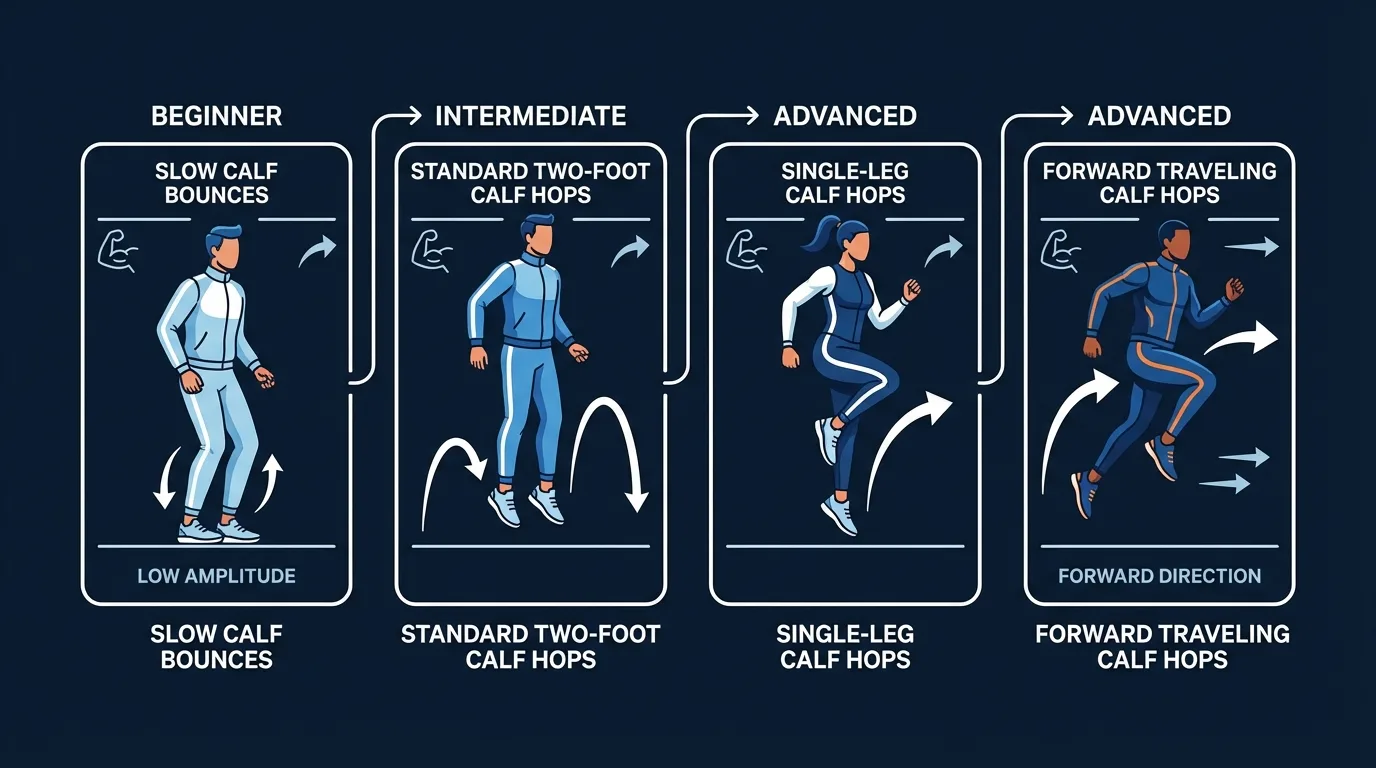
Slow Calf Bounces (Beginner Regression)
Same movement but at half speed with lower height. Focus on staying on the balls of your feet and maintaining rhythm rather than speed. Your feet may barely leave the ground. That's fine. This builds the ankle strength and tendon tolerance needed for full-speed calf hops. Once you can do 3 sets of 20 with your heels never touching, progress to full speed.
Standard Two-Foot Calf Hops (Intermediate)
The version described above. Both feet, full speed, minimal knee bend, quick ground contact. Once you can do 3 sets of 20 with crisp landings and no heel taps, progress to single-leg or traveling variations.
Single-Leg Calf Hops (Advanced Progression)
Perform calf hops on one foot at a time. This doubles the load on each calf and demands significantly more ankle stability. Hold the opposite foot behind you or in front. Start with 10 reps per leg and build from there. Only attempt this when your two-foot calf hops feel solid and rhythmic.
Forward Traveling Calf Hops (Advanced Progression)
Instead of hopping in place, travel forward with each hop. Cover about 3 to 6 inches per rep. This adds a horizontal force component that challenges your calves differently and mimics the push-off phase of sprinting. Useful for runners and field-sport athletes.
When to Avoid or Modify Calf Hops
Calf hops are safe for most healthy adults who already have a base of ankle strength, but a few conditions call for modification or substitution. None of these are permanent restrictions. They're starting points. Always consult your physician or physical therapist for personalized guidance.
- Achilles tendinopathy or recent calf strain. Plyometric loading is the single fastest way to flare up an irritated Achilles. While the tendon is symptomatic, swap calf hops for slow eccentric heel drops or isometric calf raises, both of which load the tendon under control without impact. Reintroduce calf hops only after pain-free single-leg calf raises and physical therapist clearance.
- Acute knee, ankle, or hip injury. Repeated landings transmit impact up the kinetic chain. With an acute joint injury, substitute non-impact alternatives like seated calf raises, marching in place, or pool calf work. See a physical therapist before adding plyometrics back.
- Plantar fasciitis or active heel pain. Bouncing on the forefoot increases tension on the plantar fascia. Stick with non-impact calf raises, gentle stretching, and physical therapy until symptoms resolve.
- Pregnancy (especially second and third trimester). Relaxin-driven joint laxity raises the risk of an awkward landing. Substitute low-impact movements like seated calf raises, marching in place, or pool walking. Get clearance from your OB before reintroducing plyometric work.
- First 12 weeks postpartum or active stress incontinence. Jumping movements load the pelvic floor and can trigger leakage if recovery isn't complete. Work with a pelvic-floor PT before any plyometric program. In the meantime, use calf raises and slow eccentric heel drops to maintain calf strength without the impact.
- Vertigo or balance disorders. Repeated landings can provoke symptoms and increase fall risk. Substitute seated or supported calf work and consult your physician.
- Cardiovascular conditions. Plyometric sets spike heart rate quickly. If you have hypertension or known cardiovascular disease, get cleared by your physician and stay within prescribed heart-rate zones.
Related Exercises
If calf hops are part of your routine, these movements complement or extend the same training pattern:
- Strength foundation (prerequisite): Calf Raises build the slow-twitch strength and tendon tolerance you need before adding the plyometric component. If 20 controlled single-leg calf raises feel hard, build there before progressing to calf hops.
- Lower-impact cardio alternative: High Knees elevate heart rate and train calf push-off with less Achilles loading per rep, useful when your tendon is feeling tender or you need a longer conditioning interval.
- Full lower-body plyometric: Jump Squats distribute the landing impact across quads and glutes alongside the calves, more metabolically demanding and less calf-specific. A natural next step once calf hops feel easy.
- Lower-impact substitute: Marching in Place keeps the cardiovascular stimulus and calf push-off without any impact, useful when your Achilles is feeling tender or on a recovery day.
- Ankle mobility and warm-up: Cross-Legged Ankle Stretch opens up the ankle joint and calf complex before plyometric work, useful as a warm-up pairing.
How to Program Calf Hops
Calf hops are plyometric, so they follow plyometric programming rules rather than standard strength templates. The American College of Sports Medicine (ACSM) Position Stand on resistance training notes that plyometric exercises should be programmed at lower volumes than concentric strength work, with longer recovery between sessions, and only after a base of strength has been established (Ratamess et al., 2009).
| Level | Sets × Reps | Rest between sets | Frequency |
|---|---|---|---|
| Beginner (slow bounces) | 2–3 × 15–20 | 60–90 seconds | 2 sessions/week |
| Intermediate (standard two-foot) | 3–4 × 15–20 (power) or 3 × 30–40 (endurance) | 60–90 seconds (power), 30–45 seconds (endurance) | 2–3 sessions/week |
| Advanced (single-leg, traveling) | 3–4 × 10–15 per leg | 90–120 seconds | 2–3 sessions/week |
Where in your workout: calf hops belong early in a lower-body or running session, when your calves are fresh and your Achilles is responsive. They also work well as a 2-3 set warm-up primer (10–15 reps at moderate effort) before a lower-body lift or run, where they prime the stretch-shortening cycle without creating fatigue. Don't program them after heavy squats or a long run, when your calves are already cooked.
Form floor over rep targets: the moment your heels start tapping the floor or your hops slow down, end the set. Plyometric quality depends on quick ground contact. Sloppy reps don't just waste training time, they train bad movement patterns and load the Achilles in exactly the wrong way.
How FitCraft Programs This Exercise
Knowing how to do a calf hop is step one. Knowing when to do them, how many reps, and when you're ready for single-leg or traveling variations is where most people get stuck.
FitCraft's AI coach Ty handles that. During your personalized diagnostic assessment, Ty maps your fitness level, training history, and goals. Then Ty builds a plan that slots calf hops in at the right variation and volume, with the right amount of recovery between sessions for your Achilles to adapt.
As you get stronger, Ty adjusts the variation and volume to match your level. Slow bounces become standard hops. Standard hops graduate to single-leg or traveling progressions. Volume scales with your recovery and consistency. Every program is designed by an Ivy League-trained exercise scientist and NSCA-certified strength coach using evidence-based periodization, then adapted to you by the AI.
Frequently Asked Questions
Can I do calf hops with Achilles tendon pain?
Not while the tendon is acutely painful. Calf hops are a plyometric tendon-loading exercise, and bouncing on an irritated Achilles can turn mild tendinopathy into a full strain or rupture. During the acute phase, swap to slow eccentric heel drops or isometric calf raises, both of which load the tendon without impact and are the standard starting point in physical therapy protocols. Reintroduce calf hops only when you can do 20 single-leg calf raises pain-free and your physical therapist clears the impact phase. If the pain has been there for more than two weeks, get an assessment before guessing.
What muscles do calf hops work?
Calf hops primarily target the gastrocnemius and soleus, the two main calf muscles. They also engage the tibialis anterior for ankle stability, the peroneal muscles along the outer shin, and the core for upright posture. Because they're plyometric, calf hops recruit fast-twitch muscle fibers that standard calf raises don't fully activate, and they specifically train the stretch-shortening cycle in the Achilles tendon.
How many calf hops should I do?
For reactive power: 3 to 4 sets of 15 to 20 reps with 60 to 90 seconds rest. For endurance and conditioning: 3 sets of 30 to 40 reps with shorter rest. Focus on maintaining quick ground contact and consistent hop height. When your heels start sinking to the floor between reps or the bounce feels sluggish, end the set.
Are calf hops good for runners?
Yes. Calf hops train the stretch-shortening cycle that mirrors every running stride. Research on plyometric calf training shows it improves running economy and reduces ground contact time, both of which translate to faster, more efficient running. Two to three sessions per week alongside your running program is a solid approach.
Can I do calf hops every day?
Not recommended. Calf hops create eccentric stress on your Achilles tendon and calf muscles that requires recovery. Allow at least 48 hours between sessions. Two to three times per week is optimal for most people. Daily plyometric calf work increases your risk of Achilles tendinitis and calf strains because the tendon adapts more slowly than the muscle.
What's the difference between calf hops and calf raises?
Calf raises are a slow, controlled strength exercise. Calf hops add a plyometric component: you leave the ground and use the stretch-shortening cycle for rapid, bouncy reps. Calf hops develop reactive power and fast-twitch fiber recruitment. Calf raises build raw strength and muscular endurance. Both have a place in a complete calf training program, and calf raises are the prerequisite for calf hops.