Most people skip ankle work entirely. Then they wonder why their squats feel wobbly, their balance is off, or why their knees complain every time they sit cross-legged. The cross-legged ankle stretch fixes a surprising amount of that with zero equipment and about three minutes of your day.
Quick Facts: Cross-Legged Ankle Stretch
- Equipment needed: None (folded blanket or yoga block optional for hip elevation)
- Difficulty: Beginner (elevated-hip version) to Advanced (double pigeon progression)
- Modality: Static stretching / mobility
- Body region: Lower body (outer ankle and outer hip)
- FitCraft quest category: Mobility
Areas Stretched & Mobilized
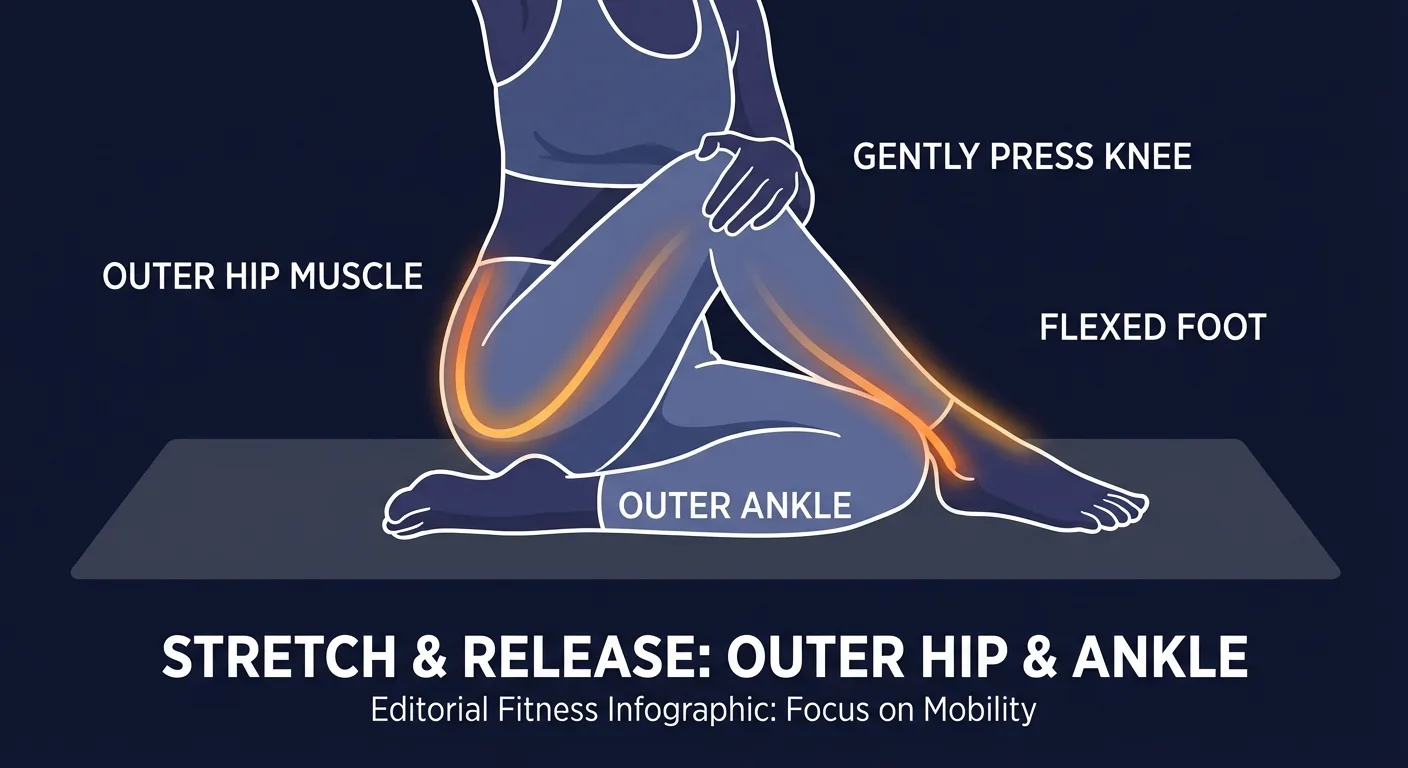
Primary areas: the peroneal muscles (peroneus longus and brevis) running along the outside of the lower leg, and the lateral ankle complex (the ligaments and connective tissue on the outer ankle that get short and stiff in people who wear supportive shoes all day). The crossed-leg position puts the foot in inversion and tibial external rotation, which loads exactly those tissues.
Secondary areas: the external rotators of the hip (piriformis, gemelli, obturator internus, and the posterior fibers of the gluteus medius). As the top knee is gently pressed toward the floor, the hip rotates externally and these deep rotators lengthen under low passive load.
What the rest of the body does: stretching usually does not require active stabilization, but this hold is the exception. The core supports a tall spine, the bottom-leg hip flexors and adductors quietly hold the seated position, and the active dorsiflexors of the top foot (tibialis anterior, extensor digitorum longus) fire isometrically to keep the foot flexed for the entire hold. That flexed-foot lock is what protects the knee.
Why this stretch matters mechanically: ankle inversion and eversion range are often the bottleneck for clean squat depth, single-leg balance, and lateral movement quality. Most of the day-to-day ankle work people do (or skip) targets the calves and dorsiflexion. The peroneals and lateral ankle structures get neglected, and the outer hip locks up alongside them after years of sitting. Working both in one position is what makes this stretch efficient. No specific high-quality EMG citation exists for this exact stretch, so the rationale here is mechanistic: passive end-range tissue loading is the dose for static stretching adaptations.
Step-by-Step: How to Do the Cross-Legged Ankle Stretch
- Sit tall on the floor. Start in a seated position with your legs extended, then bend your right knee and cross your right ankle over your left thigh, just above the knee. The outer edge of your ankle should rest on top of the thigh.
- Flex the top foot. This is the step everyone gets wrong. Pull your right toes back toward your shin and keep them there. A flexed foot protects the knee joint and sends the stretch into the ankle and outer hip.
Coach Ty's cue: "Pretend you're trying to show someone the bottom of your foot. Hold that tension for the whole stretch." - Lengthen your spine. Sit up tall through the crown of your head. Shoulders relaxed, chest open, eyes forward. If your lower back rounds, prop your hips up on a folded blanket or yoga block.
- Press the top knee gently. Rest your right hand lightly on your right knee and press it down toward the floor. Use gentle, even pressure. Go as far as a light pull and no further.
Coach Ty's cue: "About a pound or two of pressure. This isn't a wrestling match with your hip. Depth comes from weeks of holds, not from forcing one rep." - Hold and breathe. Hold for 20-30 seconds, breathing slowly and evenly. You should feel a stretch along the outside of the ankle and deep in the outer hip. Release, switch sides, and repeat 2-3 rounds per side.
Get this exercise in a personalized workout
FitCraft, our mobile fitness app, uses its AI coach Ty to program mobility work like this into your plan at the right volume and intensity, based on your level, goals, and equipment. Ty was designed and trained by Domenic Angelino, MPH (Brown University) and NSCA-CSCS, with research published in the Journal of Strength and Conditioning Research and Medicine & Science in Sports & Exercise.
Take the Free Assessment Free • 2 minutes • No credit card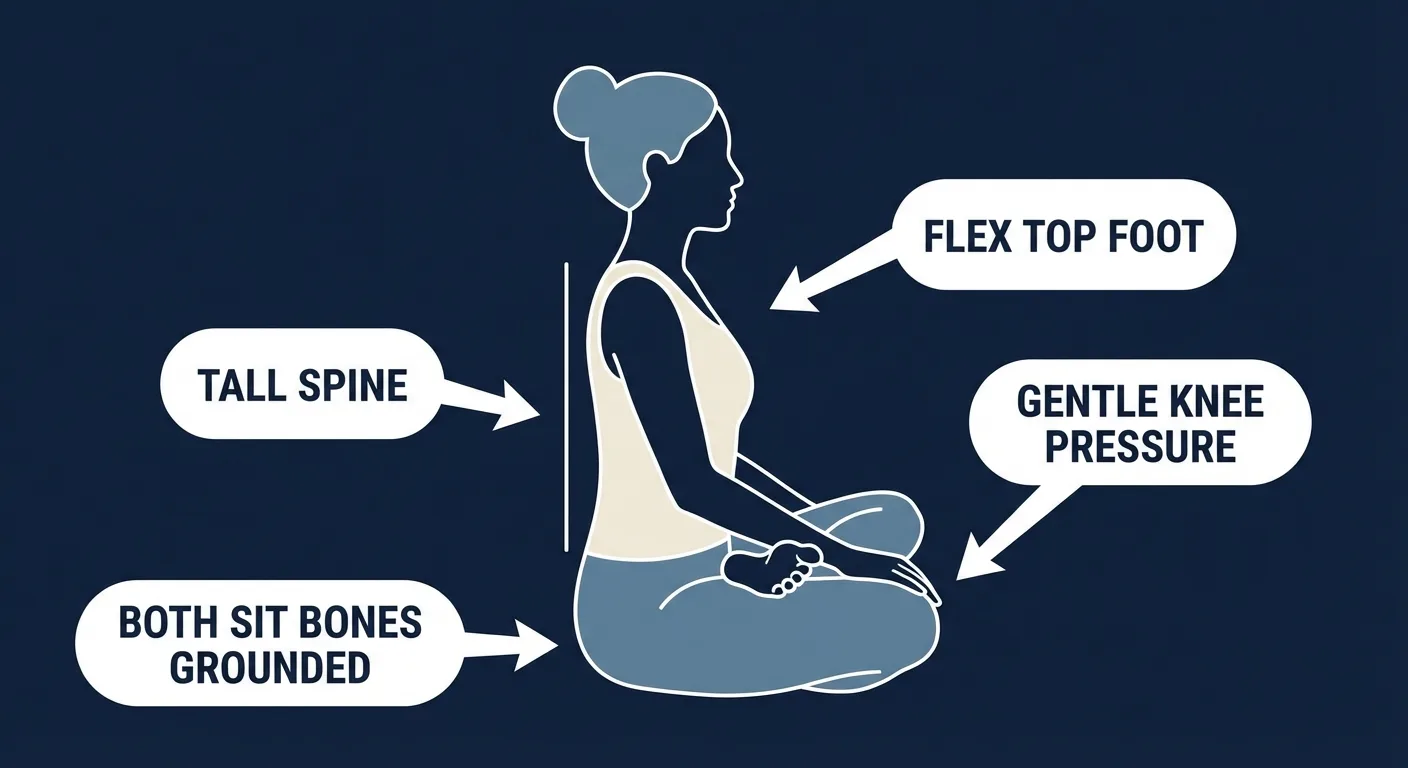
Common Mistakes (and How to Fix Them)
Pointing the Top Foot
What it looks like: The top foot hangs loose or points forward, and pressure lands on the side of the knee.
Why it's a problem: A pointed foot opens the knee joint up to lateral stress. You'll feel it as a pinching pain on the outside of the knee. That sensation is a warning sign, and you should back off immediately.
The fix: Actively flex. Pull your toes back toward your shin like you're trying to show someone the bottom of your foot. Keep that tension the entire hold.
Forcing the Knee Down
What it looks like: Cranking the top knee toward the floor with body weight or elbow pressure.
Why it's a problem: You'll feel a gentle stretch, then you'll force past it into actual strain. That's how minor hip flares turn into lingering outer-hip pain.
The fix: Rest your hand on the knee with maybe a pound or two of pressure. That's it. Over weeks of consistent holds, the knee will drop lower on its own.
Rounding the Lower Back
What it looks like: Spine collapses, shoulders slump forward, and the whole stretch turns into a tight back hunch.
Why it's a problem: You lose the hip stretch and trade it for a tired lower back. The whole point is to load the ankle and outer hip while the spine stays long.
The fix: Prop your hips up on something firm: a folded blanket, a yoga block, even a couch cushion. Elevating your hips just a few inches makes a tall spine effortless.
Holding Your Breath
What it looks like: You're squeezing the stretch and forgetting to breathe.
Why it's a problem: Breath-holding tenses the exact muscles you're trying to release. You'll feel tight for the full 30 seconds instead of letting the tissue settle.
The fix: Slow, steady nose breaths. Inhale for four counts, exhale for six. Let each exhale relax the hip a little more.
Variations
Easier (Regression)
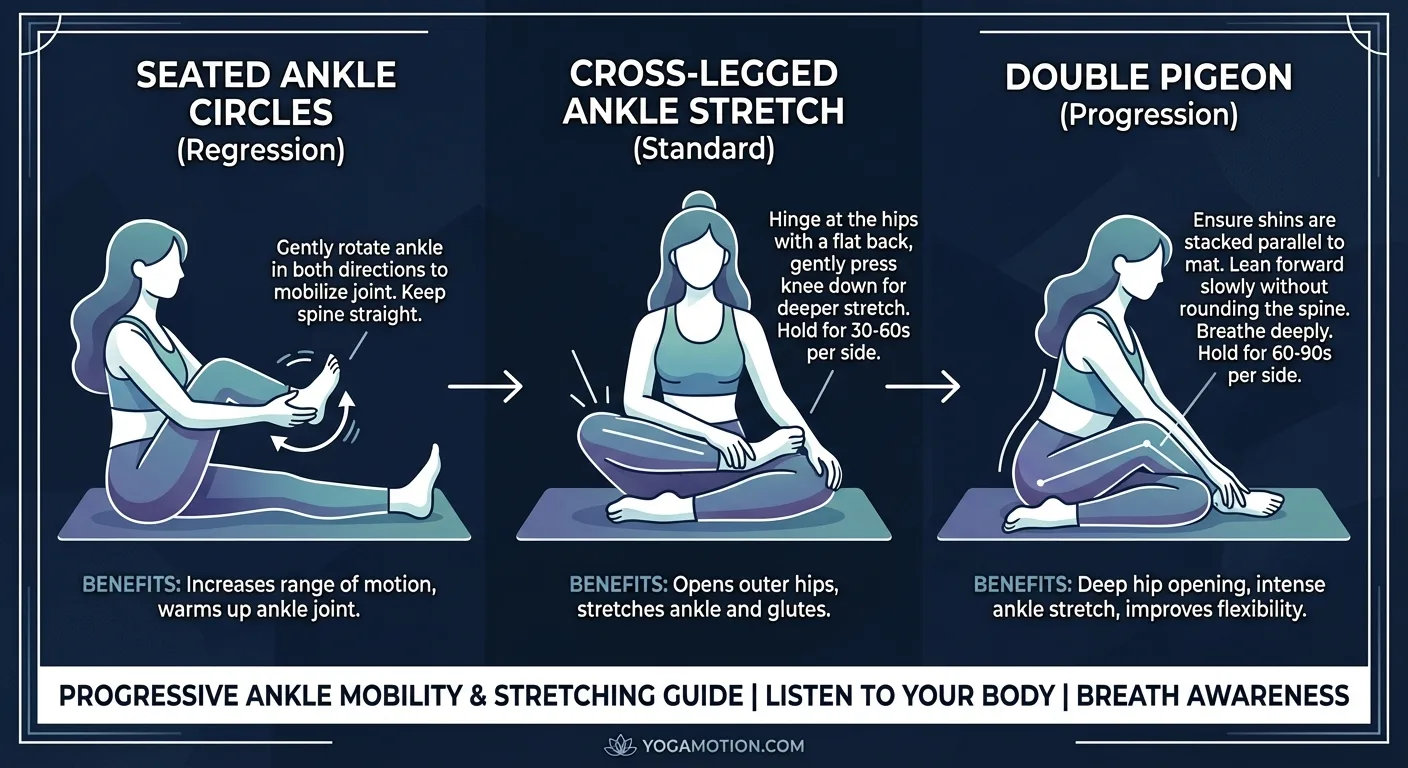
- Seated Ankle Circles. If sitting cross-legged is uncomfortable, sit in a chair and cross one ankle over the opposite knee. Draw slow circles with the top foot in both directions. Builds basic ankle mobility before loading a stretch.
- Elevated-Hip Version. Sit on a folded blanket or a yoga block 2-4 inches off the floor. The higher hip position tilts your pelvis forward, which makes a tall spine automatic and takes pressure off your lower back.
Harder (Progression)
- Forward Fold Variation. From the standard position, hinge forward at the hips with a long spine. The forward fold deepens the outer hip stretch significantly. Keep the top foot flexed the whole time.
- Double Pigeon (Fire Log). Stack your shins on top of each other instead of crossing one ankle over the thigh. A noticeably deeper hip opener that builds on the same movement pattern. Only attempt once the standard hold feels easy and your knees drop close to the floor without forcing.
Alternative Exercises
- Butterfly Pose. Soles of the feet together, knees out to the sides. Targets the inner thigh and hip more than the outer hip, but a great pair with this stretch.
- Supine Figure-4 Stretch. Same shape as the cross-legged ankle stretch, but lying on your back with the bottom leg lifted. Easier on the lower back and a good option if floor sitting is tough.
When to Avoid or Modify the Cross-Legged Ankle Stretch
The cross-legged ankle stretch is safe for most healthy adults, but a few conditions warrant modification or temporarily swapping to a different hip and ankle stretch. Always consult your physician or physical therapist for personalized guidance, especially before returning to mobility work after an injury.
- Acute knee injury or recent knee surgery. The crossed-leg position puts low-level rotational load through the knee. After meniscus injury, ligament repair, or any knee surgery, get cleared by your surgeon or PT before reintroducing this stretch. In the meantime, use the supine figure-4 stretch, which gives a similar outer-hip opening without loading the floor-side knee.
- Persistent lateral knee pain. Pain on the outside of the top knee almost always means the top foot is pointed instead of flexed. Re-cue the flexed foot first. If pain continues even with a properly flexed foot, drop the stretch and swap to the supine figure-4 or an external-rotation stretch performed standing.
- Acute ankle sprain or peroneal tendonitis. Stretching an actively irritated lateral ankle structure can prolong the healing window. Wait for acute symptoms to settle, then reintroduce gentle hip abductor stretches and pain-free ankle circles before returning to this hold.
- Hypermobility or Ehlers-Danlos. If your joints already move past normal end range, passive stretching can worsen instability and joint pain. Emphasize controlled active mobility instead (ankle circles in all four directions, active hip external rotation against light band resistance) and consult a PT with hypermobility expertise before adding end-range holds.
- Pregnancy (second and third trimesters). Relaxin loosens ligaments, which raises the risk of overstretching the sacroiliac joint and outer hip. Stay within a comfortable mid-range, skip the forward-fold and double-pigeon progressions, and prop your hips up on a block to keep the pelvis neutral.
- Lower-back pain that worsens in seated forward folds. If sitting cross-legged on the floor flares your lower back, prop your hips up on a folded blanket or two. If pain persists even with elevation, skip the floor version and use the supine figure-4 stretch instead while you build seated tolerance with cat-cow and spinal twist.
Related Exercises
If the cross-legged ankle stretch is part of your routine, these movements complement or extend the same mobility pattern:
- Same area, complementary direction: Hip Abductor Stretch targets the side of the hip from a different angle, balancing the deep external-rotator focus of this hold.
- Active mobility pairing: Cat-Cow and Spinal Twist mobilize the spine and pelvis, which makes seated stretches like this one easier to hold with a tall back.
- Inner-hip counterbalance: Butterfly Pose and Butterfly Reach open the inner thigh and adductors, the opposite line from the outer-hip work this stretch does.
- Same exercise family, deeper progression: Z-Sit is the natural next step once the standard cross-legged hold feels easy. It stacks internal and external rotation at the hips in one position.
- What this stretch prepares you for: Sumo Squats, Jump Squats, and any squat or lunge variation benefit from better ankle and external-hip range. Half-Kneeling Triplanar Stretch is a good standing-prep companion for the same goal.
How to Program the Cross-Legged Ankle Stretch
Mobility programming is different from resistance training. Frequency can be daily, sometimes multiple times a day, and total hold time matters more than sets and reps. The general resistance-training programming framework laid out by the American College of Sports Medicine (Ratamess et al., 2009) still applies in spirit: dose for the adaptation you want, and stay consistent across weeks. For static stretching specifically, ~60 seconds of total accumulated hold time per area per session is the conventional minimum dose for flexibility gains over 4-8 weeks.
| Level | Hold time per side | Sets per side | Frequency |
|---|---|---|---|
| Beginner (gentle range, elevated hips) | 15-30 seconds | 1-2 | 5-7 sessions/week |
| Intermediate (working into resistance) | 30-60 seconds | 2-3 | 5-7 sessions/week |
| Advanced (forward-fold or double-pigeon variation) | 30-90 seconds | 2-4 | Daily |
Where in your workout: use shorter holds (15-20 seconds) as part of a pre-workout dynamic mobility block before lower-body training. Long static holds right before heavy squats or jumps can transiently reduce force output, so save the longer 30-60 second holds for cool-down or standalone mobility sessions. As a daily desk-worker reset, two or three rounds per side mid-afternoon takes under three minutes and offsets a lot of hip and ankle stiffness from sitting.
Form floor over rep targets: if you can't keep the top foot flexed for the whole hold, the stretch isn't working as intended. Re-cue the flexed foot or shorten the hold rather than grinding out a 60-second round with a sloppy foot. Quality range with a flexed foot beats deeper range with a pointed foot every time.
How FitCraft Programs This Exercise
Knowing how to do the cross-legged ankle stretch is step one. Knowing when to do it, how long to hold, and how to pair it with the rest of your mobility work is where most people get stuck.
FitCraft's AI coach Ty handles that. During your personalized diagnostic assessment, Ty maps your fitness level, goals, available equipment, and the areas you flag as tight. Then Ty builds a personalized program that slots mobility work like the cross-legged ankle stretch into warm-ups, cool-downs, and recovery flows at the right dose for your level.
As your mobility improves, Ty adjusts the variation and total hold time to match. Beginner-friendly elevated-hip holds become standard floor holds. Standard holds get paired with deeper progressions like the forward-fold variation when your range supports it. Every program is designed by an Ivy League-trained exercise scientist and NSCA-certified strength coach using evidence-based programming, then adapted to you by the AI.
Frequently Asked Questions
Can I do the cross-legged ankle stretch if my knee hurts?
Knee pain in this stretch almost always means the top foot is pointed instead of flexed, which lets the stretch load the knee ligaments instead of the ankle. Actively pull your toes back toward your shin throughout the hold. If the pain continues even with a flexed foot, reduce pressure on the knee, prop your hips up on a folded blanket, and work on basic ankle mobility first. If you have a known meniscus injury, recent knee surgery, or persistent lateral knee pain, swap to the supine figure-4 stretch and consult a physical therapist before returning to the floor version.
What areas does the cross-legged ankle stretch target?
The cross-legged ankle stretch targets the muscles and connective tissue around the outside of the ankle, including the peroneal muscles, along with the outer hip rotators like the piriformis and gluteus medius. It improves ankle mobility (especially inversion and eversion range) and hip external rotation in a single position.
How long should I hold the cross-legged ankle stretch?
Hold each side for 20-30 seconds and repeat 2-3 times. The mainstream guidance is that roughly 60 seconds of total hold time per area per session is enough to drive flexibility gains over several weeks of consistent practice. Longer holds (up to 60 seconds per round) work too if you have the time.
Is this stretch safe for beginners?
Yes. The cross-legged ankle stretch is a beginner-friendly floor stretch as long as you keep pressure light and the top foot flexed. If sitting cross-legged on the floor feels uncomfortable, prop your hips up on a folded blanket or yoga block. That single change makes a tall spine effortless and takes pressure off the lower back.
Can this stretch help with plantar fasciitis?
The cross-legged ankle stretch can contribute to better overall ankle mobility, which may indirectly help with plantar fasciitis symptoms. Most clinical protocols for plantar fasciitis combine calf stretching, plantar fascia-specific stretches, and calf strengthening. Use this stretch as part of a broader mobility routine, not a stand-alone fix.
Should I do this before or after a workout?
Both work. As a pre-workout move, keep the holds short (15-20 seconds) and pair with dynamic ankle circles so you don't blunt force output. As a cool-down or standalone mobility session after training, longer holds (30-60 seconds) are ideal because the tissue is warm and more receptive to range gains.