Most core exercises give your abs one job at a time. The deadbug crunch gives them two at once: hold a small curl of your head and shoulders, and keep your lower back flat on the floor while one leg lowers away from you.
That double demand is what makes it hard. The curl never rests for the whole set, and the lower each leg goes, the harder it is to keep your back down.
The floor does the coaching for you. If your lower back peels away from it, you know the exact moment your bracing gave out.
Quick Facts: Deadbug Crunch
- Equipment needed: None
- Difficulty: Expert, as rated in the app
- Modality: Core
- Body region: Core
Muscles Worked
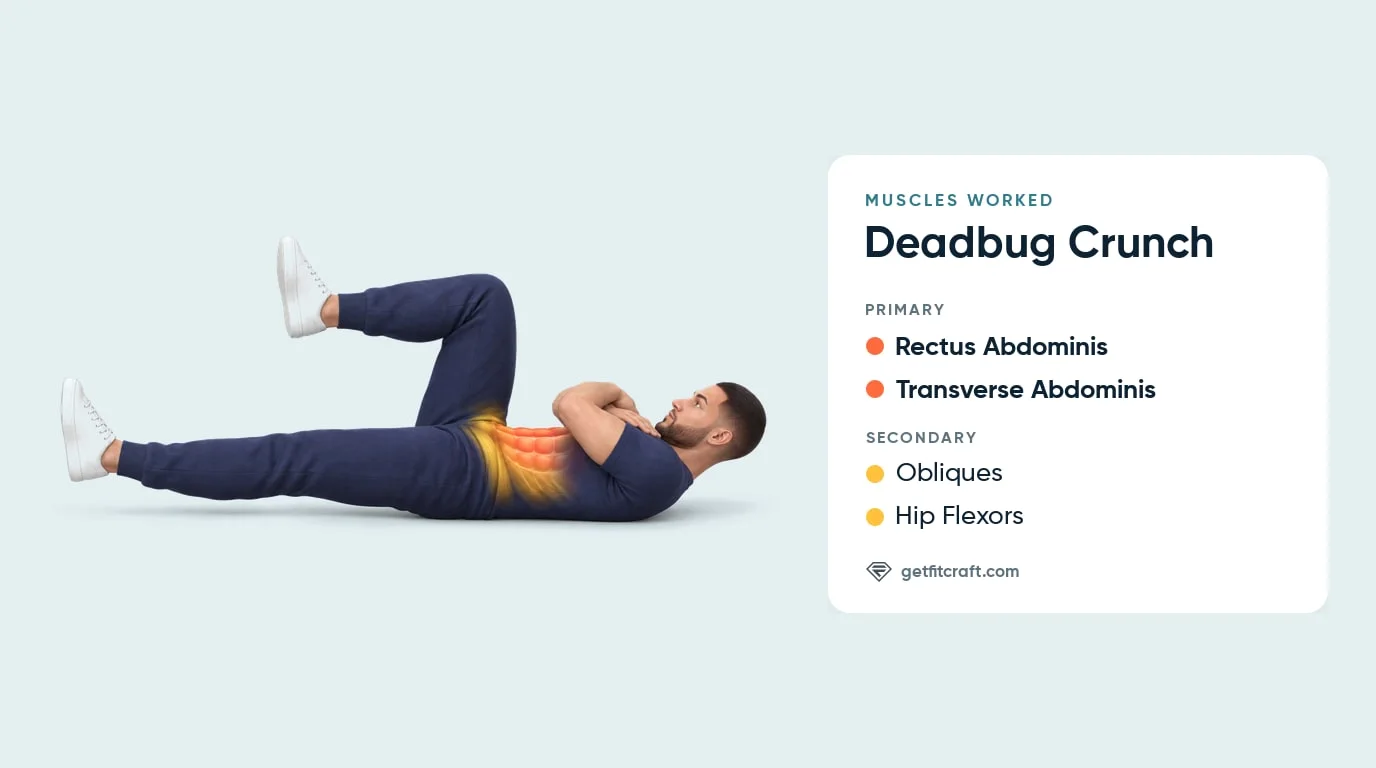
Primary muscles: the rectus abdominis and the transverse abdominis. The rectus abdominis (the long muscle down the front of your stomach) curls your head and shoulders up and holds them there for the whole set, and it stops your lower back from arching as each leg lowers. The transverse abdominis (the deepest abdominal layer, which wraps around your waist like a belt) tightens to hold your lower back flat and still on the floor.
Secondary muscles: the obliques and the hip flexors. The obliques, along the sides of your waist, help the rectus abdominis hold the curl and keep your hips level so they do not rock as one leg moves. The hip flexors (the muscles at the front of your hips) lower the straightened leg under control, hold it hovering and lift it back, while the other hip keeps the bent leg up over the hip.
Why the combination works: the curl and the leg work load your abs at the same time. Holding your head and shoulders up keeps the rectus abdominis working for the whole set. As each straightened leg lowers, its weight pulls on your pelvis and tries to arch your lower back, so your abs also have to hold the back flat while they hold the curl. That is why the deadbug crunch is harder than the regular deadbug, where your head rests on the floor.
Step-by-Step: How to Perform Deadbug Crunches
Own the regular deadbug first: 12 clean reps per side with your lower back flat on the floor. The deadbug crunch uses the same leg work and adds a small curl held for the whole set.
Step 1: Set Your Starting Position
Lie on your back on a mat and cross your arms over your chest, hands resting near your shoulders. Lift both legs so your hips and knees are bent about 90 degrees with the knees over your hips; a little more knee bend is fine.
Keep your arms crossed on your chest for the whole set. Never lace your hands behind your head, which makes it easy to pull on your neck.
Step 2: Flatten Your Back and Curl Up
Tighten your abs so your lower back rests flat on the floor; you should feel your waist tighten like a belt. Then curl your head and shoulders a few inches off the floor, keeping a small gap between your chin and chest. Hold this small curl for the whole set.
Lift only your head and shoulders; your lower back stays down. Curling until your shoulder blades just clear the floor is also fine, but never so high that your lower back lifts.
Step 3: Straighten and Lower One Leg
Holding the curl and keeping your lower back flat, straighten one leg and lower it slowly until it hovers a few inches above the floor. The other knee stays bent over your hip and your arms stay crossed.
The floor is your gauge: if your lower back starts to arch, you have lowered the leg too far, so stop it higher. Your heel never touches down.
Step 4: Hold, Then Bring It Back
Hold the leg there for a moment, up to a few seconds, then bring it back to the start. Your head and shoulders stay up; there is no extra crunch or reach to the knee between legs.
Keep a small gap between your chin and chest and never pull on your head or neck. If your neck tires, rest your head on the floor and keep going with the leg work; if your neck hurts, stop.
Step 5: Switch Sides
Repeat with the other leg, keeping the curl and your crossed arms in place, and alternate for equal reps at the same unhurried pace. Breathe out as the leg goes out and in as it comes back; never hold your breath.
Move slow and steady: about a second or two to lower the leg, and never let it drop. If your legs start swinging, slow down.
Get this exercise in a personalized workout
FitCraft, our mobile fitness app, uses an AI coach to program core stability work like this into your plan at the right volume and intensity, based on your level, goals, and equipment. Every FitCraft program is designed by Domenic Angelino, MPH (Brown University) and NSCA-CSCS, with research published in the Journal of Strength and Conditioning Research and Medicine & Science in Sports & Exercise.
Take the Free Assessment Free · 2 minutes · No credit card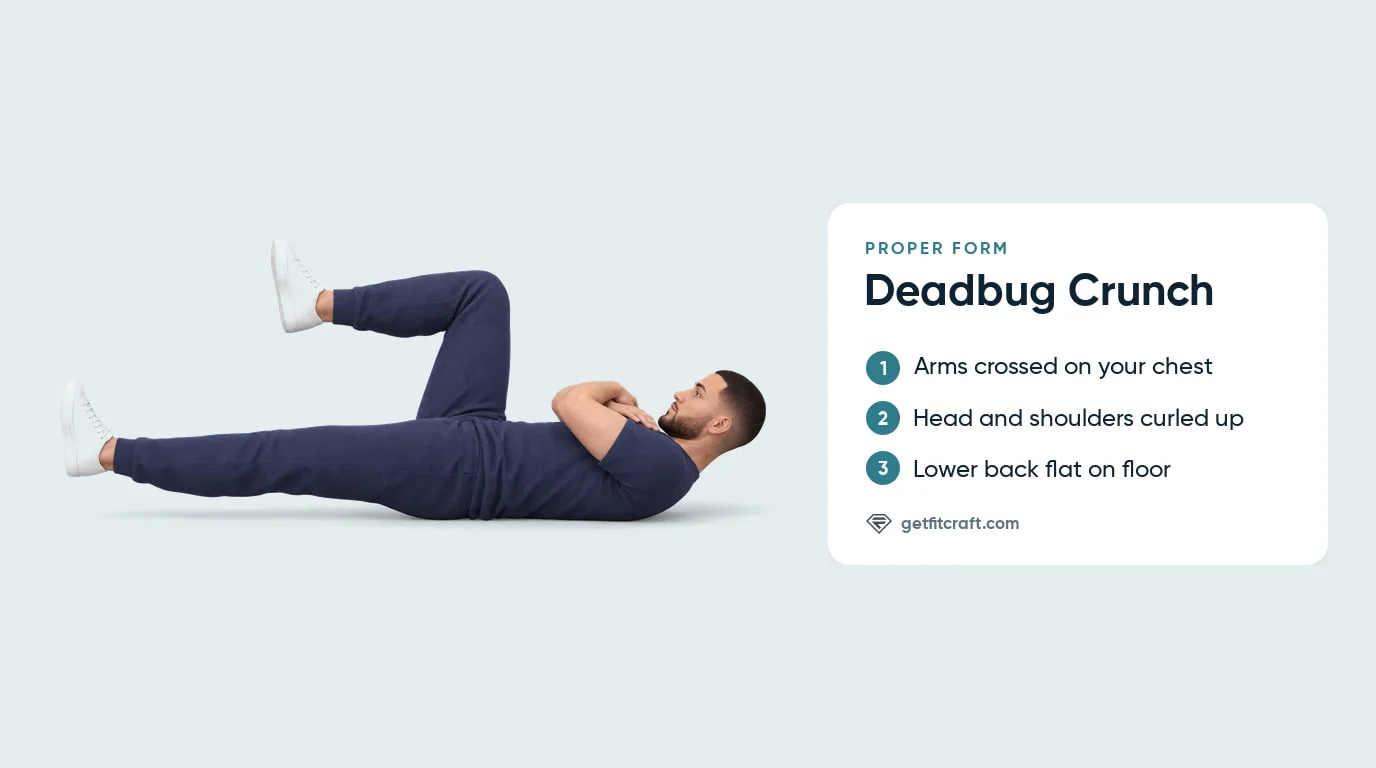
Common Mistakes (and How to Fix Them)
Watch for these mistakes.
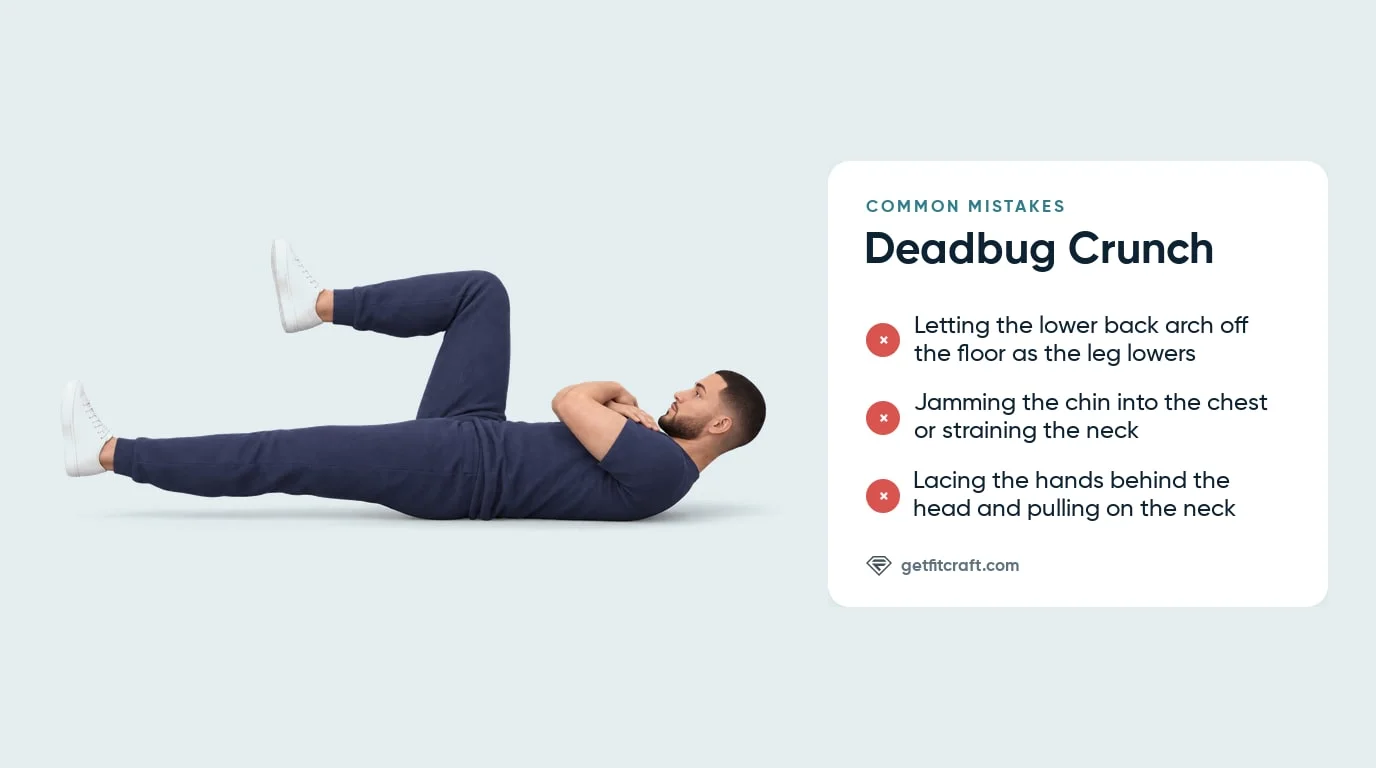
- Lower back arching as the leg lowers. The leg goes out, the pelvis tips, and a gap opens under your back. Fix: don't lower the leg as far, or keep a little bend in the moving knee, until you can hold floor contact.
- Straining the neck or jamming the chin into the chest. Leading the curl with the chin strains the neck. Fix: keep a small gap between your chin and chest, keep your arms crossed on your chest, and never lace your hands behind your head and pull.
- Rushing the rep or letting the leg drop. Fast, swinging reps let your back arch without your noticing. Fix: take about a second or two to lower the leg, hold it a moment, bring it back with the same control, and never let it drop.
- Holding your breath. Fix: breathe out as the leg goes out and in as it comes back, and keep breathing steadily while you hold your head and shoulders up.
- Curling up so high that the lower back lifts. This is a held curl, not a sit-up. Fix: only your head and shoulders come up, a few inches; your lower back stays on the floor.
Deadbug Crunch Variations: Regressions and Progressions
Start where you are and progress when your form is solid at the current level.
Regular Deadbug (Easier Version)
The same leg work with your head resting on the floor and your arms flat at your sides, so there is no curl to hold. This builds the base the deadbug crunch depends on. Twelve clean reps per side with constant floor contact is your entry ticket. The partial deadbug, which stops the leg about halfway down, is easier still.
Deadbug Crunch (Expert)
Arms crossed on your chest, head and shoulders held a few inches up for the whole set, legs alternating as in the deadbug. The app rates it Expert. Versions that reach an arm overhead or crunch a hand to the opposite knee between legs are different exercises from the one the app shows. Once 3 sets of 10 per side feel controlled from the first rep to the last, you're ready to make it harder.
Longer-Hold Deadbug Crunch (Harder)
Hold each straightened leg out a little longer, while your head, shoulders and lower back stay where they are. The longer hold makes the same position harder without adding a single rep.
Hollow Holds (Hollow-Body Progression)
A static hold: you lift your head, shoulders, straight arms and straight legs off the floor together into a long, shallow dish, with your lower back pressed flat. Like the deadbug crunch, it asks you to keep your back down while your head and shoulders are up, here with no rest between reps.
When to Avoid or Modify Deadbug Crunches
Deadbug crunches are safe for most healthy adults, but the held curl bends your upper spine and loads your neck, so a few conditions call for a doctor's or physical therapist's advice first. During any set, a burn in your abs is normal, but any pain in a joint, your lower back or your neck means stop. Always consult your physician or physical therapist for personalized guidance.
- Acute lower-back pain or known disc pathology. Skip deadbug crunches while your back hurts, or if you have been told to avoid bending your spine. See a doctor or physical therapist before you do them again, and ask them which exercises suit you. During any set, lower-back pain means stop.
- First 6-8 weeks postpartum or active diastasis recti. Get clearance from your doctor or a women's health physical therapist before you do deadbug crunches, and follow the plan they give you. If you see doming or coning along the middle of your stomach during the curl, stop.
- Recent abdominal surgery (C-section, hernia repair, appendectomy). Get clearance from your surgeon before you do deadbug crunches or any other crunch, and follow the plan they give you.
- Neck pain or a history of cervical issues. Holding your head up loads your neck for the whole set. Any pain in your neck during a set means stop. If your neck hurts or you have a neck condition, see a doctor or physical therapist before you do deadbug crunches, and ask them which exercises suit you.
- Pregnancy. Deadbug crunches are done lying on your back with a curl held up. Ask your doctor or midwife before you do them, and ask which exercises suit your stage of pregnancy.
- Hernia or pelvic-floor dysfunction. Ask your physician or a pelvic-floor physical therapist before you do deadbug crunches, and ask them which exercises suit you.
Related Exercises
If deadbug crunches are part of your routine, these movements complement or extend the same training pattern:
- Foundation pair: Deadbugs and the Partial Deadbug are the prerequisite versions, and staying strong at them keeps the crunch honest.
- Flexion family: Crunches, Reverse Crunches, and Bicycle Crunches train curling the spine as a movement, rep by rep, instead of holding a curl.
- Hands-and-knees sibling: Bird-Dog Crunches pair a reach with a crunch from your hands and knees: one arm and the opposite leg reach out, then the elbow and knee draw together under your chest.
- Static progressions: Hollow Holds and Forearm Planks convert the bracing skill into longer isometric efforts.
- Hip-flexor loaded challenge: Leg Raises push the anti-extension demand further as the legs travel through a bigger arc.
How to Program Deadbug Crunches
The American College of Sports Medicine (ACSM) Position Stand on resistance training recommends progressing volume and intensity gradually, and it says how often you should train depends partly on how well you recover (Ratamess et al., 2009). It gives no set and rep ranges for the deadbug crunch itself, so treat the table below as a practical starting point.
| Version | Sets × Reps | Rest between sets | Frequency |
|---|---|---|---|
| Easier: regular deadbug, head resting on the floor | 2-3 × 6-10 per side | 45-60 seconds | 2-4 sessions/week |
| Expert: deadbug crunch | 3 × 10-15 per side | 45-60 seconds | 3-5 sessions/week |
| Harder: deadbug crunch with a longer hold of each leg | 3-4 × 8-12 per side | 60 seconds | 4-6 sessions/week |
Where in your workout: put deadbug crunches at the end of a resistance session or in a dedicated core block. Pre-fatiguing the core before squats, deadlifts, or presses compromises the spinal stability those lifts depend on. A short, low-rep set also works as a warm-up activation drill to wake up the deep core before compound work, as long as you stop well short of fatigue.
Form floor over rep targets: if your last 2 reps of a set break form (back arching off the floor, chin jammed into the chest, legs dropping), stop the set there. Hitting a target rep count with broken form is worse than hitting fewer reps cleanly.
How FitCraft Programs This Exercise
Knowing how to do a deadbug crunch is step one. Knowing when your deadbug is clean enough to add the curl, how many reps to run, and when to hold each leg out longer is where most people get stuck.
FitCraft maps your level, goals, and equipment during the diagnostic and builds a plan around them. The app has a deadbug crunch exercise (rated Expert) beside the full deadbug (rated Expert) and the partial deadbug (rated Intermediate), and can include them in your plan.
Its 3D demonstration shows the arms crossed on the chest and the head and shoulders curled a little off the floor for the whole set, while the legs take turns straightening and lowering until each hovers just above the floor.
Frequently Asked Questions
How many deadbug crunches should a beginner do?
Start with 2 to 3 sets of 6 to 10 reps per side, two or three times per week. If your lower back lifts off the floor as the leg lowers, or your neck tires before the set ends, go back to regular deadbugs with your head resting on the floor until you can do 12 clean reps per side, then add the curl.
What muscles do deadbug crunches work?
The rectus abdominis and the transverse abdominis do most of the work, with the obliques and hip flexors helping. The rectus abdominis holds the small head and shoulder curl and, with the transverse abdominis, keeps your lower back flat while a leg lowers. The obliques along the sides of your waist help hold the curl and keep your hips level, and the hip flexors at the front of your hips lower the straightened leg and lift it back.
Are deadbug crunches better than regular crunches?
They train something different rather than something better. A regular crunch curls your head and shoulders up and back down. The deadbug crunch holds a small curl for the whole set while your legs take turns lowering, so your abs keep the curl and keep your lower back flat on the floor at the same time. No study has compared the two, so pick the one that fits your plan, or do both.
Should my lower back stay on the floor the whole time?
Yes. Gentle, constant contact between your lower back and the floor is the whole point of the deadbug base; only your head and shoulders come up. If the back arches while your leg lowers, don't lower the leg as far, or keep a little bend in the moving knee, until you can keep contact. The floor is your form coach: it tells you instantly when your bracing fails.
Can I do deadbug crunches with lower back pain?
Not while your back hurts. A burn in your abs is normal, but any pain in your lower back during a deadbug crunch means stop right away. If you have lower-back pain or a known disc problem, see a doctor or physical therapist before you do deadbug crunches, and ask them which exercises suit you.