The Reach-N-Lunge is a lunge pattern with an overhead reach. You step forward, lower under control, hold your arms high, then drive back to standing and switch sides. At a slow pace, it works well as a warm-up or mobility drill. At a faster pace, it becomes low-impact conditioning that raises heart rate without the landing stress of jump lunges.
The exercise asks for two things at once: lower-body control and honest overhead position. If your ribs flare, your lower back arches, or your front knee caves inward, the rep has stopped doing what you want. Shorten the range, slow down, or use the reverse version until the pattern feels clean.
Quick Facts: Reach-N-Lunges
- Equipment needed: None
- Difficulty: Beginner to advanced
- Modality: Conditioning, mobility, bodyweight strength
- Body region: Lower body, core, shoulders
- FitCraft quest category: Cardio
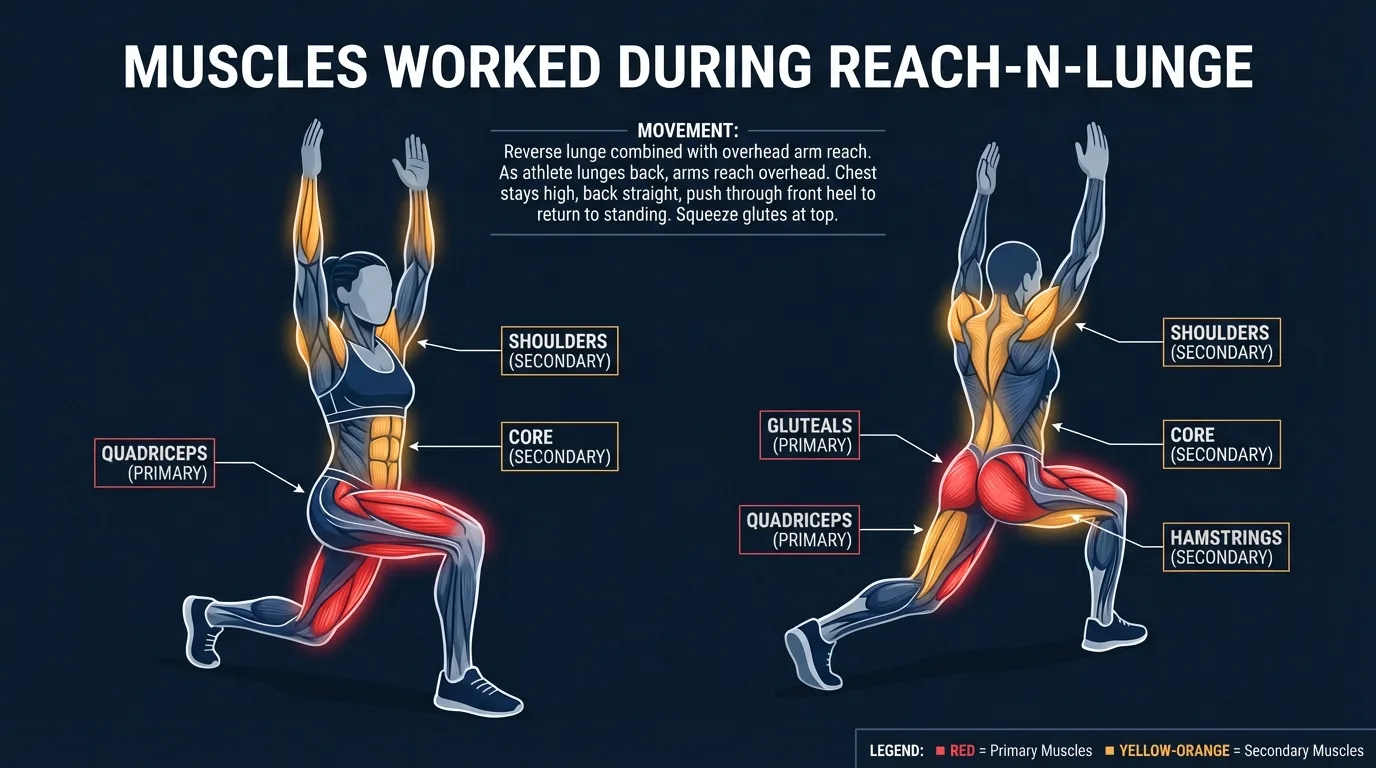
Muscles & Systems Worked
The primary movers are the quadriceps and gluteus maximus of the front leg. They control the lowering phase eccentrically and drive the return to standing concentrically. The back-leg hip flexors, especially the iliopsoas and rectus femoris, lengthen as you settle into the lunge.
The secondary movers include the hamstrings and calves, which help control the stride and foot position. The deltoids, serratus anterior, latissimus dorsi, lower trapezius, and rhomboids help maintain the overhead reach instead of letting the arms drift forward.
The stabilizers are the rectus abdominis, transverse abdominis, obliques, spinal erectors, gluteus medius, ankle stabilizers, and foot intrinsics. They keep the pelvis level, the knee tracking cleanly, and the torso stacked while your arms stay overhead.
The cardiovascular and metabolic systems work harder as tempo rises. Slow Reach-N-Lunges bias mobility and control. Alternating reps in intervals add glycolytic demand and raise heart rate, especially when the arms stay overhead the whole time. The mobility evidence is useful too: Ehresman et al. (2025) reported improved hip flexor length and single-leg broad jump distance after daily lunge-and-reach stretching in young healthy adults.
How to Do Reach-N-Lunges (Step-by-Step)
- Stand tall and reach overhead. Set your feet hip-width apart and extend both arms overhead with your biceps near your ears. Pull your ribs down so the reach comes from your shoulders and upper back, not from a lower-back arch. Coach Ty's cue: "Reach tall, ribs quiet."
- Step forward into the lunge. Take a controlled step forward and lower your hips straight down. Keep the front knee tracking over the second and third toes, and keep your torso upright instead of folding over the front thigh. Coach Ty's cue: "Knee follows toes."
- Pause with the arms still high. Hold the bottom for a brief count. Your front leg should feel loaded, your back hip should feel open, and your arms should still be stacked overhead. Coach Ty's cue: "Own the bottom."
- Drive back to standing. Press through the heel and midfoot of the front foot to return to the start. Avoid pushing off the back foot or dropping your arms as you stand. Coach Ty's cue: "Front leg brings you home."
- Alternate sides with control. Repeat on the other leg, breathing in as you lower and out as you stand. Build rhythm only after every rep stays aligned. Coach Ty's cue: "Smooth before fast."
Get this exercise in a personalized workout
FitCraft, our mobile fitness app, uses its AI coach Ty to program conditioning work like this into your plan at the right volume and intensity, based on your level, goals, and equipment. Ty was designed and trained by Domenic Angelino, MPH (Brown University) and NSCA-CSCS, with research published in the Journal of Strength and Conditioning Research and Medicine & Science in Sports & Exercise.
Take the Free Assessment Free · 2 minutes · No credit card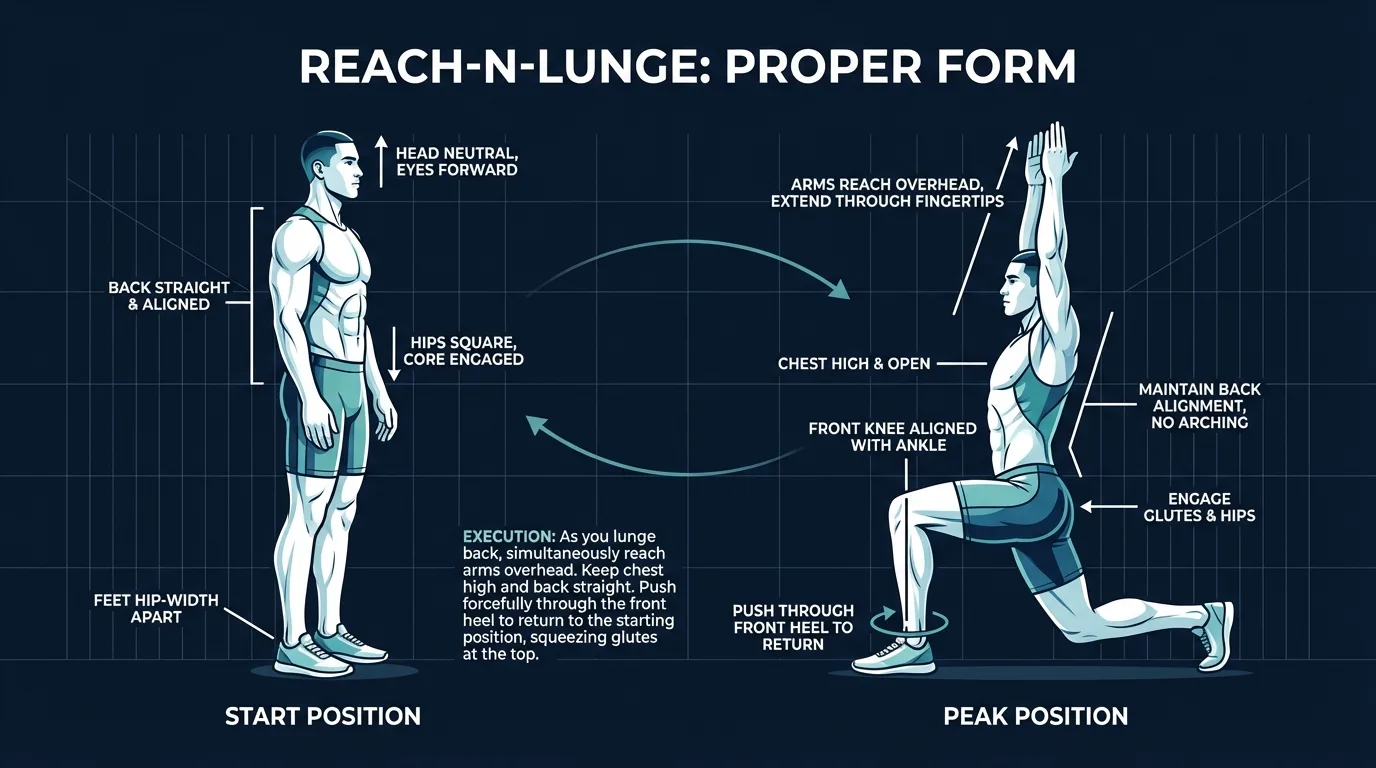
Common Mistakes to Avoid
- Arching the lower back. This usually means you're borrowing motion from the lumbar spine to fake the overhead reach. Pull the ribs down and lower the arms slightly if needed.
- Letting the front knee cave inward. A knee that dives toward the midline increases stress on the knee and makes the lunge less stable. Keep the knee pointed toward the second and third toes.
- Dropping the arms as the rep gets hard. The overhead position is part of the exercise. If the arms fall forward, slow down or take a rest.
- Overstriding. A step that's too long makes it hard to drive back through the front leg. Aim for a bottom position where the front shin is close to vertical.
- Bouncing out of the bottom. Use muscle control instead of momentum. Pause briefly, then press back to standing.
- Turning it into jump lunges too soon. The jump-switch progression belongs after you can land softly and keep the overhead reach clean.
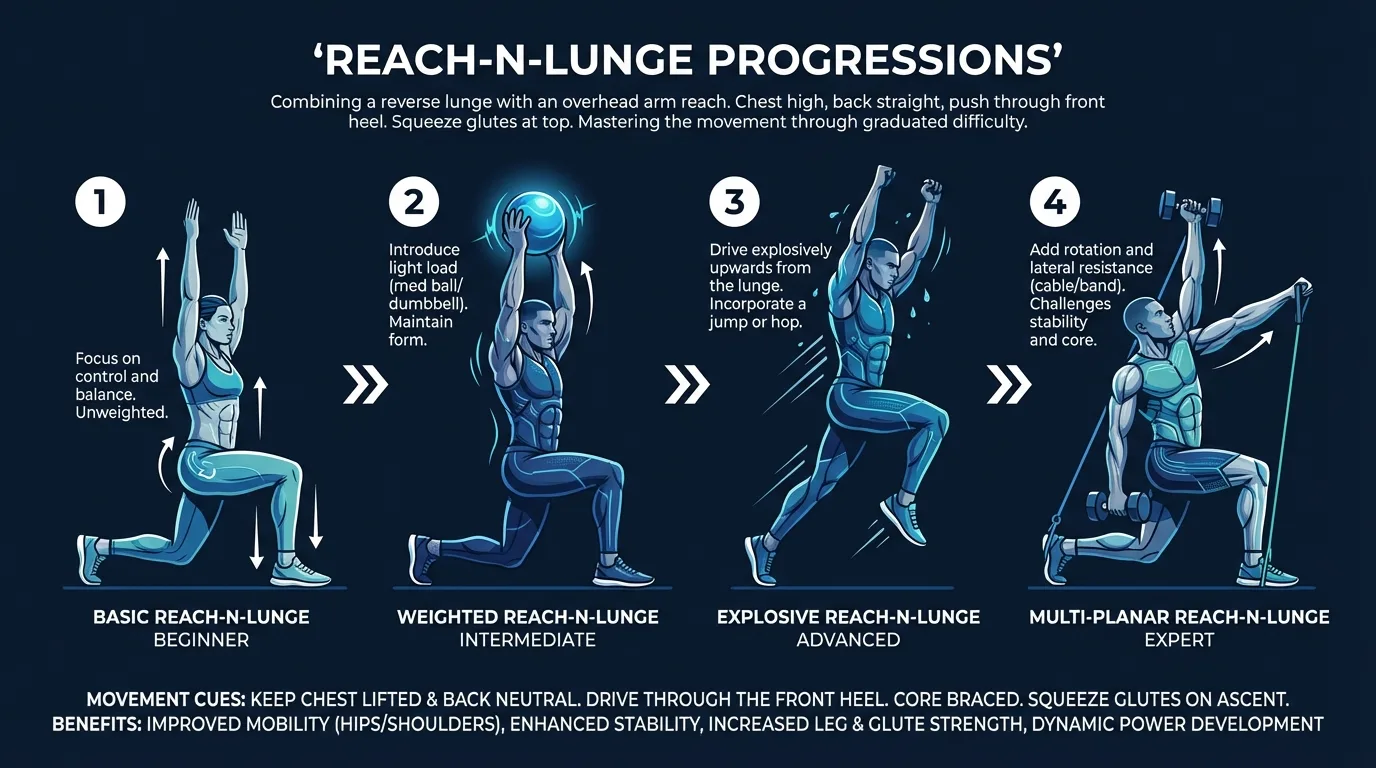
Reach-N-Lunge Variations: Regressions and Progressions
Step-N-Lunge
Use this lower-impact version when you want the lunge pattern without a demanding overhead hold. It works well for beginners, warm-ups, and cardio circuits that need less shoulder fatigue.
Reverse Reach-N-Lunge
Step backward instead of forward while keeping the overhead reach. Reverse lunges are easier for many people to control because the working front foot stays planted.
Standard Alternating Reach-N-Lunge
This is the main version: step forward, lower with control, hold the reach, drive back to standing, then switch sides. Use it before advancing to faster intervals.
Jumping Reach-N-Lunge
Add a switch jump only after your regular reps are clean. Land quietly, absorb through the hips and knees, and stop the set if the knee collapses or the arms drop.
When to Avoid or Modify Reach-N-Lunges
Reach-N-Lunges are safe for many healthy adults, but fast lunging and overhead reaching can expose knee, hip, shoulder, and balance limits. Always consult your physician before starting or returning to exercise, especially if you have cardiovascular disease, uncontrolled hypertension, joint injury, pregnancy-related restrictions, early postpartum recovery, stress incontinence, vertigo, asthma, or chronic conditions that affect training tolerance.
- Known cardiovascular disease or uncontrolled hypertension. Conditioning intervals can raise heart rate and blood pressure quickly. Get medical clearance and stay within prescribed intensity zones.
- Knee, ankle, hip, shin, or foot pain. Use step-n-lunges, shorter ranges of motion, or supported split-stance holds until impact and stride control feel comfortable.
- Limited overhead mobility or shoulder pain. Keep the hands lower, use lunge reaches with a smaller arc, or train shoulder mobility before long overhead intervals.
- Pregnancy or early postpartum recovery. Joint laxity, pelvic-floor recovery, and balance changes can make lunging intervals inappropriate. Use clinician-approved low-impact alternatives.
- Stress incontinence or pelvic-floor symptoms. Keep the drill low impact and avoid the jumping progression. Build tolerance with slower step patterns first.
- Vertigo or balance disorders. Use a wall or chair for support, avoid fast transitions, and skip the skyward gaze if it triggers symptoms.
Related Exercises
- Lower-impact alternative: Step-N-Lunge keeps the same step pattern with easier control.
- Mobility prep: Lunge Reach emphasizes hip flexor and thoracic mobility before conditioning work.
- Strength foundation: Rear Lunges build the single-leg control needed for cleaner Reach-N-Lunges.
- Advanced conditioning: Jump Lunges add plyometric intensity once landing control is reliable.
- Core stability foundation: Deadbugs teach rib and pelvis control for overhead reaching.
- Cardio pairing: Mountain Climbers pair well with Reach-N-Lunges in low-equipment circuits.
How to Program Reach-N-Lunges
Ratamess et al., 2009 recommends progressing training by matching volume, intensity, and rest to the exerciser's current capacity. For Reach-N-Lunges, that means starting with controlled intervals before increasing tempo, range, or impact.
| Level | Work | Rest between sets | Frequency |
|---|---|---|---|
| Beginner | 20-30 seconds, low-impact step-back reps | 60-90 seconds | 2-3 sessions/week |
| Intermediate | 30-45 seconds, alternating forward reps | 45-60 seconds | 3-4 sessions/week |
| Advanced | 45-60 seconds, faster reps or jump-switch reps | 30-45 seconds | 3-5 sessions/week |
Place Reach-N-Lunges after strength training as a short finisher, inside a warm-up when the tempo is slow, or in a conditioning circuit with movements like high knees and burpees. Avoid using hard intervals before heavy lower-body strength work because fatigue can make your lunges sloppy.
Keep the form floor higher than the rep target. If you can't keep the front knee aligned, ribs stacked, and arms overhead, the set is done even if the timer still has time left.
Frequently Asked Questions
Can I do Reach-N-Lunges with knee pain?
Modify or skip Reach-N-Lunges if lunging causes knee pain, swelling, or a sharp catching feeling. Use step-n-lunges, rear lunges, or a smaller range of motion until you can control the knee without pain.
What muscles do Reach-N-Lunges work?
Reach-N-Lunges work the quadriceps and glutes during the lunge, stretch the hip flexors of the back leg, and challenge the shoulders, lats, upper back, and core through the overhead reach.
Are Reach-N-Lunges cardio or strength?
They sit between conditioning, mobility, and bodyweight strength. Slow reps emphasize control and range of motion. Faster alternating reps raise heart rate and fit better in cardio circuits.
How many Reach-N-Lunges should I do?
Start with 20 to 30 seconds of controlled reps, rest 60 to 90 seconds, and repeat for 2 to 4 rounds. Keep the overhead reach clean before adding longer intervals.
What is the best beginner version of Reach-N-Lunges?
Use a reverse Reach-N-Lunge or a step-n-lunge. Stepping backward is easier to control, reduces forward knee shear for many people, and lets you practice the overhead reach without rushing.