Most leg exercises move you straight forward or straight up and down. Squats, lunges, step-ups, and deadlifts all work in the sagittal plane. That's fine for the quads and gluteus maximus, but it leaves the gluteus medius and minimus chronically undertrained. Those are the muscles on the side and upper portion of your glutes that stabilize your pelvis, shape the upper curve of your backside, and keep your knees from caving in during every lower-body movement you do.
The curtsy lunge fills that gap. By stepping back and across (like a curtsy) you force the hip stabilizers on the standing leg to fire hard just to keep you balanced. The gluteus medius, which barely activates during a standard bodyweight squat, suddenly has to work overtime. And the adductors on the inner thigh, another commonly weak group, get loaded through a meaningful range.
There's a reason this exercise shows up in nearly every serious glute program. It's not a gimmick. The crossover pattern creates a stimulus that no amount of squatting will replicate. If you've been doing squats and forward lunges exclusively and wondering why your glutes still look flat from the side, the curtsy lunge is likely the missing piece.
Quick Facts: Curtsy Lunge
- Equipment needed: None for bodyweight; optional dumbbells for the loaded variation
- Difficulty: Intermediate (assisted or bodyweight) to Advanced (dumbbell-loaded)
- Modality: Strength
- Body region: Lower body
- FitCraft quest category: Strength
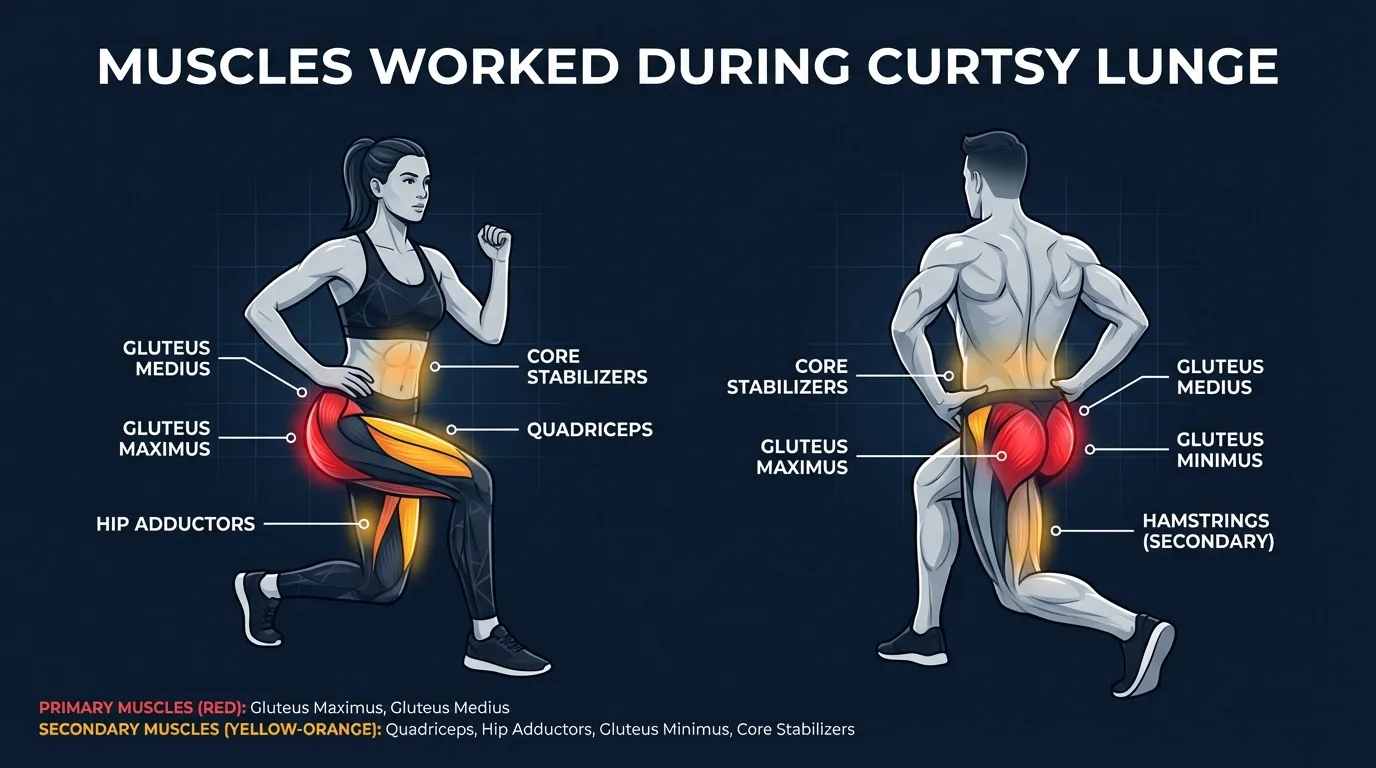
Muscles Worked
Primary movers: the gluteus maximus and gluteus medius on the standing (front) leg. The gluteus maximus drives hip extension on the way up from the bottom of the lunge (concentric phase), while the gluteus medius works isometrically and then concentrically to keep the pelvis level against the offset crossover load. Both muscles lengthen under tension on the way down (eccentric phase), which is where most of the hypertrophy stimulus actually comes from.
Secondary movers: the quadriceps of the standing leg (knee extension out of the bottom), the hip adductors of both legs (loaded through the crossover position and the eccentric descent), and the gluteus minimus (works alongside the medius for pelvic stability).
Stabilizers: the entire core (rectus abdominis, transverse abdominis, obliques) braces against torso rotation, the erector spinae keeps the spine neutral against the offset, and the smaller foot and ankle muscles (peroneals, tibialis posterior) work to keep the standing foot stable on a load that wants to roll it. The gluteus medius of the trailing (back) leg also fires to help control the crossover path.
Why the crossover changes the stimulus: a standard reverse lunge loads the gluteus maximus and quadriceps in the sagittal plane (forward and back). The curtsy adds a frontal-plane component because the back foot crosses behind the front foot, which shifts the line of pull through the standing hip. That shift recruits the gluteus medius and minimus as primary movers instead of as secondary stabilizers, and it loads the hip adductors through a range they don't see in bilateral squats. The mechanism is biomechanical, not magic. Any unilateral exercise with a frontal-plane offset will hit the lateral hip in a similar way.
Step-by-Step: How to Perform a Curtsy Lunge
Whether you're using the assisted variation or going freestanding, the movement pattern is the same. The cues below apply to both.
Step 1: Stand Tall with Feet Hip-Width Apart
Hands on your hips or clasped at chest height for counterbalance. Core engaged. Shoulders back. Weight distributed evenly across both feet. Pick a point straight ahead to focus your gaze, which helps balance more than you'd expect.
Coach Ty's cue: "Pick a point on the wall straight ahead and lock your eyes there. The crossover will try to make you look down. Don't."
Step 2: Step Back and Across
Lift your right foot and step it back and behind your left leg, as if performing a curtsy. Your right foot lands roughly 2 feet behind and to the left of your left foot. The exact distance depends on your hip mobility, so don't force it beyond what feels natural.
Ty's key cue: "Hips stay square. Imagine your hip bones are headlights pointed straight ahead. They don't rotate during the crossover." Most form errors on the curtsy lunge come from letting the hips open up toward the crossing leg.
Step 3: Lower Into the Lunge
Bend both knees and lower your body until your front (left) thigh is approximately parallel to the floor. Your back (right) knee should hover just above the ground. Keep your torso upright, not leaning forward or twisting. Your front knee tracks over your toes, not caving inward.
Ty's cue: "Front knee over the toes, not inside the big toe. If the knee caves, the crossover is too wide for your current strength."
Step 4: Drive Back to Standing
Push through the heel of your front (left) foot to return to the starting position. Squeeze the glute of your standing leg as you rise. That squeeze at the top is where the gluteus medius gets its peak activation.
Ty's reminder: "Drive through the heel, not the toes. Toe-driven means quad-dominant. Heel-driven keeps the glutes in charge."
Step 5: Complete Reps and Switch Sides
Complete all reps on one side, then switch, or alternate legs each rep. Quality matters more than rep count. If your hips start rotating or your knee starts caving, the set is over regardless of how many reps you'd planned.
Get this exercise in a personalized workout
FitCraft, our mobile fitness app, uses its AI coach Ty to program compound strength exercises like this into your plan at the right volume and intensity, based on your level, goals, and equipment. Ty was designed and trained by Domenic Angelino, MPH (Brown University) and NSCA-CSCS, with research published in the Journal of Strength and Conditioning Research and Medicine & Science in Sports & Exercise.
Take the Free Assessment Free · 2 minutes · No credit card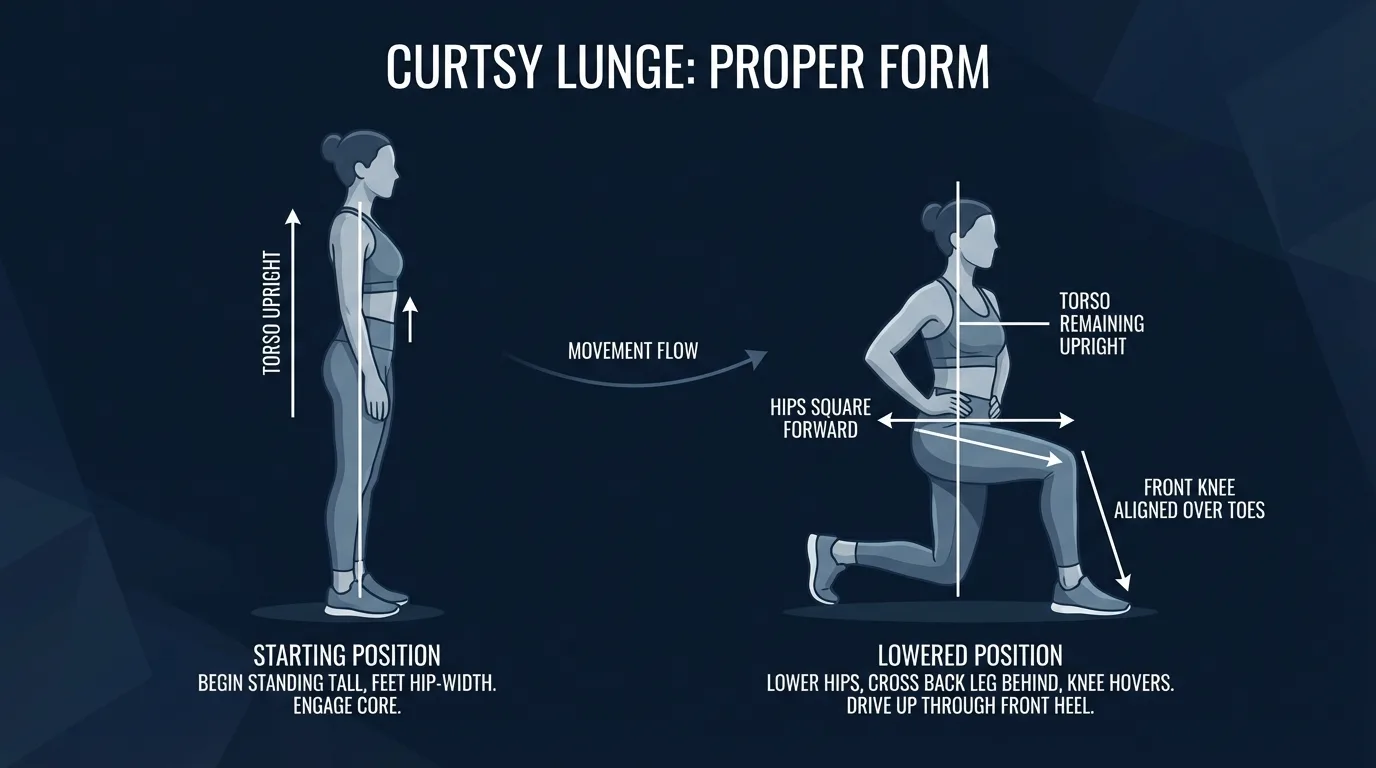
Common Mistakes (and How to Fix Them)
The curtsy lunge has a higher coordination demand than most lower-body exercises. These mistakes show up constantly, even in experienced lifters.
- Letting the hips rotate. The most common mistake and the hardest to self-correct. When the hips open up toward the crossing leg, the gluteus medius stops stabilizing and the lower back starts compensating. Film yourself from the front or use a mirror. Your hip bones should face forward through every phase of the rep.
- Front knee caving inward. Knee valgus puts shearing force on the medial knee structures. If your knee tracks inside your big toe, narrow the crossover distance and focus on pushing the knee out over the pinky-toe side. Build the supporting strength with fire hydrants if this is persistent.
- Leaning the torso sideways or forward. Usually a compensation for weak glutes. When the gluteus medius can't stabilize the pelvis, the torso tilts to redistribute load. Stay upright. If you can't, regress to side lunges first and rebuild from there.
- Stepping too far back. Overreaching on the crossover puts the knee in an awkward rotational position and actually reduces the glute activation you're chasing. About 12 to 18 inches of crossover behind the standing foot is plenty. Moderate crossover, moderate depth.
- Pushing through the toes instead of the heel. Toe-drive shifts load to the quads and reduces glute recruitment. Press through the heel of the front foot on the way up to keep the glutes leading the movement.
- Rushing reps. Speed hides bad form on a balance-demanding exercise. Aim for 2 seconds down, 1 second pause at the bottom, 1 second up. If you can't move that slowly with control, you're not ready for the next level of progression.
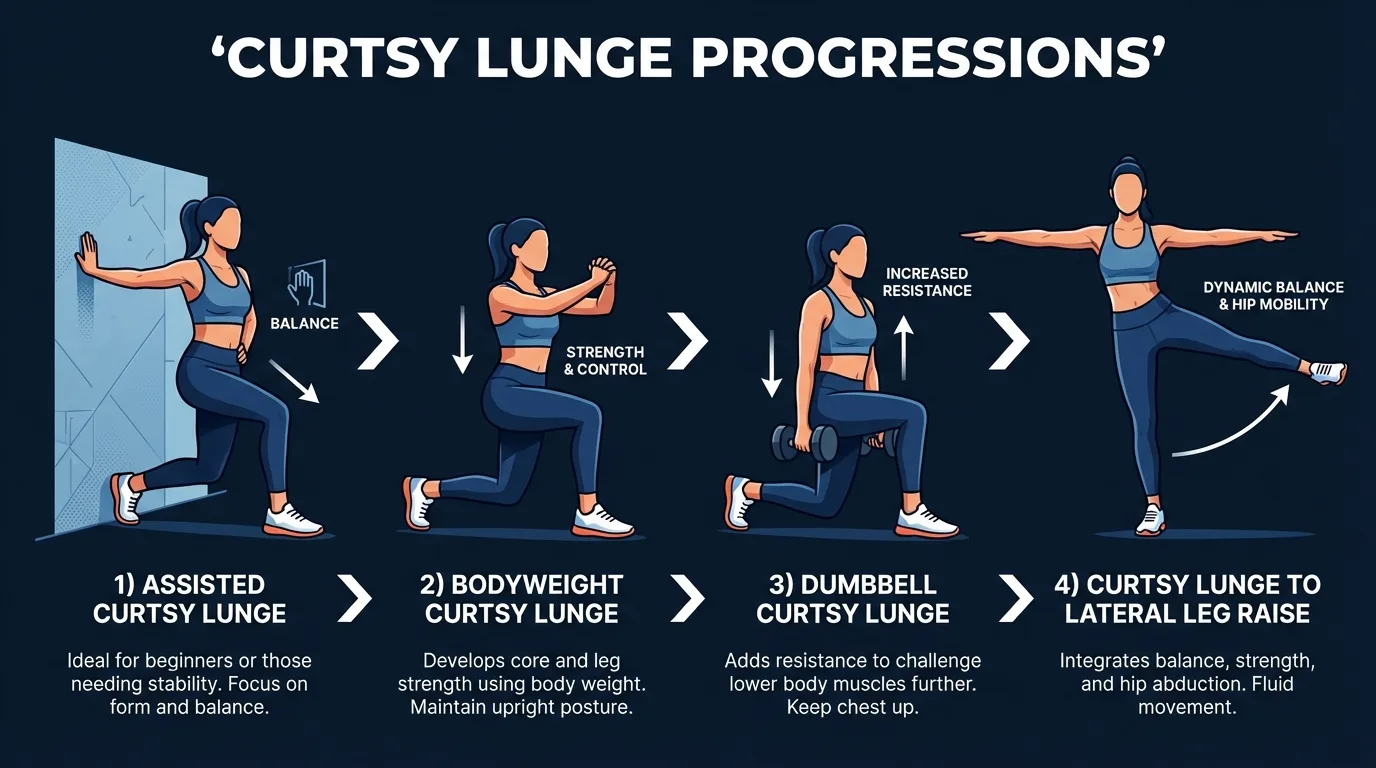
Curtsy Lunge Variations: Regressions and Progressions
Start where you can hold clean form and progress when the current level feels controlled at 3 sets of 10 reps per leg.
Assisted Curtsy Lunge (Intermediate Regression)
Hold onto a wall, doorframe, or TRX strap with one hand for balance support. This lets you learn the crossover pattern and build hip stabilizer strength without worrying about falling over. Use this variation if you can't complete 8 reps with clean form freestanding.
Bodyweight Curtsy Lunge (Intermediate Standard)
The standard version described above. Freestanding, no support, full range of motion. Master this with controlled tempo and hips squared before adding load. Most people underestimate how demanding this version is on balance and coordination.
Dumbbell Curtsy Lunge (Advanced)
Hold a dumbbell in each hand at your sides, or hold a single dumbbell goblet-style at chest height. The goblet hold can actually improve form for some people because it provides a counterbalance. Start light. Even 5 to 10 pounds per hand changes the balance demand significantly. Build up to 15 to 25 pounds per hand for hypertrophy work.
Curtsy Lunge to Lateral Raise (Advanced Combo)
Combine the curtsy lunge with a side leg raise as you return to standing. After pressing back up, lift the crossing leg out to the side before planting it for the next rep. This adds an extra gluteus medius contraction at the top and turns a strength exercise into a coordination challenge.
When to Avoid or Modify Curtsy Lunges
Curtsy lunges are safe for most healthy adults who can already perform a clean reverse lunge, but a few conditions call for modification or substituting easier variations. None of these are permanent restrictions. They're starting points. Always consult a qualified healthcare provider or physical therapist for personalized guidance.
- Existing knee pain, meniscus injury, or ligament instability. The rotational component of the crossover can aggravate medial knee structures. Substitute reverse lunges or side lunges, which load similar muscles without the rotational stress. If pain persists in those variations, see a PT before continuing lower-body work.
- Hip impingement or labral pathology. The crossover position closes the standing hip into adduction and internal rotation, which can pinch tissues for people with cam or pincer impingement. Reduce the crossover distance significantly (6 inches behind, not 18) and shallow the depth. Work with a sports medicine physician or PT to identify the exact provocative range.
- Recent knee, hip, or ankle surgery. Get clearance from your surgeon. Most post-surgical protocols restore bilateral stability (squats, glute bridges) before introducing unilateral or rotational patterns. Curtsy lunges typically come back in the late-stage return-to-sport phase, not early rehab.
- First 6 to 8 weeks postpartum or active diastasis recti. The unilateral offset and trunk-stability demand can stress the linea alba. Start with bilateral lower-body work and deadbugs plus bird-dogs to restore deep-core function first. Reintroduce unilateral exercises gradually with a postpartum-focused PT or trainer.
- Lower-back pain that worsens with rotation or asymmetric loading. If the offset crossover triggers lumbar pain, drop to reverse lunges and rebuild trunk stability with forearm planks, deadbugs, and bird-dogs first.
- Poor single-leg balance or fall-risk concerns. If you can't stand on one leg for 20 seconds without tipping, the freestanding curtsy lunge is too advanced. Use the assisted variation with a wall or sturdy chair, and build single-leg balance with single-leg deadlifts against support first.
Related Exercises
If curtsy lunges are part of your routine, these movements complement or extend the same training pattern:
- Same movement pattern (lunge family): Reverse Lunges and Side Lunges load the same primary movers in different planes; reverse lunges in the sagittal plane, side lunges in the frontal plane, and curtsy lunges in a hybrid crossover.
- Unilateral progression: Bulgarian Split Squats and Split Squats remove the crossover and balance challenge so you can load the quads and glutes harder, useful when you've outgrown bodyweight curtsy lunges and want more absolute strength stimulus.
- Glute medius isolation: Fire Hydrants remove the balance and coordination demand so you can target the gluteus medius directly. Pair as a warm-up before curtsy lunges or as a regression for building baseline hip stability.
- Bilateral foundation: Glute Bridges build the gluteus maximus through hip extension in a stable supine position, useful for adding glute volume on days when balance work is too fatiguing.
- Posterior chain unilateral: Single-Leg Deadlifts train the same single-leg stability demand from a hip-hinge pattern, pairing well with curtsy lunges in a glute-and-hamstring session.
- Core foundation for unilateral loading: Deadbugs and Bird-Dogs isolate the anti-rotation bracing pattern curtsy lunges rely on, useful if your hips rotate during sets.
How to Program Curtsy Lunges
Curtsy lunge programming follows the same evidence-based ranges as any unilateral compound lower-body exercise. The American College of Sports Medicine (ACSM) Position Stand on resistance training recommends 8 to 12 reps per set for strength and 12 to 20 for muscular endurance, with at least 48 hours between sessions training the same muscle group (Ratamess et al., 2009).
| Level | Sets × Reps (per leg) | Rest between sets | Frequency |
|---|---|---|---|
| Beginner (assisted) | 2–3 × 8–10 | 60–90 seconds | 2 sessions/week |
| Intermediate (bodyweight) | 3 × 10–12 | 90–120 seconds | 2–3 sessions/week |
| Advanced (dumbbell-loaded) | 3–4 × 8–12 | 120–180 seconds | 2–3 sessions/week |
Where in your workout: curtsy lunges belong in the middle of a lower-body session. Place them after your heavy bilateral compound lift (squats, deadlifts, or hip thrusts) when the glutes are pre-fatigued and the smaller stabilizers are still fresh enough to control the crossover. Pair them in a superset with fire hydrants or glute bridges for complete gluteal development in the same session. Avoid putting them at the very end of a fatigued workout because the balance demand collapses fast when the stabilizers are smoked.
Form floor over rep targets: if your last 2 reps of a set break form (knee caving, hips rotating, torso leaning) stop the set there. Hitting a target rep count with broken form is worse than hitting fewer reps cleanly, and on a balance exercise it's also a meaningful injury risk.
How FitCraft Programs This Exercise
Knowing how to do a curtsy lunge is step one. Knowing when to do it, how many reps, and when to progress is where most people get stuck.
FitCraft's AI coach Ty handles that. During your personalized diagnostic assessment, Ty maps your hip mobility, single-leg balance, and lower-body strength baseline. Then Ty builds a personalized program that slots curtsy lunges into a balanced training plan at the right variation for your level.
As you get stronger, Ty adjusts the variation and volume to match your level. Assisted becomes freestanding. Bodyweight gets paired with dumbbells. Volume adjusts based on your recovery and consistency. Every program is designed by an Ivy League-trained exercise scientist and NSCA-certified strength coach using evidence-based periodization, then adapted to you by the AI.
Frequently Asked Questions
Can I do curtsy lunges if I have knee pain?
Curtsy lunges place rotational stress on the knee because the back leg crosses behind the standing leg. If you have meniscus damage, ligament instability, or patellofemoral pain, the crossover pattern can aggravate symptoms. Modify by reducing the crossover distance (a 6-inch step instead of 18), keeping the depth shallow, or substituting reverse lunges or side lunges, which load similar muscles without the rotational component. If pain persists during modified variations, see a physical therapist before continuing.
What muscles do curtsy lunges work?
Curtsy lunges primarily target the gluteus maximus and gluteus medius, with secondary activation of the quadriceps, hip adductors, and gluteus minimus. The crossover stepping pattern recruits the gluteus medius harder than standard lunges because the hip stabilizers on the standing leg must work to keep the pelvis level against the offset load.
How are curtsy lunges different from regular lunges?
In a regular reverse lunge the back foot steps straight behind you in the sagittal plane. In a curtsy lunge the back foot crosses behind and to the opposite side of the front foot, adding a frontal-plane component. That crossover increases gluteus medius activation, loads the hip adductors through a meaningful range, and adds a balance and coordination demand that straight lunges lack.
Do curtsy lunges grow glutes?
Yes. Curtsy lunges are one of the most effective bodyweight exercises for gluteus medius and minimus development, muscles that standard squats and forward lunges tend to undertrain. The crossover pattern creates an adduction-under-load stimulus that builds rounder, more balanced glute shape. Adding dumbbells (goblet hold or one in each hand) increases the hypertrophy stimulus further.
How many curtsy lunges should I do per set?
For glute development, 3 to 4 sets of 10 to 15 reps per leg works well. Because curtsy lunges demand balance and coordination, quality matters more than quantity. If your form breaks down (knee caving, torso leaning, hips rotating) the set should end regardless of rep count.
Why does my knee cave inward on curtsy lunges?
Knee valgus on a curtsy lunge usually means the crossover distance is wider than your current hip strength can control. The gluteus medius is the muscle responsible for keeping the knee tracking over the toes; when it fatigues or is underdeveloped, the knee drifts inward to the path of least resistance. Narrow the crossover step until you can hold knee position, and build the supporting strength with fire hydrants and side-lying clams between sessions.