Quick Facts: Side Lunge Leans
- Equipment needed: None
- Difficulty: Beginner to intermediate
- Modality: Low-impact conditioning, strength, and mobility
- Body region: Lower body and hips
- FitCraft quest category: Cardio and mobility
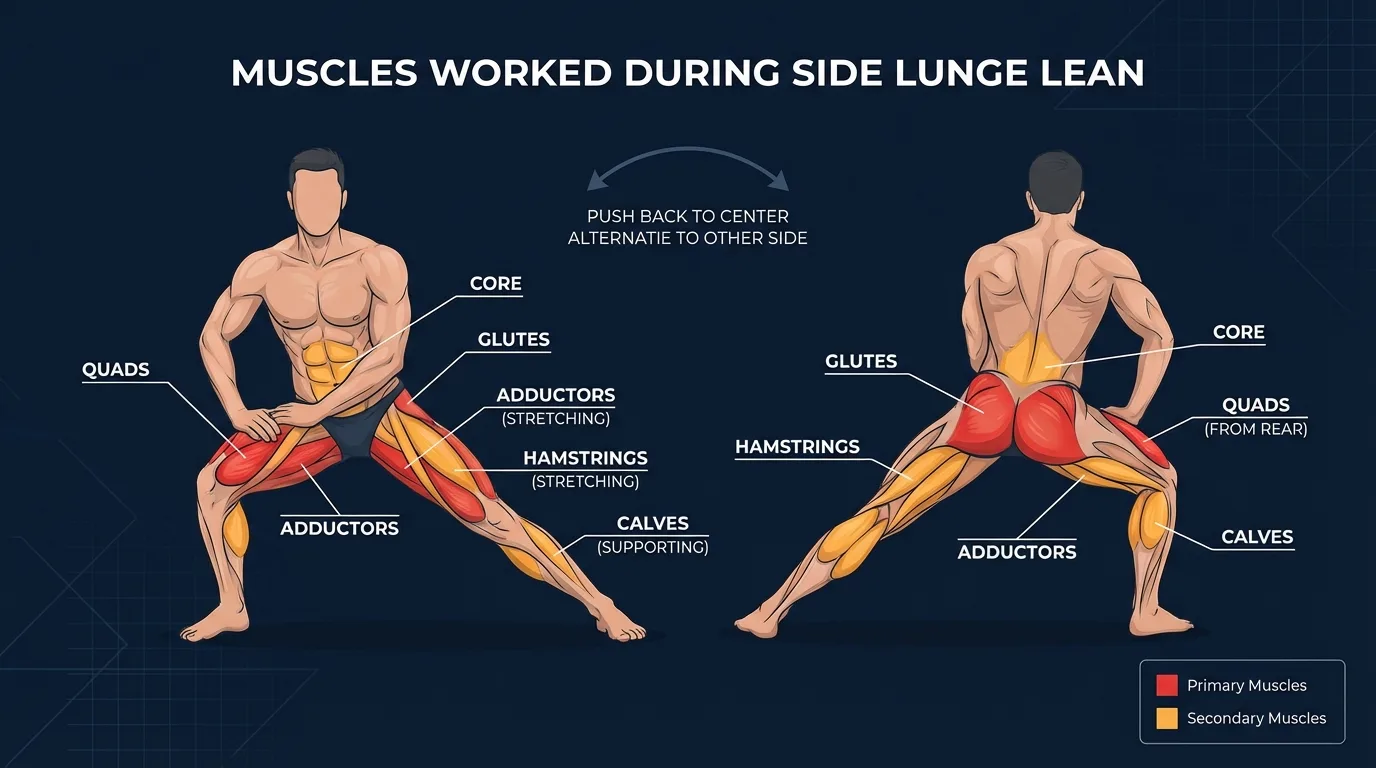
Muscles & Systems Worked
The primary movers are the gluteus maximus, quadriceps, and hip adductors of the leg you lean into. They control the lowering phase eccentrically as the knee bends, then contract concentrically to push you back to the wide-stance center position.
The secondary movers are the hamstrings, gluteus medius, calves, and the adductors of the straight leg. The straight side helps create the inner-thigh stretch while the gluteus medius keeps the pelvis from dropping or drifting as your weight moves laterally.
The stabilizers are the transverse abdominis, obliques, spinal erectors, ankle stabilizers, and foot muscles. They work isometrically so the torso stays controlled, the arch does not collapse, and the knee keeps tracking over the middle of the foot.
No exercise-specific PubMed, PMC, or DOI citation is included for side lunge leans in the verified FitCraft citation library. The mechanism is still straightforward: repeated frontal-plane weight shifts train lateral hip strength, adductor mobility, knee tracking, and low-impact cardiovascular work when performed continuously.
Side lunge leans fit people who need lateral lower-body training without the coordination cost of stepping. A standard side lunge asks you to step wide, decelerate, and push back. This version starts with the feet already wide, so you can focus on the hip shift, the knee line, and the push back to center.
The planted stance also makes the exercise easy to scale. Use a shallow range when your adductors feel tight, press your hands into the working thigh when the legs need help, and slow the tempo when you want more strength work. The goal is controlled range. Depth comes later.
How to Do a Side Lunge Lean (Step-by-Step)
- Set a wide stance. Stand with your feet about one and a half to two times shoulder width apart. Angle the toes slightly out if that feels better for your hips. Brace your core and keep both feet flat.
Coach Ty's cue: "Plant the feet first. The stance does the setup work."
- Shift your weight to one side. Move your hips toward your right leg. Bend the right knee as the left leg straightens, and keep the right knee tracking over the middle of the foot.
Coach Ty's cue: "Pour your weight sideways into the whole foot."
- Lean into the working leg. Let your torso lean slightly over the right thigh and place your hands on that thigh for support. Lower only as far as both feet can stay planted and the straight leg can stay long.
Coach Ty's cue: "Use your hands for support while the leg drives the rep."
- Push back to center. Drive through the right foot, engage the quad, and squeeze the right glute to return to the wide-stance center position. Exhale as you stand tall.
Coach Ty's cue: "Push the ground away and finish tall."
- Alternate sides. Shift left and repeat the same pattern. Match the range on both sides and keep the tempo smooth until the set is done.
Coach Ty's cue: "Both sides get the same honest rep."
Get this exercise in a personalized workout
FitCraft, our mobile fitness app, uses its AI coach Ty to program conditioning work like this into your plan at the right volume and intensity, based on your level, goals, and equipment. Ty was designed and trained by Domenic Angelino, MPH (Brown University) and NSCA-CSCS, with research published in the Journal of Strength and Conditioning Research and Medicine & Science in Sports & Exercise.
Take the Free Assessment Free · 2 minutes · No credit card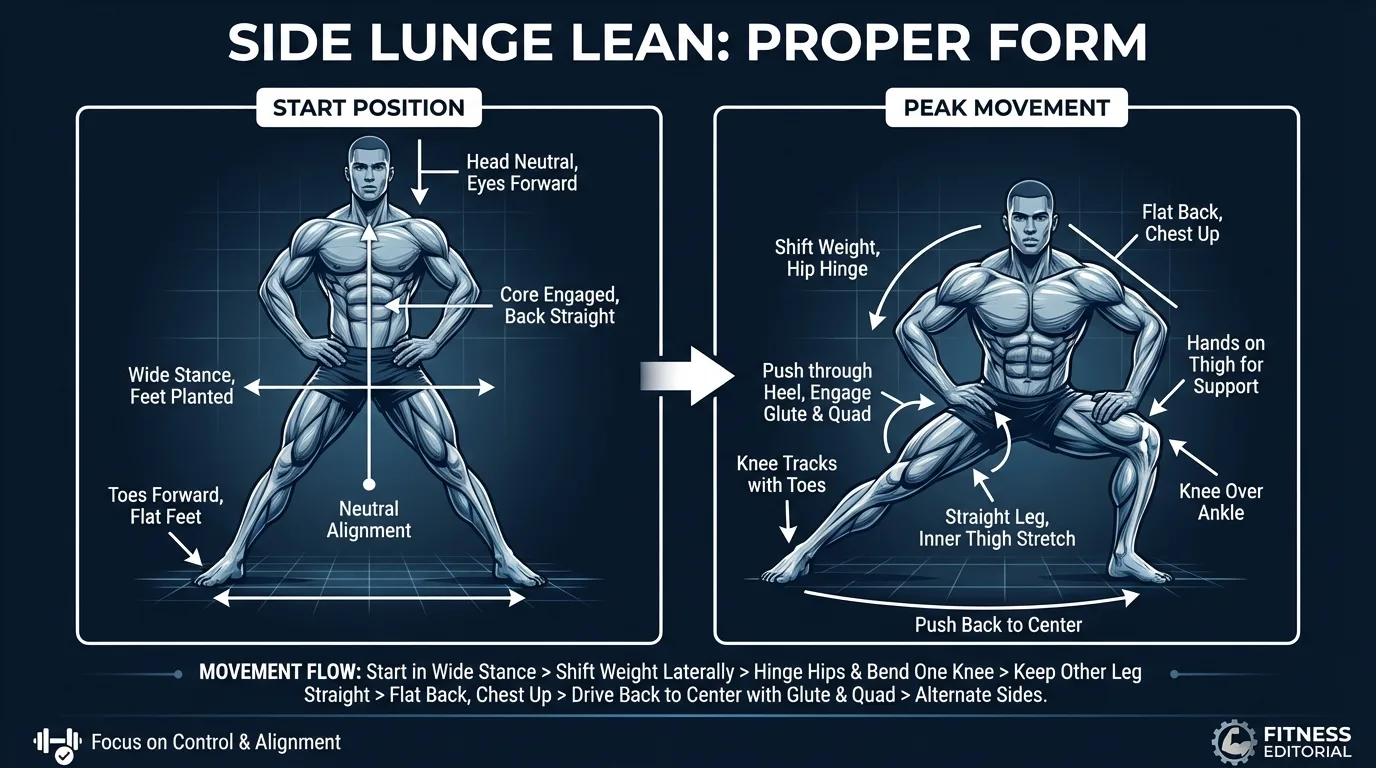
Common Mistakes to Avoid
- Letting the feet move. Set your stance before rep one and keep it there. If a foot slides or pivots hard, narrow the stance and slow down.
- Going too wide too soon. A huge stance can make the heels lift, the knee cave, or the groin feel sharp. Start moderate and earn more range over time.
- Bending the straight leg. The non-working leg should stay long so the inner thigh gets a real stretch. If it keeps bending, your stance or depth is too aggressive.
- Letting the working knee collapse inward. Track the knee over the middle toes. A small outward cue usually fixes the line.
- Bouncing side to side. Momentum hides the strength work. Use a smooth lower, a firm push back, and a steady rhythm.
- Holding your breath. Inhale into the lean and exhale as you push back to center. Breath keeps the tempo controlled.
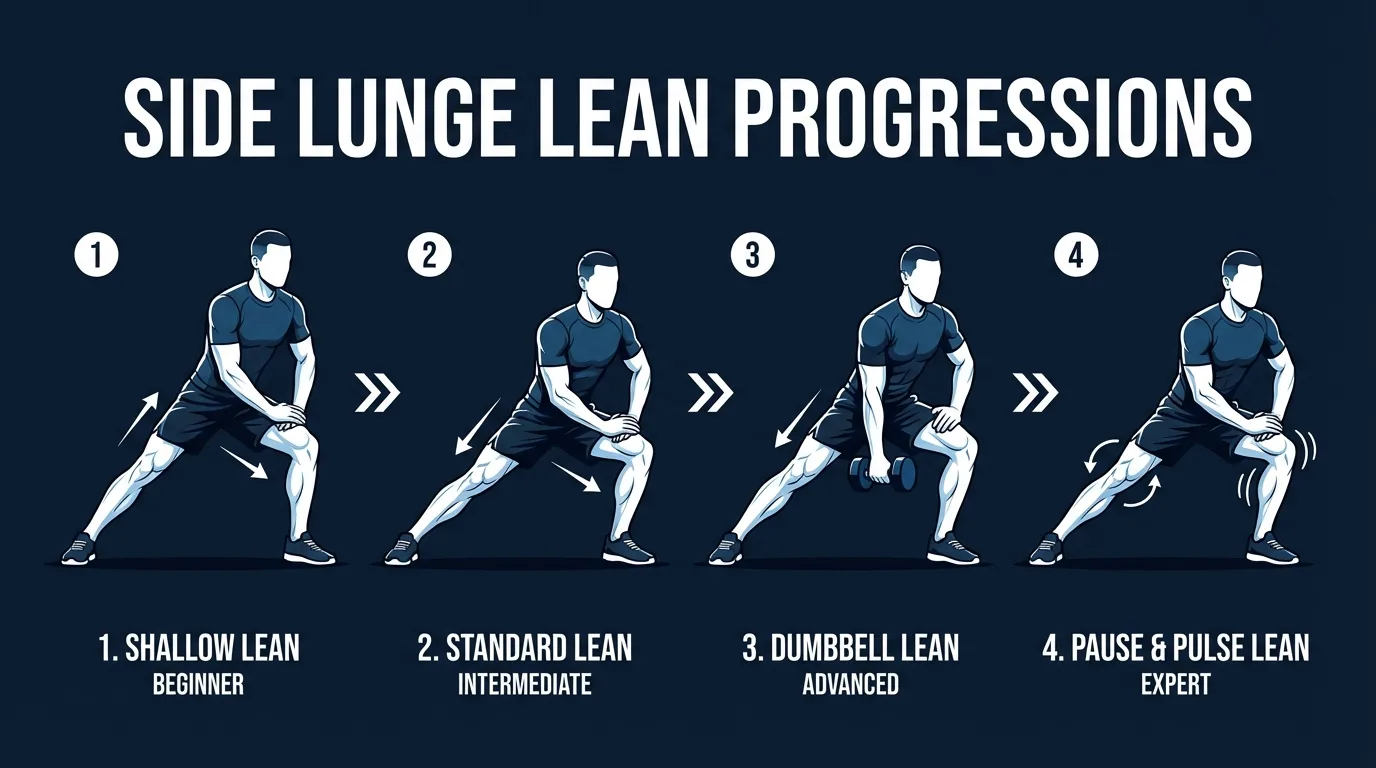
Side Lunge Lean Variations: Regressions and Progressions
Shallow Hands-on-Thigh Side Lunge Lean
Use the same wide stance, but move only halfway into the lean. Press your hands into the working thigh for support and keep the range pain-free.
Full-Depth Side Lunge Lean
This is the standard version. Shift until the working thigh approaches parallel or reaches your clean end range, then push back to center without moving the feet.
Paused Side Lunge Lean
Hold the bottom position for one or two seconds before standing. The pause removes bounce and makes the working leg produce the return.
Hands-Free Side Lunge Lean
Cross your arms over your chest or let them hang by your sides. Removing hand support makes the leg and hip do more of the work.
Side Lunges
Progress to side lunges when the planted version is easy. The stepping version adds deceleration, balance, and a bigger lateral strength demand.
When to Avoid or Modify Side Lunge Leans
Side lunge leans are safe for most healthy adults, but a few situations call for a smaller range, slower tempo, or a different drill. Always consult your physician or physical therapist when pain, pregnancy, cardiovascular disease, or a recent injury changes your training status.
- Sharp knee, hip, or groin pain. Narrow the stance, reduce depth, or switch to glute bridges until side-to-side loading feels calm.
- Recent ankle, knee, hip, or adductor injury. Use clinician-cleared rehab first. Deadbugs can keep the core active without loading the sore joint.
- Known cardiovascular disease or uncontrolled hypertension. Keep the movement slow and low intensity unless your clinician has cleared interval training.
- Pregnancy or early postpartum recovery. Use a smaller stance, hold support, and avoid fast interval versions unless your provider clears them.
- Vertigo or balance disorders. Hold a wall, rack, or countertop. If the lateral shift still feels unstable, use supported squat walks or seated mobility instead.
- Asthma or exercise-induced bronchoconstriction. Warm up gradually, keep an inhaler accessible if prescribed, and stay below the intensity that triggers symptoms.
Related Exercises
- Same pattern: Side lunges add the step-out and push-back demand after you master the planted lean.
- Lateral conditioning: Side lunge toe touches add a reach and deeper rhythm for warm-ups or circuits.
- Low-impact lunge flow: Reach-N-Lunges train coordination, hips, and overhead reach without jumping.
- Strength foundation: Glute bridges build hip extension strength that supports the push back to center.
- Core foundation: Deadbugs teach trunk control without stressing the hips or knees.
- Mobility prep: Hip abductor stretch helps the side hip tolerate wider stances.
How to Program Side Lunge Leans
Use side lunge leans as a low-impact interval drill or warm-up movement. The broader progression model from Ratamess et al., 2009 supports matching volume, rest, and frequency to training status, then progressing only when form stays clean.
| Level | Work | Rest between sets | Frequency |
|---|---|---|---|
| Beginner | 20-30 seconds slow alternating reps | 60-90 seconds | 2-3 sessions/week |
| Intermediate | 30-45 seconds full-depth or paused reps | 45-60 seconds | 3-4 sessions/week |
| Advanced | 45-60 seconds hands-free or faster circuit reps | 30-45 seconds | 3-5 sessions/week |
Place side lunge leans in a dynamic warm-up, as a low-impact conditioning station, or as a short finisher after strength work. Avoid using them before heavy lower-body lifts if they fatigue your hips or adductors.
Use the form floor over time targets: stop the interval when a heel lifts, the working knee caves inward, the straight leg keeps bending, or your range changes from side to side.
FitCraft's 3D AI coach Ty can show movement patterns like side lunge leans inside a personalized program and adjust the variation and volume to your level. Keep the promise simple: start with the version you can control, then progress when the reps look the same on both sides.
Frequently Asked Questions
What muscles do side lunge leans work?
Side lunge leans work the gluteus maximus, quadriceps, and adductors of the leg you lean into. The opposite leg's adductors lengthen dynamically while the gluteus medius, hamstrings, calves, and deep core muscles help control the side-to-side shift.
How are side lunge leans different from side lunges?
Side lunges use a step out and push back. Side lunge leans start from a wide planted stance, so the feet stay on the floor while you shift your weight. That makes them lower impact and easier to learn.
Can I do side lunge leans with knee, hip, or groin pain?
Modify or skip side lunge leans if they create sharp knee, hip, or groin pain. Use a smaller range, narrow the stance, hold a support, or switch to glute bridges and deadbugs until the painful pattern settles. Always follow clinician guidance if pain is current or recurring.
How many side lunge leans should beginners do?
Beginners can start with 20 to 30 seconds of slow alternating reps, then rest 60 to 90 seconds. Two to three rounds is enough. Stop early if one heel lifts, the knee caves inward, or the straight leg cannot stay long.
Can side lunge leans be used as a warm-up?
Yes. Side lunge leans work well before lower-body training because they warm the hips, adductors, glutes, knees, and ankles without jumping. Keep the range comfortable and the tempo smooth.