Triangle pose looks simple until you try to keep the feet grounded, the spine long, the chest open, and the breath steady at the same time. The common error is chasing the final shape with the bottom hand instead of building the pose from the ground up.
Quick Facts: Triangle Pose
- Equipment needed: None; yoga block, chair, or wall optional
- Difficulty: Beginner to intermediate when supported; intermediate without support
- Modality: Yoga, mobility, and isometric strength
- Body region: Lower body, hips, core, spine, and shoulders
- FitCraft quest category: Yoga
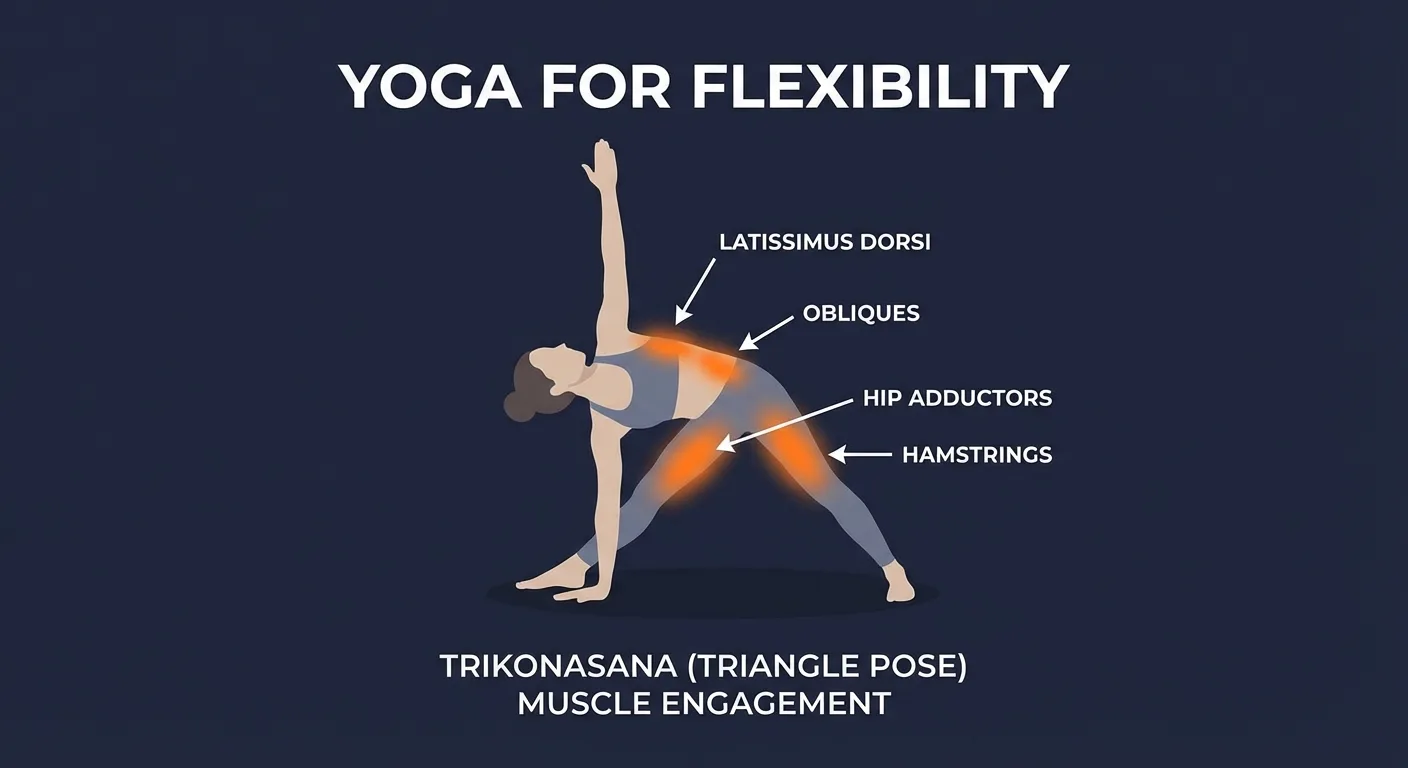
Muscles Engaged & Stretched
The front-leg hamstrings and inner-thigh adductors take the biggest stretch demand as you hinge sideways. The quadriceps stay active to support the front knee without locking it, and the glutes help keep the pelvis organized instead of letting the torso dump forward.
The obliques, quadratus lumborum, spinal erectors, and intercostals manage the long side-body line. The bottom side resists collapse while the top side lengthens through the ribs, shoulder, and lat.
The deep hip stabilizers, ankle stabilizers, and core hold the pose isometrically. Diaphragmatic breathing matters here because each slow breath helps you keep tension where you need it and release depth where you don't.
No exercise-specific PubMed, PMC, or DOI citation is included for triangle pose in the verified FitCraft citation library. The muscle section uses mechanism-based anatomy rather than a proxy citation.
The pose works best when you think of length before depth. If the bottom hand reaches lower but the spine rounds, the stretch shifts away from the side body and into a folded shape that triangle pose was never meant to be.
Triangle also pairs naturally with standing yoga poses like warrior pose and grounding floor work like downward dog, cobra pose, and butterfly pose.
Step-by-Step: How to Do Triangle Pose
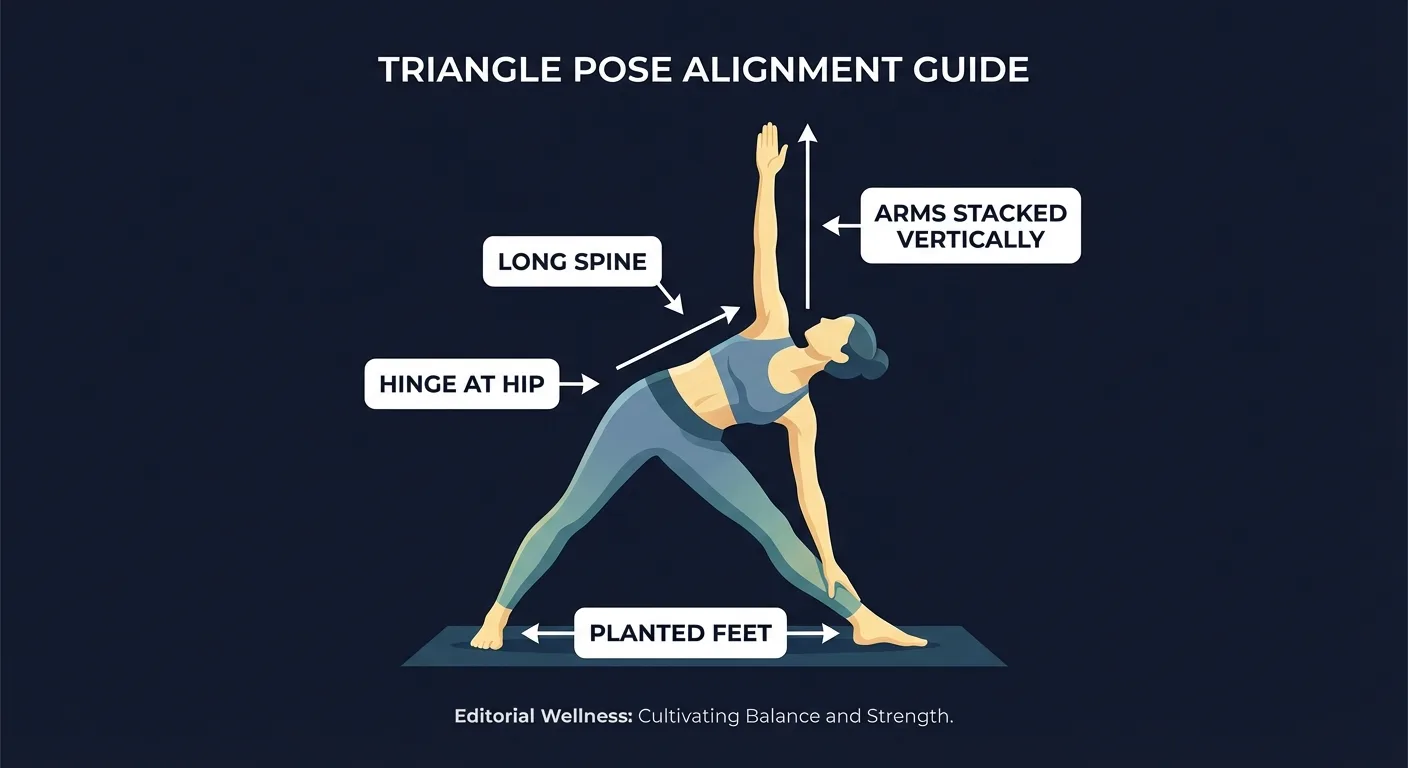
- Set your stance. Stand with your feet about 3 to 4 feet apart, wide enough that your ankles sit roughly under your wrists when your arms reach out. Turn your right foot straight forward and angle your left foot in about 45 degrees. Press through both feet.
- Extend your arms. Raise your arms to shoulder height, palms down. Keep the arms long, soften the shoulders, and let the chest feel broad.
- Reach, then hinge. Reach your right arm forward over your right leg. Keep that length as you hinge from the right hip, as if the right side of your waist is getting longer before the hand lowers.
- Lower the bottom hand. Place your right hand on your shin, ankle, a yoga block, or the floor outside your foot. Pick the height that lets your spine stay long and your chest stay open.
- Stack the top arm. Extend your left arm toward the ceiling so both arms form one vertical line. Rotate the chest open. Look up only if your neck feels relaxed; otherwise, look forward or down.
- Hold and release. Hold for 5 to 8 slow breaths. To exit, press into both feet, engage your core, return to standing, and repeat on the other side.
Get this exercise in a personalized workout
FitCraft, our mobile fitness app, uses its AI coach Ty to program yoga poses like this into your plan at the right volume and intensity, based on your level, goals, and equipment. Ty was designed and trained by Domenic Angelino, MPH (Brown University) and NSCA-CSCS, with research published in the Journal of Strength and Conditioning Research and Medicine & Science in Sports & Exercise.
Take the Free Assessment Free • 2 minutes • No credit cardCommon Mistakes (And How to Fix Them)
Rounding the Spine to Reach the Floor
What it looks like: The bottom hand reaches the floor, but the chest collapses and the back rounds.
Why it's a problem: You lose the side-body stretch and turn the pose into a folded position.
The fix: Use a yoga block, chair, or stack of books under your bottom hand. Choose the height that lets your spine stay long and your chest stay open.
Leaning Forward Instead of Sideways
What it looks like: Your torso tips toward the front foot instead of staying in a clean side hinge.
Why it's a problem: The lower back takes more strain, and the pose stops targeting the side waist and hips cleanly.
The fix: Imagine a wall in front of your body and another behind it. Move inside that narrow space with no forward or backward tilt.
Locking the Front Knee
What it looks like: The front kneecap pulls hard back and the joint hangs in hyperextension.
Why it's a problem: Hyperextension can irritate the back of the knee and shift effort away from the muscles that should support the pose.
The fix: Keep a small micro-bend in the front knee. Engage the quad so the leg feels active instead of locked.
Letting the Top Shoulder Round Forward
What it looks like: The top arm drifts forward and the chest turns toward the floor.
Why it's a problem: The chest opening disappears, the upper back rounds, and the shoulder position gets cramped.
The fix: Roll the top shoulder back and stack it over the bottom shoulder. If that makes the neck tense, look forward or down.
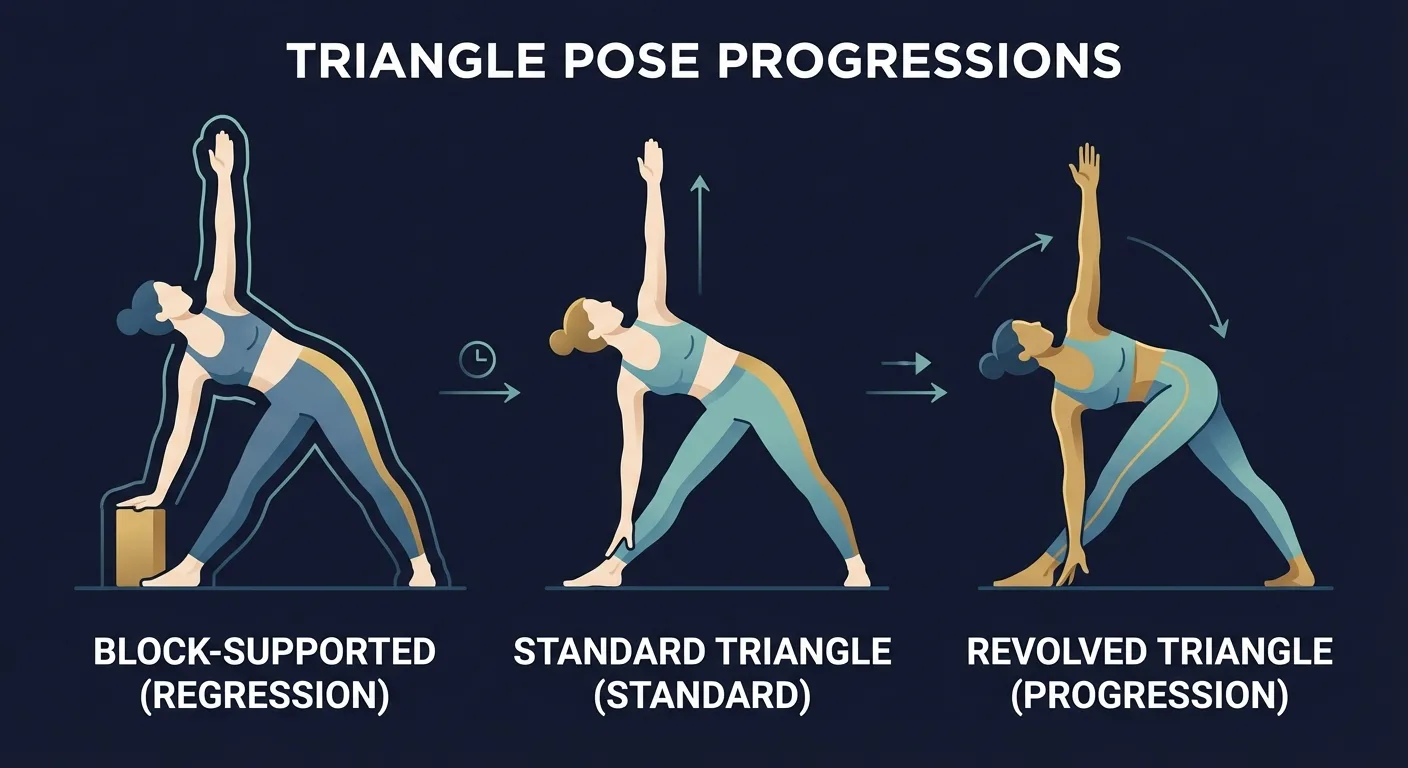
Triangle Pose Variations: Regressions and Progressions
Easier Regressions
- Supported triangle. Place a yoga block or chair outside your front foot and rest the bottom hand on it. You get the same shape without forcing the spine to round.
- Wall triangle. Practice with your back near a wall. The wall shows you when the torso is tipping forward instead of hinging sideways.
- Short-stance triangle. Bring the feet closer together and keep the bottom hand higher. This reduces the hamstring and adductor demand.
Harder Progressions
- Overhead-arm triangle. Reach the top arm over the ear instead of straight up. This increases the side-body and lat stretch.
- Revolved triangle preparation. Add a gentle twist from a shorter stance before trying the full revolved version. Keep the breath smooth and the pelvis controlled.
- Long-hold triangle. Hold 10 to 15 slow breaths per side while keeping the front knee active, the chest open, and the hand height honest.
Alternative Exercises
- Warrior Pose. Another standing posture with a wide stance and strong leg engagement.
- Seated Side Bend. A lower-balance way to train side-body length before returning to triangle.
When to Avoid or Modify Triangle Pose
Triangle pose is safe for most healthy adults, but a few situations call for a smaller range, a higher support, or a different pose. Always consult your physician if you're returning after pain, surgery, pregnancy, or a diagnosed condition.
- Lower-back pain or pinching. Don't force the hand to the floor. Shorten your stance, raise the bottom hand, or use seated side bend instead.
- Front-knee irritation or hypermobility. Keep a micro-bend in the front knee and stop if the joint feels sharp, unstable, or locked back.
- Recent hip, knee, spine, or shoulder surgery. Wait for clinical clearance and use props during the return phase.
- Late pregnancy. Use prenatal-specific modifications and avoid deep twisting, balance-heavy versions, or positions that feel compressive.
- Uncontrolled hypertension or known cardiovascular disease. Held poses can raise pressure in some people. Ask your clinician which yoga holds are appropriate.
- Vertigo, balance disorders, or vestibular symptoms. Practice near a wall, keep the gaze down, or choose a floor-based option such as butterfly pose.
Related Exercises
- Same body region: Warrior Pose and Chair Pose build leg engagement for standing yoga work.
- Easier regression: Seated Side Bend trains side-body length with less balance demand.
- Mobility prep: Butterfly Pose opens the inner thighs before triangle.
- Core foundation: Boat Pose builds trunk control for longer holds.
- Hip and shoulder opener pair: Downward Dog and Cobra Pose round out a simple yoga flow.
How to Program Triangle Pose
Use triangle pose as a mobility and isometric-control drill. The broader progression principles from Ratamess et al., 2009 still apply: match the dose to your current capacity, progress gradually, and stop when form changes.
| Level | Sets × reps | Rest between sets | Frequency |
|---|---|---|---|
| Beginner | 1-2 holds of 3-5 breaths per side | 30-60 seconds or a neutral reset pose | 3-5 sessions/week |
| Intermediate | 2-3 holds of 5-10 breaths per side | 30-60 seconds | 4-6 sessions/week |
| Advanced | 3-5 holds of 10-15+ breaths per side, or deeper variations | 60-90 seconds or downward dog between sides | 5-7 sessions/week if joints recover well |
Place triangle pose after a general warm-up in a standalone yoga session, as a short mobility drill before lower-body training, or in a cool-down after lifting. It fits well between standing poses and floor-based hip openers.
Use a form floor over breath-count targets. End the hold when the front knee locks, the back rounds, the chest collapses, the neck tightens, or the breath gets strained.
Frequently Asked Questions
What muscles does triangle pose work?
Triangle pose engages the quadriceps, glutes, adductors, obliques, spinal erectors, shoulders, and deep hip stabilizers while stretching the hamstrings, inner thighs, side waist, chest, and lats.
Am I supposed to touch the floor in triangle pose?
No. The goal is a long spine, open chest, and steady breath. Use your shin, a block, or a chair if reaching the floor makes your back round or your chest collapse.
How long should I hold triangle pose?
Most people do well with 3 to 5 breaths per side at first, then 5 to 10 breaths as the pose feels more stable. Advanced yoga practices may use 10 to 15 slow breaths per side.
Can I do triangle pose with lower-back pain?
Modify it or skip it if the pose causes lower-back pain. Use a higher hand position, shorten your stance, keep a soft front knee, and stop if the back pinches, grabs, or feels worse after the hold.
Can beginners do triangle pose?
Yes. Beginners should use a block, chair, or wall and treat the pose as an alignment drill instead of a flexibility test. Lower the support only when the spine stays long and the chest stays open.