Goddess pose (utkata konasana) is a wide-stance isometric squat with the hips turned out. Picture a deep sumo squat with cactus arms held at shoulder height. It builds quad endurance, fires the glutes hard, and stretches the adductors and hip flexors at the same time.
It looks easy in the photo, then your legs start shaking around breath four and you understand why this one shows up in nearly every vinyasa class as a strength test disguised as a pose.
This guide covers the alignment cues that protect your knees, the mistakes that turn a hip-opener into a low-back ache, and the regressions and progressions that match your level.
Quick Facts: Goddess Pose
- Equipment needed: None (yoga mat optional)
- Difficulty: Beginner (shallow) to Intermediate (full depth)
- Modality: Yoga / isometric strength
- Body region: Lower body (primary) + core and shoulders (secondary)
- FitCraft quest category: Yoga
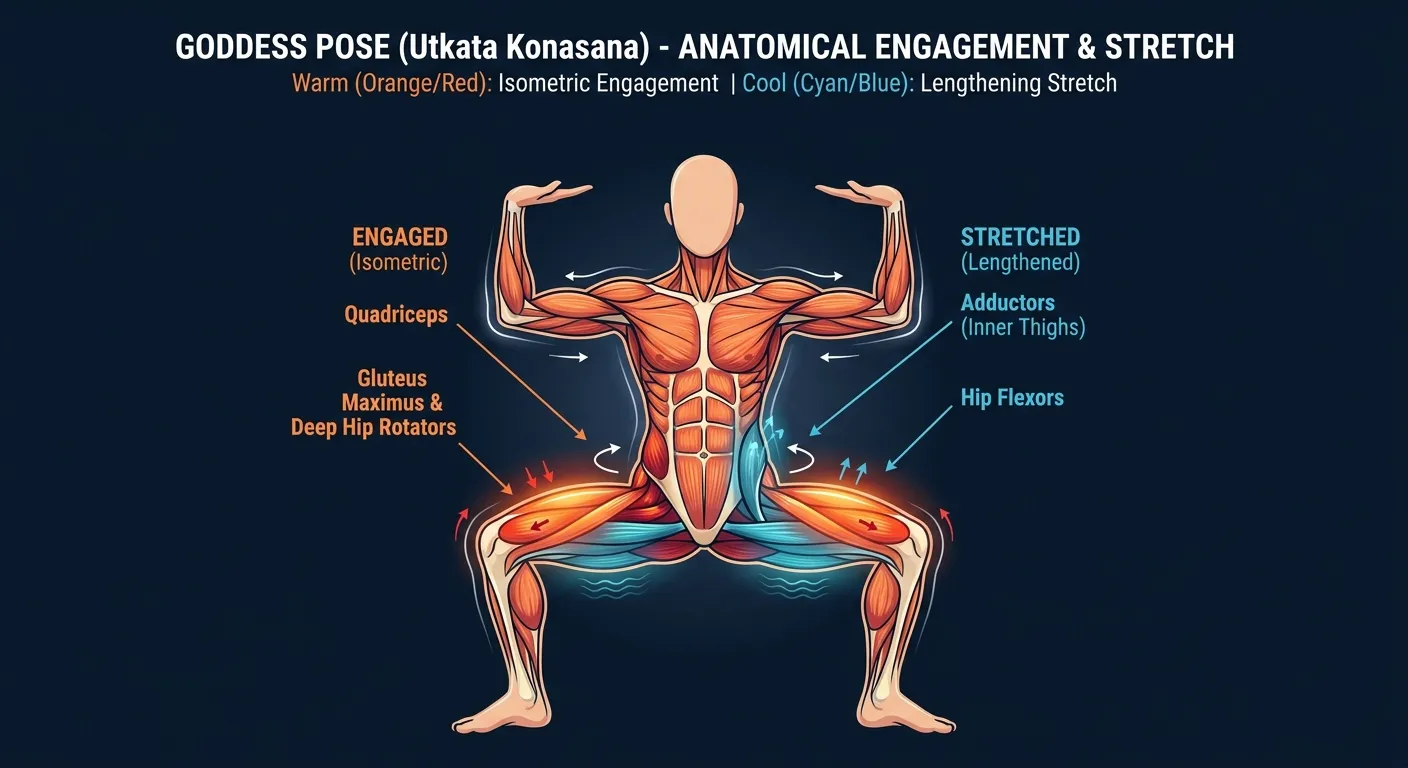
Muscles Engaged & Stretched
Primary movers: the quadriceps (rectus femoris and the three vasti) and the gluteus maximus hold the deep partial-squat against gravity. The deep hip external rotators (piriformis, gemelli, obturators, quadratus femoris) and gluteus medius work continuously to keep the femurs turned out, which is what makes goddess pose distinct from a standard squat.
Secondary movers: the calves (gastrocnemius and soleus) stabilize the ankles in the externally rotated position. The hip flexors hold the pelvis in neutral relative to the femurs. The deltoids and trapezius support the cactus arms at shoulder height, with the upper back (rhomboids and middle trapezius) drawing the shoulder blades down and together.
Muscles stretched: the adductor group (adductor longus, brevis, magnus, and gracilis) is lengthened under load throughout the hold. This is what makes the inner thighs burn within a few breaths. The hip flexors (psoas and iliacus) also lengthen on the front side of the pelvis, and the chest opens with the cactus arm position. Stabilizers include the deep core (rectus abdominis, transverse abdominis, obliques, erector spinae) bracing the trunk against lumbar over-extension, plus the breath, which steadies the working muscles and the stretched fascia.
Mechanism: goddess pose is one of the few movements that loads hip external rotation under significant resistance. Most lower-body work happens in a hip-neutral or slightly turned-out position; here the hips are turned out close to 45 degrees, which means the deep rotators have to fire continuously to maintain the position while the quads and glutes carry the load. That combined demand is why people feel goddess pose in places they don't normally feel a squat (the deep glute, the inner thigh, the outer hip), and why it doubles as a mobility drill for the hips alongside its strength benefits.
Step-by-Step: How to Perform Goddess Pose
- Set a wide stance with feet turned out. Step your feet 3 to 4 feet apart, wider than the mat. Turn both feet out to roughly 45 degrees so the toes track diagonally outward. Your knees will track over this same line throughout the pose.
Coach Ty's cue: "Your knees and toes have to point in the same direction. That single rule prevents most knee complaints in this pose." - Bend the knees and lower into the squat. On an exhale, bend the knees and lower the hips until the thighs approach parallel with the floor. Keep the torso upright and stacked over the pelvis. Don't lean forward.
Ty's cue: "Sink straight down between your feet. Imagine your spine is a pole and the hips slide down it." - Bring the arms into cactus position. Lift both arms to shoulder height and bend the elbows to 90 degrees so the palms face forward, fingers pointing up. This is cactus arms. Alternative: bring the palms together overhead for a longer reach.
Ty's cue: "Pull your shoulder blades down your back, don't let them creep up toward your ears." - Engage the core and hold. Draw your lower ribs in and lengthen your tailbone toward the floor to keep the spine neutral. Engage your core. Hold for 5 to 10 breaths, breathing steadily.
Ty's cue: "Steady breath, neutral spine. If you can't breathe slowly, come up an inch." - Release with control. Straighten the legs back to a wide stance on an inhale, then step the feet together to return to mountain pose. Shake out the legs if the quads and adductors are burning.
Get this exercise in a personalized workout
FitCraft, our mobile fitness app, uses its AI coach Ty to program yoga poses like this into your plan at the right volume and intensity, based on your level, goals, and equipment. Ty was designed and trained by Domenic Angelino, MPH (Brown University) and NSCA-CSCS, with research published in the Journal of Strength and Conditioning Research and Medicine & Science in Sports & Exercise.
Take the Free Assessment Free · 2 minutes · No credit card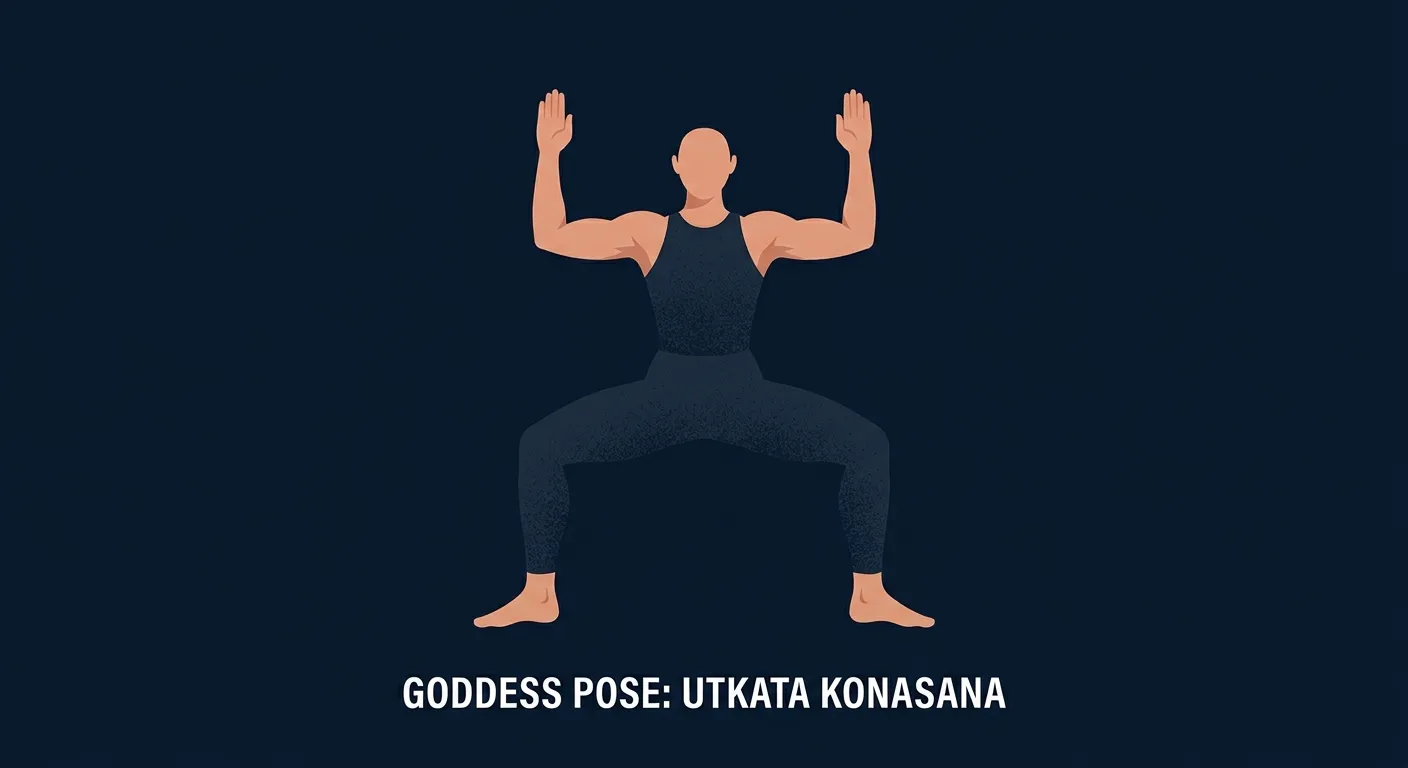
Common Mistakes (and How to Fix Them)
Here are the mistakes Ty corrects most often:
- Knees collapsing inward. The most common mistake. When the knees track inward (away from the toes), the medial knee structures take excess load and the glutes disengage. Fix: actively press the knees out over the pinky-toe side of each foot. Think "open the doors" with the knees.
- Torso leaning forward. The pose loses its strength stimulus when you fold forward at the hips. The spine should stack vertically over the pelvis. Fix: think of lengthening the crown of the head upward as the hips sink down.
- Arching the lower back. When the cactus arms come up, the lumbar wants to extend. That's compression dressed up as a deeper pose. Fix: pull the front ribs down, engage the abs, and lengthen the tailbone toward the floor.
- Stance too narrow. If the feet are closer together than the goddess width, the hips can't open into external rotation and the pose loses its hip-opening benefit. Fix: take a wider step, at least the length of one leg plus a foot.
- Heels lifting off the mat. If the ankles are tight, the heels may lift to let the hips drop. This shifts load forward onto the knees. Fix: don't go as deep. Stay shallower until ankle mobility allows full heel contact.
- Holding the breath. The pose is intense. People stop breathing without realizing it. Fix: count your breaths out loud or with a partner if needed. If the breath can't stay steady, come up.
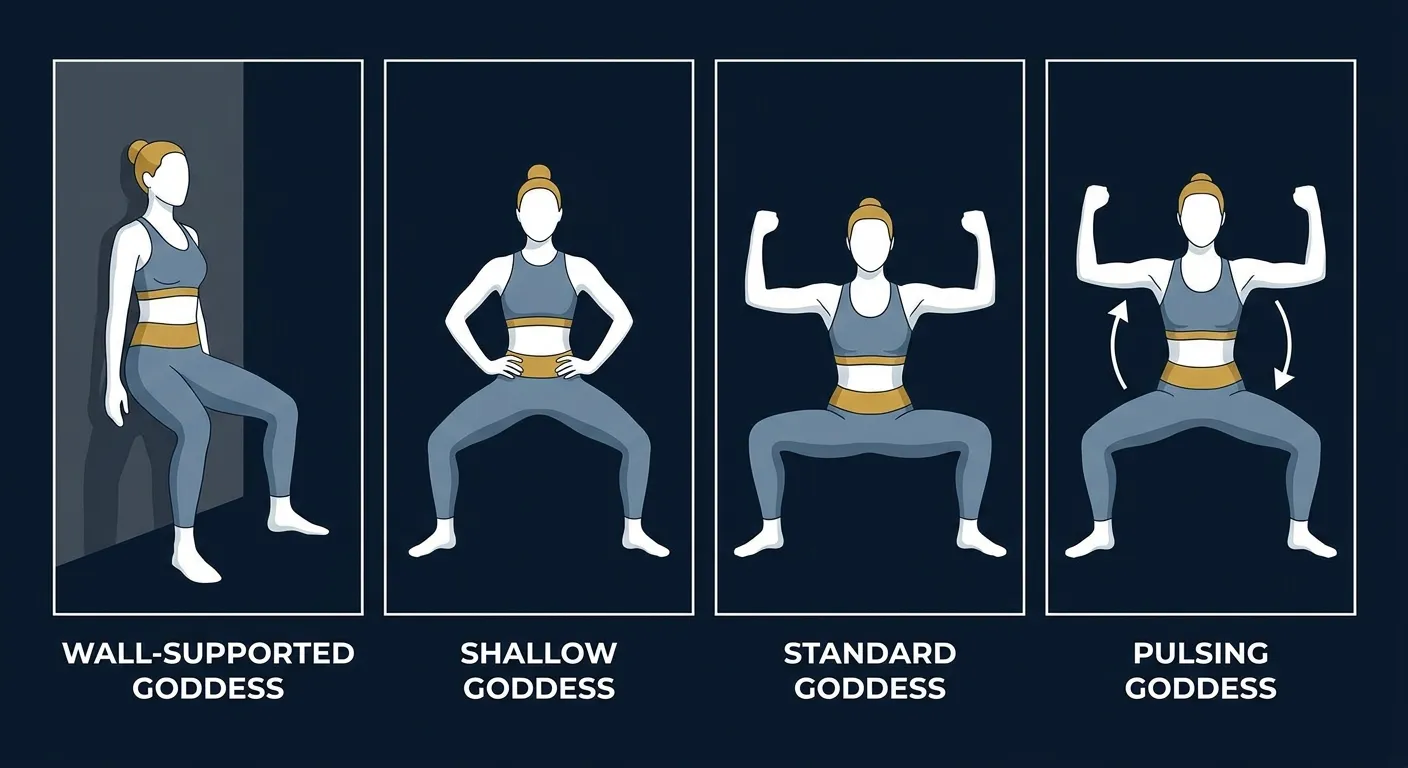
Goddess Pose Variations: Regressions and Progressions
Wall-Supported Goddess (Beginner Regression)
Stand with your back against a wall and slide down into the goddess position. The wall supports your spine and lets you focus on knee tracking and depth without worrying about balance or trunk stability.
Shallow Goddess (Standard)
Take the full stance but only lower to a quarter-squat or half-squat depth. This still trains the pattern without demanding full hip mobility. Go deeper over weeks.
Standard Goddess (Intermediate)
Full stance, hips at thigh-parallel, cactus arms or arms overhead, held for 5 to 10 breaths. This is the version most yoga classes teach.
Goddess with Heel Lifts (Calf-Focused Progression)
From the standard hold, slowly lift and lower the heels for 5 to 10 reps without shifting the hips. Adds dynamic calf and balance demand.
Pulsing Goddess (Endurance Progression)
From the standard depth, pulse the hips up and down by 1 to 2 inches for 10 to 20 reps. This is brutal on the quads and adductors. Used in barre and power yoga classes.
When to Avoid or Modify Goddess Pose
Goddess pose is safe for most healthy adults, but a few conditions call for modification or temporarily substituting an easier variation. None of these are permanent restrictions. They're starting points. Always consult your physician or physical therapist before starting a new exercise practice.
- Patellar tendinopathy or anterior knee pain. The sustained quad load at a flexed knee can aggravate patellar tendon issues. Modify with shallower depth, prioritize knee tracking over depth, and use the wall-supported variation to control depth precisely. Stop if you feel sharp pain in the joint itself.
- Hip labral tears or femoroacetabular impingement (FAI). Deep hip flexion combined with external rotation is exactly the position that can provoke labral or impingement symptoms. Reduce depth, narrow the turnout angle, or substitute with bodyweight squats in a more neutral hip position until cleared by your provider.
- Acute knee injury or recent knee surgery. Get clearance from your surgeon or physical therapist before any loaded knee flexion. Many post-surgical protocols start with isometric quad sets and shallow wall sits before progressing to a wide turnout stance.
- Acute shoulder injury or rotator cuff irritation. The cactus arm position loads the shoulders at end-range external rotation. Modify with prayer hands at the chest or hands on hips, which preserves the leg work without loading the shoulders.
- Late pregnancy. The wide stance often remains comfortable in pregnancy, but balance and the deep core engagement change. Substitute with the wall-supported variation taught by a prenatal yoga instructor.
- Uncontrolled hypertension. Isometric holds elevate blood pressure during the contraction. If you have uncontrolled hypertension, consult your physician about which holds are safe and how long. Avoid breath-holding.
- Lower-back pain that worsens with overhead arm reach. If the lumbar spine arches as soon as the arms go up, the overhead reach is loading the lower back. Build bracing strength first with deadbugs, bird-dogs, and forearm planks, and keep the hands at the chest until your core can hold a neutral spine throughout the reach.
Related Exercises
If goddess pose is part of your practice, these movements complement or extend the same pattern:
- Same body region (similar yoga pose): Chair pose trains the same isometric quad-and-glute pattern from a narrower stance. Warrior pose and Warrior 3 load the legs in different planes with added balance demand.
- Easier regression (similar pose, less depth/balance): Wall sits remove the balance and trunk-stability requirement so you can focus entirely on quad endurance with controlled depth.
- Same wide-stance pattern with external load: Sumo squats use the same wide turnout stance as a dynamic squat. Goblet squats are a good progression if you want to add external load to the pattern.
- Mobility prep: Butterfly pose and hip abductor stretch open the adductors and external rotators, which limit goddess pose depth when tight.
- Core foundation for stable pose: Deadbugs and forearm planks isolate the bracing pattern goddess pose relies on. Useful if the lower back arches during the overhead reach.
- Dynamic alternative for the same muscles: Bodyweight squats and jump squats train the same quad-and-glute pattern through a full range of motion instead of an isometric hold.
How to Program Goddess Pose
Goddess pose programming follows the same evidence-based principles as any isometric strength work, with a yoga-specific framing. The American College of Sports Medicine (ACSM) Position Stand on resistance training supports the use of isometric holds for muscular endurance and recommends frequency that allows for adequate recovery between high-effort sessions (Ratamess et al., 2009). Yoga's lower load profile permits daily practice at moderate intensity.
| Level | Hold time | Sets & rest | Frequency |
|---|---|---|---|
| Beginner | 3-5 breaths (~15-30 seconds) | 1-2 holds, 30-60 sec rest | 3-5 sessions/week |
| Intermediate | 5-10 breaths (~30-60 seconds) | 2-3 holds, 15-30 sec rest | 4-6 sessions/week |
| Advanced | 10-15+ breaths (~60-90+ seconds) | 3-5 holds, deeper or pulsing variations | 5-7 sessions/week |
Where in your workout: Goddess pose fits in three contexts. As part of a standalone yoga session, sequence it after a brief warm-up and alongside other standing poses like warrior and triangle. As a warm-up before training, use 1-2 short holds (15-30 seconds) to activate the glutes and open the hips before squats or lunges. As a finisher, two to three near-max-duration holds at the end of a leg day will challenge anyone. Yoga programming differs from resistance training: frequency can be daily because the stimulus is mobility and isometric endurance rather than progressive overload.
Form floor over hold-time targets: if the knees start to track inward or the lower back arches and cueing can't fix it, end the hold there. Hitting a target time with broken form is worse than ending the hold cleanly and resting before another set.
How FitCraft Programs This Exercise
Knowing how to hold goddess pose is step one. Knowing when to do it, how long, and when to progress to deeper or pulsing variations is where most people get stuck.
FitCraft's AI coach Ty handles that. During your personalized diagnostic, Ty maps your fitness level, goals, and available equipment. Then Ty builds a personalized program that slots goddess pose into a balanced training plan at the right depth and hold duration for your level. As you get stronger, Ty adjusts the variation and hold time to match your level.
Frequently Asked Questions
Can I do goddess pose with knee pain?
It depends on the source of the pain. Goddess pose is safe for healthy knees when the knees track over the toes (not collapsing inward) and depth is controlled. If you have patellar tendinopathy, meniscus issues, or anterior knee pain, use a shallower depth, prioritize knee tracking over depth, and consider the wall-supported variation for more control. Stop if you feel sharp pain in the joint itself. Consult a physical therapist for personalized guidance if you have a known knee condition.
What muscles does goddess pose work?
Goddess pose primarily works the quadriceps, gluteus maximus, and the deep hip external rotators. The adductors (inner thigh muscles) are lengthened under load, the calves stabilize the ankles, and the core braces the trunk against the demand of the deep wide-stance hold. The shoulders and upper back engage to hold the cactus arms.
How long should I hold goddess pose?
Hold goddess pose for 5 to 10 breaths (roughly 30 to 60 seconds) per set. Beginners can start with 3 to 5 breaths and build up as leg endurance improves. Advanced practitioners can extend to 60 to 90 seconds with deeper variations or pulses.
Why does goddess pose burn so much?
Goddess pose loads the quads and glutes isometrically at near-maximum hip and knee flexion while the externally rotated hips also load the deep rotators and adductors. That's a lot of large-muscle isometric work happening at once. The burn is normal and indicates the muscles are working. If it becomes sharp or focal at a joint, ease out of the pose.
Is goddess pose good for the hips?
Yes. Goddess pose actively trains hip external rotation, abduction, and end-range flexion in a single movement. Over time it builds strength and mobility in the deep hip rotators, glutes, and adductors. People who sit for long hours often find it especially useful as a counterpose.