The windmill looks like a simple side lean, but the movement starts at your hips. As you lower, your hip pushes back toward the dumbbell side and your free hand slides down your front leg. Your chest turns open, and your top arm stays locked straight up with your eyes on the weight.
The name is used for more than one move. The standing toe-touch warm-up, where you bend and reach one hand to the opposite foot and switch sides every rep, is also called a windmill. It is a different exercise, and on this site it is called cross toe touches. The name also covers seated and half-kneeling mobility drills, which this page does not teach.
The windmill can also look like triangle pose in a photo. Triangle pose is a stretch you hold with no weight, with your feet about 3 to 4 feet apart, your front foot turned out and your trunk reaching out over your front leg into a side bend. The windmill is a strength exercise you do for reps: your feet are only a little wider than your hips or shoulders and both turn away from the weight, your hips push back in a hinge, and you stand back up every rep.
The textbook version holds a kettlebell overhead. FitCraft has no kettlebells, so this guide teaches the dumbbell windmill, which Cleveland Clinic and Catalyst Athletics also describe, and it starts you with no weight at all.
Quick Facts: Windmill Exercise
- Equipment needed: One light dumbbell; no weight while you learn, and a band with handles also works
- Difficulty: Advanced, because you hinge, turn your trunk and hold a weight overhead all at once. ACE's exercise library rates the windmill Advanced. Learn it with the no-weight version first.
- Modality: Strength
- Body region: Sides of the waist, glutes, backs of the thighs and the muscles along the spine, with the front of the top shoulder holding the weight
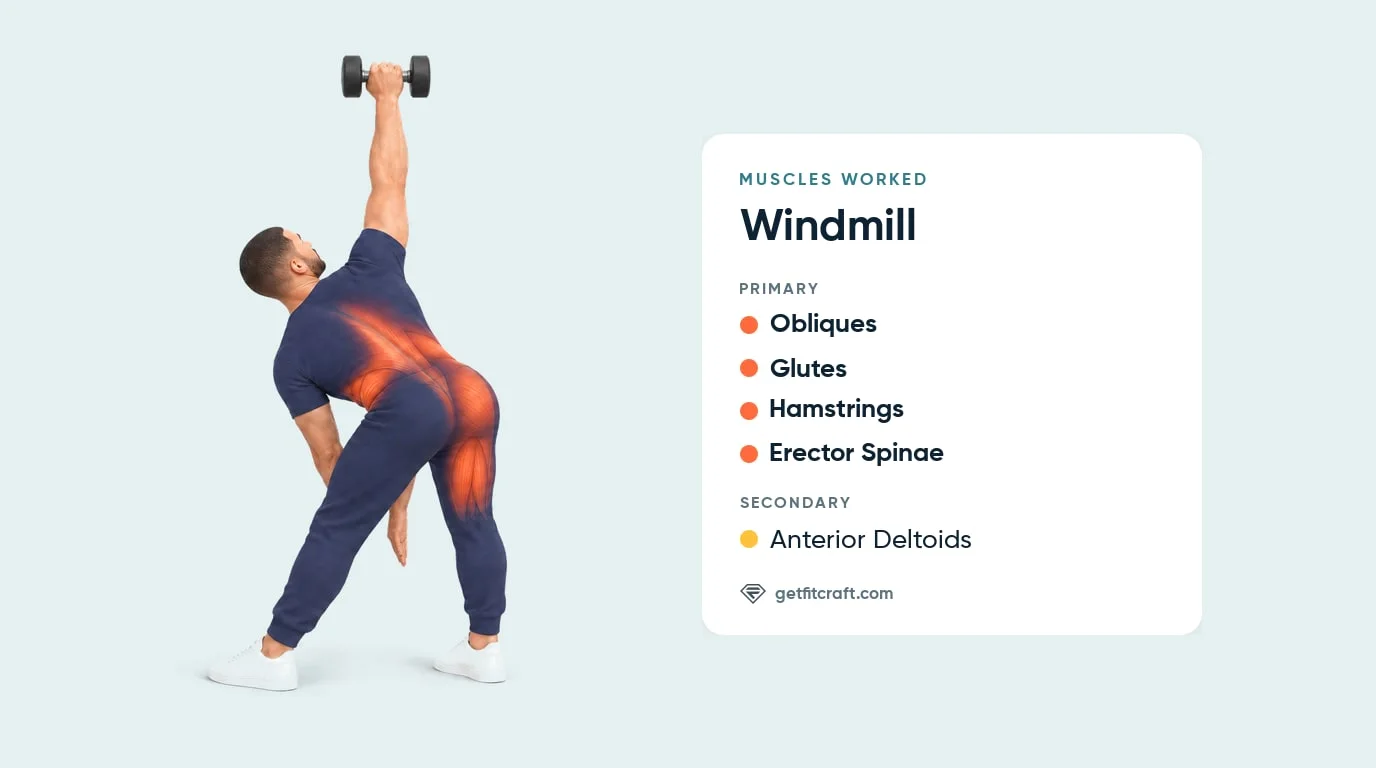
Muscles Worked
Primary movers: the obliques, the glutes, the hamstrings and the erector spinae. The obliques, on the sides of your waist, control the side bend and turn of your trunk on the way down and pull it back up. Your glutes and hamstrings lower your trunk as your hips fold back over the leg on your dumbbell side, then drive your hips forward to stand you up. The erector spinae, the muscles along your spine, hold your back long the whole time.
Secondary: the anterior deltoids, at the front of your shoulder, hold the dumbbell up overhead for the whole set.
Why your eyes stay on the dumbbell: watching the weight keeps it right over your shoulder and helps your upper body turn instead of just bending sideways. Cleveland Clinic notes that looking away from the weight turns the movement into a side bend.
Where you should feel it: mostly in the side of your waist, your glutes and the backs of your thighs. The muscles along your spine hold your back long, and your top shoulder holds your arm steady. You should not feel pain in your lower back, neck or shoulder joint, and any pain there means stop.
No study we found has measured muscle activity in the windmill itself, so these roles come from how the movement works: the hinge at your hips, the turn of your trunk and the weight held still overhead.
Step-by-Step: How to Do the Dumbbell Windmill
Learn the movement with no weight first: reach your top arm straight up and keep your eyes on your hand. When every rep keeps your back long and your arm straight up, hold one light dumbbell instead.
Step 1: Set Your Stance
Stand with your feet a little wider than your hips, or up to a little wider than your shoulders. Turn both feet away from the side that will hold the dumbbell, anywhere from a little to about 45 degrees. If the dumbbell goes in your right hand, both feet turn toward your left, and your left leg is your front leg.
Form tip: your front leg is always the one on your free-hand side.
Step 2: Lock the Dumbbell Overhead
Press one light dumbbell straight overhead and lock your elbow, with your palm facing forward and your wrist straight, so the weight sits right over your shoulder. Let your free arm hang along the inside of your front leg, and look up at the dumbbell.
Form tip: keep your top arm locked and straight up over your shoulder for the whole set.
Step 3: Push Your Hips Back and Hinge
Push your hip out and back toward the dumbbell side and hinge at your hips. Slide your free hand down the inside of your front leg as your chest turns open. Your top arm stays locked and vertical, and your eyes stay on the dumbbell. Breathe in as you lower.
Form tip: hinge from your hips and keep your back long. If you are only bending sideways at the waist, push your hips back more.
Step 4: Stop While Your Back Is Long
Keep both knees close to straight but not locked; your front knee may bend a little. Go only as low as your hips can hinge without your back rounding, whether that is your knee, your shin or the floor. Take about two to four seconds to get there.
Form tip: never round your back to reach the floor. Your hand on your knee or shin is fine.
Step 5: Stand Back Up, Then Switch Sides
Drive your hips forward to stand back up, taking about two to four seconds and breathing out. Do all your reps on one side. To finish, stand tall, bend your elbow to bring the dumbbell to your shoulder and lower it to your side. Then switch hands, turn your feet the other way and do the same number of reps.
Form tip: always stand up before you lower the dumbbell. If your top arm shakes, bends or drifts, end the set the same way.
Get a personalized dumbbell workout
FitCraft builds your plan from the dumbbell, band, and bodyweight exercises in its library, including cross toe touches and the dumbbell Romanian deadlift, at the right volume for your level, goals, and equipment.
Take the Free Assessment Free · 2 minutes · No credit card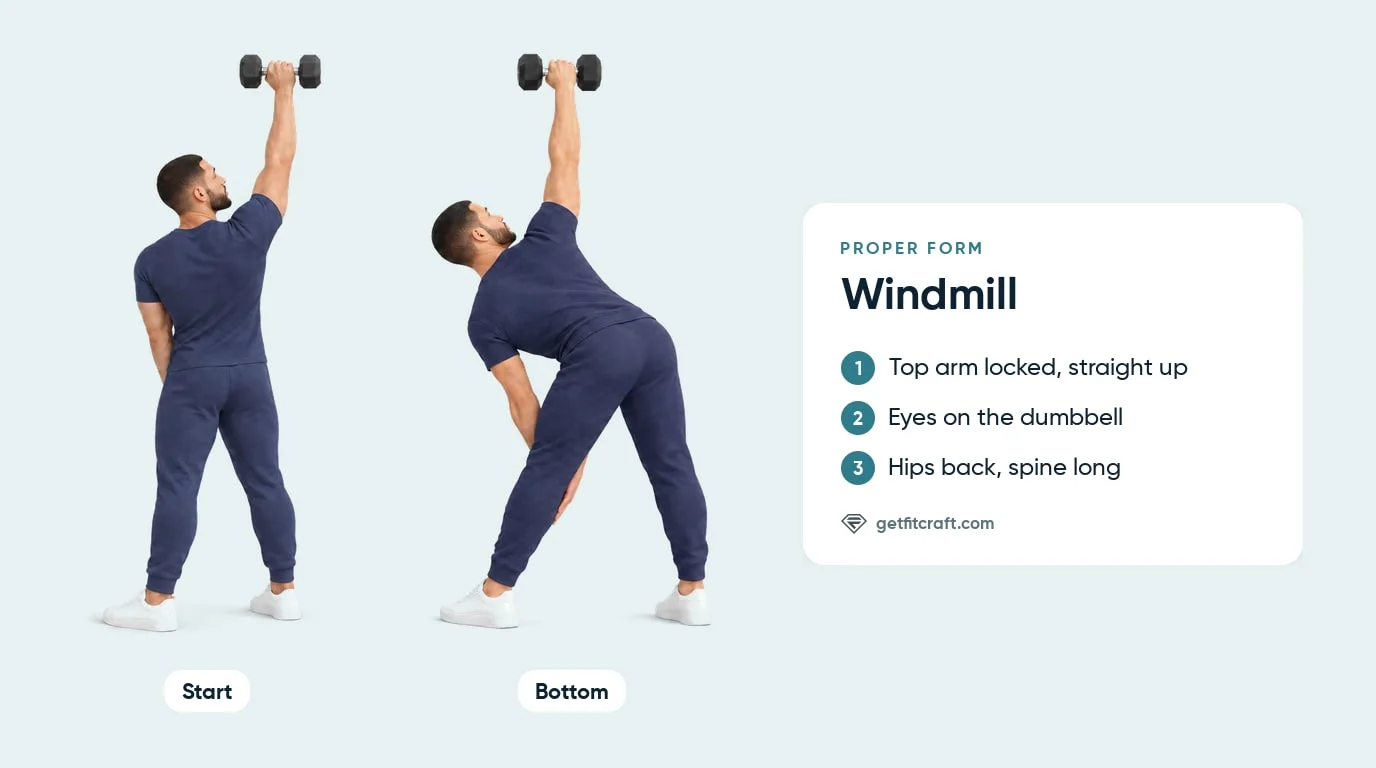
Common Mistakes (and How to Fix Them)
Most windmill mistakes come from chasing depth or using too much weight. Fix the top arm and the hips first, then add range.
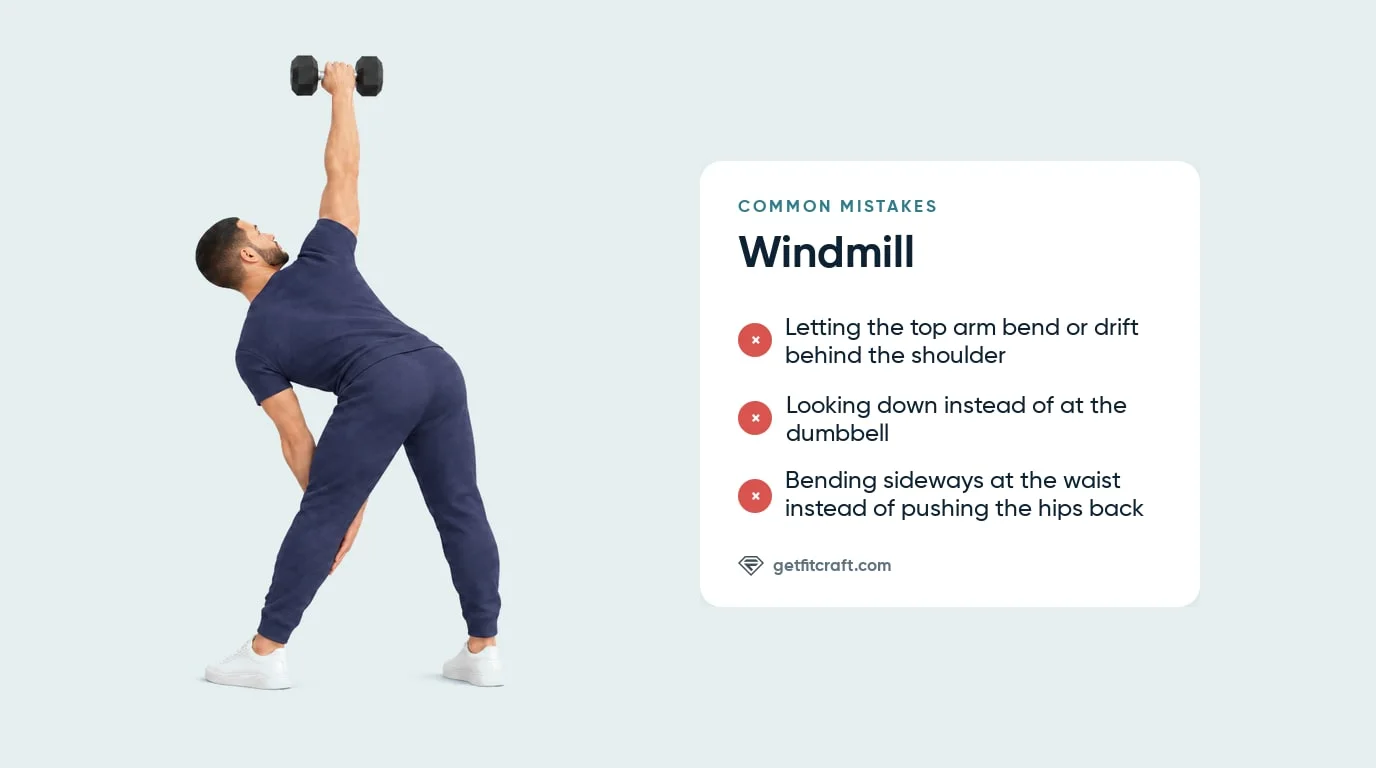
- Letting the top arm bend or drift behind your shoulder. The dumbbell should sit right over your shoulder on a locked arm the whole time. Cleveland Clinic notes that too much weight lets the arm drift behind the shoulder, so go lighter or use no weight, and keep your elbow locked.
- Looking down instead of at the dumbbell. Keep your eyes on the dumbbell the whole rep, down and up. Watching it keeps the weight over your shoulder and helps your upper body turn instead of just bending sideways.
- Bending sideways at the waist instead of pushing your hips back. The movement starts at your hips. Push your hip out and back toward the dumbbell side first, then let your free hand slide down your front leg as your chest turns open.
- Rounding your back to reach the floor. Go only as low as your back stays long. Your knee or shin is far enough, and if the backs of your legs feel tight, let your front knee bend a little.
- Starting with a dumbbell that is too heavy. Learn the windmill with no weight, then use a light dumbbell. Cleveland Clinic suggests starting with no weight or a light one, about 5 to 15 pounds.
- Rushing the reps. Take about two to four seconds to lower and the same to stand back up. Smooth and steady matters more than going deep.
Windmill Exercise Variations: Easier and Harder Versions
Progress in this order: no weight, then the low windmill, then one light dumbbell overhead, then a few pounds more.
No-Weight Windmill (Learn It Here)
Do the same movement with your top arm reaching straight up and your eyes on that hand. This is the version to learn the shape with, before you hold any weight.
Low Windmill
Hold the dumbbell low in your bottom hand instead, with your empty top arm reaching straight up, and slide the dumbbell down the inside of your front leg as your hips push back. ACE's exercise library teaches this version with a kettlebell as the Low Windmill, and ACE's Pete McCall starts with the weight low before moving it overhead.
Shorter Reach or a Bent Front Knee
Slide your hand only to your knee, or let your front knee bend a little as you lower. A slightly bent front knee makes the reach easier when the backs of your legs feel tight, and ExRx lists a bent-knee windmill as its slightly easier version.
Dumbbell Windmill (The Version This Page Teaches)
Hold one light dumbbell straight overhead on a locked arm and follow the steps above. Cleveland Clinic and Catalyst Athletics both list a dumbbell for the windmill.
Kettlebell Windmill
The textbook version holds a kettlebell overhead. Overhead, a kettlebell's ball rests behind your forearm, so its weight sits off your hand, while a dumbbell's weight sits centered in your palm. Either way your wrist stays straight and the movement is the same. FitCraft has no kettlebells, so this page sticks to the dumbbell.
Band Windmill
Stand on one end of a band with handles and hold the other handle straight overhead, then do the same movement. This works when you do not have a dumbbell.
Heavier Dumbbell or a Deeper Reach
Once 10 to 15 slow reps per side feel easy, use a dumbbell a few pounds heavier. You can also reach lower, toward the floor inside your front foot, but only while your back stays long and your top arm stays straight up.
When to Avoid or Modify the Windmill
The windmill is not a beginner exercise, so learn it with no weight first. A stretch or a burn in the sides of your waist, your glutes or the backs of your thighs is normal; any pain in a joint, your lower back or your neck means stop. A few conditions call for a check with a doctor or physical therapist first. Always consult your physician or physical therapist for personalized guidance.
- Shoulder pain or a past shoulder injury. Your top arm holds a dumbbell overhead for the whole set. See a doctor or physical therapist before you do windmills, and ask them which exercises suit you. During any rep, shoulder pain means stop: stand up, then lower the dumbbell to your shoulder and down to your side.
- Lower back pain or other back problems. The windmill hinges and turns your trunk while the muscles along your spine hold it long. Skip windmills while your back hurts, and see a doctor or physical therapist before you do them. Any lower back pain during a rep means stop.
- Neck pain. You keep your eyes on the dumbbell, so your head turns up toward it for the whole rep. If you have neck pain or a neck problem, check with a doctor or physical therapist first. Any neck pain means stop.
- Hip, knee or wrist pain. The hinge loads the hip on the dumbbell side, your knees stay close to straight, and your wrist holds the weight overhead. If you have pain in any of these joints, see a doctor or physical therapist before you do windmills, and ask them which exercises suit you. Any joint pain during a rep means stop.
- Dizziness or balance problems. You lower your trunk while you look up at a weight overhead. If you often feel dizzy or unsteady, check with your doctor before you do windmills. If you feel dizzy or light-headed during a set, come up slowly, lower the dumbbell and rest.
Related Exercises
If the windmill is part of your plan, these exercises build the same hip hinge, side-of-the-waist strength or overhead control:
- Same hip hinge: Romanian Deadlift and Good Mornings train the hinge the windmill is built on, without the turn or the weight overhead.
- Sides of the waist: Side Planks and Russian Twists work the obliques.
- Overhead strength: the dumbbell Shoulder Press trains the front of the shoulders, the muscles that hold the windmill's dumbbell up.
- Look-alikes that are different moves: Cross Toe Touches are the toe-touch warm-up also called a windmill, and Triangle Pose is a held yoga stretch.
How to Program the Windmill Exercise
The windmill fits best as a slow core and hip exercise near the end of a session, which is where Catalyst Athletics places it. No study has tested sets and reps for the windmill itself, so the ranges here come from coaching sources. ACE's Pete McCall suggests four to six reps per side, Cleveland Clinic five or ten, and Catalyst Athletics eight to twelve. About 5 to 10 slow reps per side is a good place to start.
For how often to train, the American College of Sports Medicine position stand on resistance training suggests 2 to 3 days a week for novices (Ratamess et al., 2009). It does not cover the windmill itself.
| Version | Reps per side | Move on when |
|---|---|---|
| No weight, top arm reaching straight up | About 5 to 10, slow | Your top arm stays straight up, your eyes stay on your hand and your back stays long on every rep |
| Low windmill, dumbbell in the bottom hand | About 5 to 10, slow | The same three checks hold on every rep with the weight in your hand |
| Dumbbell windmill, weight locked overhead | About 5 to 10, slow | 10 to 15 slow reps per side feel easy; then use a dumbbell a few pounds heavier |
Sets and rest: build up to 4 sets over time, resting 30 to 45 seconds between them, as ACE suggests. Do all your reps on one side, then switch.
Form floor over rep targets: end the set when your top arm shakes, bends or drifts, or you cannot keep your back long. Stand up first, then bring the dumbbell down to your shoulder and to your side.
The Windmill Exercise and FitCraft
The windmill is a skill you build in stages: no weight first, then the low windmill, then one light dumbbell overhead. Most of the progress comes from keeping the same clean shape as the weight goes up.
The FitCraft app does not include the windmill, so use the stages above to plan it yourself. The app's closest exercises are cross toe touches, a different bodyweight fold and turn that works the same four main muscles, and the dumbbell Romanian deadlift, which trains the same hip hinge.
FitCraft's own programs are built from the dumbbell, band and bodyweight exercises in its library, with no barbells. The app shows each exercise in a 3D demo so you can check your form, and it turns your workouts into a game to help you stick with them. Every program is shaped by an Ivy League-trained exercise scientist and NSCA-certified strength coach using evidence-based progression.
Frequently Asked Questions
Can I do the windmill exercise with back or shoulder pain?
Not while it hurts. A burn in the sides of your waist, your glutes or the backs of your thighs is normal, but any pain in your lower back, your neck, your shoulder or another joint means stop right away: stand up, then lower the dumbbell to your shoulder and down to your side. If you have back or shoulder problems, see a doctor or physical therapist before you do windmills, and ask them which exercises suit you.
What muscles does the windmill exercise work?
The windmill works four main muscles: the obliques, the glutes, the hamstrings and the erector spinae. The obliques, on the sides of your waist, control the bend and turn of your trunk and pull it back up. The glutes and hamstrings lower and raise your trunk as your hips fold back and drive forward, and the erector spinae, along your spine, hold your back long. The anterior deltoids, at the front of your shoulder, help by holding the dumbbell up.
What is a kettlebell windmill?
The kettlebell windmill is the textbook version of this exercise: you hold a kettlebell straight overhead, push your hips back and slide your free hand down the inside of your front leg. With one dumbbell the movement is the same, and that is the version this page teaches, since FitCraft has no kettlebells. Overhead, a kettlebell's ball rests behind your forearm, so its weight sits off your hand, while a dumbbell's weight sits centered in your palm. Either way, keep your wrist straight.
Is the windmill the same as the toe-touch windmill warm-up?
No. The standing toe-touch warm-up that is also called a windmill has you bend and reach one hand to the opposite foot, then switch sides every rep. On this site that move is called cross toe touches. The windmill on this page is a slow strength exercise: your free hand slides down its own-side leg while your other arm holds a dumbbell straight overhead, and you do all your reps on one side before you switch.
What is the difference between the windmill and triangle pose?
Triangle pose is a stretch you hold with no weight. Your feet are about 3 to 4 feet apart, your front foot turns out, both legs stay long and your trunk reaches out over your front leg into a side bend. The windmill is a strength exercise you do for reps with a dumbbell. Your feet are only a little wider than your hips or shoulders and both turn away from the weight, your hips push back toward the weight side in a hinge, your top arm holds the dumbbell straight up over its shoulder, and you stand back up every rep.
Are windmill exercises effective?
No study has tested the windmill itself, so there is no measured answer. The movement trains the sides of your waist, your glutes and hamstrings and the muscles along your spine in one exercise, while your shoulder learns to hold a weight steady overhead. Working one side at a time also shows if one side is weaker.
How low should you go in a windmill?
Only as low as you can while your back stays long and your top arm points straight up. Your hand on your knee or shin is fine, and you don't have to touch the floor. Reaching to the floor inside your front foot is the full range, for when your back stays long all the way down.