The dead hang is the entry-level pull-up bar exercise: you grip a bar overhead, lift your feet, and let your bodyweight hang from your hands. No pulling, no shoulder set, no core brace. The whole body goes passive and gravity does the rest. It looks like nothing is happening, but it's training one of the most under-developed qualities in most modern bodies, grip endurance, while gently decompressing the shoulders and lower spine.
Here's the trap: people see the dead hang demoed online and assume it must be active to do anything. They start cueing themselves into shoulders-down, lats-on, core-braced, glutes-squeezed positions. That's a different exercise (the engaged hang), and it serves a different purpose. The dead hang is supposed to be quiet. The point is to teach the hands and the soft tissue around the shoulder how to tolerate hanging under bodyweight, which is a prerequisite before any of the louder pulling work.
Used as written, the dead hang scales from a 10-second beginner hold to a multi-minute weighted endurance challenge. This guide covers the setup, the form floor, the common mistakes that turn a passive hang into a shoulder problem, and how to slot it into a pulling-day warm-up or grip block.
Quick Facts: Dead Hang
- Equipment needed: pull-up bar (doorway bar, rack-mounted bar, or sturdy overhead beam) plus a box or step stool for safe setup
- Difficulty: Beginner (feet-assisted) to Intermediate (full bodyweight for 30 to 60 seconds) to Advanced (weighted holds beyond 60 seconds)
- Modality: Passive isometric hang, bilateral, pronated grip
- Body region: Upper body (grip, forearms, shoulder girdle, lats receive a passive stretch)
- FitCraft quest category: Grip endurance and shoulder mobility
Muscles Worked
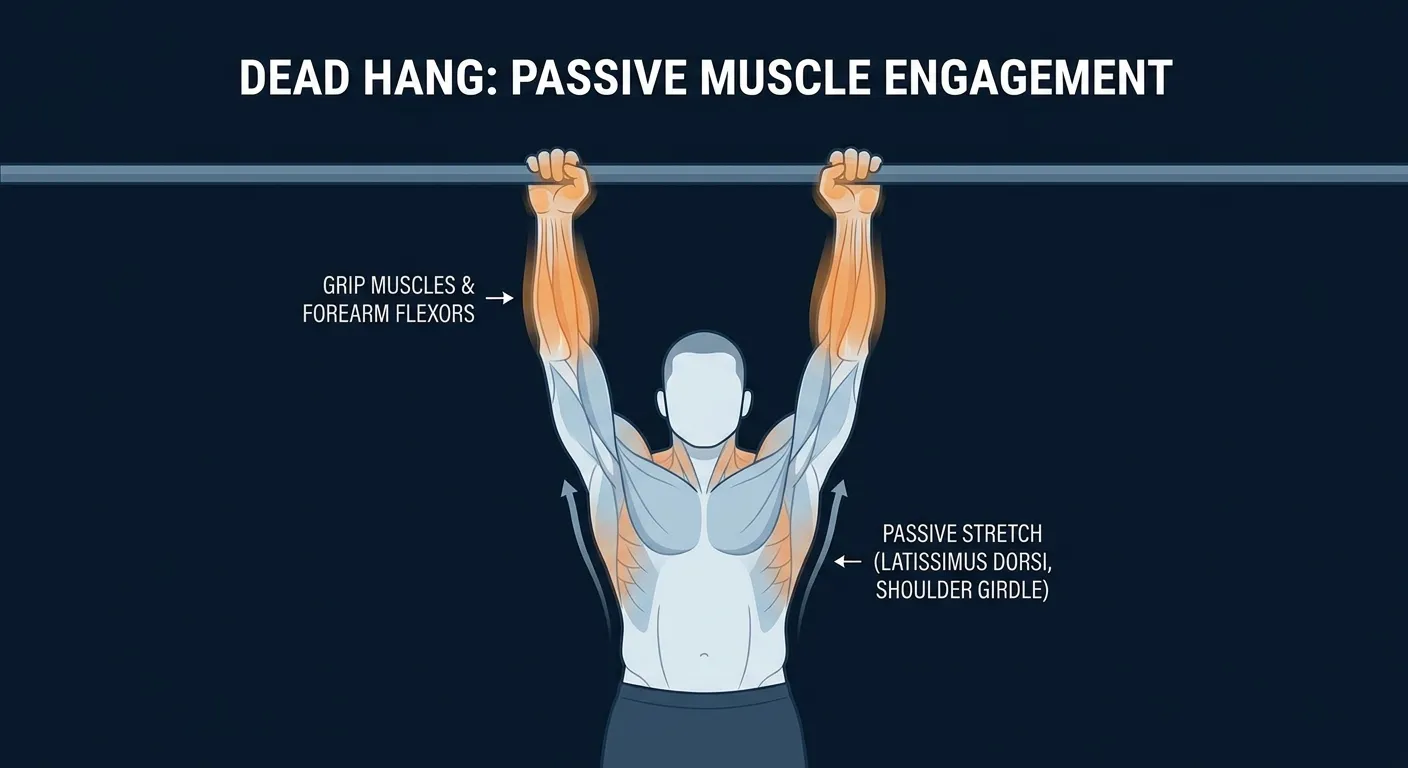
Primary movers: the forearm flexors (flexor digitorum superficialis, flexor digitorum profundus, flexor carpi radialis, flexor carpi ulnaris) work as a max-effort isometric to squeeze the bar and support bodyweight. The thumb flexors contribute when the thumb is wrapped under the bar for a full grip. Grip is the limiting factor for almost every beginner.
Secondary movers: in a true passive dead hang, no other muscles work concentrically. The biceps brachii and brachialis are mildly active to prevent elbow hyperextension under the load, and the upper trapezius shrugs passively as the shoulders rise toward the ears. These are technically isometric contributors rather than movers because nothing is moving by design.
Passively stretched (load-bearing through length, not contraction): the latissimus dorsi takes a long axial pull from origin (thoracolumbar fascia, iliac crest) to insertion (intertubercular groove of the humerus). The teres major and the posterior shoulder capsule are also lengthened. The pectoralis minor stretches at the front of the shoulder as the scapula upwardly rotates and protracts. The thoracic spine gently extends, and the intervertebral discs of the lumbar spine receive a brief decompression as gravity pulls the pelvis away from the rib cage.
Why passive vs. active matters mechanically: in a passive hang, the bodyweight load is transferred largely through the joint capsule, ligaments, and the long lever of the relaxed musculature. This is what gives the dead hang its decompression and shoulder-mobility effects, but it's also why an acute rotator cuff or shoulder-impingement injury can be aggravated by hanging at full elevation. The active engaged hang transfers load through the contractile tissue (lats, lower traps, rotator cuff) instead, which trains different qualities and protects the joint capsule at the cost of higher metabolic demand. Both have their place.
Step-by-Step: How to Perform a Dead Hang
The dead hang is short on technique and long on patience. The cues below cover the safe setup and the dismount, which is where most novices get hurt.
Step 1: Set up under the bar
Position yourself under a sturdy pull-up bar with a box, bench, or step stool close enough that you can reach the bar by standing on it. Keep the box in place so you can dismount safely without dropping.
Coach Ty's cue: "Setup is the safety. Box stays put for the dismount."
Step 2: Grip the bar overhand
Reach up and grip the bar with a pronated (overhand) grip, hands roughly shoulder-width apart. Wrap your thumbs around the bar for a full grip. Squeeze the bar firmly enough to support your bodyweight before you commit your feet.
Ty's cue: "Thumbs under the bar, not on top. The thumb wrap protects you if the grip starts to give."
Step 3: Step off and hang
Step off the box and let your bodyweight hang from the bar. Keep your arms straight with a soft micro-bend at the elbow (don't hyperextend), feet off the floor, and the rest of your body completely relaxed.
Ty's key cue: "Soft micro-bend at the elbows. Locked-out hyperextension loads the joint capsule instead of the muscles."
Step 4: Hold passively and breathe
Allow your shoulders to relax up toward your ears. Let the chest open, hips hang heavy, and legs dangle. Breathe steadily through the nose for the prescribed hold (typically 10 to 30 seconds for beginners). Don't fight the position; the point is to be quiet under the load.
As Ty coaches it: "Let gravity do the work. Hips heavy, legs heavy, breathe."
Step 5: Step down under control
Reach a foot back to the box and step down with control rather than dropping. Shake out your hands, rest, and reset for the next hold. Dropping from height loads cold shoulders and wrists and risks a soft-tissue strain.
Ty's reminder: "Step down, never drop. The dismount is part of the rep."
Get this exercise in a personalized workout
FitCraft, our mobile fitness app, uses its AI coach Ty to program pulling exercises like this into your plan at the right volume and intensity, based on your level, goals, and equipment. Ty was designed and trained by Domenic Angelino, MPH (Brown University) and NSCA-CSCS, with research published in the Journal of Strength and Conditioning Research and Medicine & Science in Sports & Exercise.
Take the Free Assessment Free · 2 minutes · No credit card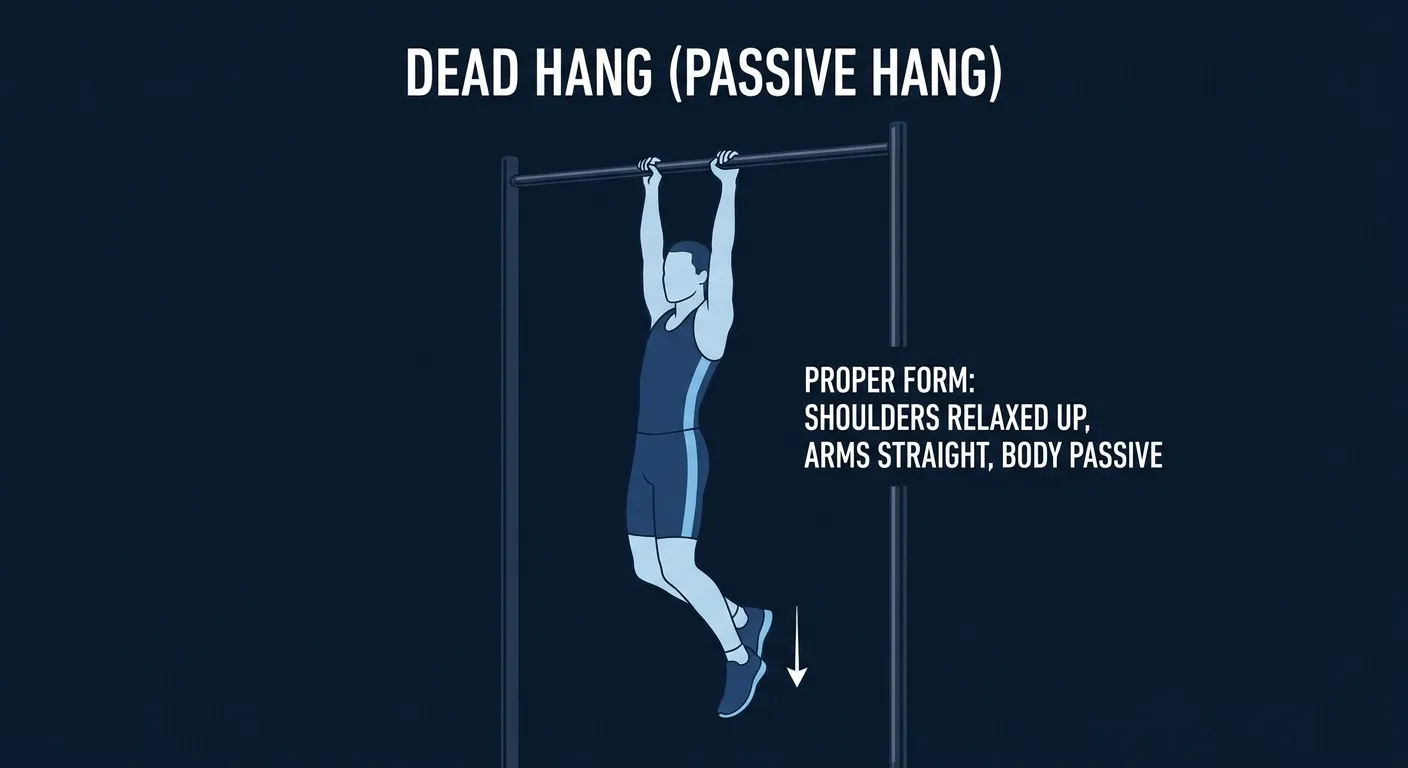
Common Mistakes (and How to Fix Them)
The dead hang is so simple that it's easy to overlook the few mistakes that can turn it into a shoulder or wrist problem.
- Thumbless (or "monkey") grip. Resting the thumb on top of the bar alongside the fingers feels easier but cuts your safety margin in half. If the grip starts to fail mid-hold, there's nothing to stop the hand from sliding off. Fix: wrap the thumb under the bar opposite the fingers (full grip) on every hold.
- Jumping or kipping into the hold. Hopping up to the bar lands cold soft tissue under bodyweight in one impact. It's also how people pull a lat or jam a shoulder. Fix: set up on a box, step off into the hang, and step back onto the box for the dismount.
- Holding the breath. Bracing your breath during a passive hang spikes intra-thoracic pressure and accelerates grip fatigue. Fix: breathe steadily through the nose for the entire hold. If you can't breathe normally, your form has drifted into an active hold, or the duration is too long.
- Hyperextending the elbows. Fully locked-out arms transfer load off the contractile tissue and into the joint capsule and ligaments of the elbow. People with hypermobility are especially prone. Fix: keep a barely-visible micro-bend at the elbow. The arms should look straight, not folded backward.
- Dropping from the bar at the end of the set. The dismount is the most common injury point for hanging work. Cold soft tissue plus an impact equals a sprain risk. Fix: reach a foot to the box and step down. Always.
- Pushing past grip failure. Hanging on through hands-shaking, grip-peeling-off failure teaches the wrong pattern and risks an uncontrolled drop. Fix: end the set with a controlled dismount while you still have grip in reserve. Quality holds at moderate duration build endurance faster than grinding failures.
Dead Hang Variations: Regressions and Progressions
Start where you are and scale duration or load only when the current variation feels easy and clean.
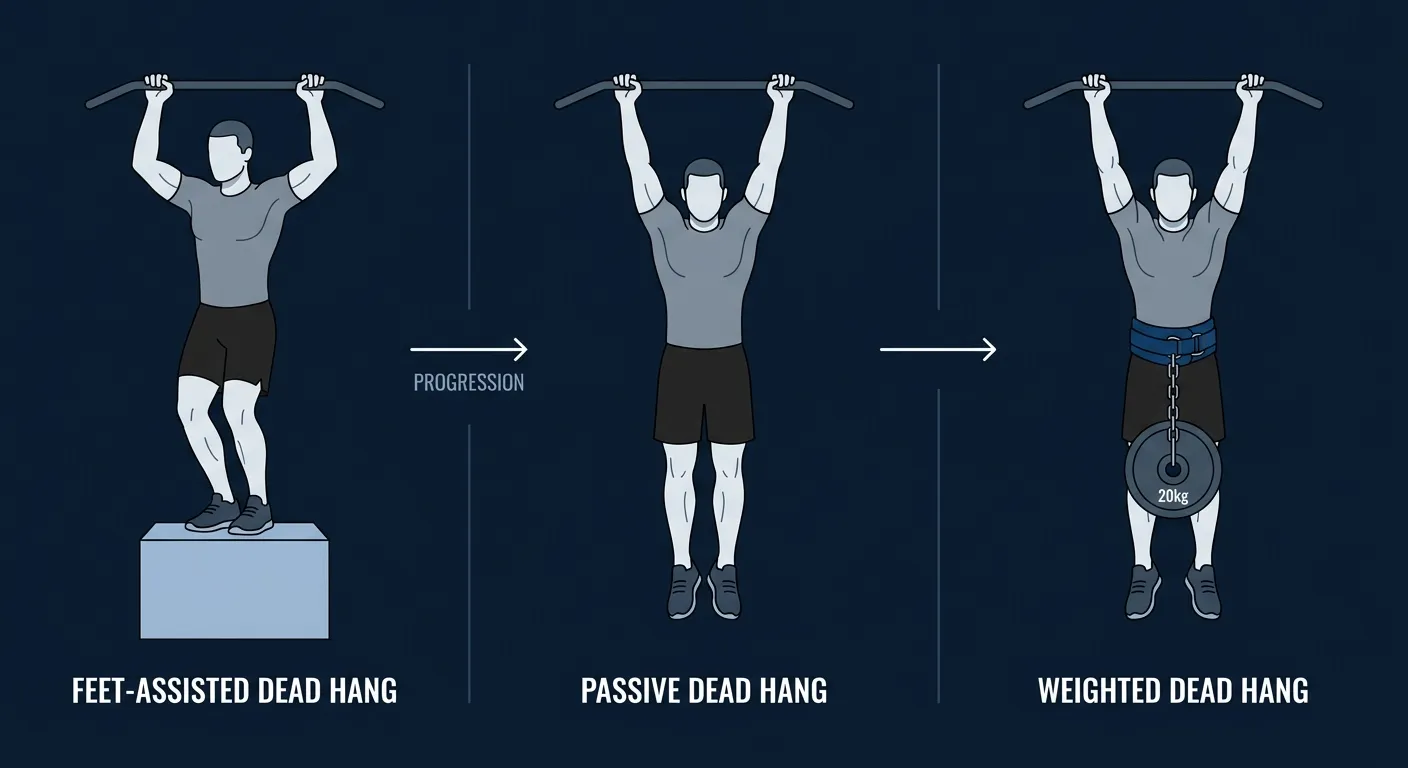
Feet-Assisted Dead Hang (Beginner Regression)
Keep one or both feet on a box or low bench while gripping the bar. The box supports a portion of bodyweight so grip and shoulders can build tolerance without burning out in five seconds. Gradually unload the feet as the hands get stronger.
Standard Dead Hang (Standard)
Full bodyweight passive hang from the bar with a pronated grip. Standard hold time is 10 to 60 seconds. Once you can clean up multiple sets at 60 seconds, you're past beginner.
Engaged Hang (Active Progression)
Same setup, but you actively depress the shoulders, brace the core, and squeeze the glutes. The engaged hang trains the bottom position of a chin-up rather than passive grip endurance. Use it as the natural step toward pulling work.
Weighted Dead Hang (Loaded Progression)
Clip a dip belt around your waist with a light weight plate, or pinch a dumbbell between your feet. Extra load sharply increases grip and shoulder demand. Reserve this for trainees who can hold a clean 60-second unweighted dead hang and have no shoulder, elbow, or wrist sensitivity.
When to Avoid or Modify the Dead Hang
The dead hang is one of the gentlest entry points into pull-up bar work, but the passive loaded overhead position is exactly what makes it problematic for a few specific conditions. Always consult a qualified healthcare provider or physical therapist for guidance on your specific situation.
- Acute shoulder injury or rotator cuff irritation. A passive hang at full shoulder elevation transfers bodyweight load through the joint capsule and the supraspinatus tendon, which can aggravate an active rotator cuff strain, impingement, or labral irritation. Skip dead hangs until cleared by a physical therapist. Substitute with high-incline supported rows or inverted rows at a steep angle, which load grip and scapular work without the overhead position.
- Recent shoulder or elbow surgery. Get clearance from your surgeon before any overhead hanging. Most post-surgical protocols start with scapular activation drills and assisted variations long before the joint is loaded at full elevation.
- Tennis elbow or golfer's elbow (lateral or medial epicondylitis). Sustained grip under load aggravates the elbow tendons. During a flare, reduce hold duration, use a thicker grip (a folded towel over the bar) to spread load across the hand, or substitute with isometric grip work that doesn't load the elbow tendon at end-range.
- Wrist pain or instability. The dead hang loads the wrists in extension under bodyweight. A neutral-grip parallel bar (palms facing each other) cuts wrist stress significantly. Thick-grip handles also help by spreading load across a wider contact area.
- Shoulder hypermobility or generalized joint laxity (e.g., Ehlers-Danlos). A passive hang can over-stretch already-lax shoulder capsules. Use the active engaged hang instead, which keeps the rotator cuff loaded as an active stabilizer rather than passively distracting the joint.
- Uncontrolled high blood pressure or acute cardiovascular symptoms. Hanging from a bar can briefly spike intra-thoracic pressure if you brace or hold your breath. Get medical clearance, breathe steadily through the nose for the entire hold, and start with short feet-assisted durations.
Related Exercises
If the dead hang is part of your routine, these movements complement or extend the same pattern:
- Active counterpart: the engaged hang is the next step in the chin-up progression. Same setup, active scapular depression and full-body tension, trains the bottom position of a chin-up rep.
- Direct chin-up progression: Chin-up negatives and full chin-ups are the natural endpoints once your grip and shoulder tolerance have built up through hanging.
- Easier pulling regressions: Inverted rows, supported rows, reverse rows, and corner rows build pulling strength at a friendlier load when full bodyweight on the bar is too much.
- Grip and top-position counterpart: Top chin holds isolate the top half of the chin-up and pair well with the dead hang as a bookend on the rep.
- Loaded back work: Bent-over rows and the overhead pullover load the same lat pattern with dumbbells when you want to add volume without burning more grip endurance.
How to Program the Dead Hang
Dead hang programming follows the same evidence-based progression logic as any isometric: progress hold duration first, then load (feet on the floor, full bodyweight, weighted), then frequency. The American College of Sports Medicine (ACSM) Position Stand on resistance training recommends progressive overload with adequate rest between sets for novice and intermediate trainees (Ratamess et al., 2009).
| Level | Sets × Hold | Rest between sets | Frequency |
|---|---|---|---|
| Beginner (feet-assisted on a box) | 3–4 × 10–20 seconds | 60–90 seconds | 2–3 sessions/week |
| Intermediate (full bodyweight passive hang) | 3 × 30–60 seconds | 90–120 seconds | 2–3 sessions/week |
| Advanced (weighted hang or paired with engaged hangs) | 3–4 × 30–90 seconds | 90–180 seconds | 2–4 sessions/week |
Where in your workout: the dead hang works in three places. As a warm-up at the start of an upper-body or pulling session (1 to 2 short holds to wake up the grip and open the shoulders), as a grip-endurance finisher at the end of a pulling day (1 to 3 longer holds), or as a standalone shoulder-mobility drill on a recovery day. Avoid stacking it immediately after heavy carries, deadlifts, or barbell rows: a fried forearm can't hold a clean position safely.
Form floor over duration targets: end the set with a controlled dismount while you still have grip in reserve. Pushing past hand failure trains the wrong pattern (uncontrolled drops, shoulder shrugs, breath-holding) and risks a soft-tissue strain on landing. Quality holds at moderate duration build endurance faster than grinding failures.
How FitCraft Programs This Exercise
Knowing how to set a dead hang is step one. Knowing when to do it (warm-up, grip block, or post-pull cooldown), how long to hold, and when to graduate to the engaged hang is where most people get stuck.
FitCraft's AI coach Ty handles that. During your personalized diagnostic, Ty maps your current pulling strength, grip endurance, and shoulder mobility. Then Ty slots the dead hang into a balanced training plan at the variation and duration that matches your level, whether that's a 10-second feet-assisted hold to start or a 60-second weighted hang at the back end of a pulling session.
As your grip gets stronger, Ty adjusts the hold time and progression so the dead hang stays useful as a warm-up and feeds directly into chin-up work. Every program is designed by an Ivy League-trained exercise scientist and NSCA-certified strength coach using evidence-based periodization, then adapted to you by the AI.
Frequently Asked Questions
How long should a beginner hold a dead hang?
Start with 10 to 20 second holds for 3 to 4 sets. Stop the set the moment your grip starts slipping; a controlled dismount under tension is the goal, not a desperate drop when the hands fail. Build to 30 to 60 second holds over a few weeks.
Can I do the dead hang if I have shoulder pain or rotator cuff irritation?
A passive dead hang loads the shoulder at full elevation through the joint capsule and the supraspinatus tendon, which can aggravate an acute rotator cuff strain, impingement, or labral irritation. If you have a current shoulder injury, skip dead hangs until cleared by a physical therapist. In the meantime, substitute with high-incline supported rows or inverted rows (bar set high, body almost upright), which load the same grip and scapular pattern without the overhead position. Once symptoms are quiet, reintroduce a feet-assisted dead hang for 5 to 10 seconds before progressing to full bodyweight.
What is the difference between a dead hang and an engaged hang?
A dead hang is passive: shoulders relax up toward the ears, lats and traps go quiet, and bodyweight hangs from the joint capsule. An engaged hang is active: shoulders pull down and back, the core braces, and the body becomes one stiff unit under tension. The dead hang trains grip endurance and decompresses the shoulders. The engaged hang trains the scapular position used at the bottom of every chin-up.
What muscles does the dead hang work?
The forearm flexors (flexor digitorum superficialis and profundus) do the visible work, squeezing the bar to support bodyweight. The shoulder girdle (deltoids, rotator cuff) and the latissimus dorsi take a passive stretch under load. Because the hold is passive, the dead hang is primarily a grip-endurance exercise and a shoulder decompression drill, not a back-strengthening lift.
Is the dead hang good for shoulder health?
For most healthy adults, regular hanging appears to support shoulder mobility and grip strength, which are themselves predictors of long-term shoulder health. The passive stretch also gently decompresses the lower spine. But hanging is contraindicated for acute rotator cuff irritation, shoulder impingement, or post-surgical shoulders without clearance from a physical therapist, because the loaded overhead position can aggravate those conditions.