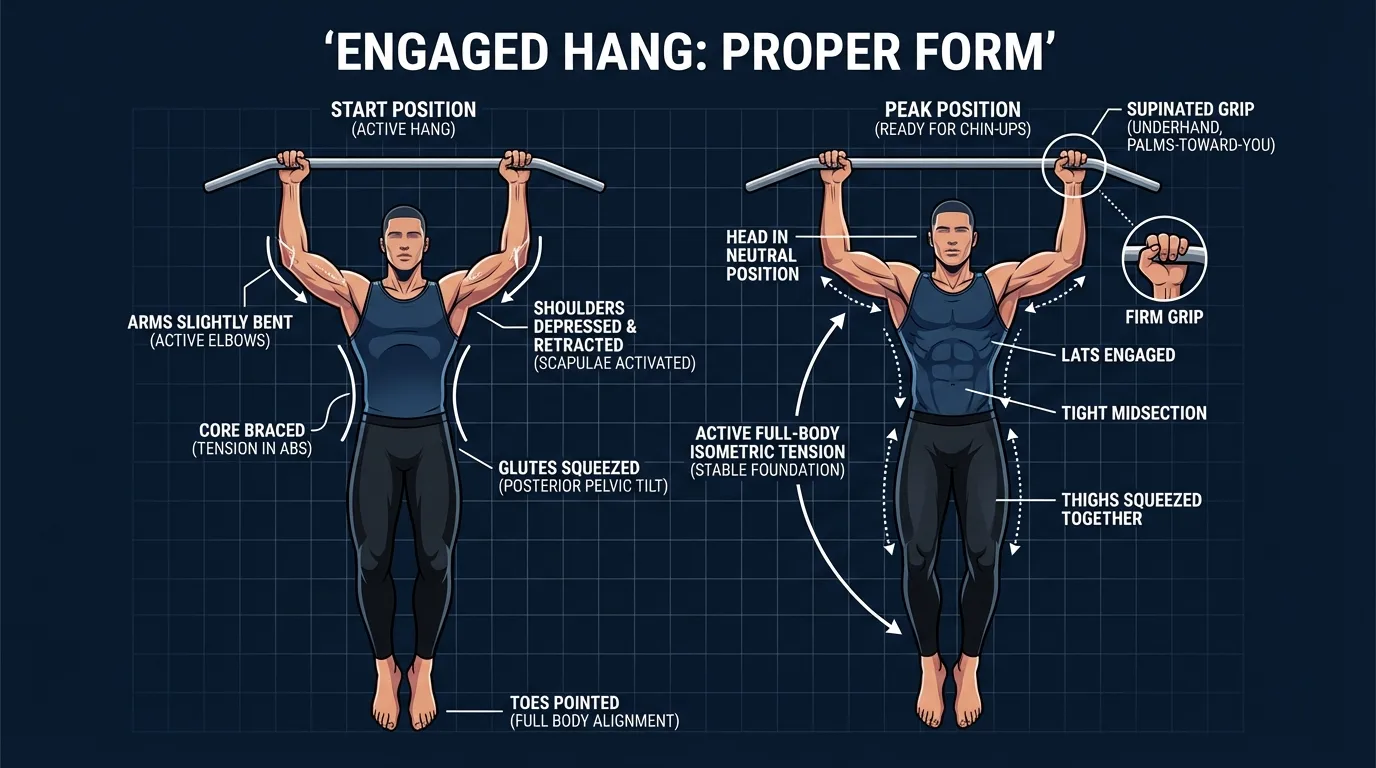
The engaged hang looks like you're just hanging there until you try it for the first time and realize nothing about it is passive. You grab a bar underhand, lift your feet, and turn your entire body into a single contracted unit. Grip tight. Shoulders down. Elbows almost (but not quite) straight. Core braced. Glutes squeezed. Toes pointed. It's more work than it looks like, and that's the point.
Here's why it matters: every chin up starts from exactly this position. If your chin up falls apart at the bottom, it's usually because you never learned how to own the starting position in the first place. You reach up, grab the bar, and start yanking with your biceps before your shoulders and core are set. The engaged hang forces you to build the starting position first, the full-body tension that a chin up actually pulls against. Once the hang feels solid, the pull becomes a lot more obvious.
The engaged hang is also surprisingly good on its own. A 2018 review in the International Journal of Sports Physical Therapy reported that grip strength and scapular stabilizer function are strongly associated with shoulder health and pulling performance (Andersen et al., 2018). Hanging under load, with the shoulders set, the core braced, and the glutes engaged, trains all of those qualities at once without requiring the strength to complete a single chin up rep.
Quick Facts: Engaged Hang
- Equipment needed: pull-up bar (doorway bar, rack-mounted bar, or sturdy overhead beam)
- Difficulty: Beginner (feet-assisted or band-assisted) to Intermediate (full bodyweight for 10 to 20 seconds)
- Modality: Isometric, bilateral, full-body hang with supinated grip
- Body region: Upper body and full-body bracing (grip, lats, mid and lower traps, rotator cuff, core, glutes)
- FitCraft quest category: Strength and chin-up progression
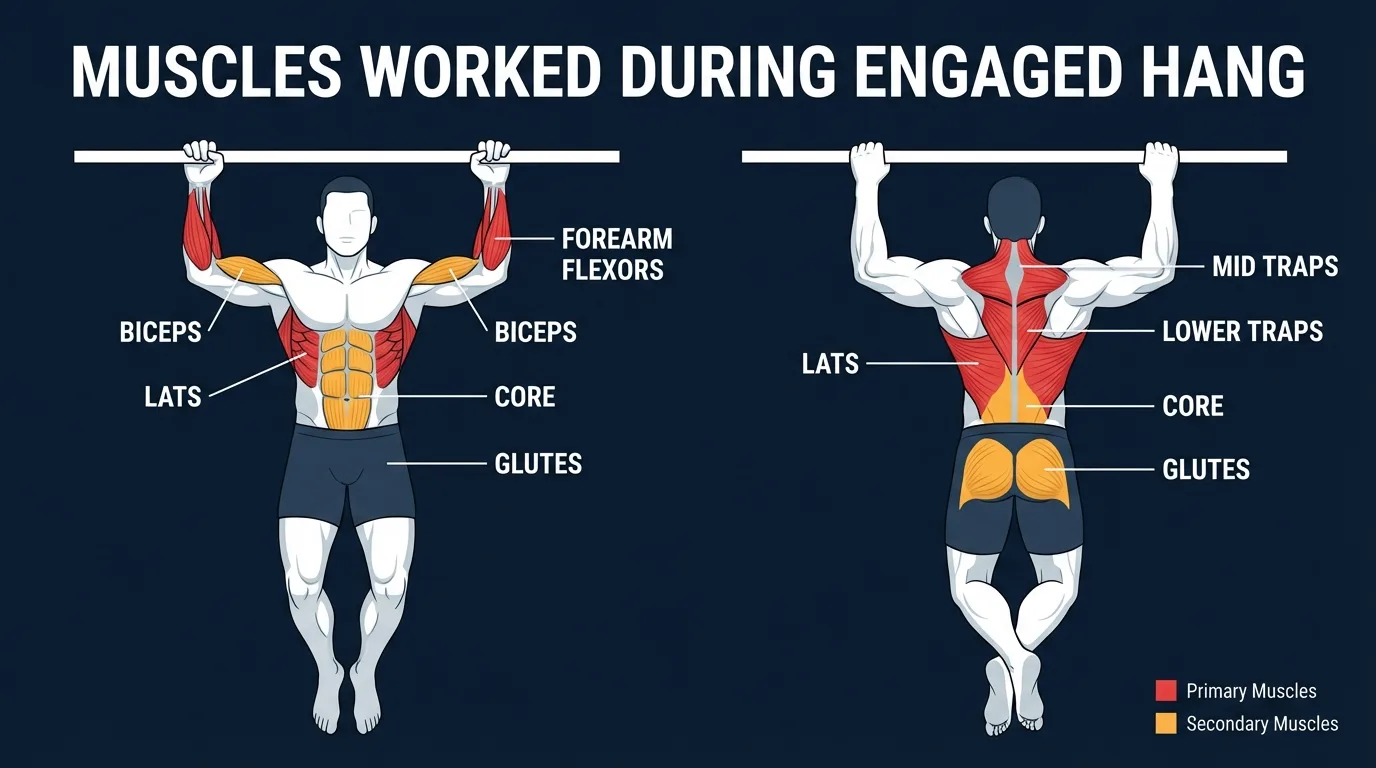
Muscles Worked
Primary movers: the latissimus dorsi and the mid and lower trapezius do most of the visible work. They hold the shoulder blades down and back against bodyweight, which is why the hang feels like a static row even though nothing is moving. The forearm flexors (flexor digitorum superficialis and profundus) run a parallel max-effort isometric contraction to keep the hands locked on the bar.
Secondary movers: the rhomboids and the long head of the biceps brachii. The rhomboids assist scapular retraction at the back of the shoulder blade, and the biceps work mildly through the slight elbow bend, which is why you can feel a soft pump in the upper arm after a tough set.
Stabilizers: the rotator cuff (supraspinatus, infraspinatus, teres minor, subscapularis) centers the humeral head in the socket while the shoulder is loaded overhead. The serratus anterior and lower trapezius coordinate scapular control so the shoulder blade sits flush against the ribcage. The anterior core (rectus abdominis, transverse abdominis, obliques) braces the trunk against body swing, and the glutes lock in the pelvis so the legs don't drift forward into a hollow-shape collapse.
Why a slight elbow bend matters mechanically: with the elbows fully locked, load transfers off the contractile tissue and into the joint capsule and ligamentous structures of the elbow. With a soft bend, the biceps, brachialis, and forearm musculature stay under active tension, sharing the load and protecting the connective tissue. The same principle applies at the shoulder: an actively depressed scapula (shoulders down and back) keeps the rotator cuff loaded as an active stabilizer rather than passively hanging from the joint capsule. This is the difference between training the muscles and stretching the connective tissue.
How to Do an Engaged Hang (Step-by-Step)
- Grip the bar with a supinated grip. Reach up and grab a pull-up bar with an underhand grip so your palms face you, hands roughly shoulder-width apart. Wrap your thumbs all the way around the bar. Squeeze as hard as you can. Grip is the first thing to give out in a hang, so set it with intent.
Coach Ty's cue: "Picture your hands as hooks firmly attached to the bar." That visual alone tends to boost grip and extend hang time, because you stop thinking about your forearms and start thinking about the connection between you and the bar.
- Lift your feet and set your shoulders. Let your body hang from the bar and pull your shoulders down and back, away from your ears. Keep a slight bend in the elbows: not locked out, not visibly bent, just soft. Fully straight arms place unnecessary strain on the elbow joint and turn the hold into a passive dangle. You want the elbow protected and the shoulders loaded.
Ty's cue: "Squeeze a tennis ball between your shoulder blades." It's a subtle squeeze, not a hard pinch, just enough to feel the mid-back wake up and lock the scapulae in.
- Brace your core. Tighten your midsection as if you were about to take a punch to the stomach. Ribs down, pelvis slightly tucked. This locks your torso into a stable line and stops any swinging or swaying. If you let the core go loose, you'll start spinning on the bar and burning grip for no reason.
- Squeeze your glutes and point your toes. Clench your glutes tightly and extend your legs, pointing your toes down toward the floor. This pulls your whole lower body into the contraction and turns the hang from a shoulder exercise into a full-body one. From your fingers on the bar, through your braced core, to your pointed toes, everything should feel like one solid unit.
Ty's key cue: "One solid unit, head to toes." If one segment goes slack (legs swinging, belly soft, grip loose), the whole chain loses its stiffness and the set is contaminated.
- Hold, then lower under control. Maintain total-body tension for the prescribed time. Breathe steadily through your nose. Don't hold your breath. The moment the grip, shoulder position, core brace, or glute squeeze starts to fade, the set is done. Step down to the floor with control, shake out your hands, rest, and set up the next rep from scratch.
Ty's reminder: "Firm grip, shoulders down and back, core and glutes on." If any one of those four things is missing, you're not engaged yet, and a long passive hang teaches your body the wrong pattern.
Common Mistakes to Avoid
The engaged hang looks like you're just hanging there, so people assume they can't mess it up. They can. Here are the mistakes that turn a solid engaged hang into a floppy dead hang:
- Locking the elbows. Fully straight, hyperextended arms let you sink into the connective tissue of the elbow joint and take the muscles out of the hold. It also places unnecessary strain on the elbow itself. Keep a slight, soft bend in the elbows throughout: enough that the biceps and lats stay engaged, not so much that it looks like a partial chin up.
- Letting the shoulders shrug up. If your shoulders ride up toward your ears, you've lost the engaged part of the engaged hang. You're just dangling. Actively pull your shoulders down and back, away from your ears. A light squeeze between the shoulder blades (like you're holding a tennis ball there) helps lock the position in.
- Soft core, loose legs. A loose midsection and dangling legs turn the hang into a pure grip hold. You lose the full-body tension that makes this exercise worth doing. Brace the abs, squeeze the glutes, point the toes, and keep the whole body stiff. Every part of you should be contributing.
- Weak or passive grip. Loosely draping your hands over the bar wastes the best part of the hang. Squeeze the bar hard, thumbs wrapped underneath, as if you were trying to leave fingerprints in steel. Active grip trains forearm strength and keeps the shoulder girdle more stable.
- Swinging on the bar. Any swinging means the core isn't doing its job. If you start rotating or swaying, the set is contaminated. The stabilizers aren't holding position; they're reacting to momentum. Stop the rep, step down, reset with tight glutes and a braced core, and try again.
- Holding too long past good form. Grinding out a 30-second hang while your shoulders creep up, your core goes slack, and your grip peels off the bar teaches your body the wrong pattern. Ten seconds of tight, engaged hanging beats thirty seconds of slow collapse. Cut the set the moment tension starts leaking.
Get this exercise in a personalized workout
FitCraft, our mobile fitness app, uses its AI coach Ty to program pulling exercises like this into your plan at the right volume and intensity, based on your level, goals, and equipment. Ty was designed and trained by Domenic Angelino, MPH (Brown University) and NSCA-CSCS, with research published in the Journal of Strength and Conditioning Research and Medicine & Science in Sports & Exercise.
Take the Free Assessment Free · 2 minutes · No credit cardVariations
Easier (Regression)
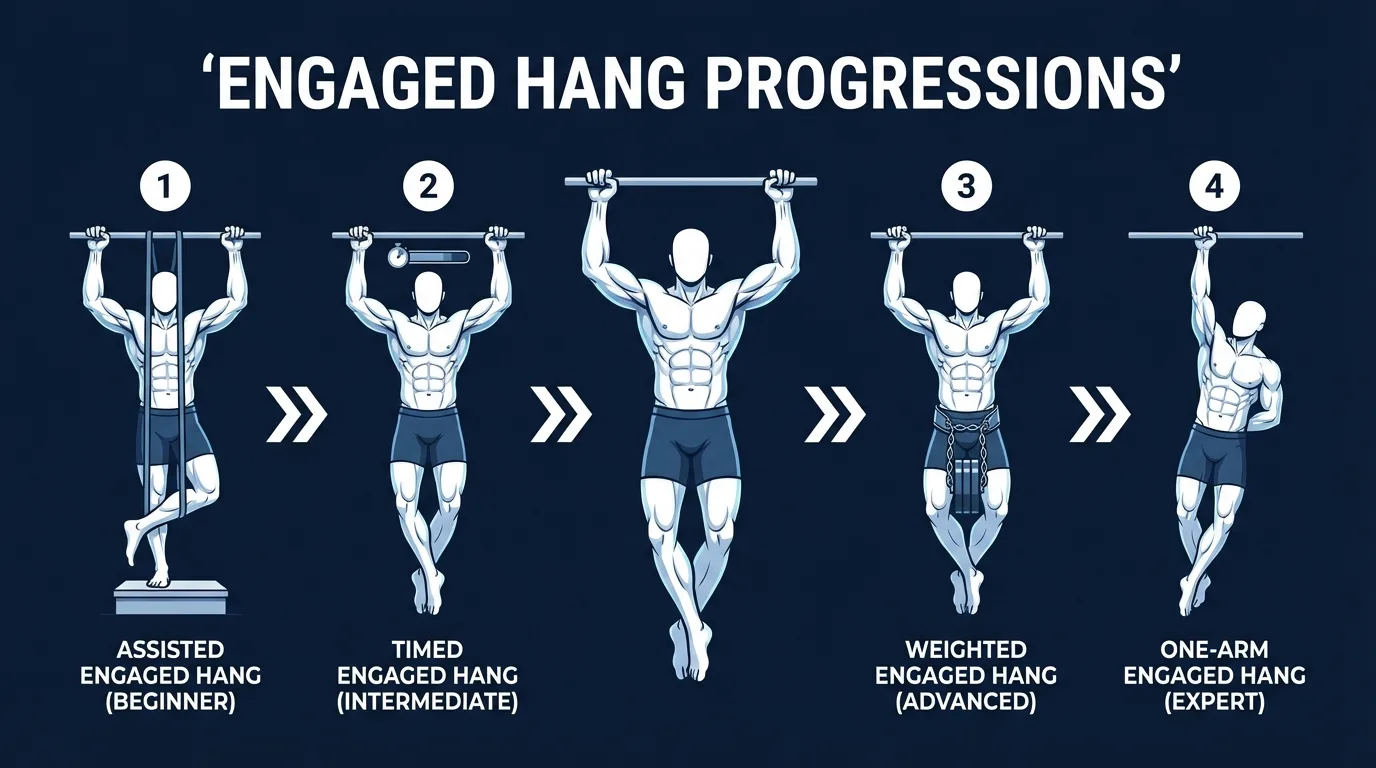
- Feet-assisted engaged hang. Keep one or both feet on the ground, a box, or a low bench while gripping the bar. This takes some of your body weight off the grip and shoulders so you can still practice the full engagement pattern (firm grip, shoulders down, core braced, glutes squeezed) without burning out in five seconds. Gradually unload the feet as you get stronger.
- Band-assisted engaged hang. Loop a resistance band over the bar and put one knee or foot in the loop. The band supports some of your body weight, letting you hold a clean engaged position for longer. Use progressively lighter bands as the hang becomes easier.
Harder (Progression)
- Chin-up negatives. Once you can hold 3 sets of 15-second engaged hangs with clean full-body tension, you're ready for the next step. Jump or step to the top of a chin-up and lower yourself as slowly as possible. The engaged hang taught your body how to stay tight under the bar. Negatives teach you how to stay tight while actually moving.
- Full chin-ups. The natural endpoint of the progression. Every chin-up rep should start from the exact position you practiced in engaged hangs: supinated grip, shoulders set, core braced, glutes squeezed. If you can hold an engaged hang for 15 seconds and control a 5-second negative, your first chin-up is close.
- Weighted engaged hang. Clip a dip belt around your waist with a light plate, or pinch a dumbbell between your feet, and hold the same engaged position. Even a small amount of added load sharply increases the demand on grip, shoulders, and core. Use this once unweighted hangs feel too easy but you're not ready to chase more chin-up reps.
Alternative Exercises
- Dead hang. Same setup without the full-body tension. You grip the bar and let your shoulders relax. It's a useful passive stretch and grip builder, but it doesn't train the engaged pattern. Use it as a cooldown, not a replacement.
- Inverted rows. A lower-load pulling pattern that trains the same scapular retraction and grip strength without the overhead position. Useful when the bar overhead bothers your shoulders, or as a complementary horizontal pull on the same day as your hangs.
When to Avoid or Modify the Engaged Hang
The engaged hang is safe for most healthy adults and is one of the gentlest entry points into pulling work, but a few conditions call for modification or a temporary swap. Always consult a qualified healthcare provider or physical therapist for guidance on your specific situation.
- Acute shoulder injury or rotator cuff irritation. Hanging from a bar loads the shoulder at full elevation, which can aggravate an acute strain, impingement, or labral irritation. Skip bar hangs until cleared by a PT. Substitute with high-incline supported rows or inverted rows at a steep angle, which load scapular retraction without the overhead position.
- Recent shoulder or elbow surgery. Get clearance from your surgeon before any hanging work. Most post-surgical protocols start with scapular activation drills and assisted variations before the joint is loaded at full elevation.
- Tennis elbow or golfer's elbow (lateral or medial epicondylitis). Sustained grip and pulling patterns aggravate the elbow tendons. During a flare, reduce volume, use a thicker grip (a folded towel over the bar) to spread load across the hand, and consider chin-up negatives with a long eccentric, which appear to tolerate rehab better than max-effort isometric grip work for some people.
- Wrist pain. Bar hangs load the wrists in extension and put fingers and forearm flexors under prolonged tension. A neutral-grip parallel bar (palms facing each other) reduces wrist stress significantly. Thick-grip handles also help by spreading load across a wider contact area.
- Lower-back pain that flares with hanging. Body swing under the bar can extend the lumbar spine and aggravate facet or disc-related pain. Lock in a hollow-body position (ribs down, pelvis slightly tucked, glutes squeezed) before lifting your feet, and substitute with inverted rows on a low bar if the hang is still uncomfortable. Build core bracing with deadbugs and bird-dogs as a complement.
Related Exercises
If the engaged hang is part of your routine, these movements complement or extend the same training pattern:
- Direct chin-up progression: Chin-up negatives are the next step once you can hold a clean 15-second engaged hang. They teach you to stay tight while actually moving down the bar. Full chin-ups are the endpoint of the progression.
- Easier pulling regressions: Inverted rows, supported rows, reverse rows, and corner rows all build pulling strength at a friendlier load when full bodyweight on the bar is too much.
- Grip and shoulder foundation: Top chin holds isolate the top half of the chin-up under maximum bicep and scapular load and pair well with the engaged hang as a bookend (bottom and top of the rep).
- Loaded back work: Bent-over rows and the overhead pullover load the same lat and scapular pattern with dumbbells when you want to add volume without burning more grip endurance.
- Anti-swing core foundation: Deadbugs and bird-dogs train the bracing pattern that keeps your body from spinning on the bar.
How to Program the Engaged Hang
Engaged hang programming follows the same evidence-based progression logic as any pulling exercise. The American College of Sports Medicine (ACSM) Position Stand on resistance training recommends progressive overload, adequate rest between sets, and 2 to 4 sessions per week per muscle group for novice and intermediate trainees (Ratamess et al., 2009). For isometric holds, that translates to progressing hold duration, then load (feet on the floor, band assistance, full bodyweight, weighted), then frequency.
| Level | Sets × Hold | Rest between sets | Frequency |
|---|---|---|---|
| Beginner (feet-assisted or band-assisted) | 3–4 × 5–10 seconds | 60–90 seconds | 2–3 sessions/week |
| Intermediate (full bodyweight) | 3 × 10–15 seconds | 90–120 seconds | 2–3 sessions/week |
| Advanced (weighted hang or paired with chin-up negatives) | 3–4 × 15–20 seconds | 90–180 seconds | 2–4 sessions/week |
Where in your workout: early in an upper-body or pulling session, after a general warm-up but before any heavy pulling. The engaged hang primes the grip, scapular retraction, and core bracing patterns for whatever pulling work follows. It also works as a finisher on a grip-emphasis day if your forearms are the weak link in your other lifts. Avoid placing it after heavy carries, deadlifts, or barbell rows: a fried forearm can't hold a clean position on the next rep.
Form floor over duration targets: if your shoulders shrug up, your core goes slack, your elbows hyperextend, or your grip starts peeling off the bar, stop the set. Ten seconds of tight, engaged hanging beats thirty seconds of slow collapse. The point of this exercise is teaching your body the engaged pattern, and a long passive hang teaches the wrong one.
How FitCraft Programs This Exercise
Knowing how to set an engaged hang is step one. Knowing when to do it, how long to hold, and when to progress to chin-up negatives is where most people stall.
FitCraft's AI coach Ty handles that. During your personalized diagnostic, Ty maps your current pulling strength, grip endurance, shoulder mobility, and goals. Then Ty slots the engaged hang into a balanced training plan at the variation that matches your level, whether that's feet-assisted on a box or full bodyweight progressing toward chin-ups.
As you get stronger, Ty adjusts the variation and volume to match your level. Feet-assisted becomes full bodyweight. Full bodyweight stretches into longer holds, then pairs with chin-up negatives on a third day. Every program is designed by an Ivy League-trained exercise scientist and NSCA-certified strength coach using evidence-based periodization, then adapted to you by the AI.
Frequently Asked Questions
What is the difference between an engaged hang and a dead hang?
A dead hang is a passive hang with completely relaxed shoulders, a loose core, and slack legs. The entire body just dangles from the bar. An engaged hang is an active, full-body contraction: you grip the bar hard with a supinated (underhand) grip, keep a slight bend in the elbows, pull the shoulders down and back, brace the core, squeeze the glutes, and point the toes. Everything is under tension. The dead hang stretches the shoulders. The engaged hang trains the same total-body stiffness you need for a chin up.
Can I do the engaged hang if I have shoulder pain or rotator cuff irritation?
Hanging from a bar loads the shoulder at full elevation, which can aggravate an acute rotator cuff strain, impingement, or labral irritation. If you have a current shoulder injury, skip bar hangs until cleared by a physical therapist. In the meantime, substitute with high-incline supported rows or inverted rows (bar set high, body almost upright), which load the same scapular retraction pattern without the overhead position. Once symptoms are quiet, reintroduce a feet-assisted engaged hang for 5 to 10 seconds before progressing to full bodyweight.
What muscles does the engaged hang work?
The engaged hang is a full-body isometric. The forearm flexors work for grip, the lats, rhomboids, and mid/lower trapezius hold the shoulders down and back, the rotator cuff stabilizes the shoulder joint, the biceps assist at the slight elbow bend, the core stabilizers keep the torso braced, and the glutes lock in the pelvis. It builds grip, shoulder stability, and the total-body tension pattern that sets up a clean chin up.
How long should I hold an engaged hang?
Beginners should aim for 5 to 10 second holds for 3 to 5 reps per set. Intermediate trainees can work up to 15 to 20 second holds. What matters is keeping every piece engaged the whole time: grip tight, shoulders down, elbows slightly bent, core braced, glutes squeezed. When any of those pieces fade, cut the set. Quality of tension beats raw duration.
Should my arms be straight or bent in an engaged hang?
Keep a slight bend in your elbows. Fully locked-out arms place unnecessary stress on the elbow joints and let you sink into a passive dead hang. A soft bend keeps the biceps, lats, and shoulder stabilizers engaged and protects the connective tissue around the elbow. Think almost straight, not locked, not bent to 90 degrees.
Is the engaged hang a good exercise for beginners?
Yes. The engaged hang is one of the best beginner exercises for building the grip strength, shoulder stability, and full-body tension needed for chin ups. It teaches you how to hold the bar, set your shoulders, brace your core, and squeeze your glutes all at the same time, which is exactly the starting position of a chin up rep. If you cannot do a chin up yet, the engaged hang is where your progression should begin.