The deadlift to shrug stacks two strength movements, a hip hinge and a shrug, into one rep. It trains the back of your body from your hamstrings and glutes up through the muscles along your spine to your upper traps, while your forearms grip the dumbbells.
The order of the movements matters most. Done right, the rep has a clear rhythm: hinge down, stand all the way up, then shrug. Done wrong, the shrug starts halfway through the ascent, the shoulders roll, the elbows bend, and the rep stops training what it should.
This guide covers the setup, the five-step sequence, the mistakes that break the movement, how to make it easier with the hinge alone or harder with the one-dumbbell version, and how to program it inside a training week.
Quick Facts: Deadlift to Shrug
- Equipment needed: Dumbbells
- Difficulty: Advanced (two dumbbells) to Expert (one dumbbell), as rated in the FitCraft app; the dumbbell Romanian deadlift, the hinge alone, is the easier, Intermediate version
- Modality: Strength
- Body region: Lower body, back and upper traps (glutes, hamstrings, the muscles along your spine and the tops of your shoulders)
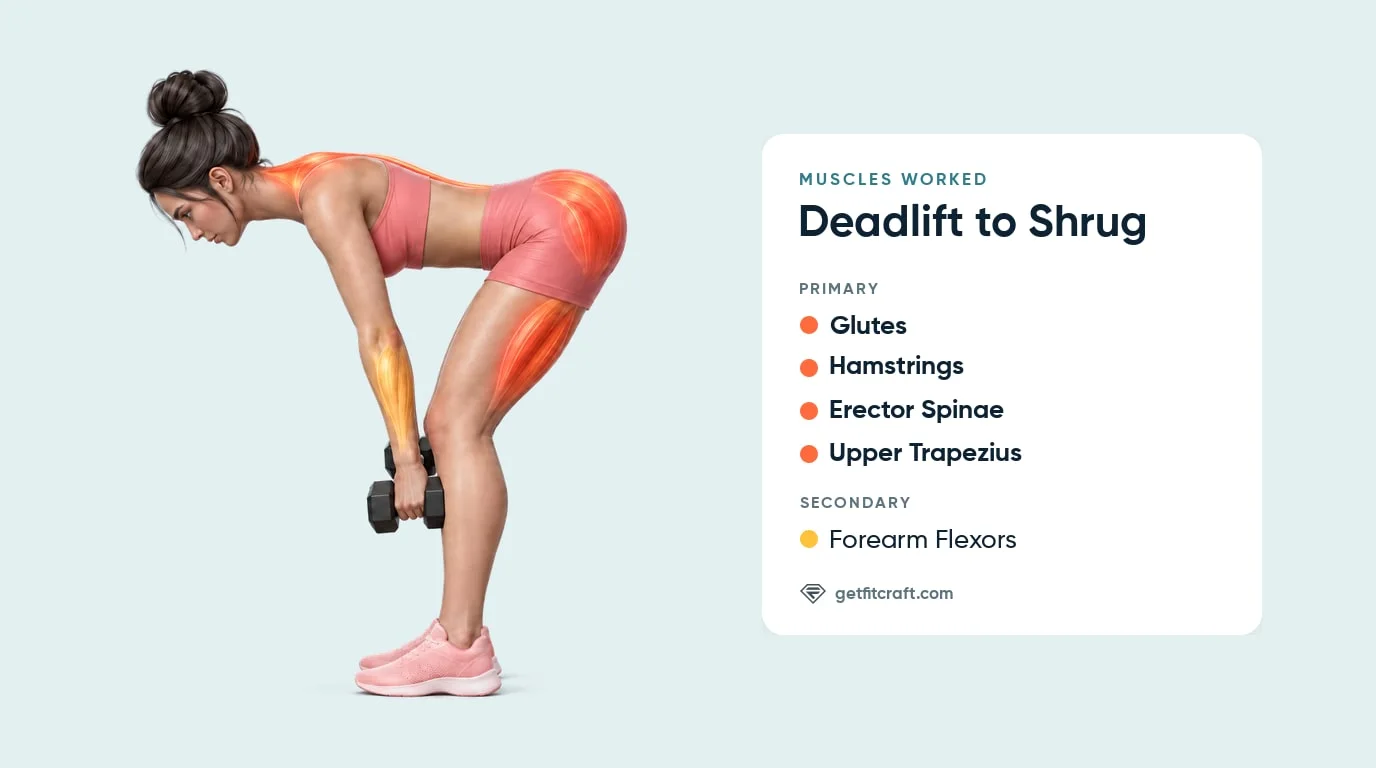
Muscles Worked
Primary movers: the glutes, hamstrings (biceps femoris, semitendinosus, semimembranosus), erector spinae, and upper trapezius. In the hinge, your glutes and hamstrings, the muscles of your buttocks and the backs of your thighs, lengthen under control as you push your hips back, then extend your hips to stand you back up. The erector spinae, the muscles along your spine, hold your back flat while you are bent forward. At the top, the upper trapezius, which runs from the base of your neck to the tops of your shoulders, lifts your shoulders straight up toward your ears against the weight of the dumbbells.
Secondary movers: the forearm flexors, the muscles on the palm side of your forearms, grip the dumbbells for the whole rep. The hold at the top of the shrug adds a second or so to every rep, so your grip works for longer than in a plain hinge.
Why the combination works: the hinge brings the dumbbells up to a tall standing position, and the shrug then uses the same dumbbells for the upper traps, so one rep trains your hips, the backs of your thighs, the muscles along your spine, and your upper traps. The cost is a longer hold on the dumbbells each rep, which your forearms have to grip through, so end the set when your grip or your form gives out.
Step-by-Step: How to Perform the Deadlift to Shrug
Think of every rep as two lifts with a checkpoint in between. The checkpoint is a full, tall standing position.
Step 1: Set Your Stance and Grip
Stand tall with your feet about hip-width apart and flat on the floor, holding a dumbbell in each hand at your sides with your palms facing your legs. Holding them in front of your thighs with your palms facing you also works. Brace your core like you're about to be nudged off balance, keep your shoulders relaxed, and keep your neck in line with your back. That braced, flat back is the position your back keeps for the entire set.
Tip: Start light. Brace before every rep, and keep breathing; never hold your breath through the rep.
Step 2: Hinge at the Hips and Lower the Dumbbells
Push your hips straight back with your knees softly bent as the dumbbells slide down close along your legs, taking about one to two seconds. Your knees bend a little as you lower, but your hips stay higher than your knees. Keep your back completely flat and your chest lifted. Lower the dumbbells to somewhere between just below your knees and the middle of your shins, only as far as your back stays flat. You should feel a stretch in the backs of your thighs.
Tip: Push your hips back, not down. If your knees bend so much that it turns into a squat, you're squatting the weight instead of hinging it.
Step 3: Drive Up to Full Hip Lockout
Push your feet through the floor and drive your hips forward to stand fully upright, glutes squeezed, ribs stacked over hips, without leaning back. The dumbbells travel straight up, staying close to your legs. Do not start shrugging on the way up; the shrug starts only once you are standing fully tall.
Tip: Let your hips do the lifting, not your lower back, and breathe out as you stand up.
Step 4: Shrug Straight Up
From the tall standing position, shrug your shoulders straight up toward your ears, as high as is comfortable; a smaller shrug is fine too. Arms stay completely straight; the elbows never bend. Hold the top for about a second. Do not roll your shoulders forward or backward: move them straight up and straight back down.
Tip: If your elbows start bending to help the dumbbells up, the dumbbells are too heavy.
Step 5: Lower the Shrug and Reset
Lower your shoulders back down with control, take a breath, re-brace, and hinge into the next rep. Keep the rhythm identical every time: hinge, stand, shrug, lower, reset. When you can no longer keep that order, end the set.
Tip: Lower your shoulders all the way before you hinge again, so each shrug starts from the same place.
Get this exercise in a personalized workout
FitCraft, our mobile fitness app, uses an AI coach to program compound strength exercises like this into your plan at the right volume and intensity, based on your level, goals, and equipment. Every FitCraft program is designed by Domenic Angelino, MPH (Brown University) and NSCA-CSCS, with research published in the Journal of Strength and Conditioning Research and Medicine & Science in Sports & Exercise.
Take the Free Assessment Free · 2 minutes · No credit card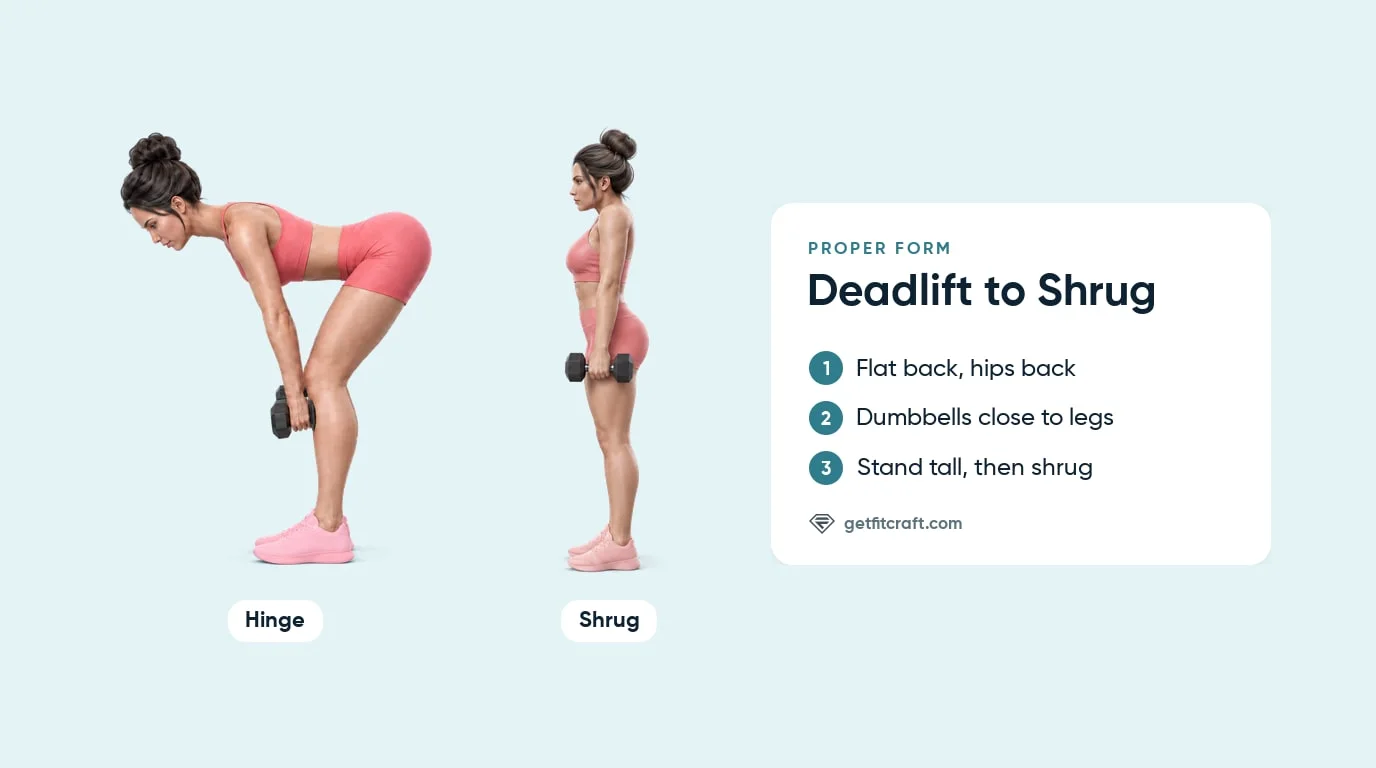
Common Mistakes (and How to Fix Them)
These are the most common mistakes on the deadlift to shrug, and how to fix each one.
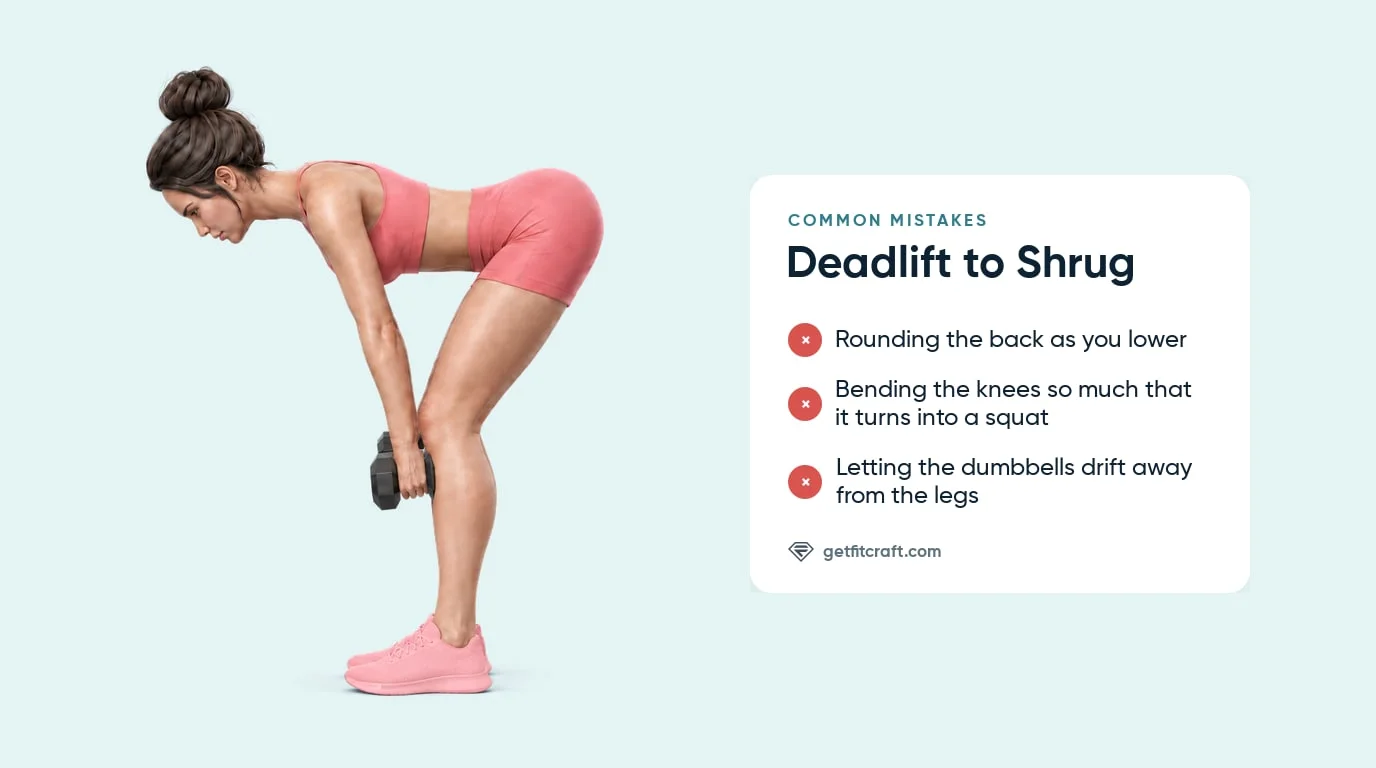
- Rounding the back as you lower. Your back rounds under load as you reach for more depth. Fix: lighten the dumbbells, lift your chest before each descent, and lower only as far as your back stays flat; stopping at your knees is fine.
- Shrugging before the hips finish. The shrug creeps into the stand-up while your torso is still tipped forward. Fix: stand fully tall first, glutes squeezed, then shrug. The stand always finishes before the shrug starts.
- Rolling the shoulders. Circling the shoulders forward or backward during the shrug adds nothing, because the dumbbells hang straight down and only the straight lift works against their weight. Fix: shrug in a straight vertical line, hold for about a second, and lower straight down.
- Bending the elbows. Arms bend to help pull the dumbbells up, so your arms do the lifting instead of your shoulders. Fix: keep your arms straight and let the dumbbells hang; only your shoulders move. If the elbows keep bending, the weight is too heavy.
- Squatting the hinge. The knees bend so much that the movement becomes a shallow squat, robbing the hamstrings and glutes of their stretch. Fix: push the hips back first; your knees bend a little as you lower, but your hips stay higher than your knees.
- Letting the dumbbells drift forward. The weights swing away from your legs on the way down, which adds stress on your lower back. Fix: keep the dumbbells close and slide them lightly along your legs in both directions, like they're on rails.
- Leaning back at the top. The hips push past straight and the shoulders tip behind the hips as you finish the stand or start the shrug. Fix: stand tall with your glutes squeezed and your ribs over your hips, then shrug straight up.
- Jerking the weight. Momentum heaves the dumbbells up instead of a smooth stand and a controlled shrug. Fix: stand up smoothly, shrug under control, and use lighter dumbbells if you can't.
- Twisting toward the weight on the one-dumbbell version. The uneven load pulls your body toward the dumbbell. Fix: keep your hips and shoulders square and your chest facing forward, and use a lighter dumbbell if you start leaning or twisting.
Deadlift to Shrug Variations: Regressions and Progressions
Start where you are and progress when your form is solid at the current level.
Dumbbell Romanian Deadlift (Easier Version)
The hinge on its own, with no shrug, rated Intermediate in the FitCraft app. If your hinge is clean and comfortable, adding the shrug is the next step. If it wobbles, adding a shrug just gives your form more places to break. Lighter dumbbells or a hinge only down to your knees also make the deadlift to shrug easier.
Deadlift to Shrug (Standard)
The full movement described above, rated Advanced in the FitCraft app: two dumbbells, hinge with a flat back, stand to full lockout, strict straight-arm shrug, lower, reset.
Paused Deadlift to Shrug (Harder)
Same movement, but hold the top of the shrug for a slow count of two each rep, and lower into the hinge more slowly, over two or three seconds. The pause removes any bounce and makes it easier to notice if your shoulders start to roll. It also works your upper traps and grip harder with the same dumbbells.
Single-Dumbbell Deadlift to Shrug (Hardest)
Hold one dumbbell in one hand and rest your other hand on your hip or thigh, or let it hang at your side. Work one side at a time. The uneven load tries to twist and tip your body toward the weight through both the hinge and the shrug, so keep your hips and shoulders square and your chest facing forward; only the shoulder holding the weight carries it. The FitCraft app has this version for each side, rated Expert. Keep the load noticeably lighter than the two-dumbbell version at first.
When to Avoid the Deadlift to Shrug
A stretch or burn in the working muscles is normal. Any other pain, especially in a joint, your lower back or your neck, means stop. With any of the conditions below, see a doctor or physical therapist before you do the deadlift to shrug.
- Acute lower-back pain or known disc pathology. The hinge loads your lower back like any deadlift, and any lower back pain during a set means stop. Skip the deadlift to shrug and see a doctor or physical therapist first; they decide when you can train the hinge again.
- Neck pain or cervical spine issues. The shrug works the upper traps, which run from the base of your neck to your shoulders, and any neck pain means stop. See a doctor or physical therapist before you do the deadlift to shrug.
- Recent spine, shoulder, hip, or knee surgery. Get clearance from your surgeon or physical therapist before you do the deadlift to shrug.
- Uncontrolled hypertension or known cardiovascular disease. Get your doctor's clearance before you do the deadlift to shrug. Whenever you do it, breathe out as you stand up and never hold your breath for the whole rep.
- Pregnancy. Ask your doctor or midwife before you do the deadlift to shrug while pregnant, and stop at any pelvic pressure or pain.
- After giving birth, or with active diastasis recti. Get cleared by your doctor or a pelvic health physical therapist before you do the deadlift to shrug; they decide how you return.
Related Exercises
If the deadlift to shrug is part of your routine, these movements complement or extend the same training pattern:
- Same movement pattern (hinge): Romanian Deadlift is the hinge on its own, the easier version of this exercise, and the Dumbbell Deadlift trains the same hip extension without the shrug. Single-Leg Deadlift trains the hinge one leg at a time, and Good Mornings train the hinge as well.
- Same upper-back emphasis: Upright Rows load the traps through a bent-arm pull, and Bent-Over Rows hit the mid-back from the hinged position this exercise already teaches.
- Hip and back accessories: Glute Bridges train hip extension lying on your back. Superman Holds work the muscles along your spine that hold your back flat in the hinge.
- Core foundation: Deadbugs and Forearm Planks are core exercises to pair with it, and Bird-Dogs train the glutes and the muscles along your spine.
- Grip support: Dead Hangs and Engaged Hangs from a pull-up bar extend the grip endurance this long-duration rep demands.
How to Program the Deadlift to Shrug
The deadlift to shrug programs like any compound strength exercise, with reps in the moderate range because your grip has to hold the dumbbells through the hinge and the shrug. The American College of Sports Medicine (ACSM) Position Stand on resistance training recommends that novices use loads they can lift for 8 to 12 reps per set and train 2 to 3 days per week. For intermediate and advanced lifters, it recommends a wider range of 1 to 12 reps per set, varied over time in a periodized plan, lifted at a moderate speed of about one to two seconds up and one to two seconds down (Ratamess et al., 2009).
| Level | Sets × Reps | Rest between sets | Frequency |
|---|---|---|---|
| Easier (the hinge alone, lighter dumbbells, or a hinge to the knees, learning the sequence) | 2-3 × 8-12 | 90-120 seconds | 1-2 sessions/week |
| Advanced (two-dumbbell deadlift to shrug) | 3-4 × 6-12 | 120-180 seconds | 1-2 sessions/week |
| Expert (one-dumbbell deadlift to shrug, each side) | 3-5 × 6-10 per side | 120-180 seconds | 1-2 sessions/week |
Where in your workout: first or second in a full-body or pull session, while your grip and lower back are fresh. Use it in place of the dumbbell deadlift rather than in addition to it; doing both heavy in one session adds up to a lot of lower back work. If your shoulders or traps are the focus of the session, do it first and save lighter shoulder exercises for later.
Stop when your form slips: the first rep where the shrug starts before you finish standing, your shoulders start rolling, or your back rounds at the bottom is your last rep. Stop the set there, whatever number you planned.
How FitCraft Programs This Exercise
During your personalized diagnostic, the app maps your fitness level, goals, and available equipment. Then it builds a balanced training plan for your level, and the deadlift to shrug is one of the strength exercises it can include, with an interactive 3D demonstration. The app has the two-dumbbell deadlift to shrug (Advanced) and a one-dumbbell version for each side (Expert), and it includes the dumbbell Romanian deadlift (Intermediate) as its own exercise.
As you get stronger, the app adjusts your training to match your level. If your hinge isn't solid yet, use the dumbbell Romanian deadlift and the easier options in this guide to build up to it.
Frequently Asked Questions
What muscles does the deadlift to shrug work?
The deadlift to shrug works the glutes, hamstrings, erector spinae, and upper trapezius as its primary muscles, with the forearm flexors as its secondary muscle. In the hinge, your glutes and hamstrings extend your hips to stand you back up while the erector spinae, the muscles along your spine, hold your back flat. At the top, the upper trapezius lifts your shoulders straight up toward your ears in the shrug. The forearm flexors grip the dumbbells for the whole rep.
Why combine a deadlift with a shrug?
It trains the hinge and the shrug in one rep. The hinge works your glutes, hamstrings, and the muscles along your spine, and once you stand tall the shrug works your upper traps with the same dumbbells, while your forearms grip the weight the whole time. That makes it a useful pick for short full-body sessions. Each rep also holds the dumbbells longer than a plain hinge, so your grip works for longer too.
Should I roll my shoulders during the shrug?
No. Shrug straight up toward your ears and lower straight back down. Rolling the shoulders forward or backward adds nothing, because the dumbbells hang straight down and only the straight lift works against their weight. Your upper traps lift your shoulder blades in a vertical line, and that is the whole motion. Lift straight up, hold for about a second, and lower straight down.
How heavy should the deadlift to shrug be?
Start light, well below your dumbbell deadlift weight, and treat the first sessions as sequencing practice: hinge, stand all the way up, then shrug. Go heavier only while your back stays flat and you can shrug without bending your elbows to pull. Your forearms grip the dumbbells through both the hinge and the shrug, so choose a weight you can hold for the whole set. If you cannot complete the shrug without bending your elbows or dipping your knees for momentum, the dumbbells are too heavy.
Can I do the deadlift to shrug with lower-back pain?
No. Any pain in your lower back means stop the exercise right away. A stretch or burn in the working muscles is normal; any other pain, above all in your lower back, a joint or your neck, is not. If you have lower-back pain or a known disc problem, see a doctor or physical therapist before you do the deadlift to shrug; they decide when you can train the hinge again.