Hip airplanes are harder than they look. You balance on one leg, tipped forward, and roll your body open the way a plane tips one wing up, while your back stays flat and your standing knee stays steady.
The drill begins in the hinge of a single-leg deadlift, but the job changes. A single-leg deadlift moves you down and up while your hips stay level. A hip airplane holds that hinge still, and the rep is the roll of your pelvis: open toward the ceiling, then back to level, while your standing thigh stays where it is.
This guide teaches the supported version first, with your fingertips on a counter, a wall or the back of a chair. Then it shows how to let go of the support, add pauses and, last of all, hold a light dumbbell.
Quick Facts: Hip Airplanes
- Equipment needed: None. A kitchen counter, a wall or the back of a sturdy chair gives your fingertips something to rest on, and one light dumbbell is the hardest version.
- Difficulty: Advanced. You balance on one leg while tipped forward and turn your hips under control, and the researchers who tested the drill call it advanced for the control it takes. Holding a support makes it easier to learn.
- Modality: Strength and balance
- Body region: The glutes and the outer side of the standing hip, with the back of that thigh and the muscles along the spine holding the hinge
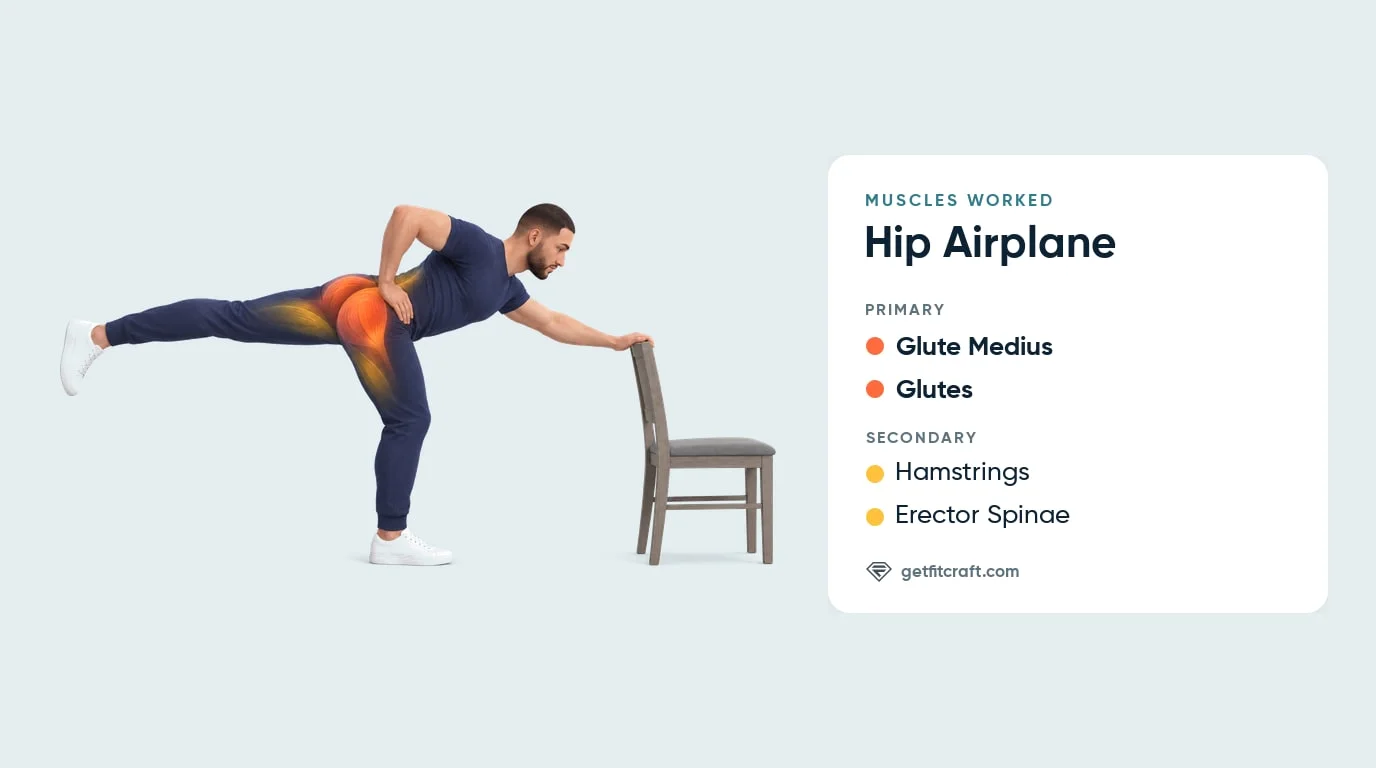
Hip Airplane Muscles Worked
Primary muscles: the glute medius and the glutes of your standing leg. The glute medius sits on the outer side of your hip, and the glutes are the larger muscles at the back of it. Gravity pulls the free-leg side of your body toward the floor, so these muscles roll your pelvis open against that pull and then let it back down to level under control. Because your standing thigh stays still, that roll turns the standing hip outward: ExRx defines hip rotation as turning either the thigh or the pelvis (ExRx: Hip Articulations).
Secondary muscles: the hamstrings on the back of your standing thigh and the erector spinae, the muscles that run along your spine. They keep you tipped forward with a flat back for the whole set, so the turn has a steady base.
What the research shows: in a 2025 study, 20 healthy men did two versions of the hip airplane, a single-leg squat and a pelvic drop while sensors on the skin measured their glute muscles. Both hip airplanes drew more glute medius activity than the single-leg squat or the pelvic drop, and the gluteus maximus, the largest glute muscle, was most active in the single-leg squat (Song and Yoo, 2025). The American Council on Exercise, which calls the drill the McGill airplane, says it works the gluteus maximus through its full range with control while it challenges your balance (Andrews, ACE, 2015).
Where you should feel it: mostly in the glute of your standing leg, at the back and side of that hip. The back of that thigh and the muscles along your spine work too. Your knee and lower back should not hurt.
Step-by-Step: How to Do a Hip Airplane
Learn the turn with support. Rest your fingertips on something sturdy until every turn feels easy, then move on to the harder versions further down.
Step 1: Set Up Facing Your Support
Stand on one leg facing a kitchen counter, a wall or the back of a sturdy chair, close enough to touch it at about hip height once you tip forward. Keep a soft bend in the standing knee and point it straight ahead over your toes.
Form tip: pick a support that won't tip or slide. Your fingertips only rest on it; don't pull on it or lean your weight into it.
Step 2: Hinge Into the Start Position
Brace your stomach and tip forward from the hips as your free leg extends behind you. Stop anywhere between halfway down and level with the floor, wherever your back is still flat. Your free leg stays straight, in one line with your back, its toes aimed at the floor, and both hips sit at the same height, facing down. Rest the fingertips of the hand on your standing-leg side on the support and put your other hand on your hip.
Form tip: this is the hinge of a single-leg deadlift, held still. If holding it already feels shaky, practice the hold on each leg before you add the turn.
Step 3: Roll Your Hips Open
Keep the hinge and slowly turn your pelvis and chest together, so the hip of your free leg rolls up toward the ceiling and your chest turns away from your standing leg. Your free leg rides along with your hips instead of swinging out on its own, and your standing knee keeps pointing over your toes. Take about two or three seconds to open.
Form tip: turn only as far as you can control with a flat back. A partial turn is fine.
Step 4: Turn Back to Level
Reverse the roll just as slowly, over another two or three seconds, until both hips are level and facing the floor again. Hold the same lean throughout: don't rise up as you open or as you come back.
Form tip: breathe out as you turn open and breathe in as you turn back. Never hold your breath.
Step 5: Rest, Then Switch Legs
After 3 to 5 turns, put your free foot down and stand up to rest. Do all your turns on one leg, then the same number on the other leg. Either leg can go first.
Form tip: stop if your hip, knee or lower back hurts.
Get a personalized lower-body workout
FitCraft does not include the hip airplane, but it builds your plan from the dumbbell, band, and bodyweight exercises in its library, including the single-leg deadlift, at the right volume for your level, goals, and equipment.
Take the Free Assessment Free · 2 minutes · No credit card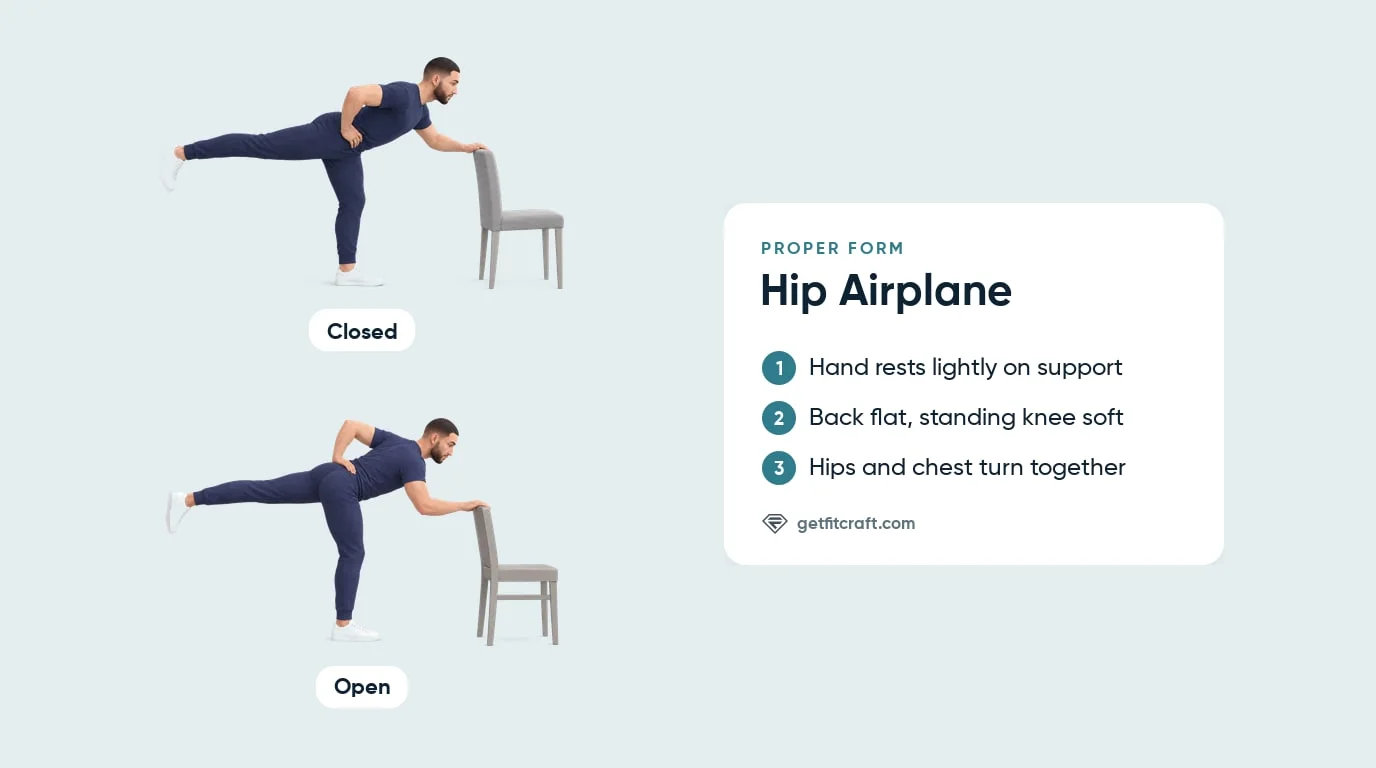
Common Hip Airplane Mistakes and How to Fix Them
Most of these mistakes come from chasing a bigger turn. Smooth control matters more than how far you turn, so fix these before you try for more range.
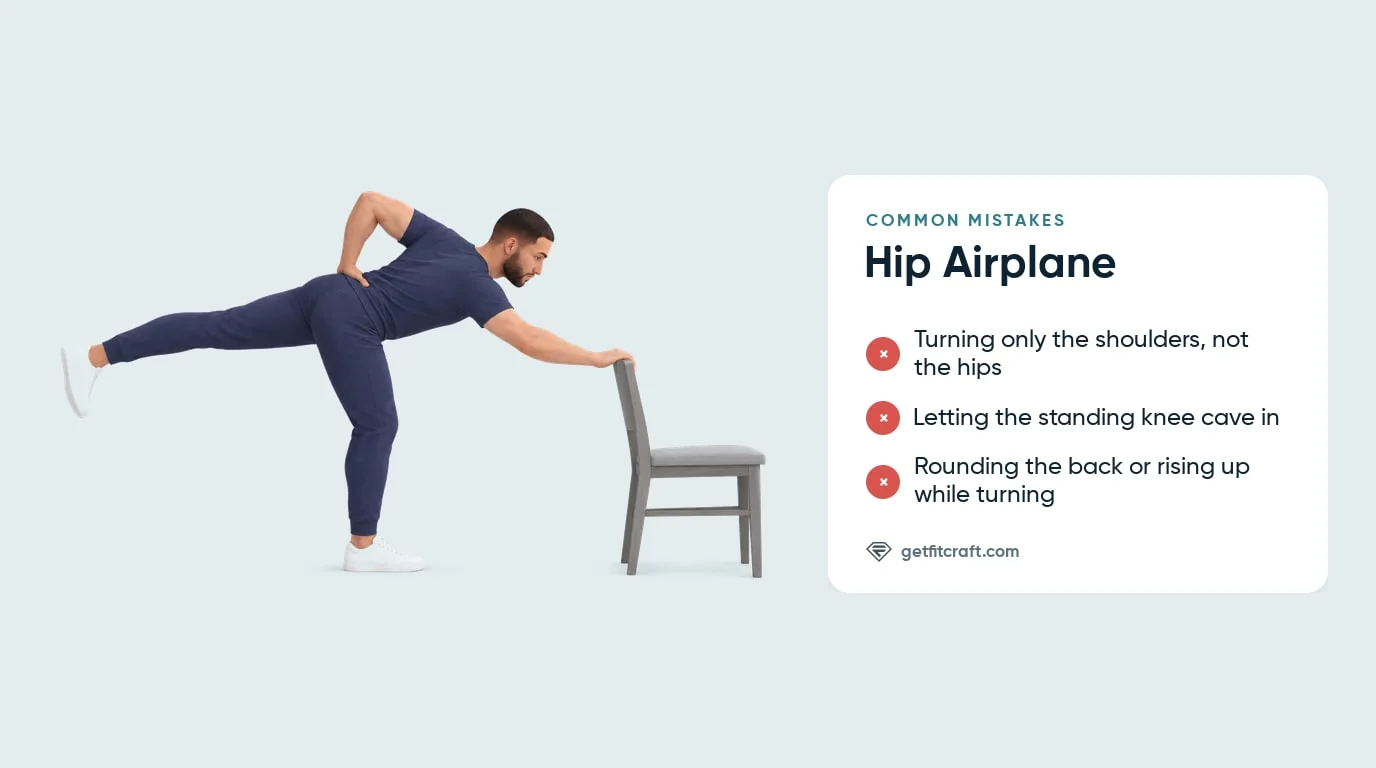
- Turning only your shoulders. Your chest turns while your hips stay square, so you twist at the waist. Fix: turn your hips and chest together, so the hip of your free leg rises with your chest.
- Letting the standing knee cave in. As your hips turn, the knee you stand on can drift inward. Fix: keep that knee pointing over your toes, and make the turn smaller until it stays put.
- Rounding your back or rising up. Reaching for a bigger turn tends to round the back or lift the chest toward standing. Fix: set your lean before the first turn and keep it, leaning only as far as your back stays flat.
- Swinging the free leg out to the side. The leg moves on its own instead of with your hips. Fix: keep it straight behind you, in one line with your back. It only rises because your hips roll.
- Rushing the turn. A quick swing open and back skips the control the drill is for. Fix: take about two or three seconds each way.
- Locking the standing knee straight. Pushing that knee all the way back turns the soft bend into a stiff leg. Fix: keep a slight bend in the knee you stand on for every turn.
- Leaning on the support. Pulling on the counter or putting weight into it takes the balance out of the drill. Fix: let your fingertips rest lightly. Hold on with both hands only when you choose the easier version on purpose.
Hip Airplane Variations: Easier and Harder Versions
Work through these in order and change one thing at a time. Stay with each version until the turn feels easy.
Both Hands on the Support (Easier)
Hold the counter or chair back with both hands and make the turn smaller. This is the gentlest way to learn how the roll feels.
Shallower Lean (Easier)
Tip forward only about halfway between standing tall and level with the floor. A smaller lean is easier to hold steady while you turn.
Single-Leg Deadlift Hold (Easier)
Practice holding the single-leg deadlift position on each leg, fingertips on your support, before you add any turn. Once the hold is steady, the turn is the only new piece.
Supported Hip Airplane (the Version in the Steps)
The fingertips of one hand rest on the support, your other hand sits on your hip, and you roll from level to open and back to level. You can touch your back toes down between sets of turns.
Hands-Free Hip Airplane (Harder)
Take your hand off the support once the turn feels easy. Put your hands on your hips or hold your arms out to your sides.
Paused Hip Airplane (Harder)
Pause for about two seconds at the open end and again back at level. The pauses make the drill harder with no equipment at all.
Turn Past Level (Harder)
Before you open, turn a little past level the other way, toward your standing leg, then roll open. Add this range only while your hip feels comfortable, and stop if it pinches or hurts.
Dumbbell Hip Airplane (Hardest)
Once the hands-free version with pauses is steady, hold one light dumbbell in the hand on your standing-leg side, arm hanging straight down. Gym versions often use a kettlebell or a cable. A light dumbbell takes the kettlebell's place at home, but a cable pulls you sideways against the turn, which a dumbbell cannot do, so this guide does not teach the cable version.
When to Avoid or Modify Hip Airplanes
Hip airplanes need little or no weight, but they ask you to balance on one leg while tipped forward and turning. A burn in your glutes or the back of your thigh is normal. Any pain in a joint, your lower back or your neck, or any pain beyond a muscle burn, means stop right away. Check with a doctor or physical therapist before you start if one of these applies to you.
- Hip pain or a hip injury. Each turn rotates your standing hip while it carries all of your weight. Skip hip airplanes while your hip hurts, and see a doctor or physical therapist before you start them. A pinch or any pain in the hip during a turn means stop.
- Lower back pain, sciatica or a disc problem. The muscles along your spine hold your torso flat while you are tipped forward on one leg. Leave hip airplanes out while your back hurts, and ask a doctor or physical therapist whether they suit you. Lower back pain during a turn means stop right away.
- Knee, ankle or foot pain on the standing leg. That leg holds you up for the whole set. Have a doctor or physical therapist check it before you train on it, and stop if the knee, ankle or foot hurts during a set.
- Recent surgery on your hip, knee, ankle or spine. Wait until your surgeon clears you, and ask them or your physical therapist when one-leg balance work is right for you.
- Balance problems, dizziness or past falls. Standing on one foot while tipped forward and turning can end in a fall. Talk to your doctor or physical therapist before you train on one leg. If you feel dizzy or light-headed during a set, put your foot down, hold your support and rest.
- High blood pressure that is not under control, or heart disease. Ask your doctor whether this exercise suits you and how hard to work. Breathe steadily through every turn and never hold your breath.
- Pregnancy or the first months after giving birth. Ask your doctor or midwife before you do hip airplanes, since they combine a one-leg balance with a forward lean and a turn. Any pain in your back, belly or pelvis means stop.
Exercises Related to Hip Airplanes
These exercises lead up to hip airplanes or train the same muscles in an easier position:
- The step before: Single-Leg Deadlift. Its hinge is your starting position. Learn to hinge down and stand back up with your hips level before you hold the hinge and add the turn.
- A held one-leg hinge: Warrior 3 holds a similar forward lean on one leg as a yoga balance, without the turn.
- The side of the hip, without the balance: Clamshells, done lying on your side, and Fire Hydrants, done on your hands and knees, train the glute medius without balancing on one leg.
- The hinge on two feet: the Romanian Deadlift trains the same hip hinge with both feet on the floor and dumbbells in your hands.
- Glute strength from the floor: Glute Bridges work the glutes while you lie on your back, with no balance to manage.
- Flat-back control: Bird Dogs teach you to keep your back flat while one leg reaches back, from your hands and knees.
How to Program Hip Airplanes
Hip airplanes are a slow control drill, so count clean turns rather than effort. Take about two or three seconds to open and the same to turn back. Do 3 to 5 turns, stand up to rest, and repeat until you reach about 5 to 10 turns on each leg, building up to two sets. For comparison, a coaching article from the National Strength and Conditioning Association prescribes two sets of ten per leg for men's lacrosse players (Glauser, Kilian and Melton, NSCA Coach, 2021), a dose written for trained athletes. No study we found has tested how many hip airplanes to do, so the table below is a practical starting point, not a figure from a study.
| Stage | How to do it | Dose per leg | Move on when |
|---|---|---|---|
| Easier | Both hands on the support, a shallower lean and a smaller turn | 3 to 5 turns per hinge, about 5 to 10 turns, 1 set | The turn feels easy |
| Supported (the steps above) | Fingertips of one hand on the support, level to open and back | 3 to 5 turns per hinge, about 5 to 10 turns, building to 2 sets | The turn feels easy with only your fingertips resting on the support |
| Hands-free | Hands on your hips or arms out to your sides, then a two-second pause at each end | 3 to 5 turns per hinge, about 5 to 10 turns, 2 sets | Every paused turn is steady |
| Dumbbell | One light dumbbell in the hand on your standing-leg side, arm hanging straight down | 3 to 5 turns per hinge, about 5 to 10 turns, 2 sets | This is the last stage in this guide |
Where in your workout: do hip airplanes while you are fresh, early in a lower-body or full-body session, because the turn takes balance and focus.
Control over the count: end the set when your back rounds, your standing knee caves in or you lose your balance and can't fix it. Put your foot down, rest and start the next set fresh.
Hip Airplanes and FitCraft
The FitCraft app does not include the hip airplane, so use the steps, variations and table above to plan it yourself: start supported, let go once the turn feels easy, add the two-second pauses, and save the light dumbbell for last.
The app does include the single-leg deadlift, the hinge every hip airplane starts from, and the fire hydrant, which works the glute medius from your hands and knees. FitCraft builds its plans from bodyweight and dumbbell exercises plus a handful of band exercises, with no barbells, and it teaches form with 3D demos. The workouts are gamified.
Frequently Asked Questions
What muscles do hip airplanes work?
Hip airplanes mainly work the glute medius and the glutes of your standing leg, which roll your hips open and lower them back to level. The hamstrings on the back of that thigh and the erector spinae, the muscles along your spine, also work: they hold the hinge while you turn. You should feel it most at the back and side of your standing hip.
What is the difference between a hip airplane and a single-leg deadlift?
A hip airplane starts in the hinge of a single-leg deadlift and then changes the job. In a single-leg deadlift you hinge down and stand back up, and your hips stay level the whole time. In a hip airplane you hold the hinge still and the turn is the rep: your hips and chest roll open toward the ceiling and back to level while your standing thigh stays put.
What are the benefits of hip airplanes?
Hip airplanes train the glutes of your standing leg to roll your hips open and control them back while you balance on one leg. The American Council on Exercise says the drill works the gluteus maximus through its full range with control and challenges your balance. Many sites call it a hip mobility drill, but your muscles move your pelvis and hold the hinge the whole time, so it is a strength and control exercise, not only a stretch.
How many hip airplanes should I do?
Do 3 to 5 slow turns, then put your foot down and stand up to rest. Aim for about 5 to 10 turns on each leg, and build up to two sets. Take about two or three seconds to turn open and the same to turn back. Smooth control matters more than the count.
Should hip airplanes hurt?
Hip airplanes should not hurt. A burn in your glutes or the back of your thigh is normal. Any pain in a joint, your lower back or your neck, or any pain beyond a muscle burn, means stop: put your free foot down and stand up. A pinch in your hip during the turn means stop too. If you have hip, knee or lower back pain, see a doctor or physical therapist before you do hip airplanes, and ask which exercises suit you.
Do I need to hold on to something during hip airplanes?
Yes, at first. Rest your fingertips lightly on a kitchen counter, a wall or the back of a sturdy chair until the turn feels easy. Don't pull on the support or lean your weight on it. Letting go is the first harder step once the supported turn is steady.
Can you do hip airplanes with weight?
Yes, as the last step. Once the hands-free version with a two-second pause at each end is steady, hold one light dumbbell in the hand on your standing-leg side, arm hanging straight down. Gyms also use kettlebells and cables. A cable pulls you sideways against the turn, which a dumbbell cannot do, so this guide does not teach the cable version.