The Pendlay row sets the weight down on the floor every rep, so each pull starts from a full stop.
That dead stop changes two things. First, your back and arms move the weight from a standstill, with no bounce to help. Second, every rep gives you a moment with the weight on the floor to reset your flat back and brace before the next pull.
The strict version needs a good hip hinge. Your torso sits about level with the floor, so you bend your knees as much as you need to reach the dumbbells with a flat back. This guide builds that position step by step.
Quick Facts: Dumbbell Pendlay Row
- Equipment needed: Pair of dumbbells (one dumbbell for the one-dumbbell version; optional low blocks under the weights)
- Difficulty: Advanced (two dumbbells) to Expert (one dumbbell), as rated in the FitCraft app; the supported row is the easier, Intermediate version
- Modality: Strength
- Body region: Upper body (back, shoulders, and arms)
Muscles Worked
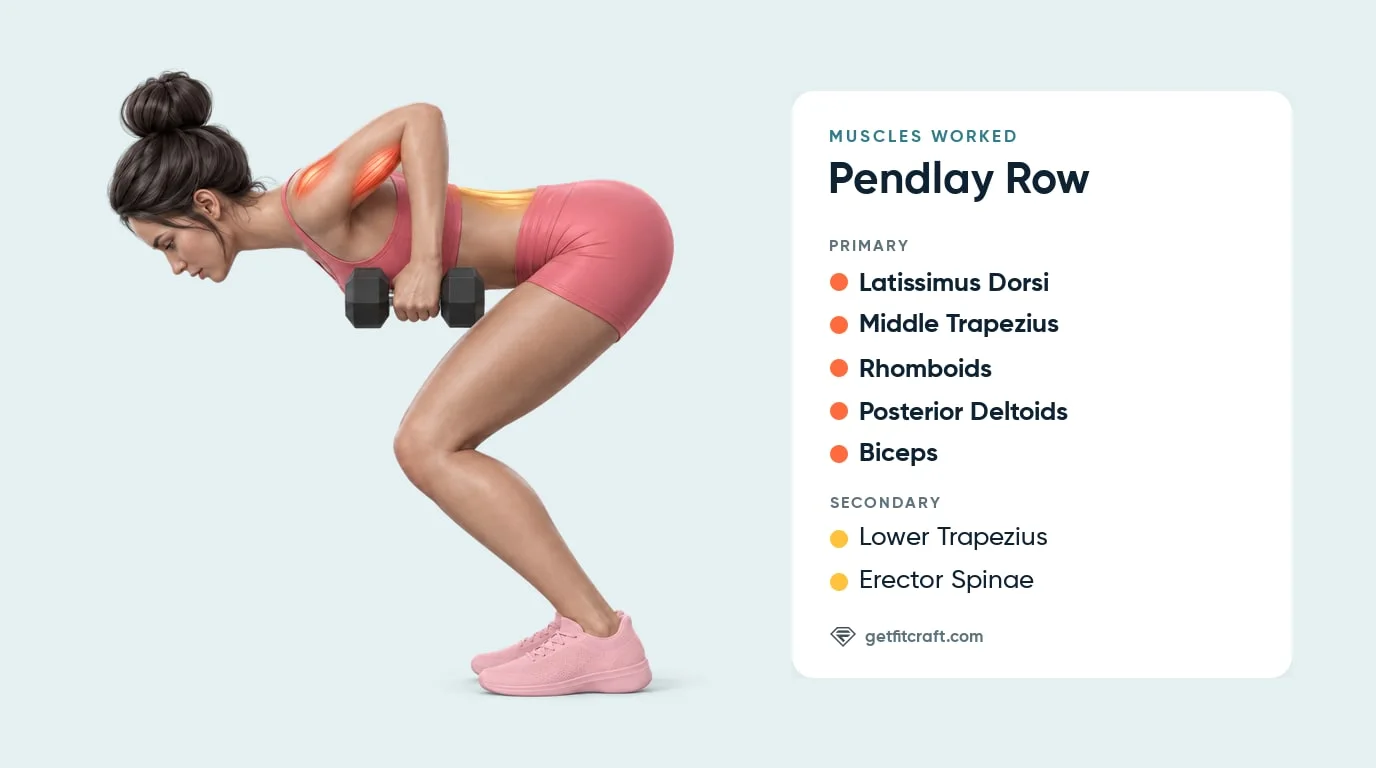
Primary movers: the latissimus dorsi, middle trapezius, rhomboids, posterior deltoids, and biceps. The lats pull your upper arms back toward your hips. The middle trapezius and rhomboids squeeze your shoulder blades together at the top of every rep. The posterior deltoids, at the backs of your shoulders, draw your arms back, and the biceps bend your elbows. These muscles shorten to pull the dumbbells off the floor and lengthen under control as you lower them back down. Because each pull starts from a dead stop, there is no bounce to help.
Secondary movers: the lower trapezius holds your shoulder blades down so your shoulders don't shrug toward your ears as you pull. The erector spinae, the muscles along your spine, hold your back flat in the hip hinge for the whole set.
Evidence: Fenwick et al. (2009) compared three rows in seven men and found the standing bent-over barbell row produced large, symmetrical back muscle activation and also the largest lumbar spine load and stiffness of the three; the inverted row had the lowest lumbar load. The study did not test the dumbbell Pendlay row itself. That lower back load is why the flat back is strict on every rep, and why the supported row is the easier option if your lower back tires before your upper back and arms do. Any lower back pain means stop.
Step-by-Step: How to Perform the Dumbbell Pendlay Row
Film yourself from the side the first few sessions. Torso position matters most, and a rising chest is easier to see than to feel.
Step 1: Set the Dumbbells and Your Stance
Set two dumbbells on the floor where your hands will hang once you bend over, under your shoulders. Stand with your feet about hip-width apart.
Tip: Start light, and set the dumbbells back down in the same spot every rep.
Step 2: Hinge to Near-Parallel and Grip
Push your hips back and bend your knees as much as you need, anywhere from a soft bend to a deep bend, until your chest is about level with the floor or a little above it. Grip both handles with your palms facing each other (an overhand grip also works), keep your back flat from head to tailbone, and stack your shoulders over the dumbbells. If tight hamstrings won't let you reach the floor with a flat back, bend your knees more, keep your chest a little above level, or raise the dumbbells on low, sturdy blocks.
Tip: Keep your neck in line with your back and your eyes on the floor below you.
Step 3: Brace Before the Pull
Breathe into your trunk, brace your core, and draw your shoulder blades slightly down and back. This reset happens before every rep, so you can fix your position each time.
Tip: Breathe in and brace while the dumbbells rest on the floor, then breathe out as you pull. Never hold your breath through the set.
Step 4: Row Quickly to Your Lower Ribs
Drive your elbows up and back toward the ceiling and pull both dumbbells to your lower ribs quickly and smoothly, in under a second. Keep your elbows close to your sides or angled out a little, never flared straight out. Your torso and legs stay still. Exhale through the pull and squeeze your shoulder blades together for a beat at the top.
Tip: Pull fast, but never jerk with your back. Your chest stays down and still the whole time.
Step 5: Lower to a Dead Stop and Reset
Lower the dumbbells under control, in about a second, until they rest fully on the floor. Let the floor take all the weight for a moment, re-flatten your back, and brace again. Bouncing the weights puts momentum back into every rep.
Tip: Set the dumbbells down every rep; never drop or bounce them.
Get this exercise in a personalized workout
FitCraft, our mobile fitness app, uses an AI coach to program compound strength exercises like this into your plan at the right volume and intensity, based on your level, goals, and equipment. Every FitCraft program is designed by Domenic Angelino, MPH (Brown University) and NSCA-CSCS, with research published in the Journal of Strength and Conditioning Research and Medicine & Science in Sports & Exercise.
Take the Free Assessment Free • 2 minutes • No credit card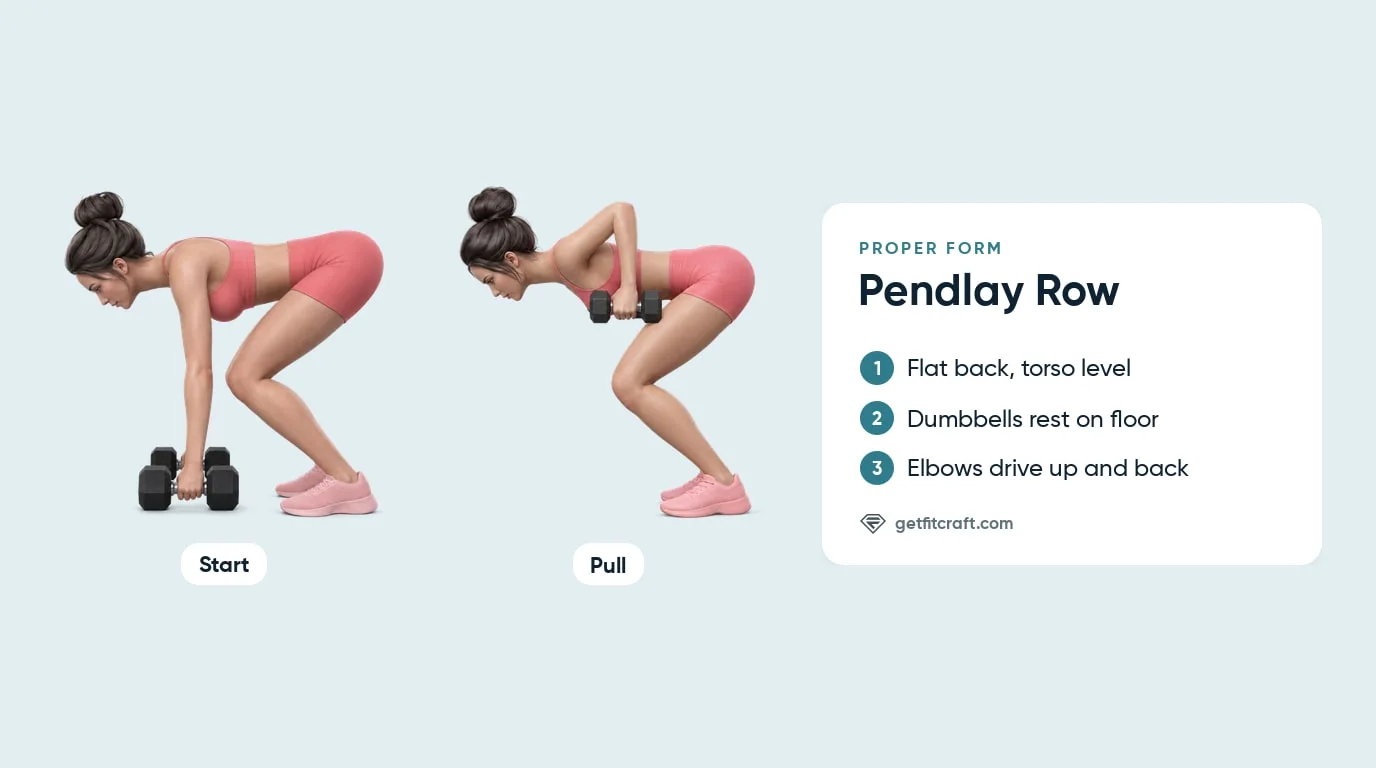
Common Mistakes (and How to Fix Them)
These are the errors that creep in as the dumbbells get heavier.
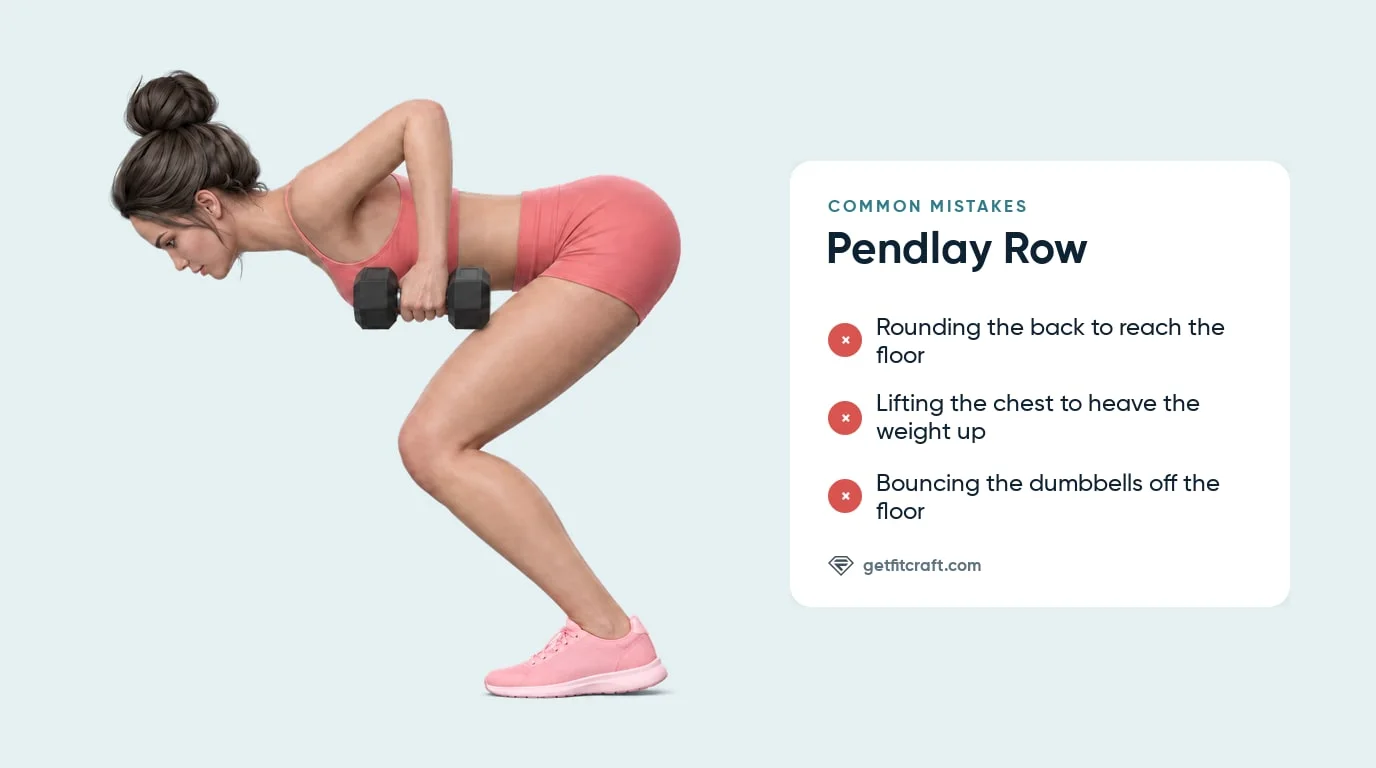
- Heaving the torso up. The chest lifts to help the weight travel, turning the row into a half-deadlift. Fix: keep your chest down and still, and use a lighter weight you can pull with your back and arms alone.
- Rounding the back to reach the floor. Your back rounds each time you reach down to the dead stop. Fix: bend your knees more, keep your chest a little above level, or shorten the reach with low, sturdy blocks under the dumbbells, and re-brace before every rep.
- Flaring the elbows and skipping the squeeze. The elbows flare straight out to the sides and the shoulder blades never move. Fix: lead with your elbows, driving them up and back close to your sides or angled out a little, so your back and arms share the pull, then squeeze your shoulder blades together at the top.
- Bouncing or dropping the dumbbells. The weights tap the floor and rebound immediately, or crash down without control, which puts momentum back into the rep. Fix: lower under control and let the dumbbells settle on the floor for a moment before the next pull.
- Standing too upright. The torso drifts up toward 45 degrees as the set goes on, so each rep starts from a different position. Fix: re-set your hips back until your chest is about level with the floor again, or only a little above it if that is what keeps your back flat.
- Shrugging at the top. The shoulders climb toward your ears as you pull. Fix: keep your shoulders away from your ears and drive your elbows up and back.
- Pushing with the legs. The knees and hips straighten to kick the dumbbells off the floor. Fix: set your knees and hips before the rep and keep your legs still; the pull comes from your back and arms.
- Twisting on the one-dumbbell version. The chest turns toward the rowing arm to throw the weight up. Fix: keep your chest square to the floor and your hips still, and use a lighter dumbbell if you start twisting.
- Looking up. Cranking your neck to look forward bends it out of line with your back. Fix: keep your eyes on the floor below you and your neck in line with your back.
- Holding your breath. You brace and stop breathing for the whole set. Fix: breathe in and brace while the dumbbells rest on the floor, breathe out as you pull, and breathe in as you lower.
Dumbbell Pendlay Row Variations: Regressions and Progressions
Learn to hold a flat back with your chest about level with the floor before you add weight. Start with the supported row if you need it, and add load only while your torso stays still.
Supported Row (Easier Version)
One hand and knee braced on a sturdy bench or box while the other arm rows a single dumbbell, rated Intermediate in the FitCraft app. The support takes load off your lower back while you learn the pulling pattern.
Bent-Over Row (Dumbbells Stay Up)
The dumbbells hang in the air for the whole set instead of touching down between reps. The torso can sit anywhere from about 45 degrees to nearly level with the floor; in the FitCraft app it hinges nearly level, like the Pendlay row. Your back gets no rest at the floor, and your lower back holds the hinge for the whole set. The two-dumbbell version is rated Advanced in the FitCraft app, the same as the two-dumbbell Pendlay row.
Dumbbell Pendlay Row (Standard)
Torso about level with the floor, dead stop on the floor every rep, a quick, smooth pull, rated Advanced in the FitCraft app. The exercise is also done with a barbell in the gym, with the same dead stop every rep.
Paused Pendlay Row (Progression)
Hold the dumbbells at your lower ribs for a moment before lowering. The pause makes the muscles between your shoulder blades hold the top position.
One-Dumbbell Pendlay Row (Expert Progression)
Row a single dumbbell while your other arm hangs straight down, or rest that hand on your thigh just above the knee for support, with your feet a little wider than shoulder-width. Keep your chest square to the floor and your hips still; only the rowing arm moves. The FitCraft app has this version for each side, rated Expert. Do all your reps on one side, then switch.
Renegade Row (Related Exercise)
Rowing from a plank position is a different exercise: your core also has to keep your body from twisting while you pull.
When to Avoid or Modify Dumbbell Pendlay Rows
A stretch or burn in the working muscles is normal. Any other pain, especially in a joint, your lower back or your neck, means stop. With any of the conditions below, see a doctor or physical therapist before you do Pendlay rows.
- Acute lower-back pain or a known disc problem. In a 2009 study the bent-over barbell row put the largest load on the lumbar spine of the three rows tested, and any lower back pain during a set means stop. Skip Pendlay rows and see a doctor or physical therapist first; they decide when you can row from the floor again.
- Recent spine, shoulder, or hip surgery or injury. Get clearance from your surgeon or physical therapist before you do Pendlay rows or any other row.
- Uncontrolled hypertension or cardiovascular disease. Get your doctor's clearance before you do Pendlay rows. Whenever you row, breathe out as you pull and never hold your breath.
- Pregnancy. Ask your doctor or midwife before you do Pendlay rows while pregnant.
- After giving birth, or with active diastasis recti. Get cleared by your doctor or a pelvic health physical therapist before you do Pendlay rows; they decide how you return.
Tight hamstrings that limit your hinge? If you can't reach the floor with a flat back, bend your knees more, keep your chest a little above level, or set the dumbbells on low, sturdy blocks. The Romanian deadlift trains the same hip hinge without the row.
Related Exercises
If Pendlay rows are in your routine, these movements build the same pulling and hinge patterns from complementary angles:
- Same muscle group (pull): Bent-Over Rows, Inverted Rows, and Supported Rows train the same horizontal pull with different spine demands, and Upright Rows add a standing pull in a different direction.
- Lat-biased complement: Overhead Pullover and Stiff-Arm Pulldown load the lats through a long arc without a hinge hold.
- Same movement pattern (hinge): Romanian Deadlifts, Dumbbell Deadlifts, and Good Mornings strengthen the hip hinge the Pendlay row is built on.
- Core foundation: Deadbugs and Forearm Planks are core exercises to pair with rows, and Bird-Dogs train the glutes and the muscles along your spine.
- Arm accessory: Bicep Curls and Hammer Curls train the biceps, which bend your elbows on every row.
How to Program Dumbbell Pendlay Rows
Pendlay row programming follows standard progressive resistance-training principles for compound pulls. The American College of Sports Medicine (ACSM) position stand recommends that novices use loads they can lift for 8 to 12 reps per set and train 2 to 3 days per week, and that intermediate and advanced lifters use a wider range of 1 to 12 reps per set, varied over time in a periodized plan (Ratamess et al., 2009). Because every rep starts from a dead stop, end each set while every rep still looks the same, rather than chasing high reps.
| Level | Sets and reps | Frequency |
|---|---|---|
| Easier (supported row, lighter dumbbells, or low blocks) | 2 to 3 sets of 8 to 12 reps | 2 to 3 sessions a week |
| Advanced (two-dumbbell Pendlay row from the floor) | 3 to 4 sets of 6 to 10 reps | 1 to 2 sessions a week |
| Expert (one-dumbbell Pendlay row, each side) | 3 to 5 sets of 5 to 8 reps per side | 1 to 2 sessions a week |
Where in your workout: first or second in a pull or full-body session, while you are fresh enough to hold a flat-back hinge. Pair it with a pushing exercise, such as a press, in the same session. Do it before lighter, higher-rep pulling exercises.
Stop when your form slips: end the set when your torso starts rising, your back rounds at the floor, or the dead stop turns into a bounce, whatever the plan said.
How FitCraft Programs This Exercise
During your personalized diagnostic, the app maps your fitness level, goals, and available equipment. Then it builds a balanced training plan for your level, and the Pendlay row is one of the strength exercises it can include, with an interactive 3D demonstration. The app has the two-dumbbell Pendlay row (Advanced) and a one-dumbbell version for each side (Expert), and it includes the supported row (Intermediate) as its own exercise.
As you get stronger, the app adjusts your training to match your level. If you can't keep a flat back yet, use the supported row and the easier options in this guide to build up to it.
Frequently Asked Questions
What muscles do Pendlay rows work?
Pendlay rows work the latissimus dorsi, middle trapezius, rhomboids, posterior deltoids, and biceps as primary muscles, with the lower trapezius and erector spinae as secondary muscles. The lats pull your upper arms back toward your hips, the middle trapezius and rhomboids squeeze your shoulder blades together, the posterior deltoids (rear delts) draw your arms back, and the biceps bend your elbows. The lower trapezius keeps your shoulder blades from creeping up toward your ears, and the erector spinae, the muscles along your spine, hold your back flat in the hinge.
What is the difference between a Pendlay row and a bent-over row?
A Pendlay row sets the dumbbells down on the floor every rep and starts each pull from a dead stop, while a bent-over row keeps the dumbbells hanging in the air for the whole set. The torso angle can be the same: in the FitCraft app both rows hinge until the torso is nearly level with the floor. The dead stop removes momentum, forces a stricter pull, and gives you a moment to reset your flat back and brace before every rep.
Can I do Pendlay rows with dumbbells?
Yes, and the dumbbell version is the one the FitCraft app teaches. It keeps everything that defines the exercise: a torso about level with the floor, a flat back, a quick, smooth pull, and a full dead stop on the floor between reps. If you cannot keep a flat back when you reach the floor, bend your knees more, keep your chest a little above level, or rest each dumbbell on a low, sturdy block.
How heavy should I go on dumbbell Pendlay rows?
Start light. Use a weight you can pull quickly and smoothly to your lower ribs on every rep of the set without your chest rising, your torso twisting, or your back rounding. Go heavier only while your back stays flat and your torso stays still. When your torso starts heaving up to finish a rep, the dumbbells are too heavy.
Can I do Pendlay rows with lower-back pain?
No. Any pain in your lower back means stop the exercise right away. In a 2009 study, the standing bent-over barbell row put the largest load on the lumbar spine of the three rows tested. If you have lower-back pain or a known disc problem, see a doctor or physical therapist before you do Pendlay rows; they decide when you can row from the floor again.