Most search results for shoulder dislocates are about the injury, when the bones of the shoulder joint are pushed out of place (Cleveland Clinic). This page is about the mobility drill with the same name. Done slowly, with a wide grip and straight arms, the drill does not dislocate the joint: it moves your shoulders through their full range.
Who should skip it: anyone who has dislocated a shoulder before, anyone whose shoulder feels loose or unstable or slips, and anyone with a shoulder injury, shoulder pain or recent shoulder surgery right now, unless a doctor or physical therapist clears them. A shoulder that has dislocated once is vulnerable to dislocating again (AAOS OrthoInfo). If you think your shoulder is dislocated or injured right now, see a doctor instead of trying this drill.
If none of that applies to you, start with a light band and a grip wider than you think you need. You should feel a gentle stretch across your chest and the front of your shoulders, never pain inside the joint.
Quick Facts: Shoulder Dislocates
- Also called: Shoulder pass-throughs, band shoulder dislocates, or stick shoulder dislocates when done with a broomstick or PVC pipe
- Equipment needed: A light resistance band; a broomstick, PVC pipe, dowel or long towel works instead
- Difficulty: Beginner. There is no weight to lift, and your grip sets how hard it feels: the wider your hands, the easier it is. The safety screen above still applies.
- Modality: Mobility (a slow, moving stretch for a warm-up or cool-down)
- Body region: Chest, front of the shoulders, sides of the back and rib cage, and the rotator cuff (stretched, not strengthened)
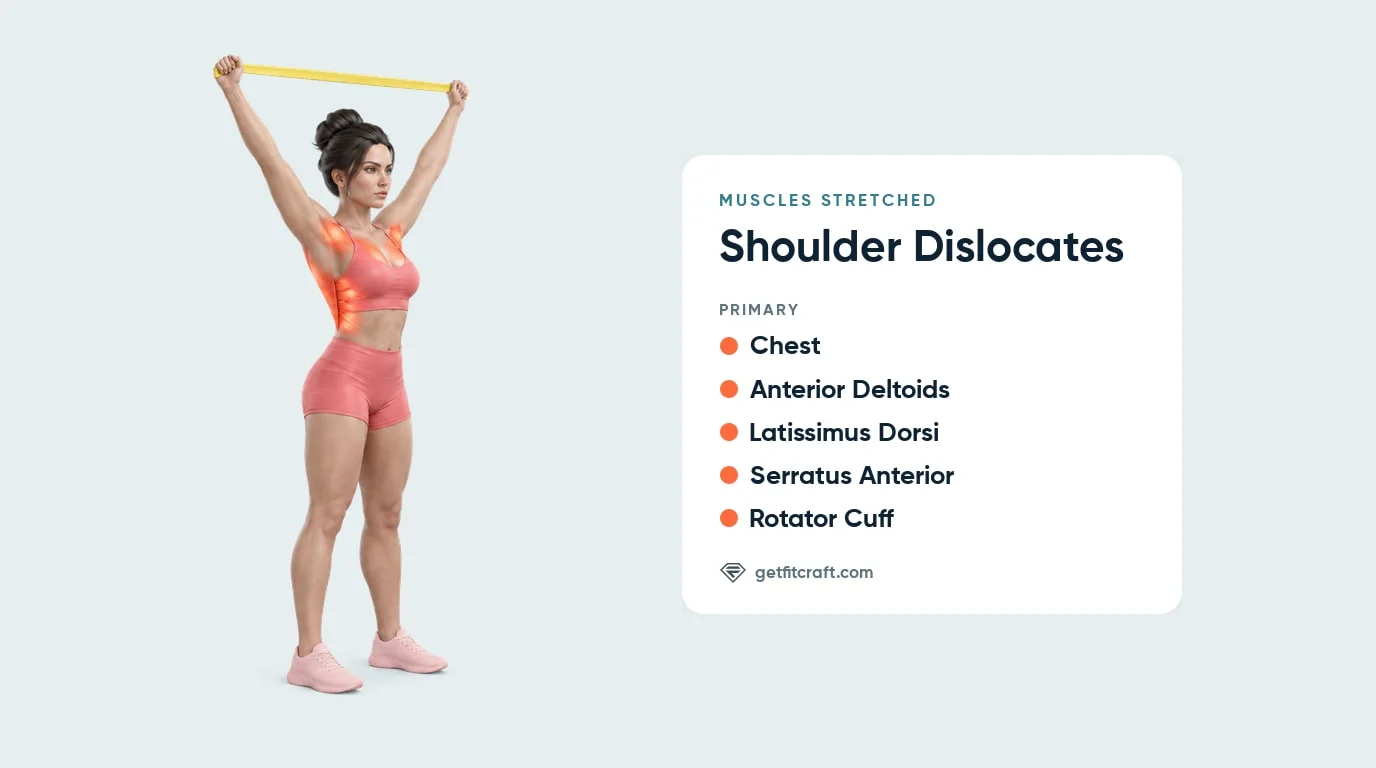
Muscles Stretched
Shoulder dislocates stretch five muscle groups: the chest, the anterior deltoids at the front of your shoulders, the latissimus dorsi (your lats), the serratus anterior and the rotator cuff. All five are stretched, not strengthened. A light band or a stick adds too little resistance to make them stronger, and the point of the drill is range of motion.
Chest and anterior deltoids. These muscles bring your arms forward and across your body. As your straight arms travel back behind you, the opposite direction, the chest and the front of your shoulders lengthen. This is the stretch you feel across your chest and the front of your shoulders as the band goes behind you.
Latissimus dorsi. The lats run from your upper arms down the sides of your back, and they pull your arms down and back. With your arms straight overhead, they lengthen, so you feel a stretch along the sides of your back as the band passes over your head.
Rotator cuff. The rotator cuff is the group of small muscles around your shoulder joint. An arm turned inward cannot rise much past shoulder height, so your upper arms turn outward to carry the band over the top. That outward turn lengthens the subscapularis, the rotator cuff muscle under your shoulder blade that turns the arm inward.
Serratus anterior. The serratus anterior runs from the side of your rib cage, just below the armpit, to the inner edge of your shoulder blade, and it pulls the shoulder blade forward around your ribs. At the end of each pass, with the band behind you and your shoulder blades drawn back, it lengthens.
What keeps the band apart: the rear deltoids at the back of your shoulders, with the middle and lower trapezius and the rhomboids in your upper back, keep light tension on the band and draw your shoulder blades back. With a light band that is light work, so shoulder dislocates are not a strength exercise for these muscles either. The band pull-apart works the rear deltoids, middle trapezius and rhomboids directly.
Where you should feel it: a stretch across your chest and the front of your shoulders as the band goes behind you, and along the sides of your back as it passes overhead. You should not feel pain inside your shoulder, your lower back or your neck. We found no study of shoulder dislocates themselves, so these roles come from how each muscle moves the shoulder joint and the shoulder blade (ExRx guides to the shoulder joint, the shoulder blade and raising the arm overhead).
Step-by-Step: How to Do Shoulder Dislocates
If your shoulders feel stiff, start with your hands near the ends of a light band. Stopping each pass overhead or just behind your head, then coming back to the front, is a fine place to start.
Step 1: Take a Wide Grip on a Light Band
Stand tall with your feet about hip-width apart. Hold a light resistance band in front of your hips with an overhand grip, palms facing your body, hands much wider than your shoulders, often near the ends of the band. Keep both arms straight and pull your hands slightly apart so the band is lightly taut.
Form tip: a broomstick or PVC pipe is held the same way, a little wider, because it will not stretch.
Step 2: Set Your Ribs and Head
Tighten your stomach a little so your ribs stay down and your lower back does not arch. Keep your head level and your neck long, with your eyes looking straight ahead.
Form tip: breathe steadily and easily through every pass, and never hold your breath.
Step 3: Raise the Band Over Your Head
Keeping both arms straight and moving together, raise the band in front of you and up over your head. Let it pass over without pushing your head forward.
Form tip: both hands should move at the same speed, so neither arm leads.
Step 4: Carry It Down Behind You
Keep your arms straight and carry the band back and down behind you until it reaches the back of your hips, or only as far as your shoulders allow without pain. If your elbows bend or your shoulders pinch, stop that pass there and widen your grip before the next one.
Form tip: never push through a pinch, bounce or force your arms back.
Step 5: Bring It Back to the Front
Bring the band back the same way, up over your head and down in front of your hips, slowly, about 2 to 3 seconds each way. That is one pass. Do about 10 to 15 slow passes.
Form tip: stop right away for any shoulder pain, or if your shoulder clunks, slips or feels like it could pop out.
Get a personalized workout plan
FitCraft, our mobile fitness app, does not include shoulder dislocates, but it builds your plan from the dumbbell, band, and bodyweight exercises in its library, including the band pull-apart, at the right volume and intensity for your level, goals, and equipment. Every FitCraft program is designed by Domenic Angelino, MPH (Brown University) and NSCA-CSCS, with research published in the Journal of Strength and Conditioning Research and Medicine & Science in Sports & Exercise.
Take the Free Assessment Free · 2 minutes · No credit card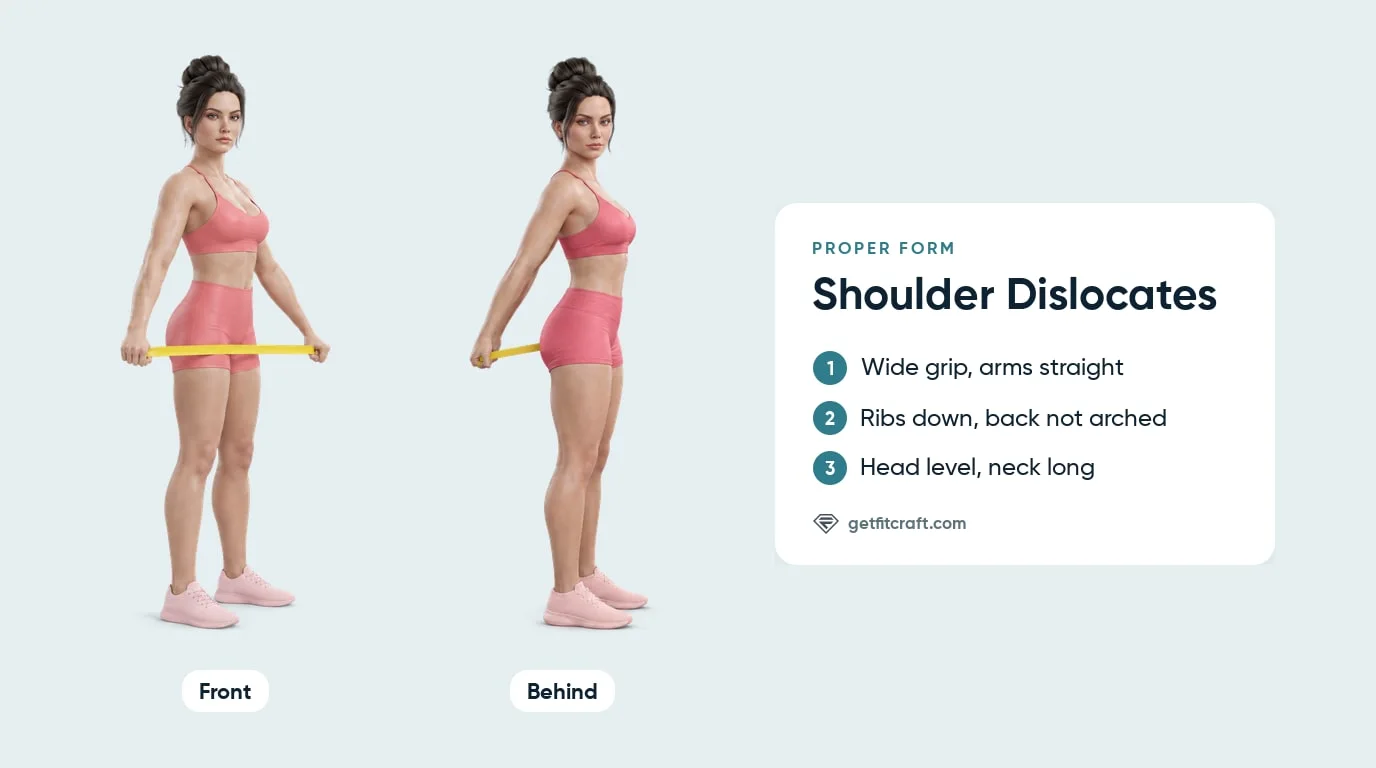
Common Mistakes (and How to Fix Them)
These are the mistakes to watch for, with the fix for each one.
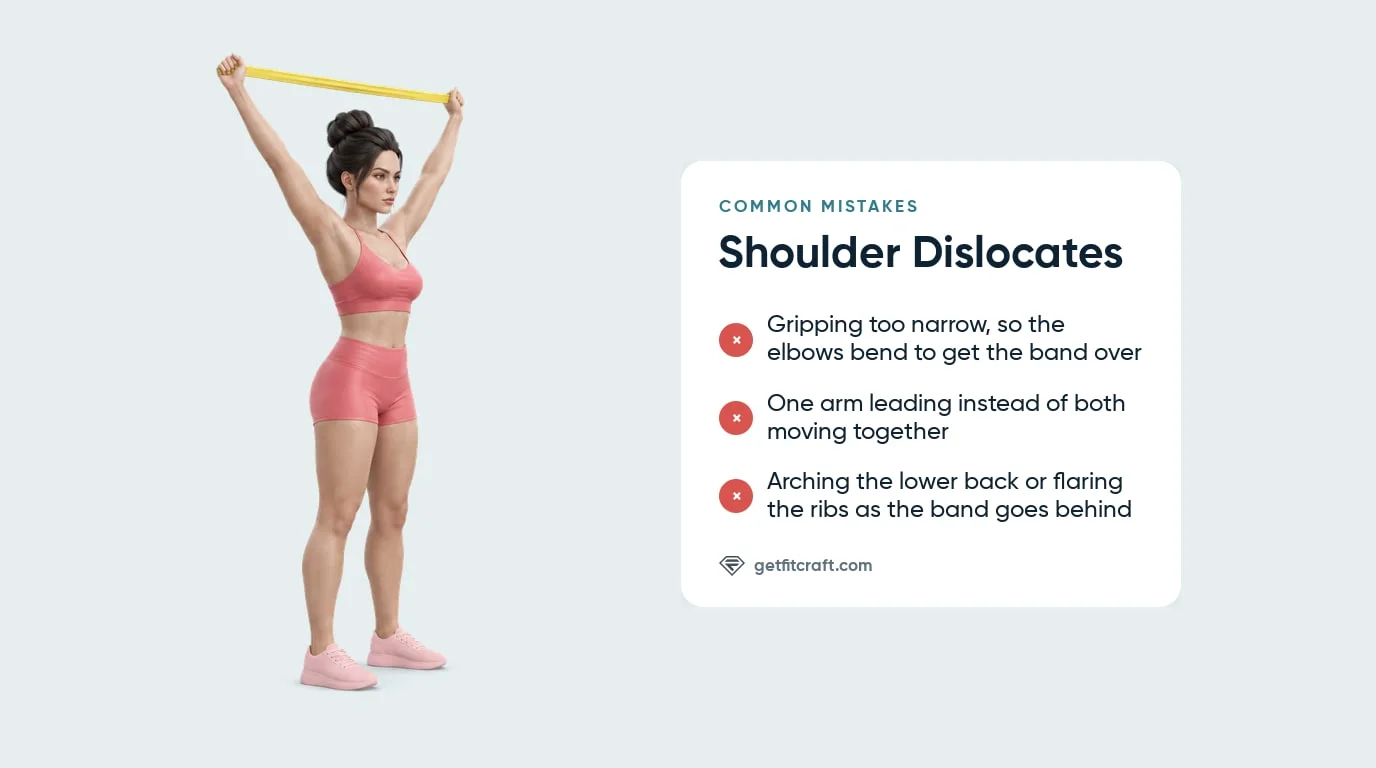
- Gripping too narrow. With your hands too close together, your elbows bend to get the band over your head. Fix it by sliding your hands wider until both elbows stay straight the whole way around. A lighter band also lets you hold it wider.
- Letting one arm lead. One hand gets ahead and the band goes over at an angle. Fix it by slowing down so both hands move together and reach the top at the same time.
- Arching your lower back. Your ribs flare and your lower back arches as the band goes behind you. Fix it by tightening your stomach and keeping your ribs down. If your back still arches, widen your grip or stop the pass sooner so your back stays still.
- Poking your head forward. Your chin juts out as the band passes over. Fix it by keeping your head level and your neck long, and let the band pass over without pushing your head forward.
- Rushing or bouncing through the stiff point. Swinging the band fast, or bouncing to get it past the tight spot, uses momentum instead of control. Bouncing stretches have been all but abandoned for safety reasons (ExRx). Fix it by taking about 2 to 3 seconds each way.
- Forcing your arms back through a pinch. A pinch means your grip is too narrow for your shoulders right now. Fix it by stopping that pass where the pinch starts and widening your grip before the next one. If it still pinches with a wider grip, stop for today. Any pain means stop right away.
- Using a band that is too heavy. A heavy band does not give a little where your range runs out, the way a light band does. Fix it by switching to a light band.
Shoulder Dislocate Variations: Easier and Harder Versions
Make the drill easier with a wider grip or a shorter pass. Make it harder only while both arms stay straight and nothing hurts.
Wider Grip or Lighter Band (Easier)
Slide your hands closer to the ends of the band, or swap to a lighter band, which also lets you hold it wider. A wider grip makes the pass easier on stiff shoulders.
Partial Pass (Easier)
Take the band overhead or just behind your head, then bring it back to the front. This is a fine version for anyone who cannot go further with straight arms and no pain.
Band Shoulder Dislocates (Standard)
This is the version the steps above teach: a light band, a wide overhand grip, straight arms and a full pass from in front of your hips to the back of your hips and back again. A light band is the easier place to start because it gives a little where your range runs out.
Shoulder Dislocates With a Stick, PVC Pipe or Towel
A broomstick, PVC pipe or dowel stays at a fixed width, so hold it wider than you would a band and expect it to feel stricter. A long towel held taut works like a stick. Move just as slowly as you would with a band.
Narrower Grip (Harder)
Over several weeks, bring your hands about a hand-width closer at a time, only while both arms stay straight and nothing hurts. The closer your hands are, the bigger the stretch.
Slower Passes (Harder)
Keep your usual grip and slow each pass down to about four or five seconds each way.
When to Avoid or Modify Shoulder Dislocates
A gentle stretch across your chest, the front of your shoulders and the sides of your back is the normal feeling. Any pain in your shoulder or another joint, your lower back or your neck means stop. So does a clunk or slipping feeling in your shoulder, tingling or numbness in your arms or hands, or feeling dizzy or lightheaded. If any of the following applies to you, skip shoulder dislocates and see a doctor or physical therapist first. Always consult your physician or physical therapist for personalized guidance.
- You have dislocated a shoulder before. A shoulder that has dislocated once is vulnerable to dislocating again (AAOS OrthoInfo), and you are much more likely to injure it again (Cleveland Clinic). The stiffest point of this pass, with your arms raised and turned outward behind your head, is a position the NSCA tells people with anterior shoulder instability, a shoulder that tends to slip toward the front, to avoid (NSCA). Skip the drill unless a doctor or physical therapist clears you.
- A shoulder that feels loose or unstable, or slips. Some people have naturally loose ligaments (AAOS OrthoInfo), and extra flexibility can bring more injury when it makes a joint less stable (ExRx). Skip the drill unless a doctor or physical therapist clears you.
- A shoulder injury, shoulder pain or recent shoulder surgery. Skip shoulder dislocates until your surgeon, doctor or physical therapist clears you, and ask them when you can add the drill.
- Numbness, tingling, or pain that travels down your arm. Stop the drill and see a doctor or physical therapist. Tingling and numbness are not normal stretching feelings.
- Neck or lower back pain. The band passes over your head, and your ribs tend to flare as it goes behind you. Stop for any neck or lower back pain during a pass, and see a doctor or physical therapist before you try the drill again.
Related Exercises
These exercises cover the same shoulder area, use the same light band, or work the muscles that keep the band apart:
- Same light band, upper-back strength: Band Pull-Apart works the rear deltoids, middle trapezius and rhomboids, the muscles that keep the band apart in shoulder dislocates.
- Same stretched muscles, one arm at a time: Rotator Cuff Stretch stretches the front of the shoulder, the chest, the rotator cuff and the serratus anterior in a seated hold.
- Lat stretch: Tricep and Lat Stretch stretches the triceps and the lats with one arm overhead.
- Gentle shoulder warm-up: Shoulder Rolls circle your shoulders slowly with your arms by your sides.
- Upper-back strength: Y Raise and W Raise work the middle and lower trapezius, the rhomboids and the rear deltoids.
- Cool-down partner: Cat-Cow sits beside stick shoulder dislocates in the NSCA cool-down described below.
- Strength pairing: Shoulder Press works the front of the shoulders and the triceps, and shoulder dislocates fit in the warm-up before upper-body work like it.
How to Program Shoulder Dislocates
Shoulder dislocates are a mobility drill, so you count them in slow passes, not heavy sets. Moving stretches like this one, also called dynamic stretches, use controlled movements and are often part of a warm-up (ExRx). Cleveland Clinic suggests about 10 to 12 repetitions of a dynamic stretch as part of a warm-up (Cleveland Clinic). The drill also works in a cool-down: a training plan for firefighter recruits in the NSCA's TSAC Report puts 15 stick shoulder dislocates in a cool-down beside cat-cow and static stretches (Bonder et al., 2023). About 10 to 15 slow passes is plenty.
| Version | Grip and range | Passes | Pace |
|---|---|---|---|
| Easier | Hands near the ends of a lighter band; stop overhead or just behind your head | 10 to 15 | About 2 to 3 seconds each way |
| Standard (band) | Wide enough that both elbows stay straight; full pass to the back of your hips | 10 to 15 | About 2 to 3 seconds each way |
| Stick, pipe or towel | A little wider than with a band, because a stick will not stretch | 10 to 15 | About 2 to 3 seconds each way |
| Harder | Hands about a hand-width closer, added over several weeks, or your usual grip with slower passes | 10 to 15 | About 4 to 5 seconds each way for slower passes |
Where in your workout: do shoulder dislocates in your warm-up before upper-body work, or in your cool-down at the end of a session.
Form before pass count: if your elbows start to bend or your lower back starts to arch, stop that pass there and widen your grip or shorten the pass before the next one. Any pain means stop right away.
Shoulder Dislocates and FitCraft
Shoulder dislocates need only a light band or a broomstick and take a minute or two, so they are easy to add to a warm-up on your own.
The FitCraft app does not include shoulder dislocates, so plan them yourself with this page: about 10 to 15 slow passes as a warm-up before upper-body work or in a cool-down, starting with a wide grip and bringing your hands closer only while both arms stay straight and nothing hurts. The app's closest exercises are the band pull-apart, which uses the same kind of light band with straight arms, and the rotator cuff stretch, which stretches the front of the shoulder and the chest.
FitCraft's own programs are built from the dumbbell, band, and bodyweight exercises in its library. The free assessment matches your plan to your level, goals, and equipment, and the app demonstrates each exercise in 3D.
Frequently Asked Questions
Can shoulder dislocates dislocate your shoulder?
No, not when you do them slowly with a wide grip and straight arms. The name describes the big circle your arms make, not an injury. Never force the pass, and stop if anything hurts. If you have dislocated a shoulder before, or a shoulder feels loose, unstable or injured, skip this drill unless a doctor or physical therapist clears you.
Can I do shoulder dislocates if I have dislocated a shoulder before?
Skip them unless your doctor or physical therapist says it is okay. A shoulder that has dislocated once is vulnerable to dislocating again, and the stiffest point of the pass, with your arms raised and turned outward behind your head, is a position people whose shoulder tends to slip toward the front are told to avoid. The same goes for a shoulder that feels loose or unstable, or one that is injured or hurting right now.
What muscles do shoulder dislocates stretch?
Shoulder dislocates stretch five muscle groups: the chest, the anterior deltoids at the front of your shoulders, the latissimus dorsi along the sides of your back, the serratus anterior on the side of your rib cage, and the rotator cuff around your shoulder joint. The rear deltoids, middle and lower trapezius, and rhomboids keep light tension on the band, but with a light band the drill is a stretch, not a strength exercise.
What are the benefits of shoulder dislocates?
Shoulder dislocates take your shoulders slowly through their full range and stretch your chest, the front of your shoulders, your lats, your serratus anterior, and your rotator cuff. That makes them a useful warm-up before upper-body work, and some programs also use them in a cool-down. No study we found has tested the drill itself.
Can you do shoulder dislocates without a band?
Yes. Use a broomstick, a PVC pipe, a dowel or a long towel held taut. Hold it wider than you would a band, because it will not stretch, and move just as slowly. A stick stays at a fixed width, so it feels stricter than a band, which gives a little where your range runs out.
How wide should your grip be for shoulder dislocates?
Wide enough that both arms stay straight the whole way around, often near the ends of the band. If your elbows bend or your shoulders pinch, slide your hands wider or use a lighter band. Bring your hands closer only gradually, about a hand-width at a time over several weeks, and only while your arms stay straight and nothing hurts.
How many shoulder dislocates should you do?
About 10 to 15 slow passes is plenty, at about 2 to 3 seconds each way, with no bouncing or swinging. Do them as a warm-up before upper-body work or in a cool-down.
What should I do if shoulder dislocates hurt?
Stop right away. A gentle stretch across your chest and the front of your shoulders is normal, but any pain in your shoulder or another joint, your lower back or your neck means stop. So does a clunk or slipping feeling in your shoulder, or tingling or numbness in your arms or hands. See a doctor or physical therapist before you try the drill again.