Side kicks look simple: stand on one leg and kick the other leg out to the side. The useful part is what happens around that simple motion. Your standing leg has to balance, your core has to keep the torso from tipping, and your hip abductors have to move the kicking leg without borrowing momentum.
That makes side kicks a practical choice for warm-ups, low-impact cardio circuits, and glute-activation blocks before lower-body training. They also fit small spaces. No jump, no equipment, and no setup beyond enough room to move one leg sideways.
Quick Facts: Side Kicks
- Equipment needed: None
- Difficulty: Beginner-friendly, with banded and squat-to-kick progressions
- Modality: Low-impact cardio / hip-abductor conditioning
- Body region: Lower body, hips, and core
- FitCraft quest category: Conditioning
Muscles & Systems Worked
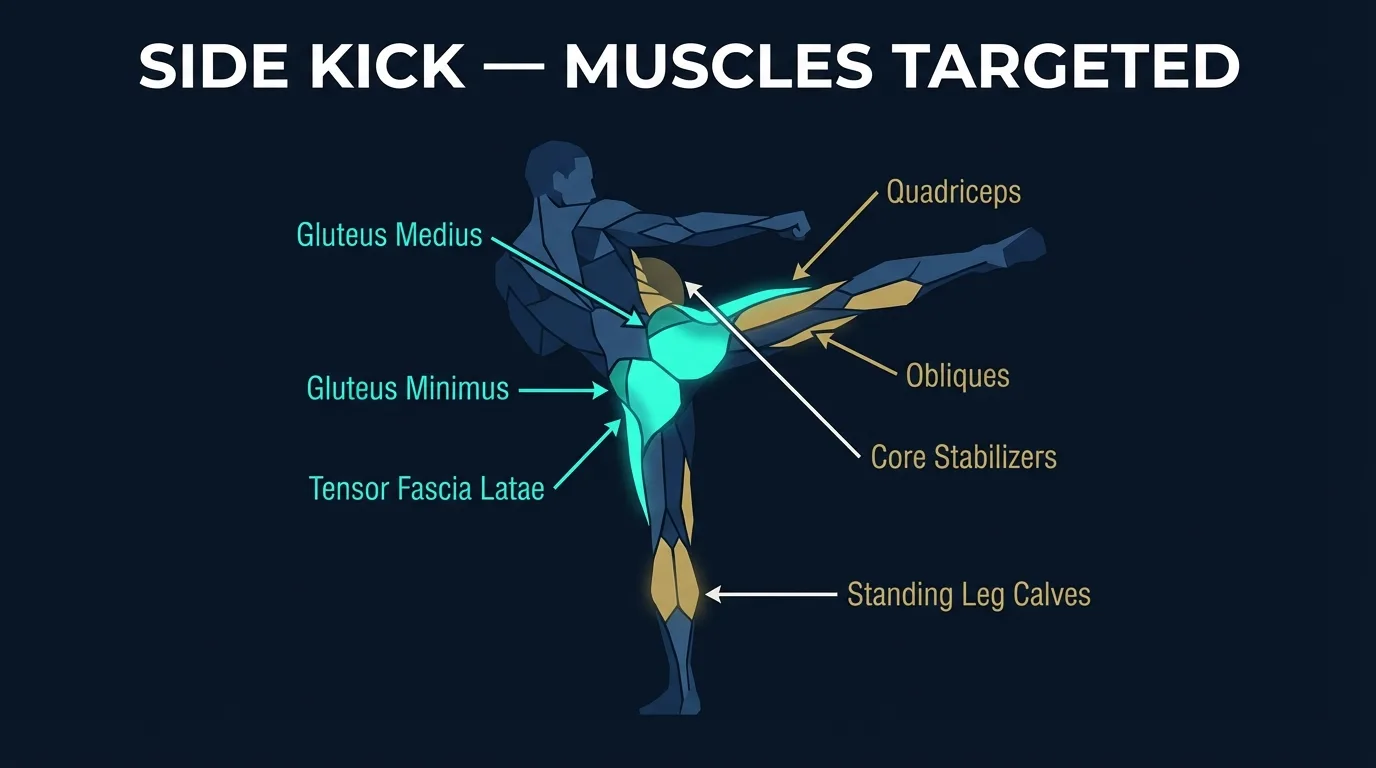
Primary movers. The hip abductors drive the kick: gluteus medius, gluteus minimus, and tensor fasciae latae. They shorten as the leg moves out to the side, then lengthen under control as the leg returns. The quadriceps help extend and hold the kicking knee when you use a straighter-leg version.
Secondary movers. The standing-leg gluteus medius and gluteus maximus hold the pelvis level. The calves and intrinsic foot muscles keep the standing foot planted, while the hip flexors and adductors help guide the leg back to center between reps.
Stabilizers. The rectus abdominis, transverse abdominis, obliques, and spinal erectors brace the trunk so the kick doesn't turn into a side bend. The ankle stabilizers, especially the peroneals and tibialis posterior, control small balance corrections. The cardiovascular system and energy systems also work when side kicks are performed continuously as intervals.
Mechanism. Side kicks use repeated frontal-plane hip abduction from a single-leg stance. That combination makes the outside hip work on both sides at once: the kicking side moves the leg, and the standing side keeps the pelvis from dropping. At a steady tempo, the continuous leg switching adds enough total muscle mass and coordination demand to raise heart rate without requiring jumping.
Step-by-Step Instructions
- Stand tall and brace. Place your feet hip-width apart with your hands on your hips or held in front of your chest. Brace your core and shift your weight slightly onto one leg. Keep the standing knee soft.
Coach Ty's cue: "Set your balance first. Tall posture, soft knee, eyes forward."
- Lift the kicking leg to the side. Shift fully onto the standing leg and raise the other leg out sideways. Lead with your heel, with toes facing forward or slightly down, so the movement comes from the outside hip.
Coach Ty's cue: "Heel leads the kick. Don't let the toes take over."
- Stop at your clean range. Kick only as high as you can without leaning away or opening the hips. Hip height is fine if you can hold alignment. Knee height is enough if that keeps the rep clean.
Coach Ty's cue: "A lower clean kick beats a high tilted kick every time."
- Lower under control. Bring the leg back down slowly. Lightly tap the floor or hover before the next rep. Keep the standing foot flat and avoid snapping the leg back with momentum.
Coach Ty's cue: "Control the return. The way down still counts."
- Repeat, then switch sides. Finish the planned reps or time on one side, then switch. For conditioning, alternate legs each rep and keep a steady breathing rhythm: exhale on the kick, inhale on the return.
Coach Ty's cue: "Smooth reps. Same height, same pace, both sides."
Get this exercise in a personalized workout
FitCraft, our mobile fitness app, uses its AI coach Ty to program conditioning work like this into your plan at the right volume and intensity, based on your level, goals, and equipment. Ty was designed and trained by Domenic Angelino, MPH (Brown University) and NSCA-CSCS, with research published in the Journal of Strength and Conditioning Research and Medicine & Science in Sports & Exercise.
Take the Free Assessment Free · 2 minutes · No credit card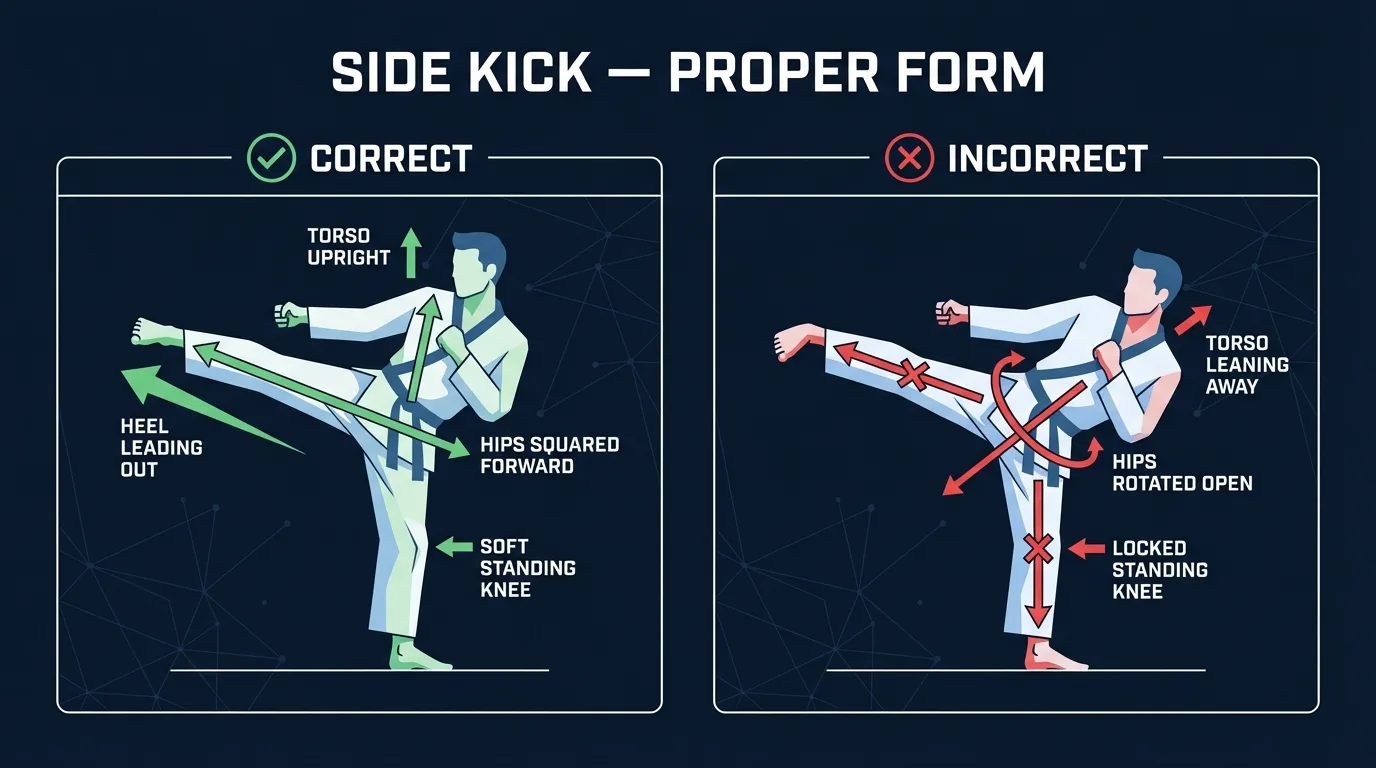
Common Mistakes
- Leaning away from the kick. This is the classic compensation. It makes the leg look higher, but it shifts work away from the hip abductors. Keep the ribs stacked over the pelvis and use a lower kick height.
- Swinging the leg with momentum. If the leg flies out and drops back down, you're training a swing. Slow the rep until you can pause briefly at the top.
- Rotating the hips open. Turning the pelvis toward the kicking leg changes the exercise from side hip abduction into a diagonal kick. Keep both hip bones facing forward.
- Locking the standing knee. A rigid knee makes balance harder and can feel harsh on the joint. Keep a slight bend so the hip and ankle can make small corrections.
- Chasing height before control. High kicks are optional. The goal is a stable pelvis, steady breath, and a controlled return. Build height after those pieces are reliable.
- Holding your breath. Balance drills often make people freeze. Exhale on the kick, inhale on the return, and keep the rhythm consistent.
Variations
- Supported side kick. Hold a wall, chair, or countertop with one hand. This removes enough balance demand to let you focus on the hip motion. Use it first if you wobble or lean.
- Low side kick. Kick to shin or knee height instead of hip height. This is the cleanest regression for tight hips, sensitive knees, or early warm-up sets.
- Squat kick. Add a bodyweight squat before each kick. The squat raises the lower-body demand, then the side kick adds lateral hip control and a conditioning rhythm.
- Banded side kick. Place a light mini band above the knees or around the ankles. Keep the range smaller at first because the band makes the glute medius and minimus work harder through the whole rep.
- Side kick with pulse. Hold the top position and add 2 to 3 small pulses before lowering. Use this for time under tension, then stop the set when posture starts to tilt.

When to Avoid or Modify Side Kicks
Side kicks are safe for most healthy adults, but the single-leg balance demand and repeated hip abduction mean a few situations deserve a lower-intensity option. Always consult a qualified healthcare provider or physical therapist before starting or returning to a new exercise program, especially if any of the following apply.
- Known cardiovascular disease or uncontrolled hypertension. Fast side-kick intervals can raise heart rate and blood pressure quickly. Get medical clearance and stay within prescribed intensity zones. Use walking in place or slow supported kicks if you need lower intensity.
- Acute knee, ankle, hip, shin, or foot injury. Single-leg support and lateral hip motion can aggravate irritated joints or soft tissue. Use supported low kicks, step-n-clap, or walking until symptoms settle.
- Pregnancy or early postpartum recovery. Balance changes, joint laxity, and pelvic-floor demand can make standing kicks less predictable. Use a wall-supported low kick or skip side kicks until cleared by an obstetric provider or pelvic-floor physical therapist.
- Stress incontinence or pelvic-floor weakness. Side kicks are lower impact than jumping, but fast alternating reps can still create pressure. Slow the pace, support the movement, and pair return-to-cardio work with deadbugs and bird-dogs.
- Vertigo, balance disorders, or vestibular conditions. Single-leg support can increase fall risk. Hold a stable support or choose marching in place if available in your program.
- Asthma or exercise-induced bronchoconstriction. Keep the first round easy, extend the warm-up, and keep prescribed medication accessible. Stop if breathing symptoms escalate.
Related Exercises
- Lower-impact conditioning alternatives: step-n-clap, step-n-punch, and walking in place keep the heart rate up without jumping.
- Same hip-abductor family: fire hydrants, donkey kicks, and side lunges build the glute and lateral-hip base behind stronger side kicks.
- Conditioning progressions: high knees, jumping jacks, and mountain climbers raise intensity when low-impact side kicks stop feeling challenging.
- Core stability foundation: forearm planks, hand planks, and deadbugs help keep the trunk quiet during standing kicks.
- Ankle and calf conditioning: calf raises and calf hops prepare the lower leg for faster cardio footwork.
How to Program Side Kicks
Side kicks program best as timed intervals because the main training effect is conditioning plus repeated hip-abductor control. Use the progression principles from Ratamess et al., 2009 (ACSM Position Stand on Progression Models in Resistance Training): start with a dose you can control, then progress work time, rest, range, or resistance.
| Level | Work interval | Rest between intervals | Total session | Frequency |
|---|---|---|---|---|
| Beginner | 20-30 seconds | 60-90 seconds | 10-15 minutes | 2-3 sessions per week |
| Intermediate | 30-45 seconds | 45-60 seconds | 15-25 minutes | 3-4 sessions per week |
| Advanced | 45-60 seconds | 30-45 seconds | 20-30 minutes | 3-5 sessions per week |
Where in your workout. Use side kicks in a general warm-up, as one station in a low-impact cardio circuit, after resistance training as a metabolic finisher, or on a conditioning-only day. Avoid placing hard side-kick intervals before heavy lower-body strength work because fatigue can make balance and knee tracking worse.
Form floor over time targets. End the interval when your torso starts leaning, your hips rotate open, your standing knee locks, or the kick height changes from rep to rep. A shorter clean interval beats a longer sloppy one.
How FitCraft Programs This Exercise
FitCraft uses its AI coach Ty to adjust conditioning work to your current level, equipment, and goals. For a movement like side kicks, that usually means starting with a controlled version, adjusting the interval length, and moving toward faster or banded variations only when your balance and hip control can handle it.
Frequently Asked Questions
Can I do side kicks with knee or hip pain?
Modify side kicks if knee or hip pain shows up. Keep the kick lower, slow the pace, hold a chair or wall for support, and stop if pain is sharp or changes your gait. If pain persists, get assessed by a qualified healthcare provider or physical therapist before returning to high-rep side kicks.
What muscles do side kicks work?
Side kicks primarily train the hip abductors: gluteus medius, gluteus minimus, and tensor fasciae latae. The quadriceps extend the knee during the kick, the standing-leg glutes and calves control balance, and the core keeps the trunk from leaning or rotating.
Are side kicks good for cardio?
Yes. Side kicks work well as low-impact cardio when you alternate legs at a steady rhythm for timed intervals. They elevate heart rate without jumping, which makes them useful in beginner conditioning circuits and warm-ups.
How many side kicks should a beginner do?
Beginners can start with 20 to 30 seconds of controlled side kicks followed by 60 to 90 seconds of rest, repeated for 10 to 15 minutes. If you prefer reps, use 2 to 3 sets of 8 to 12 reps per side and stop before balance breaks down.
Should side kicks be high or controlled?
Controlled beats high. Kick only as high as you can while keeping the torso upright, the standing knee soft, and the hips square. If you need to lean away or rotate your pelvis to raise the leg, lower the kick height.